Migrate VMs from KVM to VMware | Steps and Common Problems
2024-04-30 | Iris Lee
Kernel-based Virtual Machine (KVM) is an open source virtualization technology in the Linux kernel that enables users to transform Linux into a hypervisor running multiple and segregated virtual machines or guests. But if you need more stable enterprise-grade virtualized infrastructure and get professional technical support when you encounter problems, you may end up with VMware, a leading and mature virtualization and cloud computing solution provider. Then you need to migrate data from KVM to VMware. This blog will introduce data migration methods from KVM to VMware, some common issues, and how to fix them.
KVM vs VMware
KVM:
1. Open Source: KVM is an open-source virtualization technology built into the Linux kernel. This means it’s free to use and has a strong community-driven development model.
2. Flexibility and Customization: Being open source, KVM offers high flexibility for customization and integration with other open-source tools.
3. Cost-Effective: Since KVM is free, it can significantly reduce licensing costs compared to proprietary solutions like VMware.
4. Integration with Linux: It integrates seamlessly with Linux systems, making it a preferred choice for Linux-centered environments.
VMware:
1. Enterprise Features: VMware offers a comprehensive suite of enterprise-level features, including advanced management tools, high availability, disaster recovery, and live migration (vMotion).
2. Scalability: VMware solutions are designed to scale up and out easily, making them suitable for large enterprises and cloud environments.
3. Management Tools: VMware vSphere Suite includes powerful management tools that simplify the administration of virtual environments, such as vCenter for centralized management.
Compared with KVM, VMware’s main advantages are its rich enterprise-level features, graphical desktop virtualization capabilities, mature management tools, extensive ecosystem support, professional technical support and proven stability, which are particularly suitable for enterprise environments that pursue high performance, high availability and comprehensive management capabilities. Although migration may require careful consideration due to cost and licensing requirements, for organizations that need top virtualization solutions, the comprehensive value provided by VMware is often the driving force for migration.
How to Migrate KVM to VMware?
1. Common problems:
a. dracut=initqueue timeout - starting timeout scripts.
b. Cannot enter the rescue mode after restarting the system.
c. The system cannot be found after rebooting.
2. Convert KVM disk image
1) View virtual machines and note their ID.
# virsh list --all
 Id    Name                           State
----------------------------------------------------
 180   CentOS7-x86   running
2) Locate the disk to be transferred by entering the VM’s configuration file editing mode and check the file location, which could be divided into system disk and data disk.
# virsh edit  CentOS7-x86
  <devices>
    <emulator>/usr/libexec/qemu-kvm</emulator>
    <disk type='file' device='disk'>
      <driver name='qemu' type='qcow2'/>
      <source file='/export/kvm_images/volume-3cd374e0-bdd0-43d9-b1d3-edc694a05b13.qcow2'/>
      <target dev='vda' bus='virtio'/>
     <address type='pci' domain='0x0000' bus='0x00' slot='0x06' function='0x0'/>
    </disk>
    <disk type='file' device='disk'>
      <driver name='qemu' type='qcow2' cache='none'/>
      <source file='/export/kvm_images/volume-3cd374e0-bdd0-43d9-b1d3-edc694a05b13-1.qcow2'/>
      <target dev='vdb' bus='virtio'/>
      <address type='pci' domain='0x0000' bus='0x00' slot='0x09' function='0x0'/>
    </disk>
  </devices>
3) Convert QCOW2 to VMDK format using qemu-img tool. And to prevent the image is split into 2GB small block, you need to add compat6 option. Log in to the KVM host CLI and execute the below commands.
# mkdir /export/covert-test
# cd /export/covert-test
# qemu-img convert -f qcow2 /export/kvm_images/volume-3cd374e0-bdd0-43d9-b1d3-edc694a05b13.qcow2   -O vmdk test-91-61-os.vmdk -o  compat6
# qemu-img convert -f qcow2  /export/kvm_images/volume-3cd374e0-bdd0-43d9-b1d3-edc694a05b13-1.qcow2  -O vmdk  test-91-61-data.vmdk -o  compat6
4) Transfer VMDK to the VMware ESXi server (SSH enabled). Log in to ESXi CLI to create the data directory by using command below.
# mkdir /vmfs/volumes/SATA/convert-test
6) Log in to KVM host CLI to transfer the converted virtual disk by using below command.
# scp test-91-61-os.vmdk test-91-61-data.vmdk 10.65.0.90:/vmfs/volumes/SATA/convert-test
7) Log in to VMware and convert the disk for the second time for the converted vmdk disk is monolithic sparse, which cannot be directly used by the ESXi virtual machine. And because the converted format will vary with the different ESXi versions, we can directly convert without -o options; use -d thin -a lsilogic to set the second conversion when we use qemu-img conversion.
# cd /vmfs/volumes/SATA/convert-test
# vmkfstools -i test-91-61-os.vmdk  -d thin   test-91-20-os-v1.vmdk
Destination disk format: VMFS thin-provisioned
Cloning disk 'test-91-61-os.vmdk'...
Clone: 100% done.
# vmkfstools -i test-91-61-data.vmdk -d thin  test-91-20-data-v1.vmdk
Destination disk format: VMFS thin-provisioned
Cloning disk 'test-91-61-data.vmdk'...
Clone: 100% done.
# ls /vmfs/volumes/SATA/convert-test
test-91-20-data-v1-flat.vmdk  test-91-20-os-v1-flat.vmdk    test-91-61-data.vmdk
test-91-20-data-v1.vmdk       test-91-20-os-v1.vmdk         test-91-61.vmdk
3. Create a VMware VM
1) Custom the VM.
Select test-91-20-os-v1.vmdk as the system startup disk and test-91-20-data-v1.vmdk as the data disk. Set the same CPU and Storage as the KVM, and you don’t need to mount ISO image right now.
2) Start the VM. But an error message pops up and reads: dracut=initqueue timeout - starting timeout scripts.
Now, we solve the problem by entering rescue mode.
a) Start the timeout scripts.

b) Load the ISO image, then reboot.
If you cannot enter the rescue mode after restarting the system, you can adjust the BIOS setting and change the first boot device to CD-ROM Drive.
If the VM reboot is too fast to enter BIOS, you can log in to VMware ESXi server CLI, find the VM configuration file and change its configuration.
# cd /vmfs/volumes/SATA/10.16.91.20-test-91-20
# vi 10.16.91.20-test-91-20.vmx
  bios.forceSetupOnce = "TRUE"
  bios.bootDelay = "10000"
After that, you’ll enter the BIOS after the next reboot.

c) After changing first boot device to CD-ROM Drive, reboot and select Troubleshooting>Rescue a CentOS system, type 1, and press enter to regenerate the initramfs.
# chroot /mnt/sysimage
# dracut --regenerate-all -f && grub2-mkconfig -o /boot/grub2/grub.cfg
# exit
# reboot
d) Remove the ISO imagefrom remote console and enter BIOS settings again to set hard disk as first boot device. If the system cannot be found after rebooting, you need to enter the BIOS settings again and adjust the boot sequence of the hard disks.

e) Enter the root password to start the VM. After entering the system, configure the network and you will find that restart network service the system will also restart. This is because of the problem of /etc/fstab. The data drive label has been changed, modify the drive label to /dev/sdb1, after confirming that the mount is normal then restart the system.

Easy VM migration from KVM to VMware
The qemu-img and vmkfstools conversion tools help facilitate the V2V migration, but there are unknown problems that may hinder the process and irritate the IT staff such as data loss or corruption. Could this be solved?
Vinchin Backup & Recovery will help you solve this, is not only a professional backup solution for virtual machine, but also an advanced VM migration solution, supporting VMware vSphere, Hyper-V, Proxmox, XenServer, XCP-ng, oVirt, OLVM, RHV, OpenStack, etc.
It performs robust backup and recovery functionality including fast incremental backup, image-based, agentless backup, LAN-Free backup and recovery, offsite backup copy, multithreading transmission, instant restore, ransomware protection and more, to comprehensively secure your critical data. By adding both virtualized platforms into the backup system, you can perform easy agentless V2V migration with a user-friendly web console.
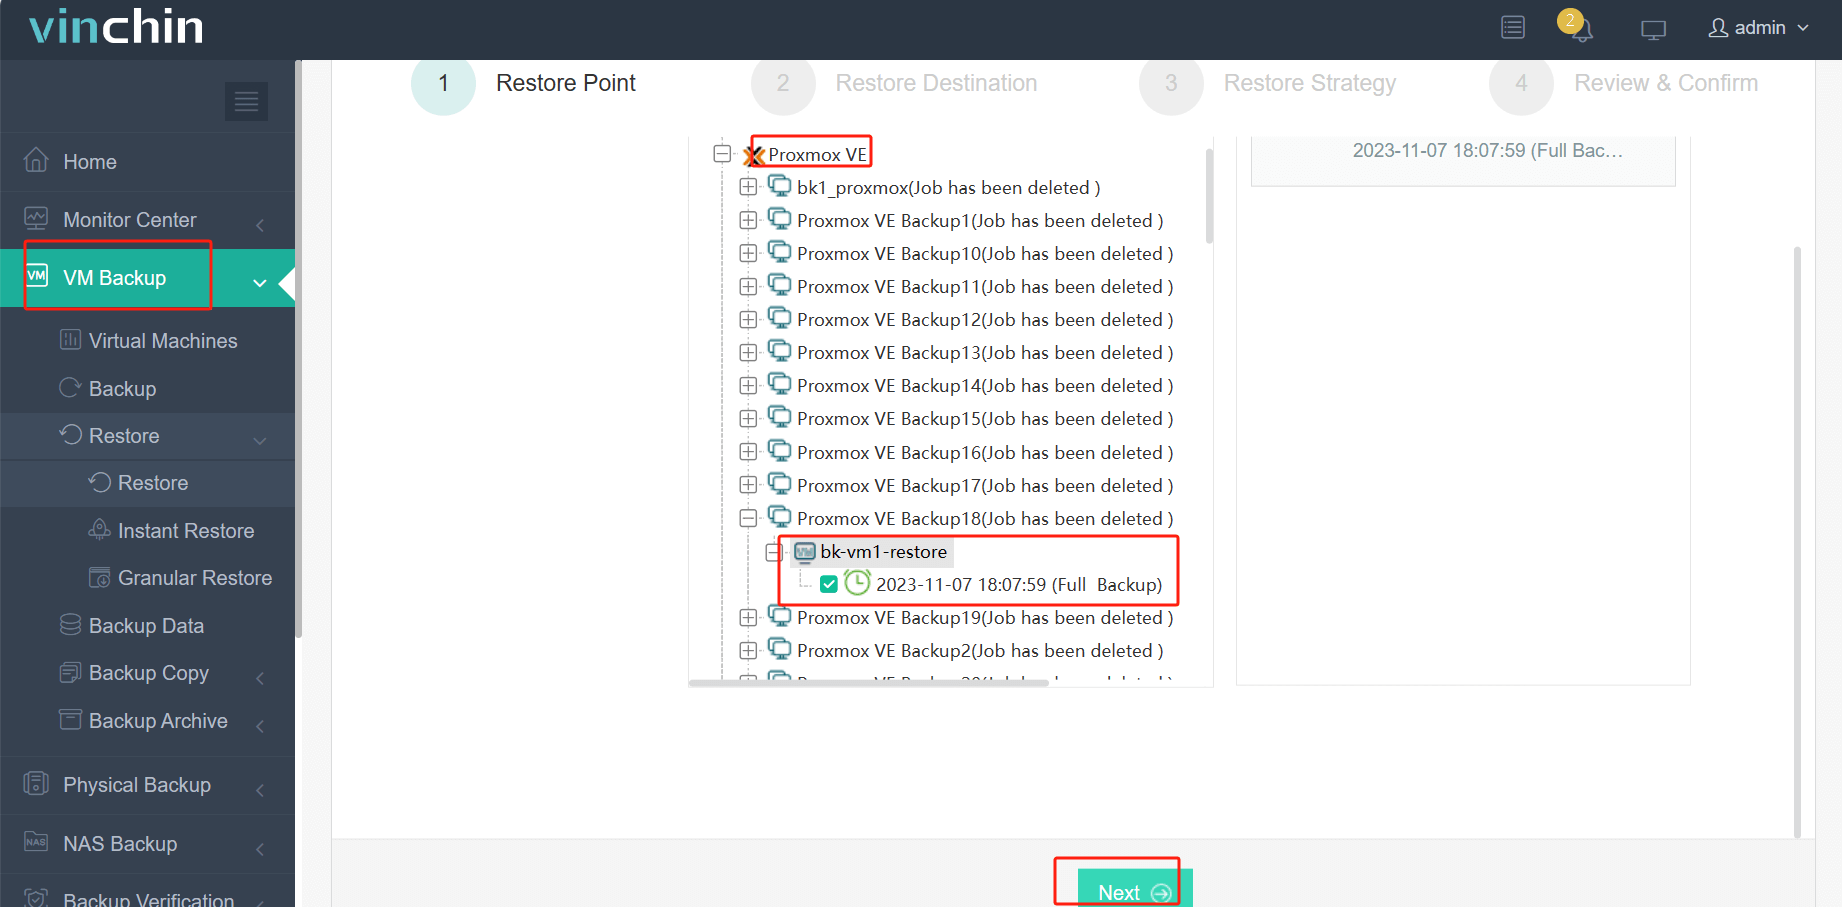
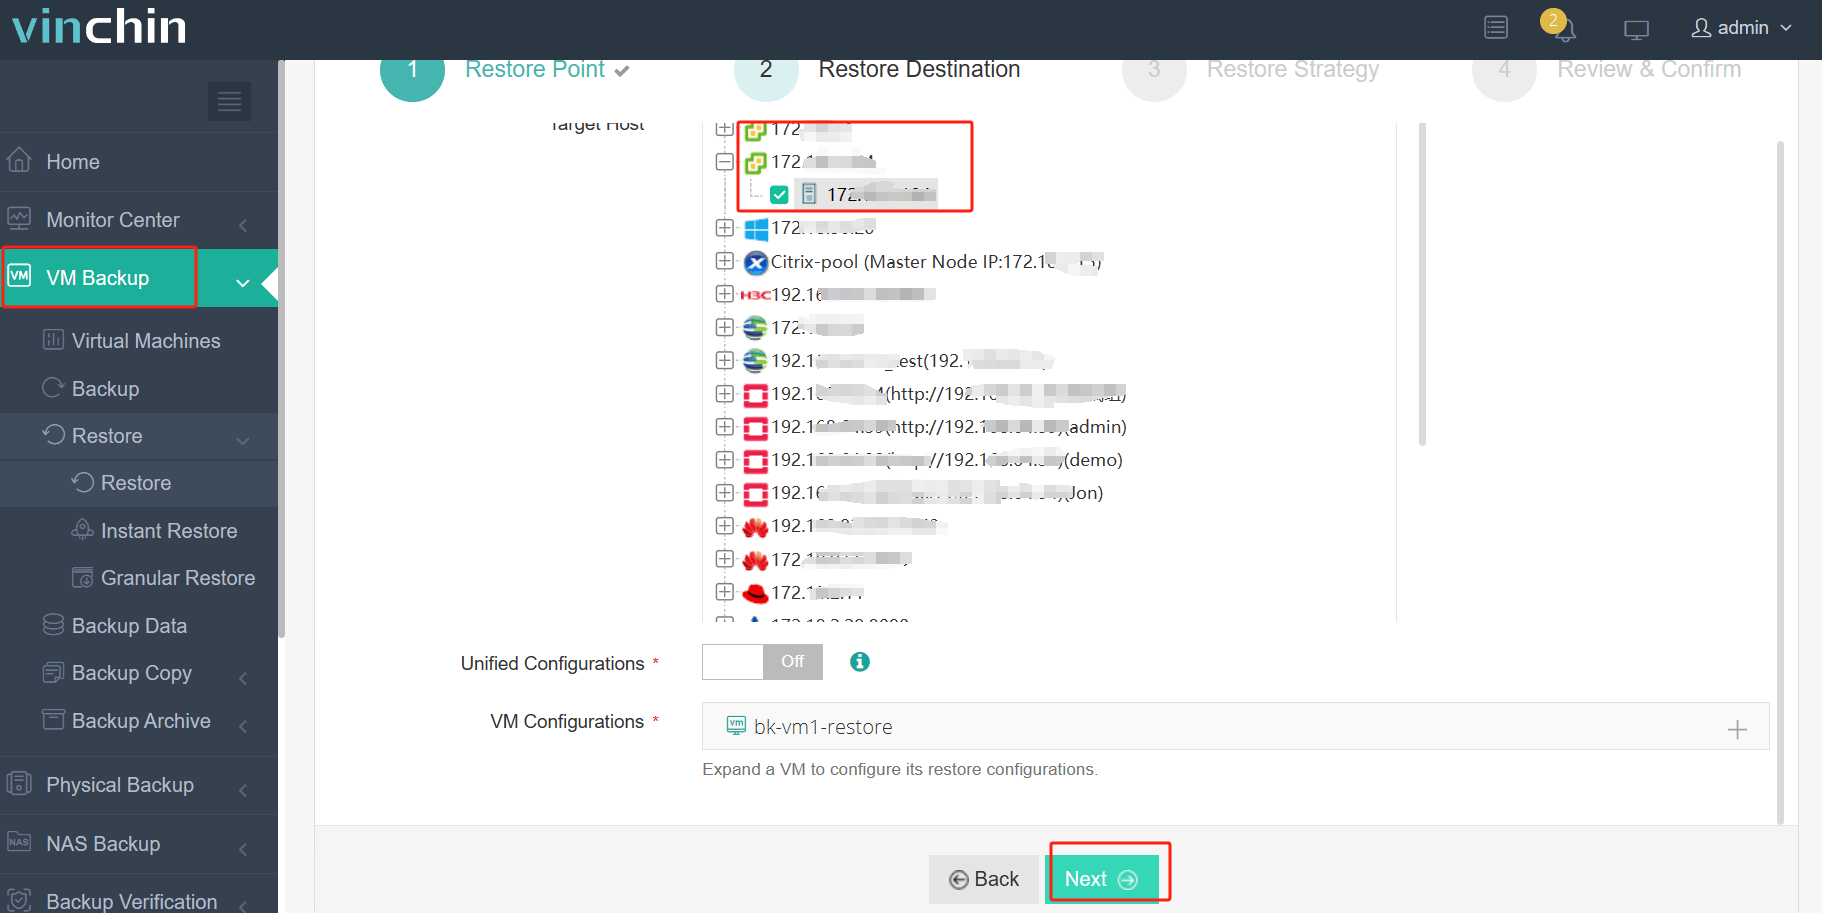
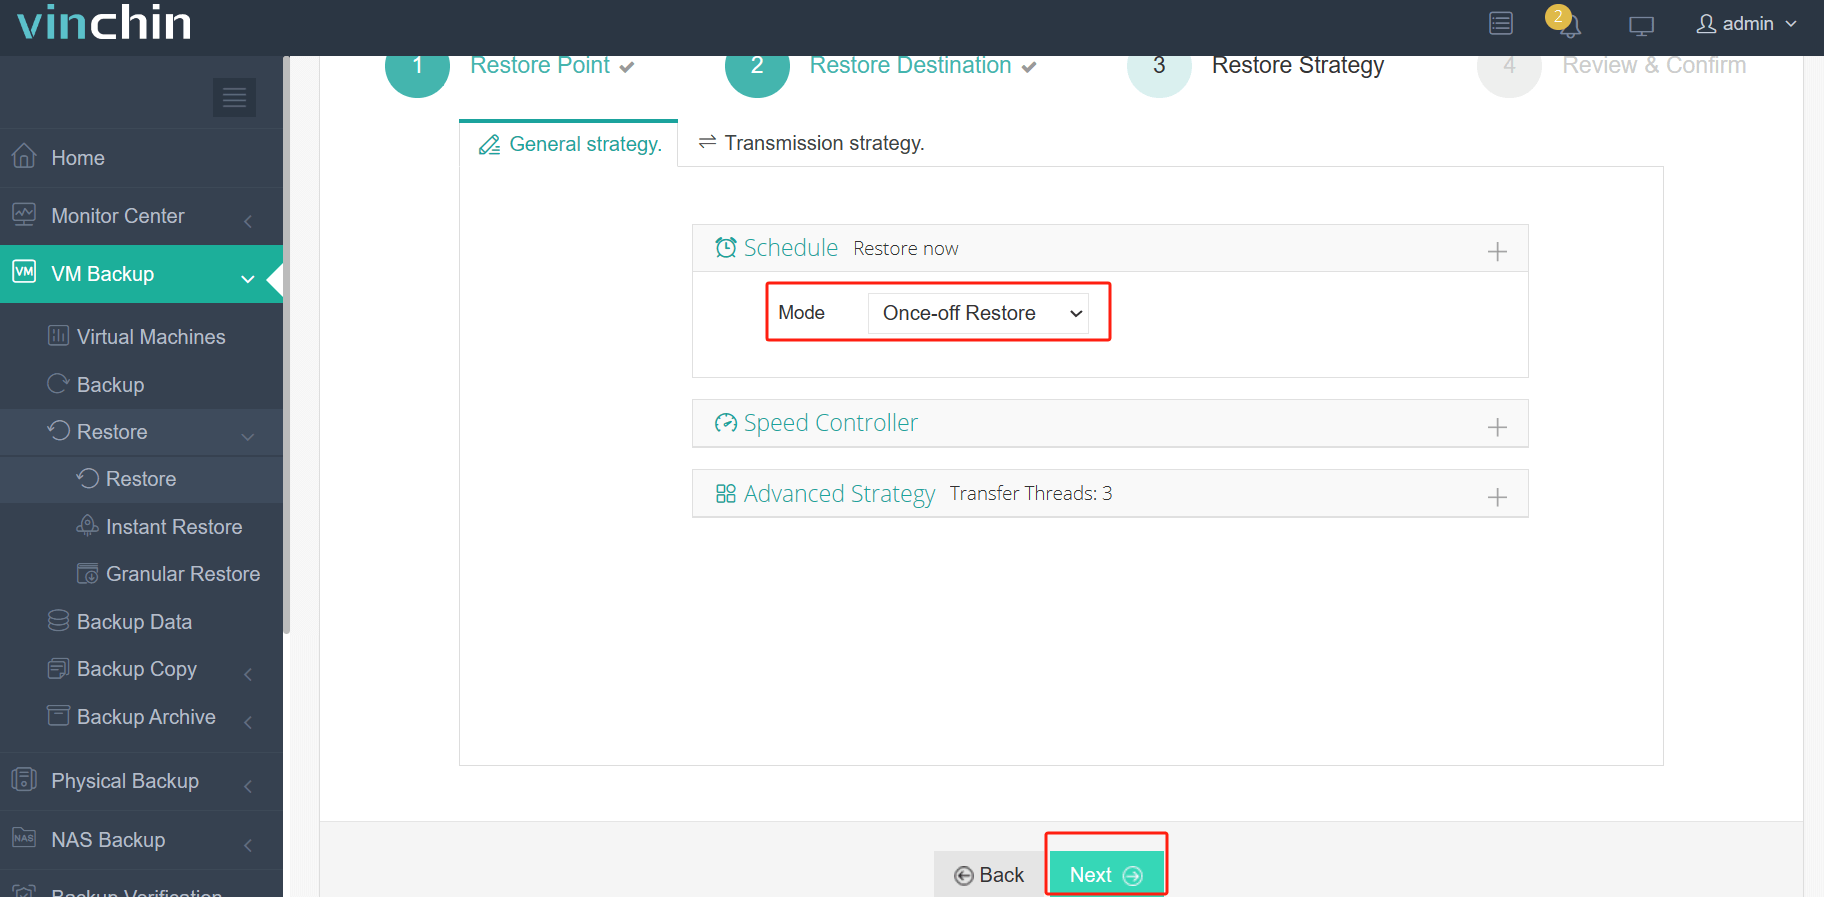
It only takes 4 steps to migrate KVM VMs to VMware:
1.Choose the VM you want to restore.
2.Select the VMware host to run the restored VM.
3.Select the restore strategy.
4.Review and submit the job.
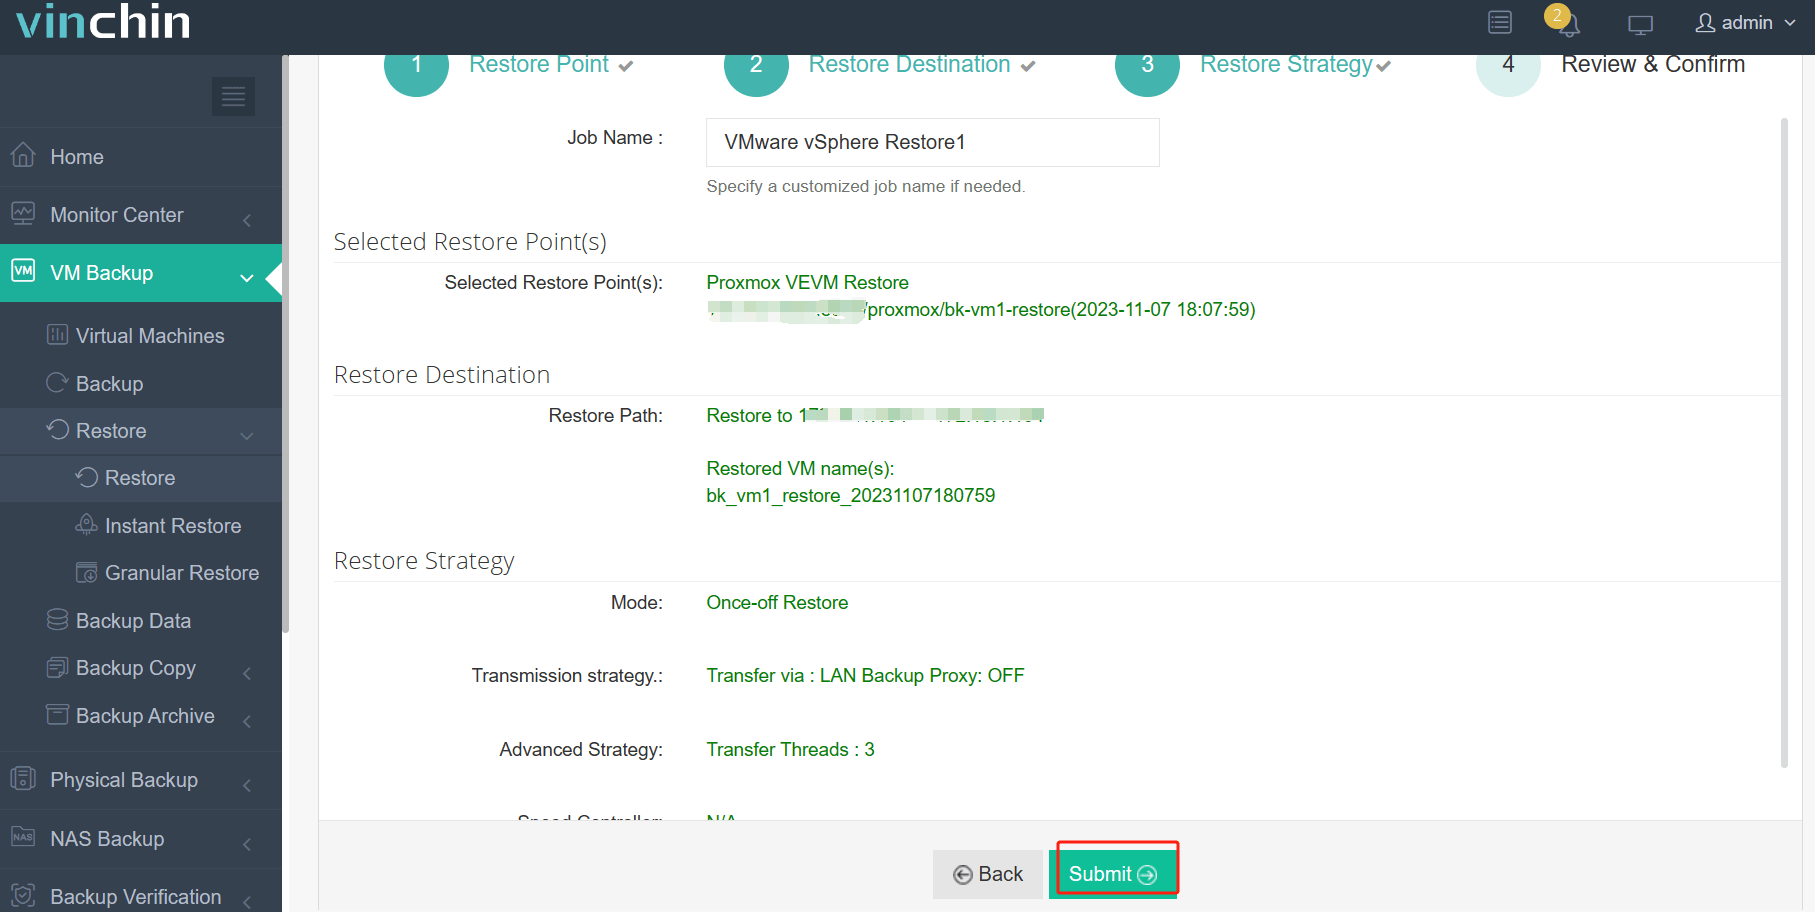
Desire to test the backup solution and see if it works as above mentioned? You can deploy the 60-day full-featured free trial of Vinchin Backup & Recovery or share your needs with us for a tailored solution.
KVM to VMware FAQs
1. Q: Can KVM and VMware solutions coexist in the same environment?
A: Yes, although they are separate virtualization platforms, KVM and VMware can coexist within the same network or data center. However, they would not directly interact; each would manage its own set of VMs independently. Integration or migration tools can facilitate moving VMs between the two platforms if needed.
2. Q: Can I run KVM in VMware?
A: Yes, you can run KVM inside a VMware virtual machine by leveraging nested virtualization, provided both the host system and the VMware settings support and enable hardware-assisted virtualization (VT-x/AMD-V) and nested virtualization features. While possible, this setup may incur performance overhead and is typically used for testing, development, or educational purposes rather than production environments due to the complexity and potential performance impact.
Wrap Up
Data migration from KVM to VMware or other platforms can be made easy with the help of various tools and command lines, but still, problems like you cannot find the system or the incompatible file format arise and go on and on. While Vinchin Backup & Recovery solves them in one solution and smooths virtualization backup and recovery for 10+ platforms.
Share on:


 English


