-
How to migrate KVM virtual machine to another host with command line?
-
How to easily migrate VM with Vinchin Backup & Recovery?
-
KVM migrate VM to another host FAQs
-
Sum Up
For virtual environment maintenance, sometimes you might need to move VM between hosts.
VM migration will bring benefits to IT environment. It will decrease the planned downtime when you would like to maintain or upgrade servers. In addition, it will help fully utilize the hardware resources on all the hosts.
KVM is a not so mature compared with VMware vSphere but it is free and open-source so it's friendly to startup companies but is not so convenient to use as VMware vSphere.
For virtual machine migration, VMware provides vCenter to let users perform vMotion or cold migration with a few clicks, but in mative KVM environment, IT administrators often need to manually move VM with command line. If you are using oVirt, there is VM portal to export and import VM.
The procedures to use commands can be tedious and it is likely to have a failed virtual machine so every step needs to be carefully checked.
P.S. If you would like to move VM on KVM-based hypervisor like , you can also try Vinchin Backup & Recovery.
How to migrate KVM virtual machine to another host with command line?
This section will introduce the way to perform cold KVM migration. Generally speaking, to move KVM VM, you need to copy all the VM data from the source host to the destination host and then define the new VM. Before that, you can backup KVM VM to ensure data security.
You should note that the virtual environment on the destination host must be the same as that on the source host. In addition, the absolute directory of virtual hard disk has been saved in configuration file so the directory on the destination host must be also the same.
1. Since it is cold migration, the first step is to power off the target VM. You can list all the VMs on the source host to find the VM you would like to migrate.
virsh list --all
2. Remember the name of the target guest machine and you need shut down it.
virsh shutdown guest_name
3. You can also recheck its state to make sure it has been powered off:
virsh domstate guest_name
4. The next step is exporting the configuration of guest machine:
virsh dumpxml guest_name > /root/guest_name.xml
5. Copy the configuration file to the destination host:
scp /root/guest_name.xml destination_host_ip://etc/libvirt/qemu
6. Input the password of the destination host to start transferring.
Get the directory of the guest machine's virtual disk:
virsh domblklist guest_name
7. Copy the hard disk to destination host in the same way.
The new VM needs to be defined on the destination host:
virsh define guest_name.xml
8. The you can start the VM to test whether it works:
virsh start guest_name
If it reports the error that the CPU is not compatible with host CPU, then the CPU of the VM needs to be modified.
virsh edit guest_name
Replace CPU configuration with <cpu mode='host-passthrough' check='none'/>
If you would like to perform a live migration, you can follow this post.
How to easily migrate VM with Vinchin Backup & Recovery?
Migrating VM part by part with command line might cause issue if certain step is incorrect. In addition, unknown errors might appear on the destination host. To smoothly migrate virtual machine, you can trust Vinchin Backup & Recovery.
Vinchin Backup & Recovery is not only a professional backup and disaster recovery solution for multiple KVM-based platforms, but also an advanced VM migration solution, supporting VMware vSphere, Hyper-V, XenServer, Proxmox, Red Hat Virtualization, oVirt, Oracle Linux KVM (OLVM), OpenStack, etc. (Native KVM is not supported for now)
VM migration will be easy in Vinchin Backup & Recovery. You just need to backup VM agentlessly in a user-friendly web console and then you can use that backup to restore VM on another added host. You don't have to type commands anymore, just complete the process with backup and restore wizards.
Vinchin Backup & Recovery lets you migrate VM between platforms. With Vinchin Virtual Machine Convert Engine, source VM will be smartly converted to be compatible on the destination host.
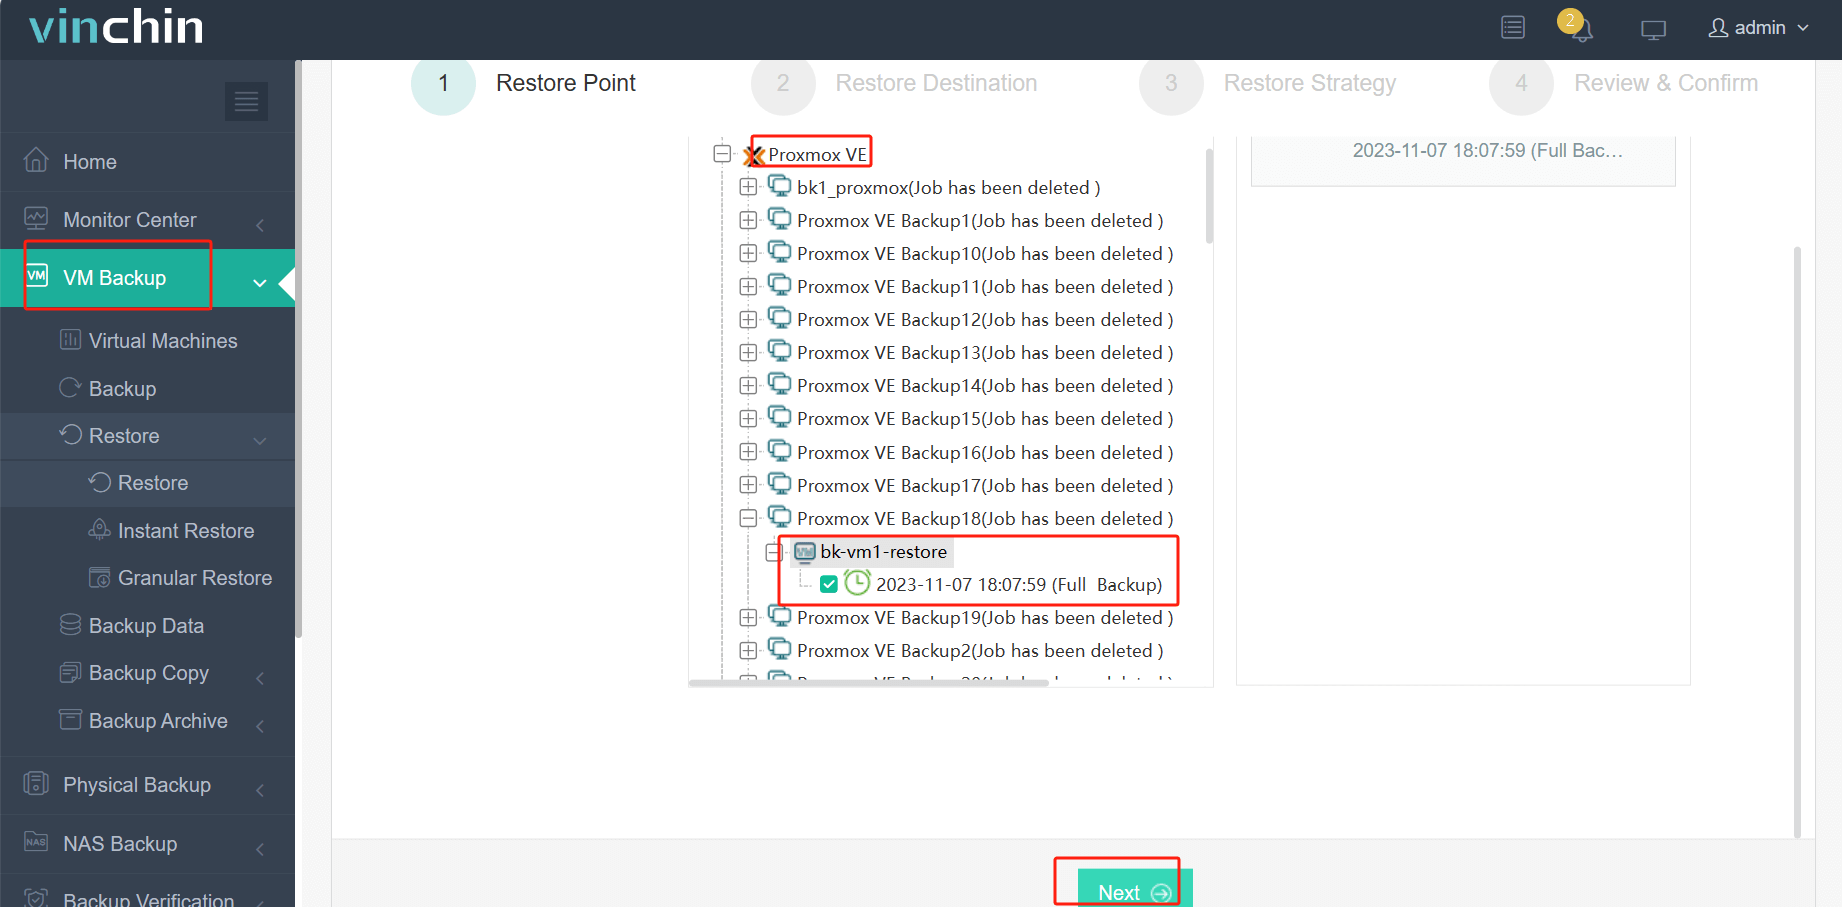
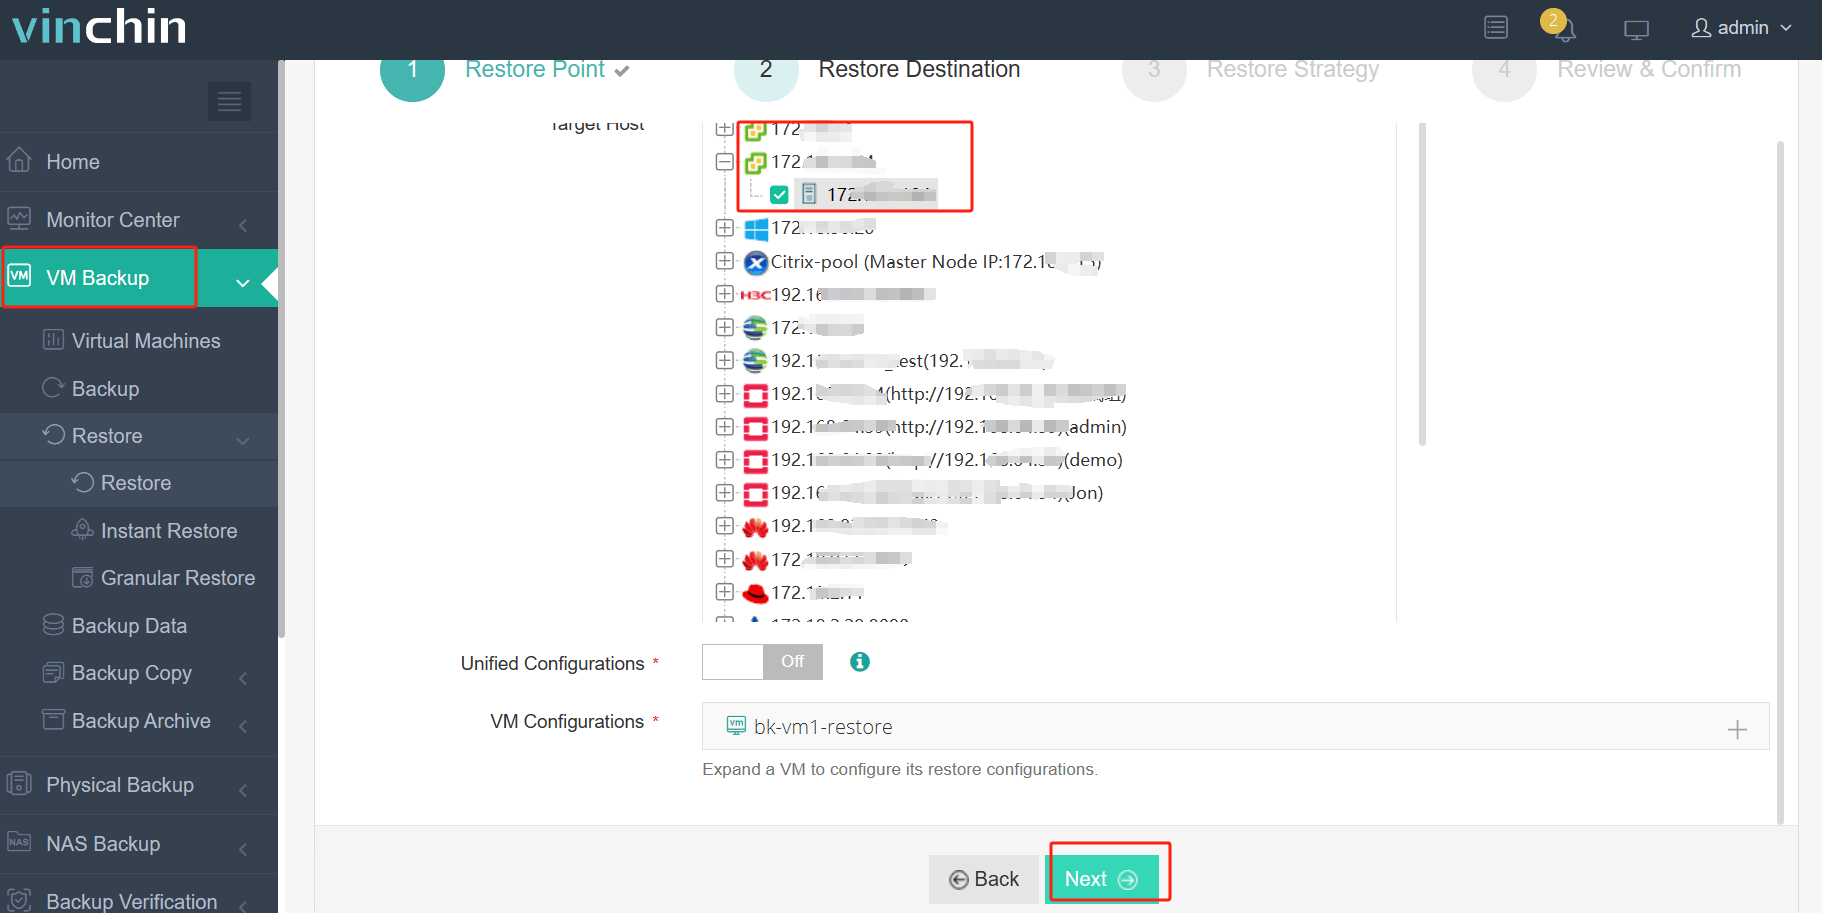
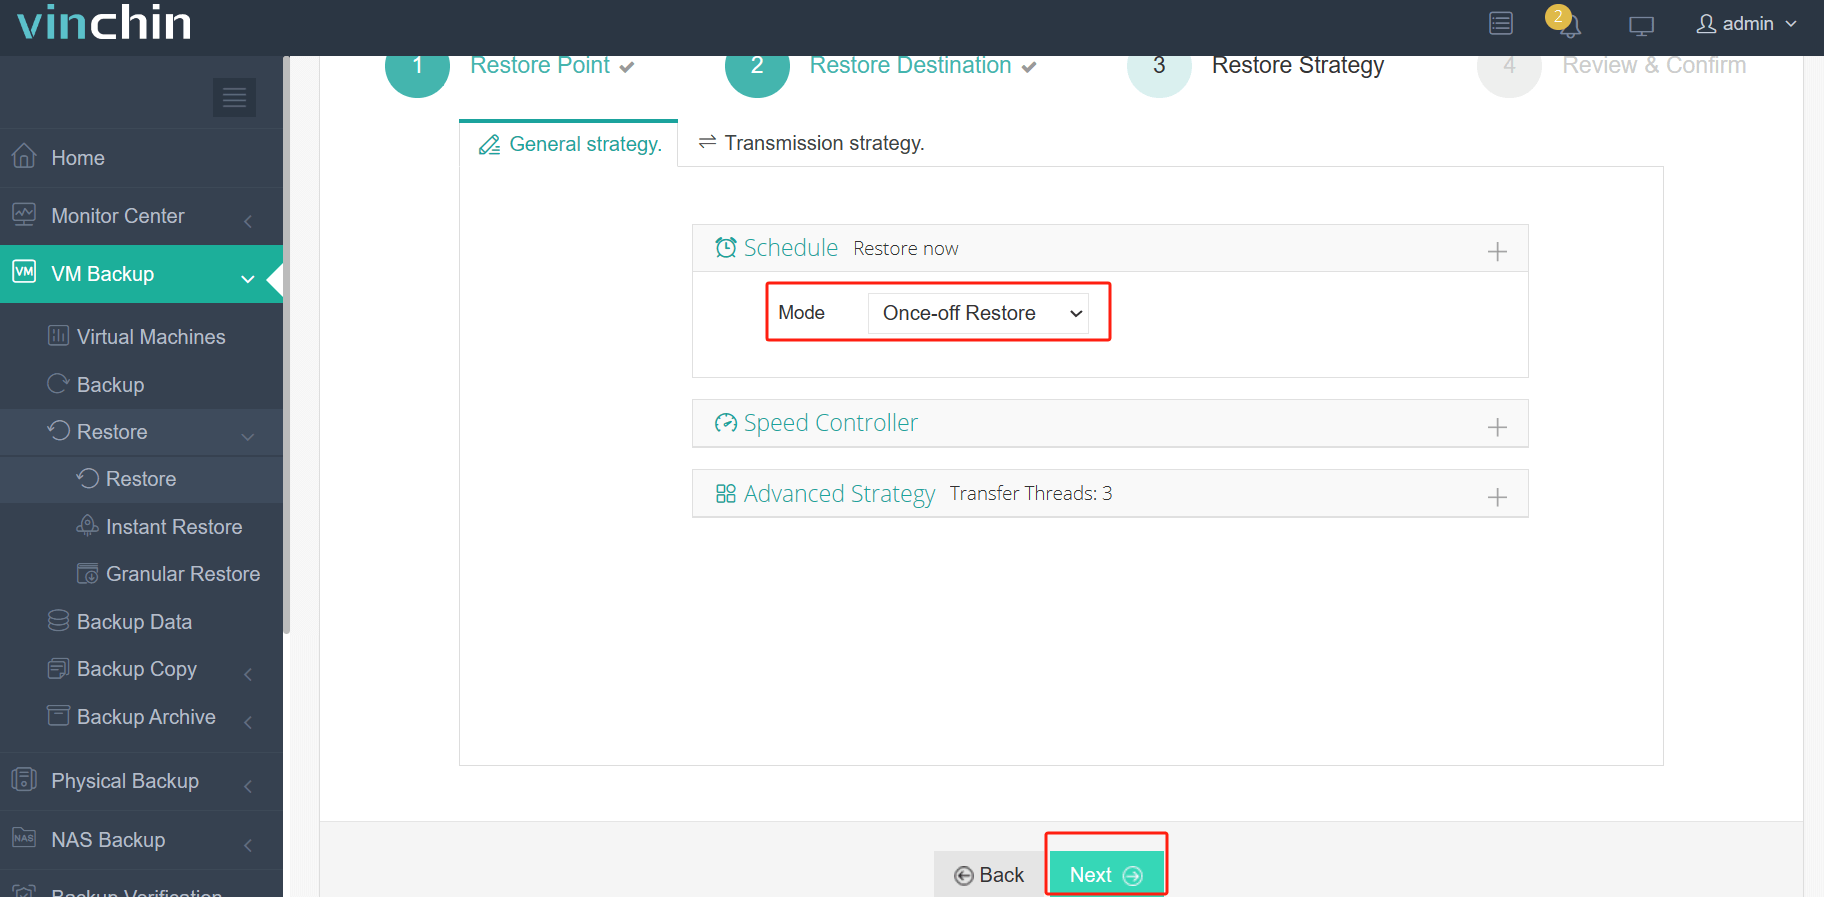
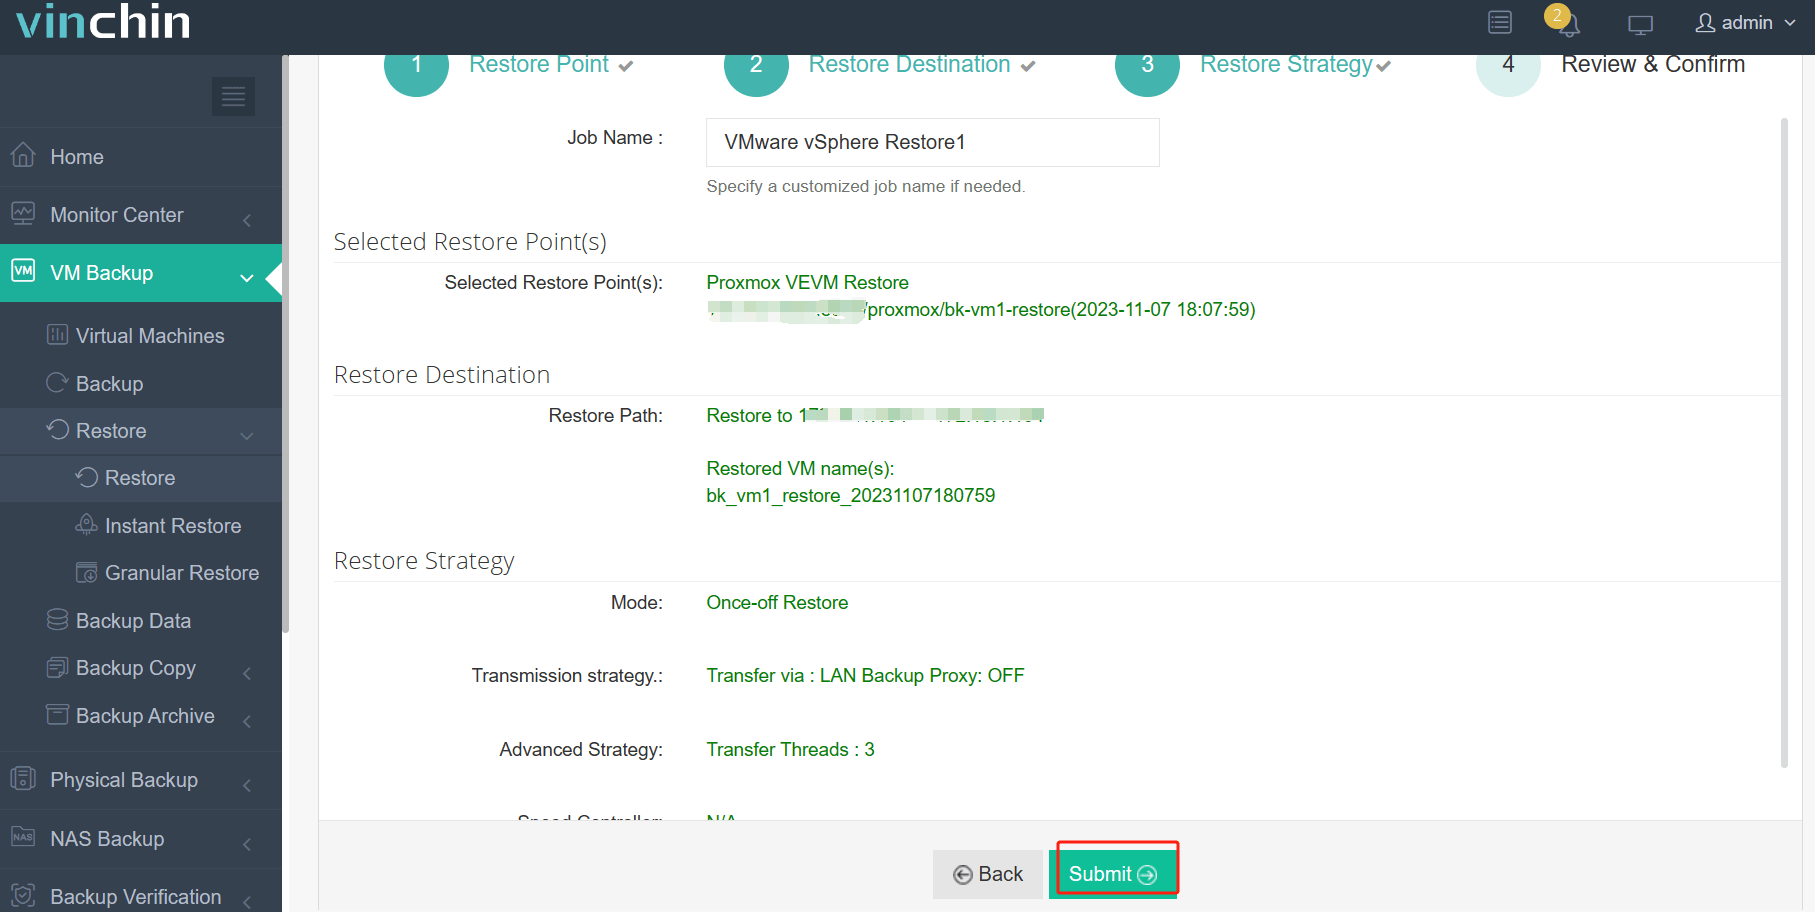
For instance, if you would like to migrate VM from Proxmox to VMware:
1. Just select the backup of the target Proxmox VM

2. Select a VMware host as target host

3. Simply set up restore strategies or directly skip this step

4. Just submit the job and then the Proxmox VM will be quickly restored on the VMware host

Vinchin Backup & Recovery has been selected by thousands of companies and you can also start a 60-day full-featured free trial here. Also, contact us, leave your requirements, and then you will receive your tailored solution. We have established partnerships with reputable companies all over the world so if you would like to do a local business, you can select a local partner here.
KVM migrate VM to another host FAQs
1. Can you migrate a KVM virtual machine to another host without shutting it down?
Yes, you can. KVM live migration is supported in some environment like Red Hat and Oracle. There is also another way to migrate VM without shutting down VM. Using Vinchin allows you to migrate the VM via its backup so the impact to production environment is mitigated.
2. What is the difference between hot migration and cold migration in KVM?
Hot migrate allows you to migrate the KVM to another host while it is running but clod migration requires you to shut down the VM during the migration.
3. Can you migrate a KVM VM via snapshot?
Usually, it is not supported because snapshot is not a full VM and it can only work with the original VM.
Sum Up
Virtualization technology allows IT administrators to easily move virtual machines and this post has introduced the way to migrate KVM VM to another host with commands, moving VM part by part and then defining it on the destination host.
Of course, you have an easy way to move KVM VM with Vinchin Backup & Recovery. It is easy to operate and you will have more options to choose. Don't miss out on the free trial.
Share on:


