-
What is AWS EC2 CLI?
-
How to Manage EC2 with AWS CLI?
-
Common AWS CLI Commands for Managing EC2 Instances
-
Easily manage EC2 instances with Vinchin Backup & Recovery
-
AWS EC2 CLI FAQs
-
Conclusion
AWS is one of the world’s leading cloud computing platforms, and its EC2 service provides scalable computing capacity. AWS EC2 allows users to launch and manage virtual server instances in the cloud. In addition to operating through the AWS Management Console, AWS offers powerful command-line tools that enable developers and system administrators to manage their cloud resources more efficiently.
What is AWS EC2 CLI?
AWS CLI is an open-source tool that enables you to interact with AWS services using commands in a command-line terminal. When you use the AWS CLI to run commands, you can achieve the same functionality provided by the browser-based AWS Management Console directly from your terminal’s command prompt. The commonly used command-line terminals vary based on the operating system:
Linux Shell: Use common shell programs (such as bash, zsh, and tcsh) to run commands in Linux or macOS.
Windows Command Line: On Windows, run commands from the Windows Command Prompt (cmd) or PowerShell.
Remote Terminals: Run commands on Amazon EC2 instances using remote terminal programs like PuTTY or SSH, or use AWS Systems Manager to run commands.
Any operation that can be performed through the AWS Management Console can also be executed using the AWS API and AWS CLI. New AWS IaaS features and services are made available via the API and CLI either upon release or within a 180-day release period, providing full functionality equivalent to the AWS Management Console.
How to Manage EC2 with AWS CLI?
1. Install AWS CLI
First, ensure that AWS CLI is installed on your computer. You can find installation instructions suitable for your operating system in the official AWS CLI documentation.
After installing AWS CLI, you need to use it through a terminal. Once the terminal window is open, you can enter AWS CLI commands directly. For instance, type “aws --version” to verify the correct installation of AWS CLI and to check its version.

2. Configure AWS CLI
After installation, you need to run the following command to configure CLI:
aws configure

When configuring AWS CLI, you will be prompted to enter the following information, which are basic authentication and preference settings for using AWS services:
a. AWS Access Key ID and AWS Secret Access Key: Together, these form a set of credentials that allow you to interact with AWS services through CLI, SDKs, or other development tools. Each AWS user (including IAM users) can have their own access key pair for fine-grained permission control. The Secret Access Key should be kept confidential and not shared with others, as possession of both allows full control over the associated account’s AWS resources.
b. Default Region Name: AWS is globally distributed with multiple regions and availability zones. Each region is an independent geographic area that provides a complete set of AWS services. The default region name specifies the AWS region used by CLI when no region is explicitly mentioned. For example, “us-west-2” corresponds to the Oregon region in the USA.
c. Default Output Format: This specifies the data format returned by AWS CLI commands. Common options include “json” (default), “text”, and “table”. The “json” format is easy for programs to parse, while the “text” or “table” formats are more human-readable.
Note: AWS Access Key ID and AWS Secret Access Key can be obtained from the AWS Management Console. AWS CLI will use this information as a username and password to connect to AWS services. To generate these keys:
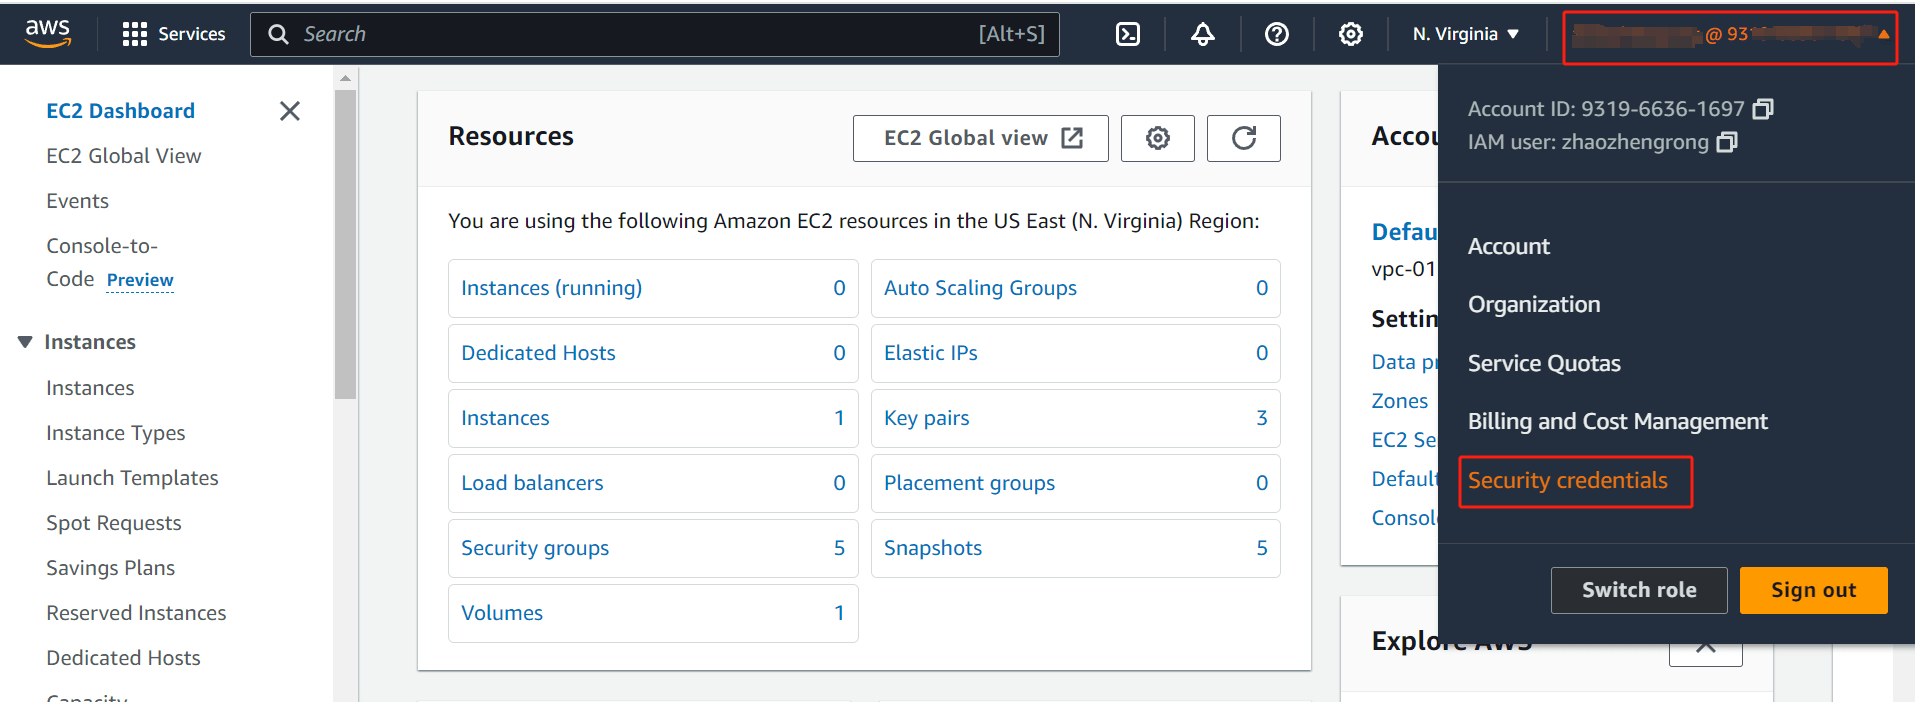
Go to the AWS Management Console > Click on your username at the top right corner > Select Security Credentials.
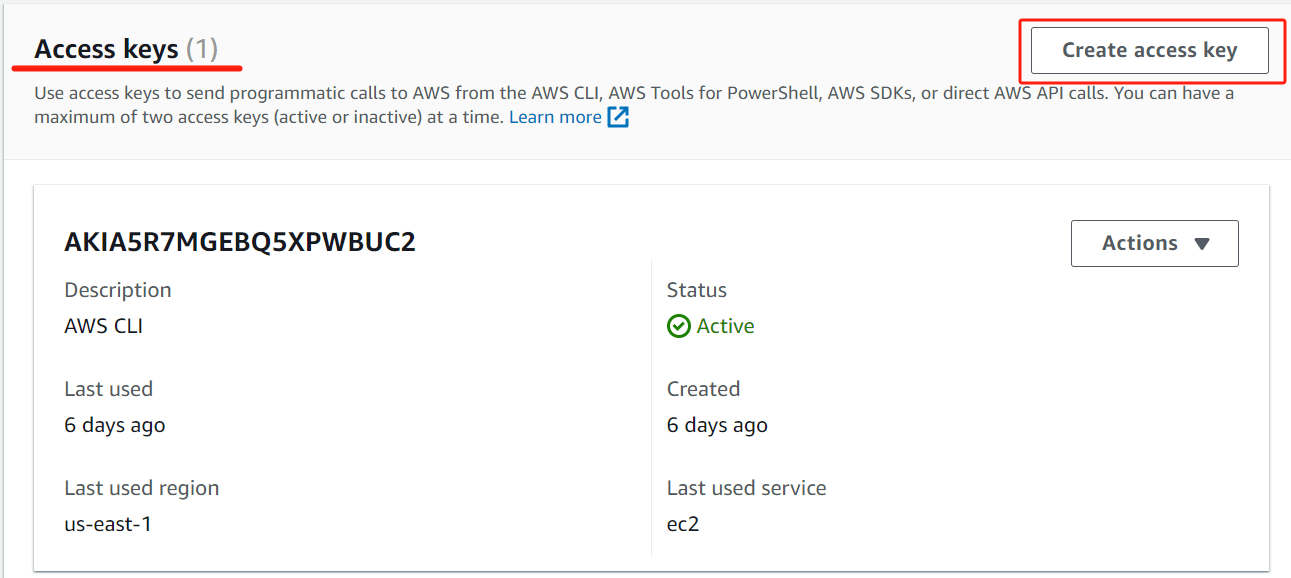
In the Access keys section, click Create Access Key to create a pair of Access Key ID and Secret Access Key and save them (you can only save the Secret Access Key when it is created).
Once configured, you can start using CLI commands to interact with EC2 services.
Common AWS CLI Commands for Managing EC2 Instances
1. View Instance Information
aws ec2 describe-instances
List all EC2 instances and their details, such as instance ID, type, status, public and private IP addresses, etc.
2. Launch an Instance
aws ec2 run-instances
Start a new EC2 instance, specifying parameters like AMI ID, instance type, security group, etc.
3. Stop an Instance
aws ec2 stop-instances
4. Reboot an Instance
aws ec2 reboot-instances
5. Terminate an Instance
aws ec2 terminate-instances
6. Create an AMI
aws ec2 create-image
7. View Security Group Rules and Associated Instances
aws ec2 describe-security-groups
8. Create a Security Group
aws ec2 create-security-group
9. Modify Security Group Rules
Add Inbound Rule
aws ec2 authorize-security-group-ingress
Remove Inbound Rule
aws ec2 revoke-security-group-ingress
10. Allocate an Elastic IP
aws ec2 allocate-address
11. Associate an Elastic IP
aws ec2 associate-address
12. Create a Key Pair
aws ec2 create-key-pair
13. View EBS Snapshot Information
aws ec2 describe-snapshots
14. Create a Snapshot
aws ec2 create-snapshot
For each command, you can use the “--help” parameter to see more detailed usage instructions. For example:
aws ec2 run-instances --help
Easily manage EC2 instances with Vinchin Backup & Recovery
Vinchin Backup & Recovery is a comprehensive data protection solution designed to simplify and streamline the process of managing VM backups and recoveries for your virtualization environment including Amazon EC2 instances.
Vinchin Backup & Recovery offers a streamlined solution for managing EC2 backups across various AWS regions, supporting customizable strategies with full, incremental, and differential backup options. It facilitates flexible recovery including entire instances or specific files, with the ability to restore to different regions or even migrate to other virtualization platforms like VMware and Hyper-V. Integrating with Amazon S3 for cost-effective archival storage, Vinchin also simplifies infrastructure management through an intuitive UI, enabling efficient backup configuration and seamless V2V migrations, thus enhancing cloud data protection and business continuity.
To backup EC2 instance with Vinchin Backup & Recovery, follow these steps:
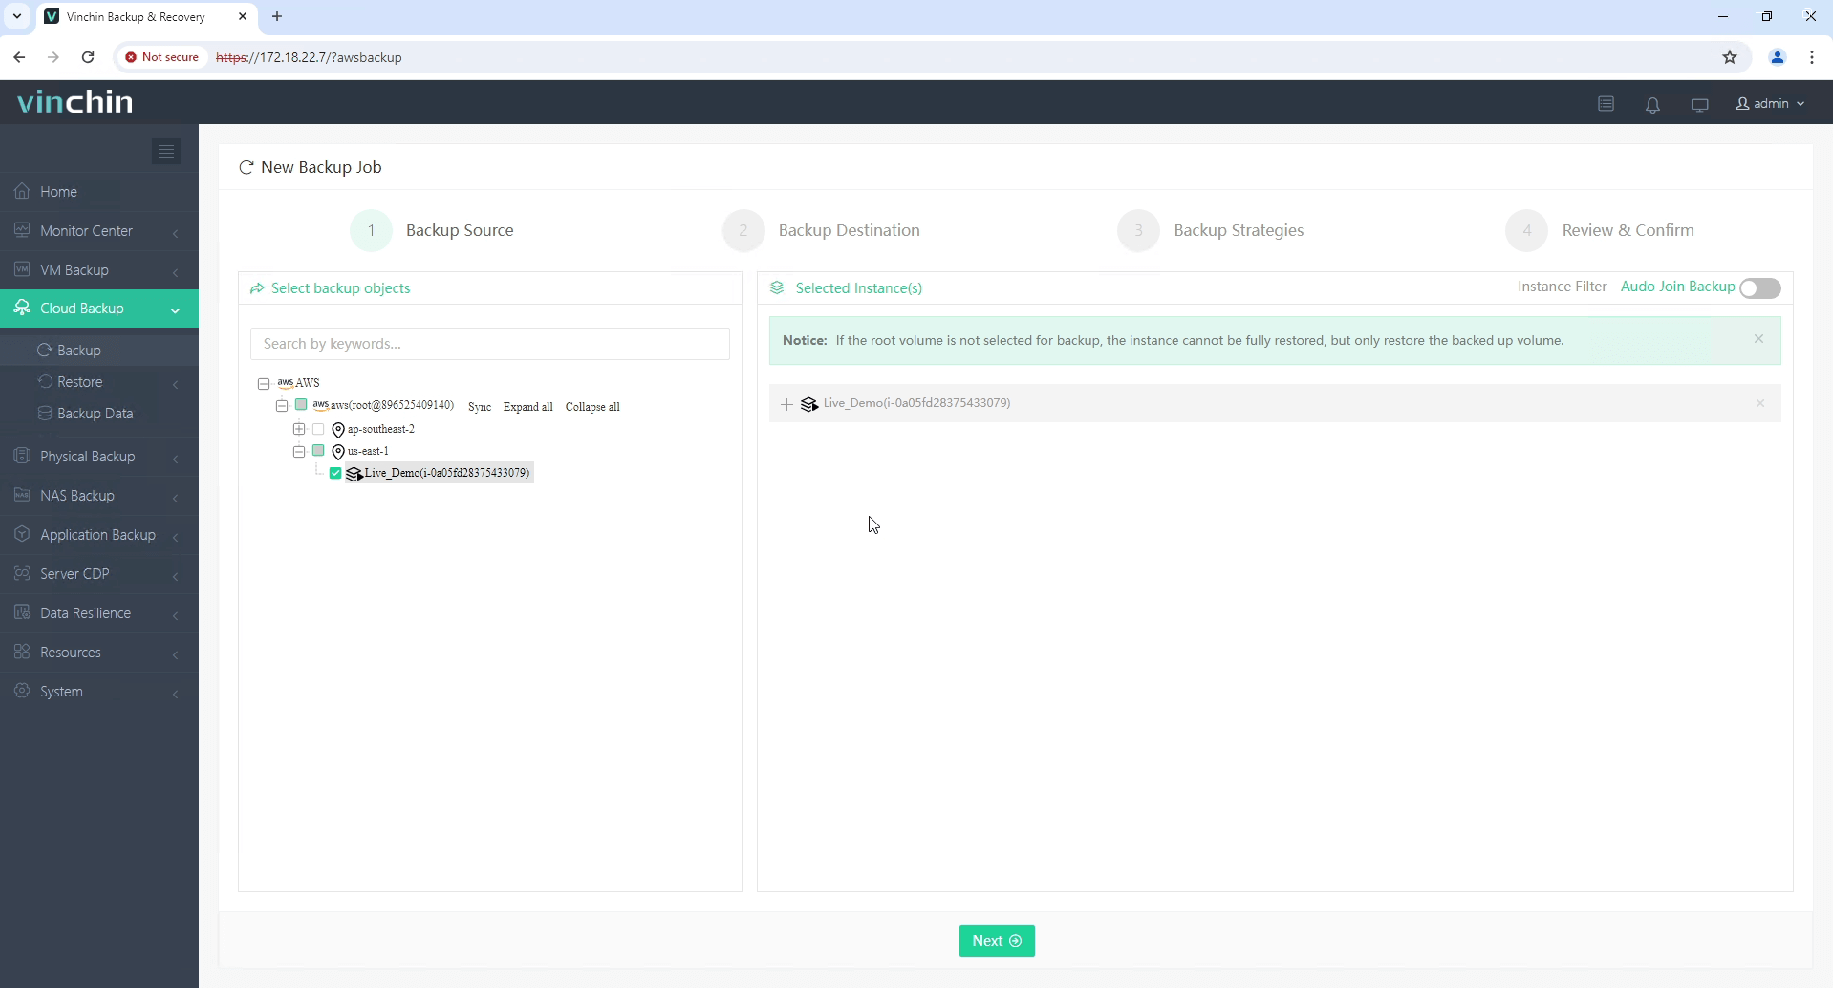
1. Select the EC2 instance to be backed up.
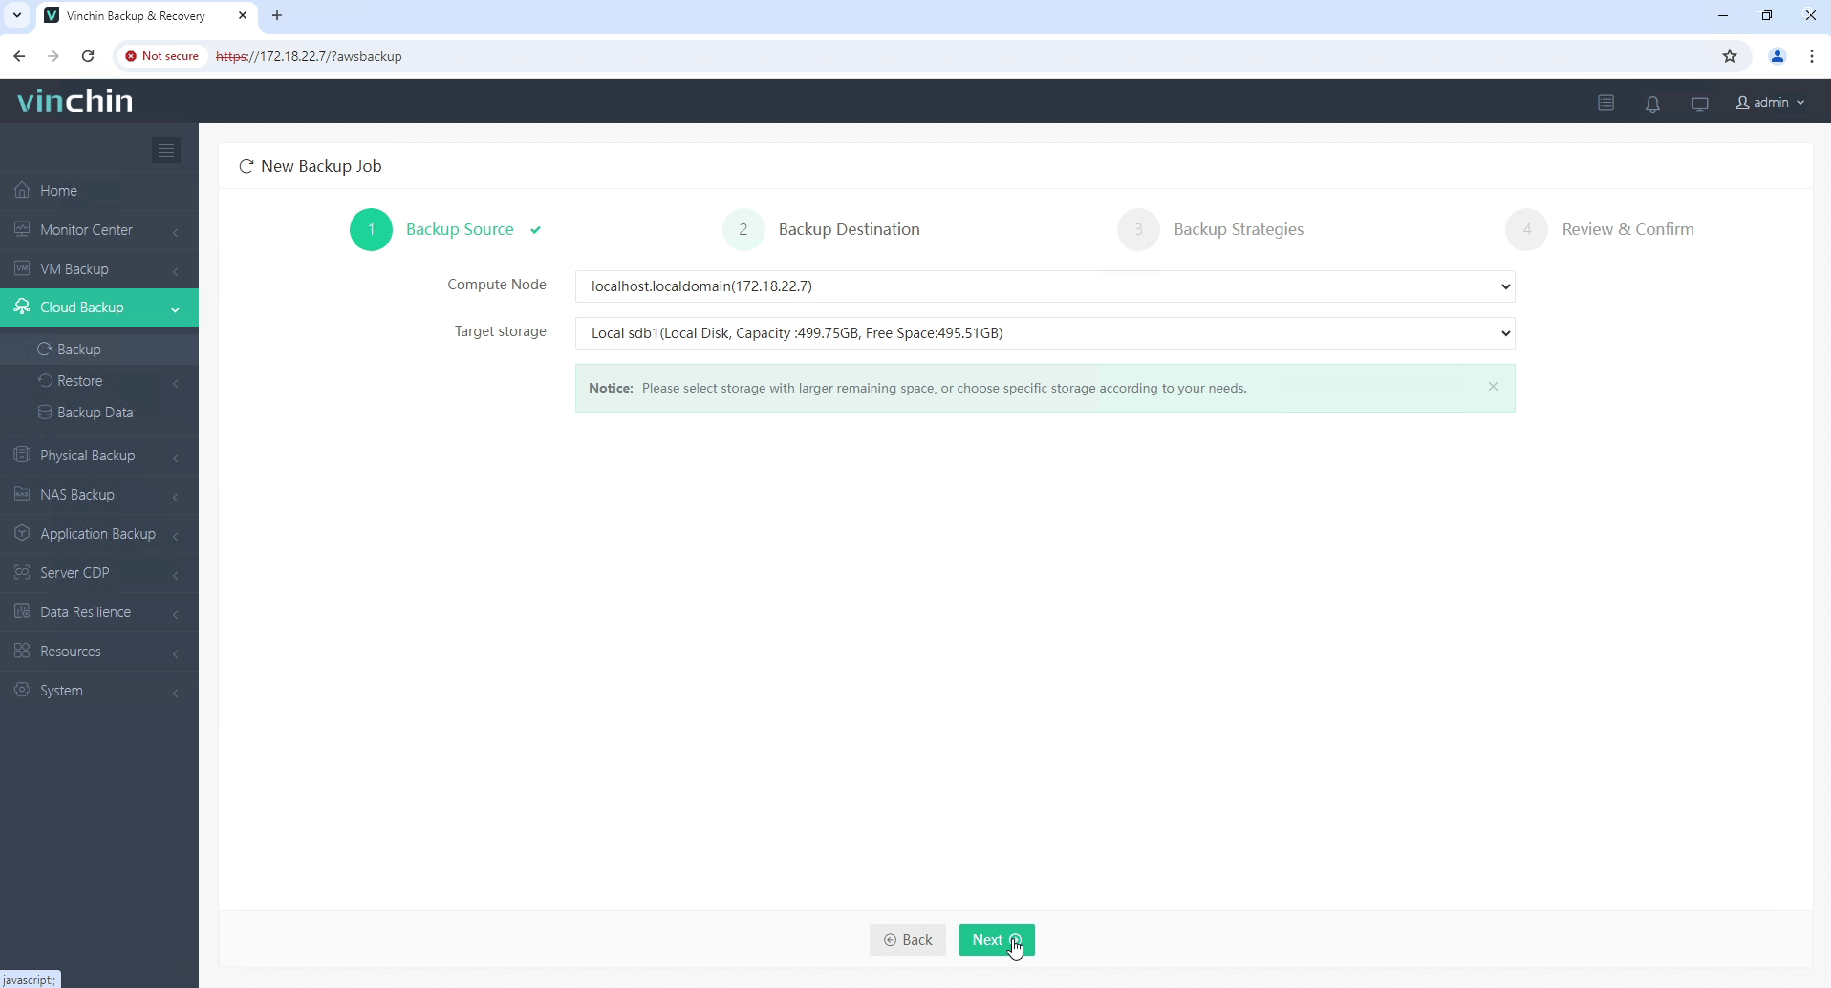
2. Select the backup destination.
3. Select the backup strategies.
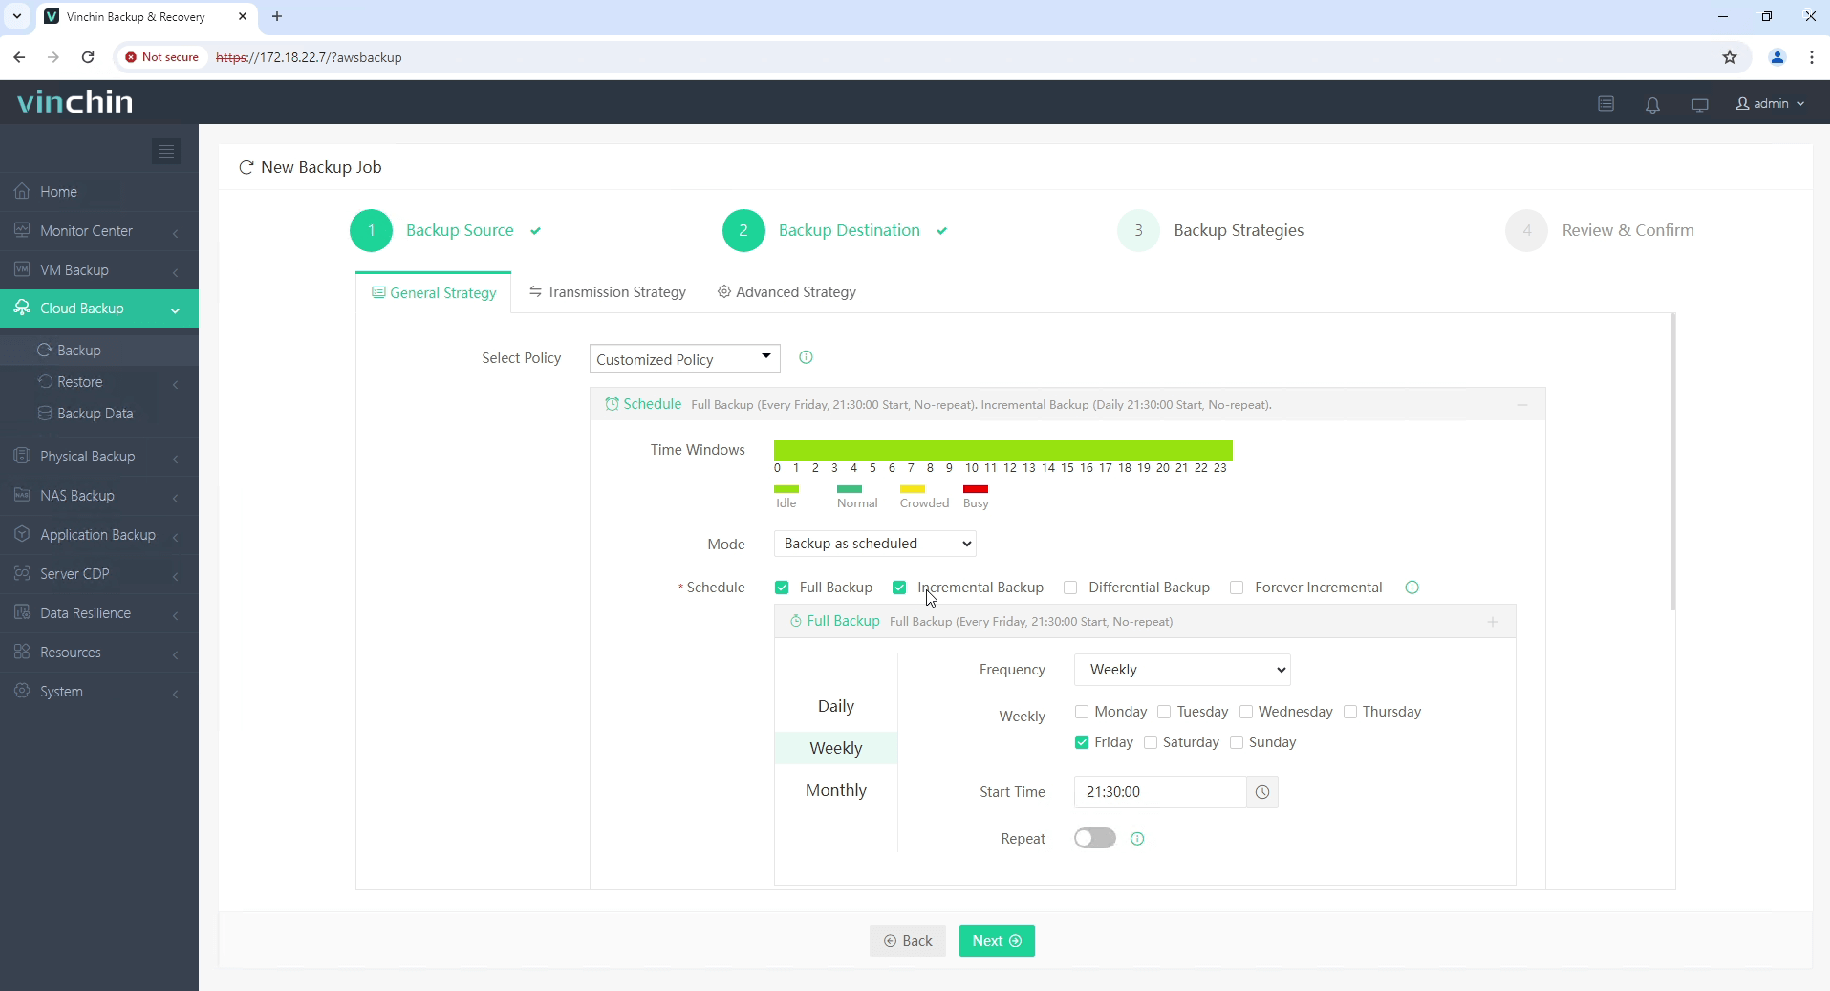
4. Review and submit the job.
Start your 60-day free trial of Vinchin Backup & Recovery to experience its secure, resource-efficient backup solutions. Or, contact us for a customized plan tailored to your IT needs.
AWS EC2 CLI FAQs
1. Q: What is the difference between EC2 and S3?
A: Amazon EC2 provides scalable computing capacity in the cloud, essentially offering virtual servers. Amazon S3 provides scalable storage for any type of data, making it ideal for storing and retrieving large amounts of data.
2. Q: What is a security group?
A: A security group acts as a virtual firewall for your EC2 instances to control inbound and outbound traffic. You can specify rules for allowing specific traffic to or from your instances.
3. Q: What is the difference between Elastic IP and Public IP?
A: A Public IP is automatically assigned to your instance from AWS’s pool of IP addresses and changes when you stop and start the instance. An Elastic IP is a static IP address that you can allocate and associate with an instance, allowing it to remain the same even if you stop and start the instance.
Conclusion
Using the AWS CLI to manage EC2 instances not only enhances efficiency but also enables a higher degree of automation and repeatability. Whether you’re launching and stopping instances, managing security groups, or creating and attaching EBS volumes, the AWS CLI offers a powerful set of commands that allow users to manage their AWS resources flexibly and effectively. Mastering these commands and techniques will help you better manage and optimize your computing resources on the AWS cloud computing platform.
Share on:


