-
What are the advantages of adding NFS storage in Proxmox?
-
How to set up NFS storage for backup in Proxmox VE?
-
How to backup Proxmox VM with Vinchin Backup & Recovery?
-
Proxmox add NFS FAQs
-
Conclusion
NFS stands for Network File System and is a protocol for sharing file systems over a network of computers. It allows sharing files and directories between different computers in a network, making them accessible just like local files.
Adding NFS storage in Proxmox, you can mount a storage device on a Proxmox VE node and make it accessible to virtual machines or containers on other nodes. This enables the sharing of storage resources and the convenience of centralized management.
What are the advantages of adding NFS storage in Proxmox?
Flexibility and Scalability: Adding NFS storage in Proxmox enables the sharing of storage devices among multiple nodes in a Proxmox VE cluster. This enhances flexibility, allowing seamless scalability and efficient management of storage resources.
High Availability and Load Balancing: By utilizing Proxmox add NFS storage, you can achieve high availability and load balancing for virtual machines and containers. When sharing storage to multiple nodes via NFS, if one node fails, VMs and containers can be seamlessly migrated to other nodes to maintain service continuity and availability.
Data Sharing and Collaboration: Proxmox add NFS storage enables multiple VMs and containers to access and share the same storage resources. This sharing makes transferring files and data between different VMs easier and more efficient.
How to set up NFS storage for backup in Proxmox VE?
In the following, you will be shown how to install and configure the NFS service on a CentOS 7 server as an example, create a shared directory, and add NFS storage in a Proxmox server to back up virtual machines.
Prerequisites
Make sure to get the IP addresses of the Proxmox server and CentOS 7 server
Install NFS on CentOS 7
1. Use SSH to connect to the CentOS server and obtain root privileges with the sudo command:
ssh centosuser@CentOS 7 IP
sudo su
2. Install NFS using yum
yum -y install nfs-utils libnfsidmap rpcbind
3. After successful installation, enable the rpcbind and nfs-server services to start at server boot time.
systemctl enable rpcbind
systemctl enable nfs-server
4. Start all services:
systemctl start rpcbind
systemctl start nfs-server
systemctl start rpc-statd
systemctl start nfs-idmapd
5. Enable Firewalld and open the NFS, mountd and rpc-bind service ports for access from other servers:
systemctl start firewalld
firewall-cmd --permanent --zone public --add-service mountd
firewall-cmd --permanent --zone public --add-service rpc-bind
firewall-cmd --permanent --zone public --add-service nfs
6. Reload the Firewalld configuration to apply the changes
firewall-cmd --reload
Create a shared directory
1. Create a directory and share it with the Proxmox server. Create the directory "nfsproxmox" in the /var directory and change the permissions to 777 so that anyone can read and write to it:
mkdir -p /var/nfsproxmox
chmod -R 777 /var/nfsproxmox/
2. Modify the /etc/exports file to configure shared directories, client IPs, and other specific options:
vim /etc/exports
Add the following configuration and then save and exit:
/var/nfsproxmox 192.168.1.111(rw,sync,no_root_squash)
3. Use the following command to export the shared directory:
exportfs -r
Mount the NFS service
Open Proxmox VE, hit Datacenter > click Storage > choose Add > click NFS
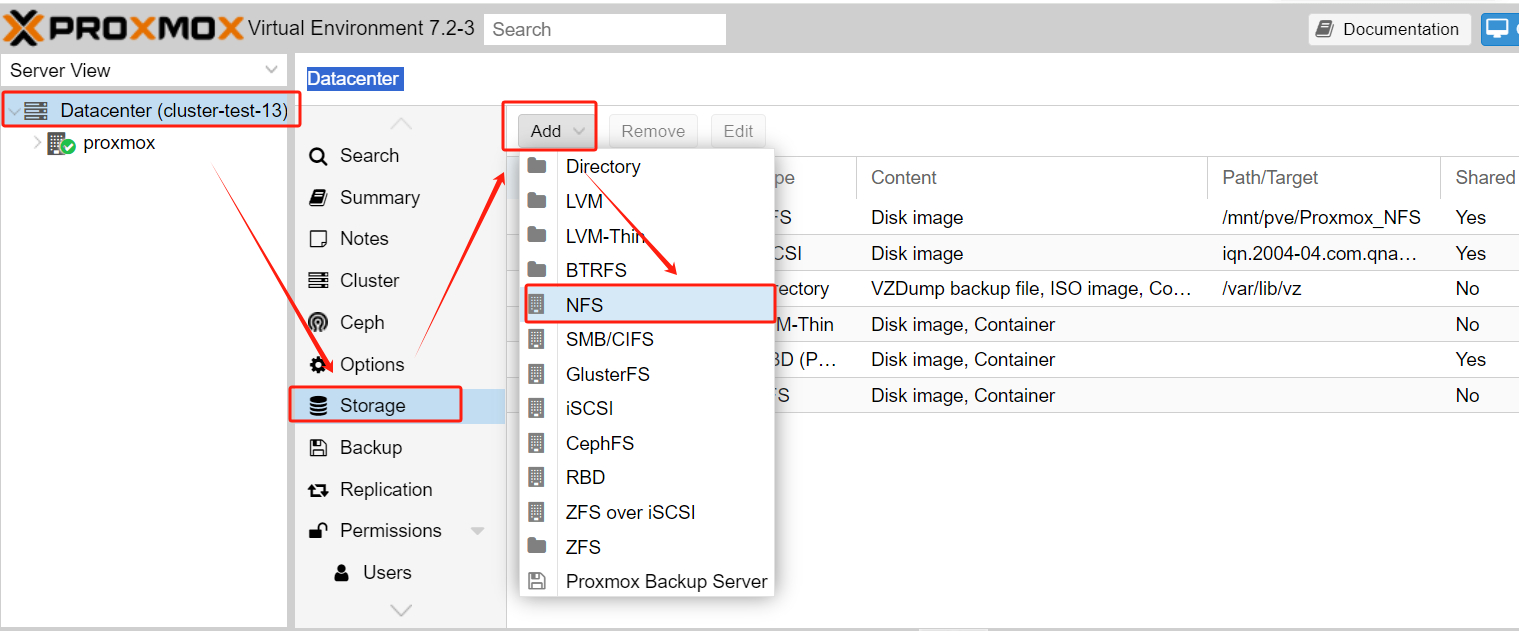
Define your NFS
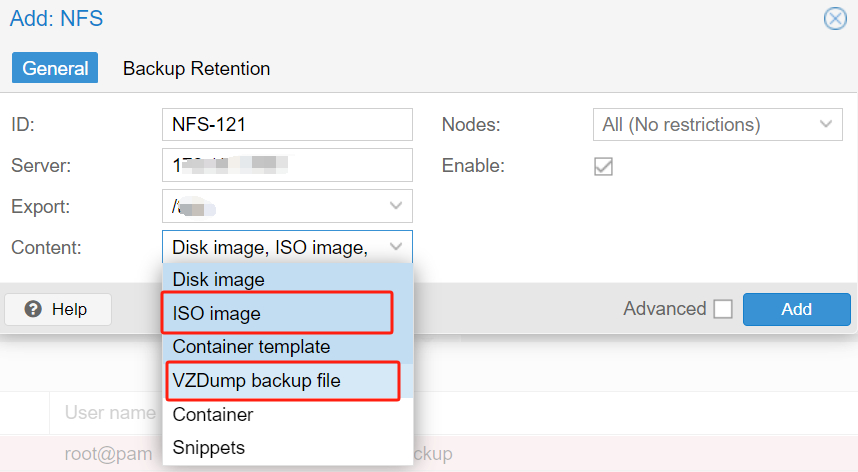
1. As long as the NFS server permissions are set properly, the set shared directory can be automatically detected after entering the NFS server IP. (actually invoking the system command pvesm nfsscan Server IP)
2. Add at least ISO image, VZDump backup file in content > hit Add
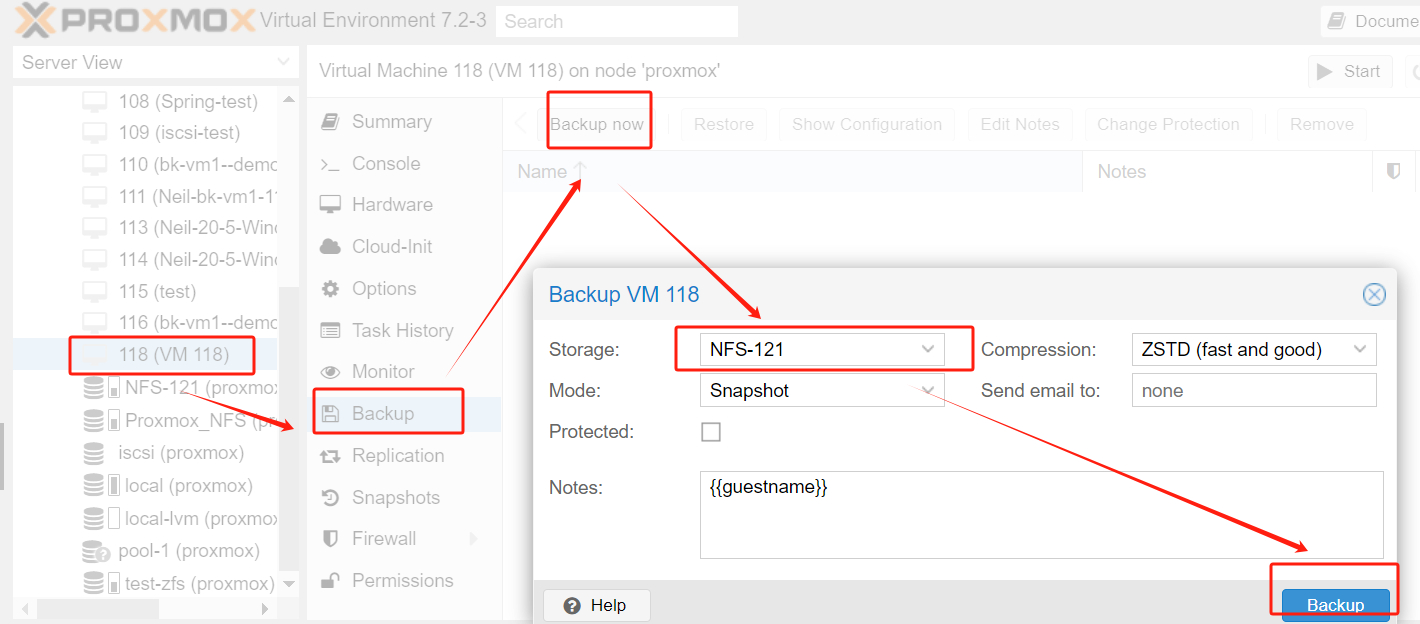
Backup Proxmox VM to NFS storage
Hit VM > choose Backup > click Backup now > choose NFS-121 in Storage you just created> hit Backup
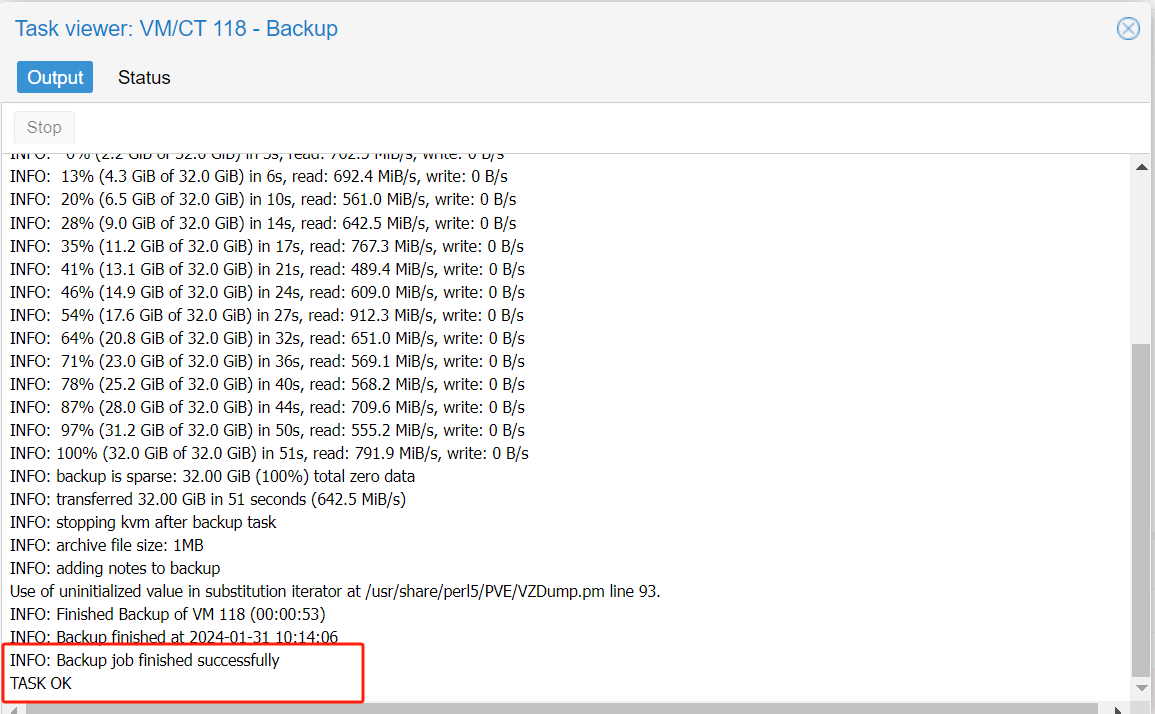
You can see that the backup task has completed.
How to backup Proxmox VM with Vinchin Backup & Recovery?
When considering a VM backup strategy, in addition to fully utilizing the built-in backup features of Proxmox, it is highly recommended to explore the potential of third-party backup software to further enhance the backup capabilities. Among them, Vinchin Backup & Recovery is a backup solution designed for Proxmox, VMware, Hyper-V, XenServer, XCP-ng, oVirt, RHV and other virtual machine environments.
The software provides comprehensive and powerful VM backup and recovery features, including agentless backup, instant recovery, V2V migration and more, designed to fully protect and manage critical data in virtualized environments. This comprehensive backup solution provides many backup options to ensure data integrity and fast, efficient recovery when needed.
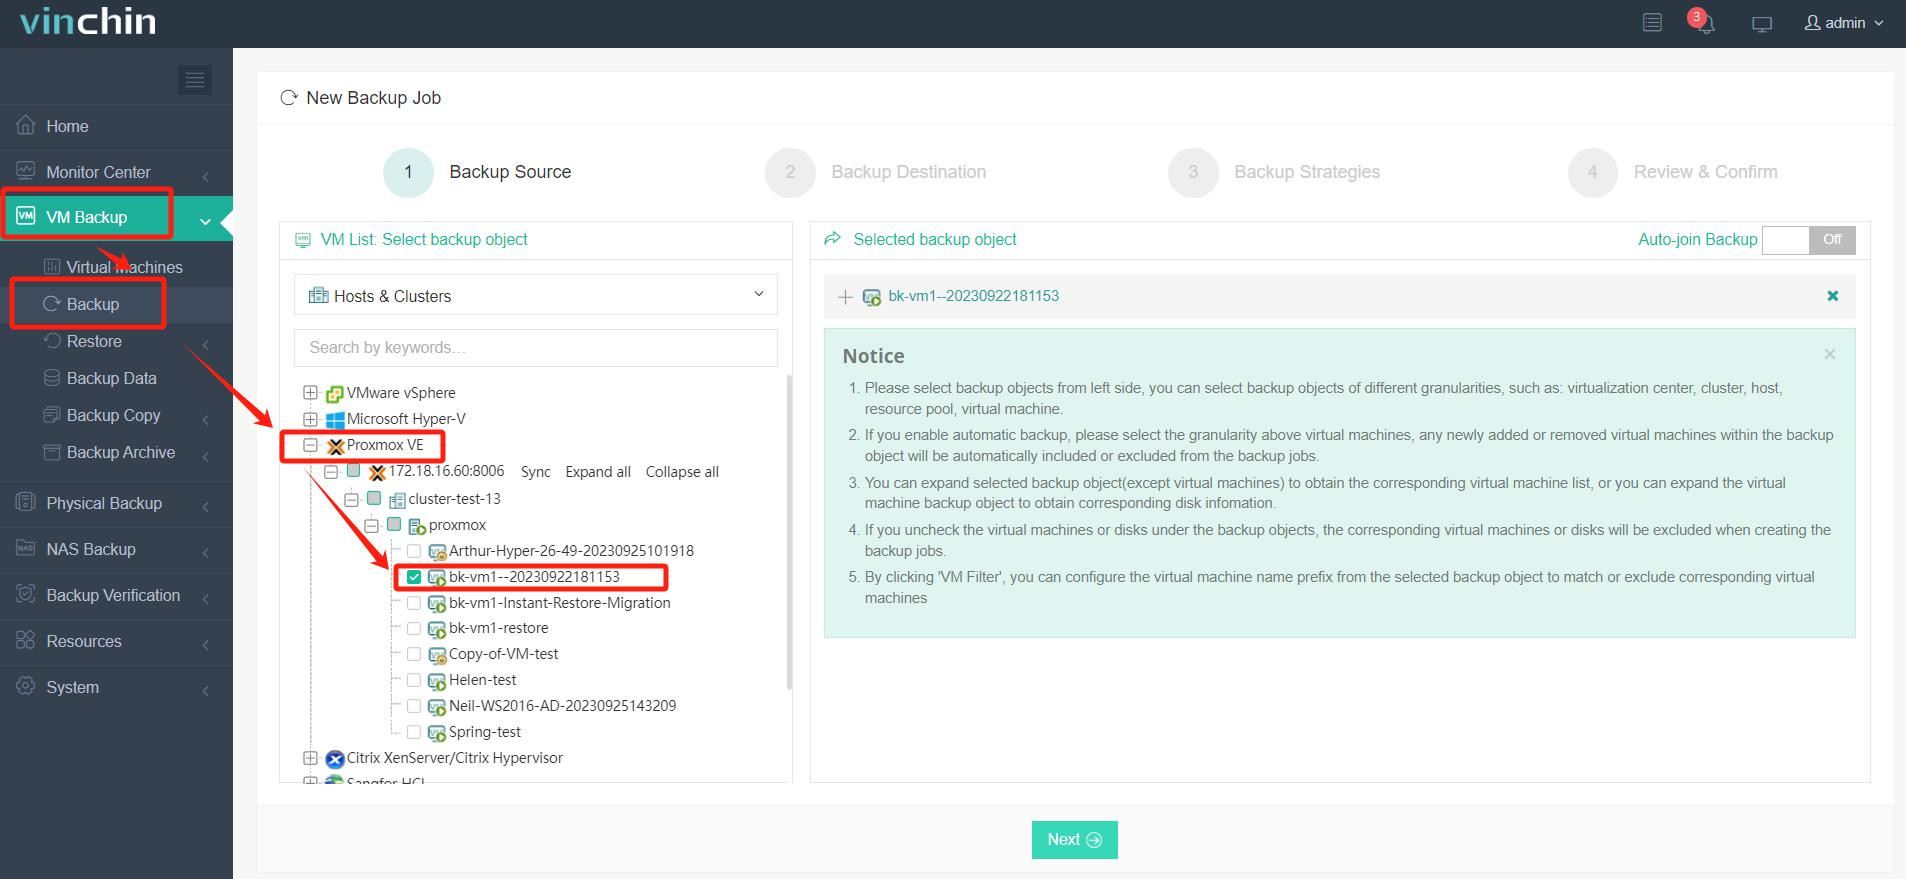
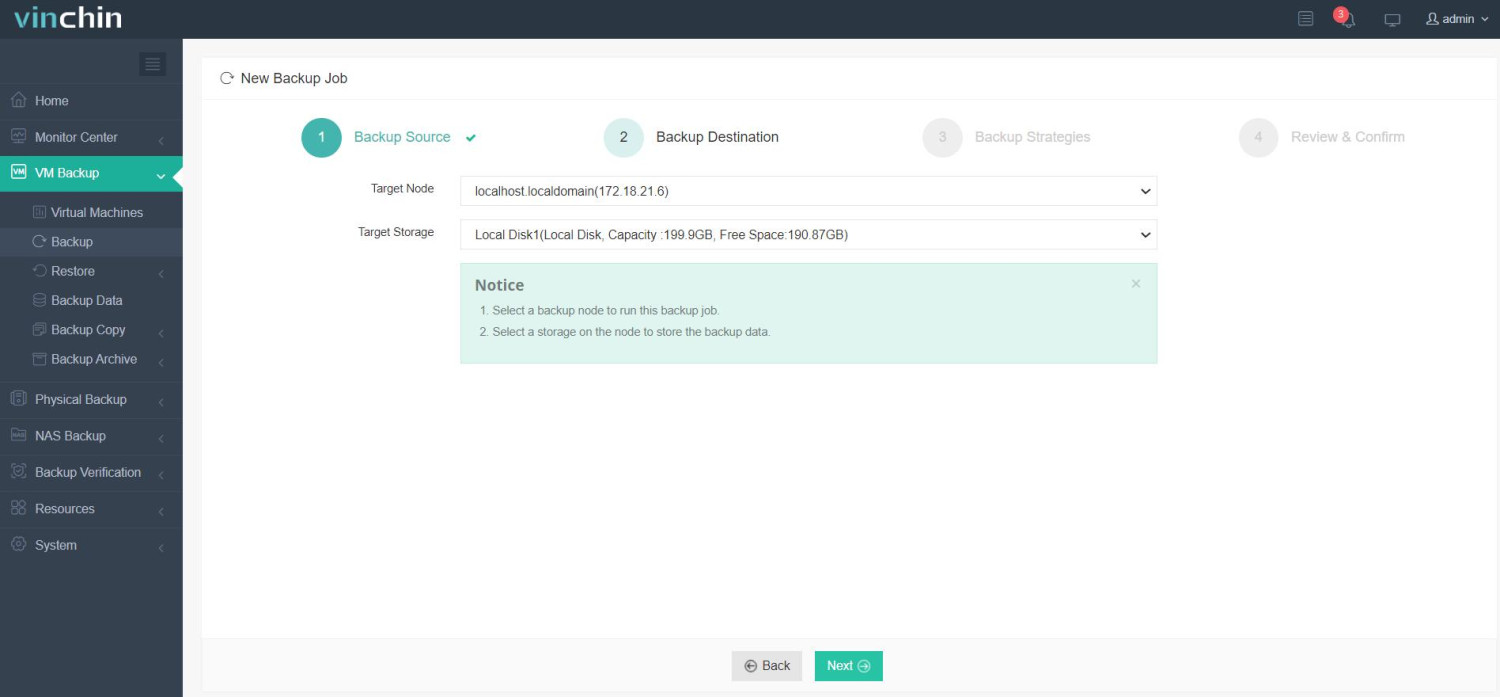
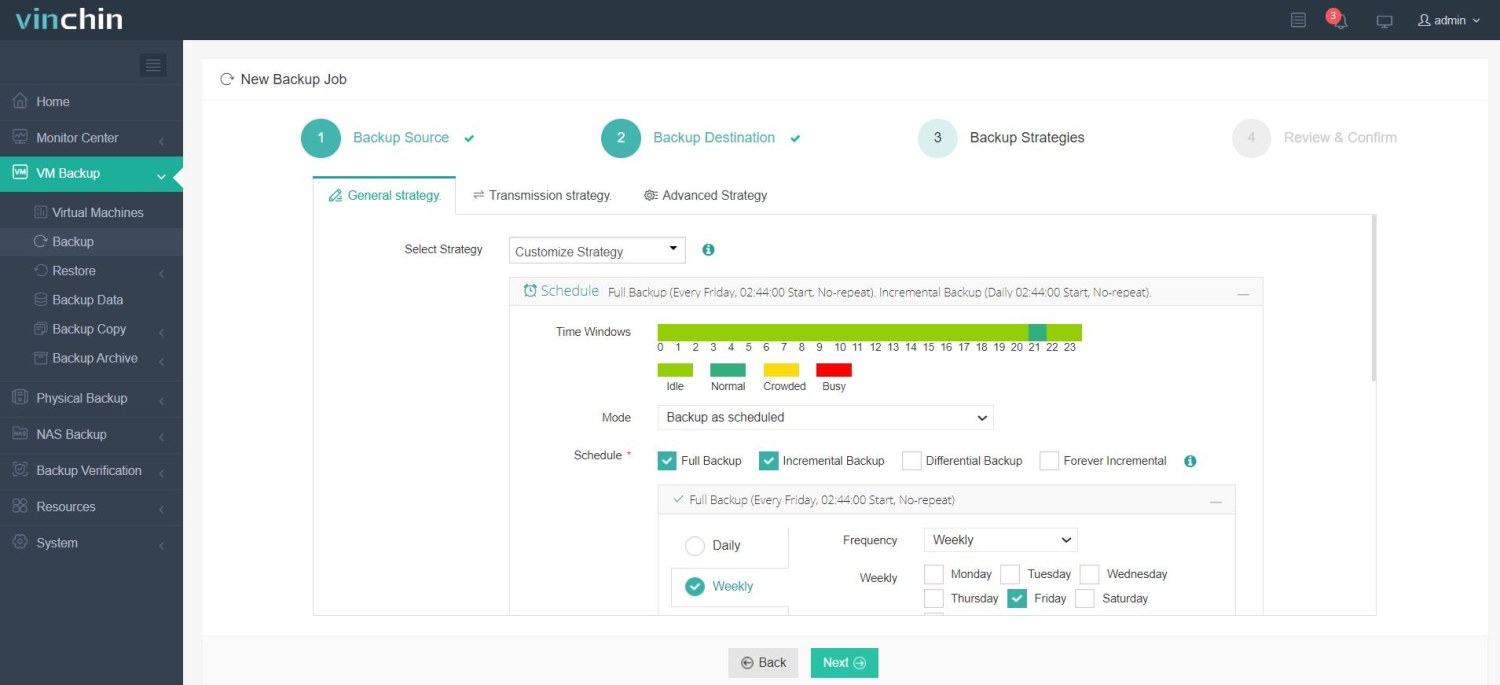
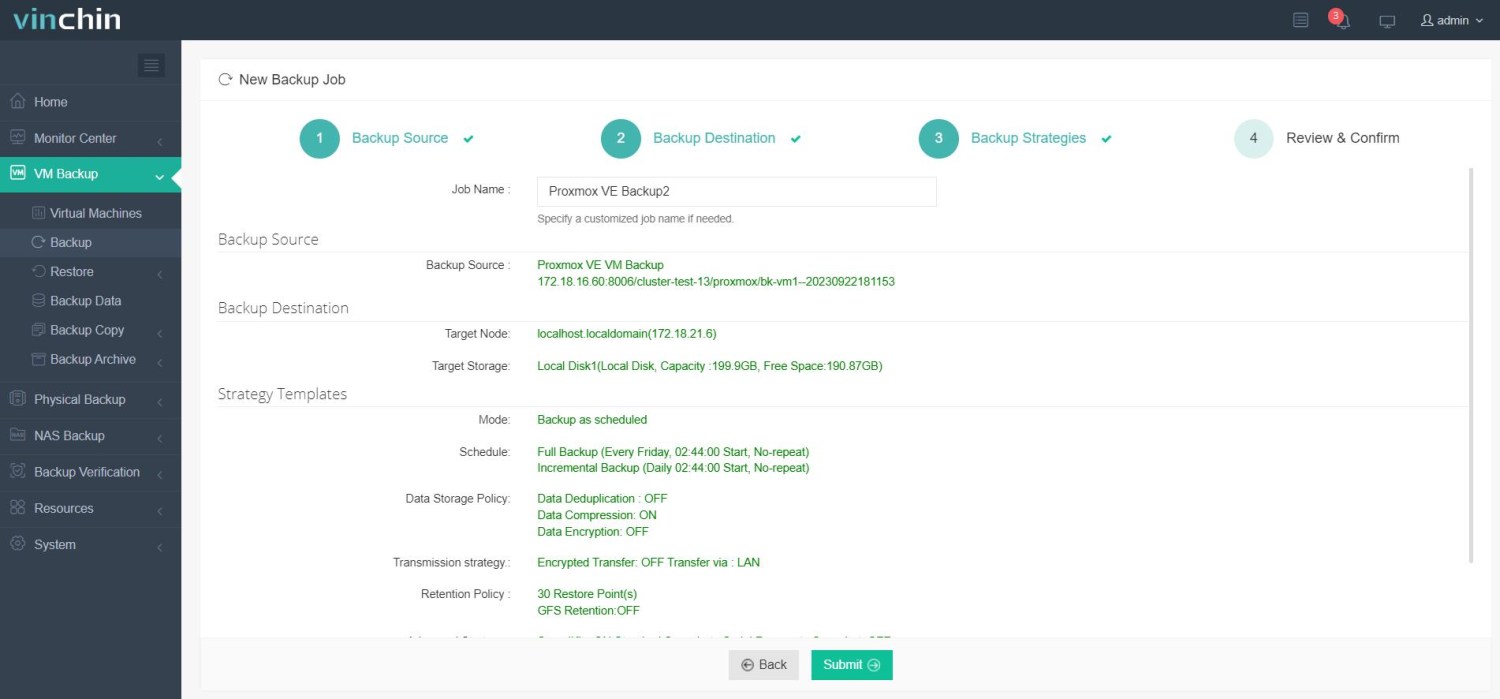
Vinchin Backup & Recovery’s operation is very simple, just a few simple steps.
1. Just select VMs on the host
2.Then select backup destination
3.Select strategies
4.Finally submit the job
Vinchin offers a free 60-day trial to allow users to experience its capabilities in a real-world environment. For more information, please contact Vinchin directly or get in touch with one of our local partners.
Proxmox add NFS FAQs
Q1: How to secure NFS storage?
A1: To ensure the security of your NFS storage, it is recommended that you use firewall rules to restrict access and make sure that permissions are set correctly on your shared directories. In addition, consider using authentication in your NFS configuration to improve the security of your storage.
Q2: Is it possible to monitor the performance of NFS storage in Proxmox VE?
A2: Yes, Proxmox VE provides performance monitoring tools that you can use to monitor the performance of NFS storage. Through the Dashboard and Logs in the Proxmox VE interface, you can view storage usage and performance statistics.
Conclusion
In conclusion, integrating NFS storage into Proxmox offers numerous benefits, including increased flexibility, scalability, high availability, load balancing, and data sharing capabilities. By configuring NFS on CentOS 7 and adding storage for VM backups in Proxmox, you can easily establish a reliable backup strategy. Furthermore, exploring third-party solutions like Vinchin Backup & Recovery can provide additional features and capabilities to enhance your backup functionality.
Share on:


