-
Where does Proxmox save backups?
-
How to modify the backup location in Proxmox?
-
Manage Proxmox backups with a professional solution
-
Proxmox backup location FAQs
-
Conclusion
In the realm of virtualization, Proxmox VE stands out as a robust and efficient platform for managing virtual machines and containers. One critical aspect of maintaining a healthy virtual environment is ensuring that all your data is backed up securely and efficiently. A Proxmox backup location is essentially a storage space where Proxmox VE can save backups of virtual machines and containers. This location can be on local storage, such as a hard drive or SSD within the Proxmox server, or on remote storage, like a NAS, SAN, or other storage services.
Where does Proxmox save backups?
Proxmox VE typically saves backups to a location specified by the user during the backup configuration process. By default, Proxmox allows you to save backups to local storage on the Proxmox server itself or to a remote storage location such as NFS, CIFS, or a Proxmox Backup Server.
Here’s how the backup storage is typically organized:
1. Local Storage: If you’re saving backups to local storage, they will usually be stored in the /var/lib/vz/dump/ directory on the Proxmox node. This path is the default backup directory for local storage, but it can be changed if you’ve configured a different storage location in the Datacenter Storage settings.
2. Remote Storage: For remote storage, you’ll need to have added and configured a storage backend in Proxmox VE’s storage settings. This could be a NFS share, or other supported types. Backups saved to remote storage will be located on the respective remote server or system, in the path that you’ve specified when setting up the storage in Proxmox.
3. Proxmox Backup Server: If you are using a Proxmox Backup Server, the backups will be stored in the datastores you’ve created on that server. The location on the backup server is defined during the datastore creation process.
To manage and configure backup locations in Proxmox, you can go to the Datacenter > Storage section in the Proxmox web interface, where you can add, edit, or remove storage resources and define where backups should be stored.
How to modify the backup location in Proxmox?
To modify the backup location in Proxmox VE, you need to either add a new storage for backups or edit an existing storage configuration. Here’s a step-by-step guide on how to do this through the Proxmox web interface:
1.Access the Proxmox web interface, then navigate to Datacenter > Storage
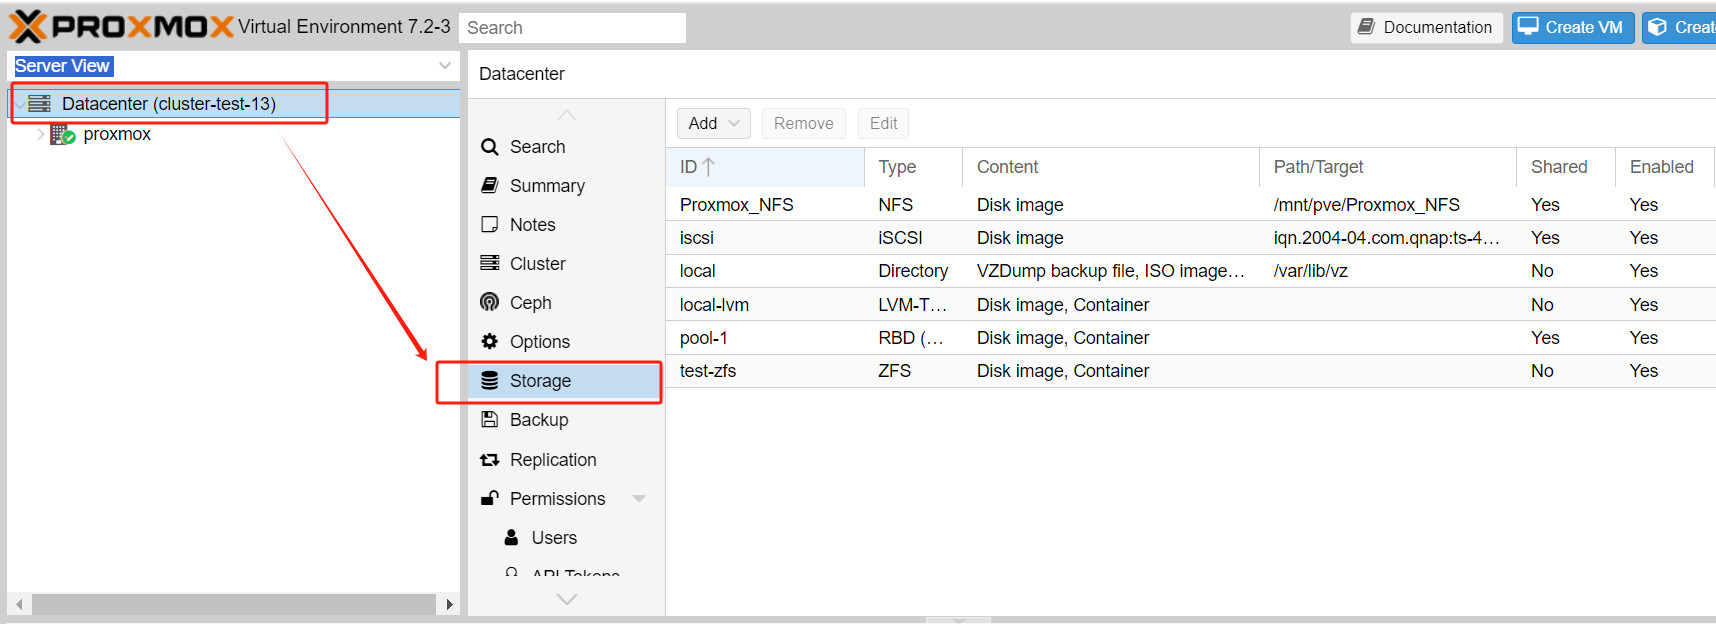
2. Add new storage or edit existing storage
To add a new storage, click on the Add button and select the storage type (e.g., NFS, CIFS, iSCSI, LVM, Directory, Proxmox Backup Server, etc.).
To edit an existing storage, select the storage from the list and click on the Edit button.
3. Configure storage settings
Enter the necessary information for the storage you are adding or editing. This typically includes the ID, server address, path, and credentials if required.
For backups, you may also have an option to select or create a directory specifically for storing backup files.
4. Adjust backup job to use the new Location
Once the new storage is added or the existing one is modified, you’ll need to adjust your VM or container backup jobs to use the new location.
Go to the Datacenter or select the specific node, then click on Backups and create a new backup job or edit an existing one.
In the backup job configuration, select the storage you’ve just added or modified from the Storage drop-down menu.
5. Verify the configuration
You can perform a test backup to ensure that the backup files are indeed being saved to the new location.
Manage Proxmox backups with a professional solution
While Proxmox VE does come with its own built-in feature for backing up and restoring VMs and containers, it’s always a good idea to have a secondary, professional solution for data protection.
Vinchin Backup & Recovery is a robust Proxmox VE environment protection solution, which provides advanced backup features, including automatic VM backup, agentless backup, LAN/LAN-Free backup, offsite copy, instant recovery, effective data reduction, cloud archive and etc., strictly following 3-2-1 golden backup architecture to comprehensively secure your data security and integrity in Proxmox VE beyond replication.
Besides, data encryption and anti-ransomware protection offer you dual insurance to protect your Proxmox VE VM backups. You can also simply migrate data from a Proxmox host to another virtual platform and vice versa.
It only takes 4 steps for you to backup Proxmox VE VMs:
1. Select the backup object.
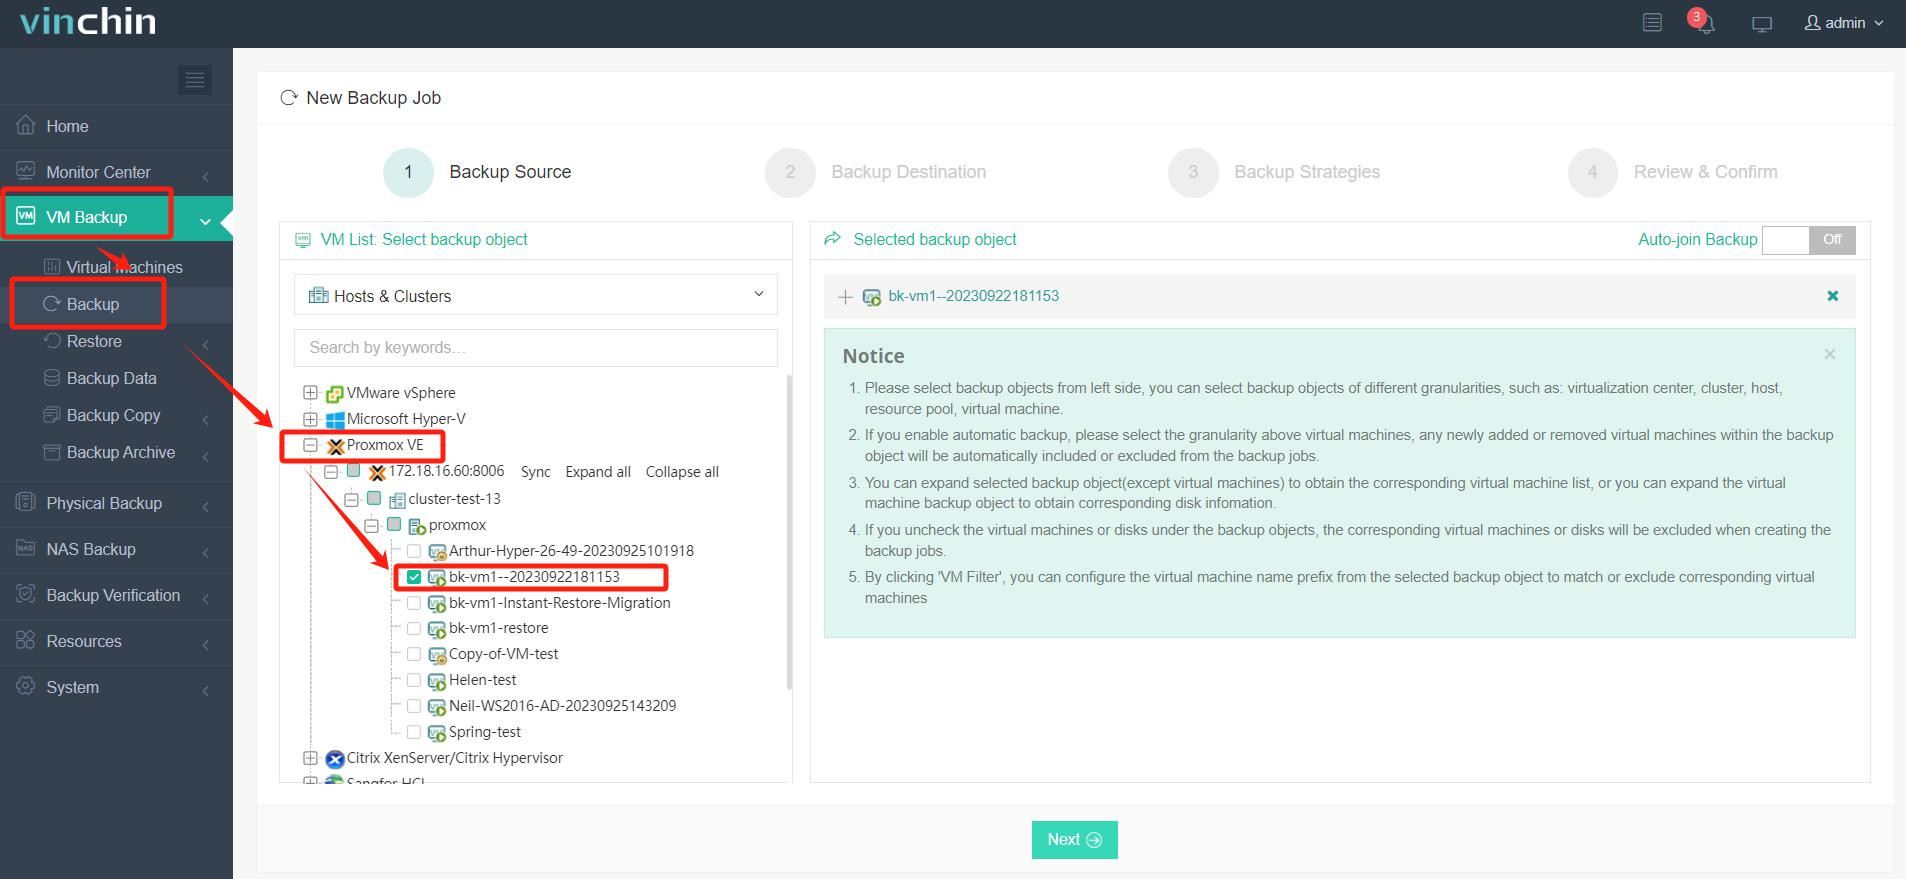
2. Select backup destination.
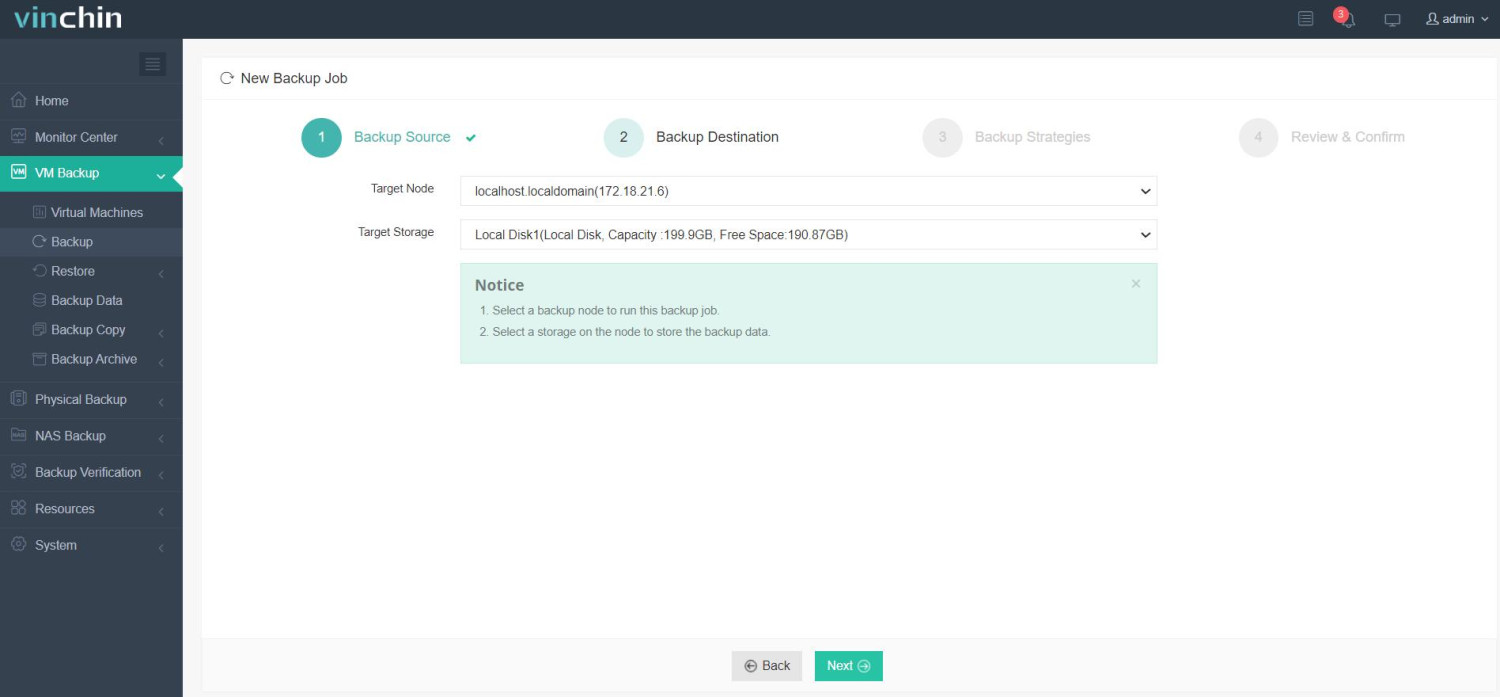
3. Select backup strategies.
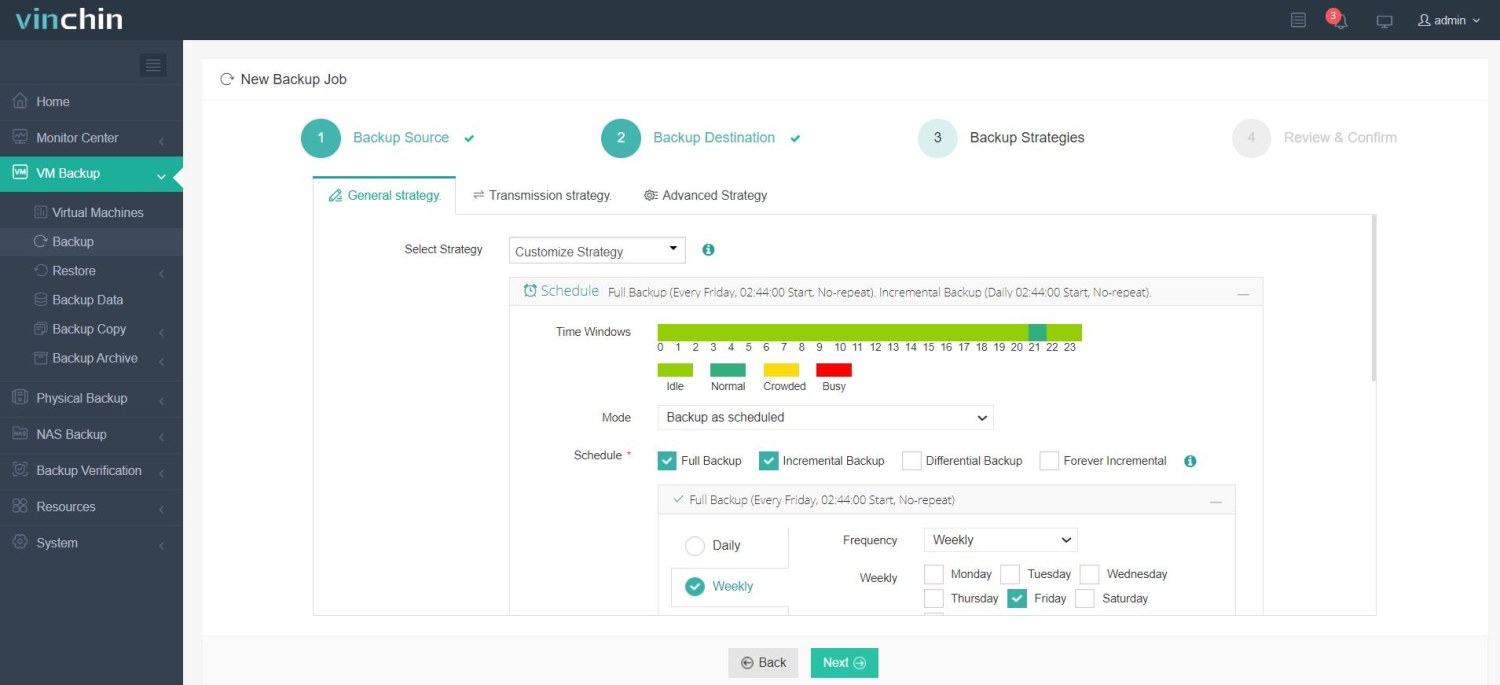
4. Review and submit the job.
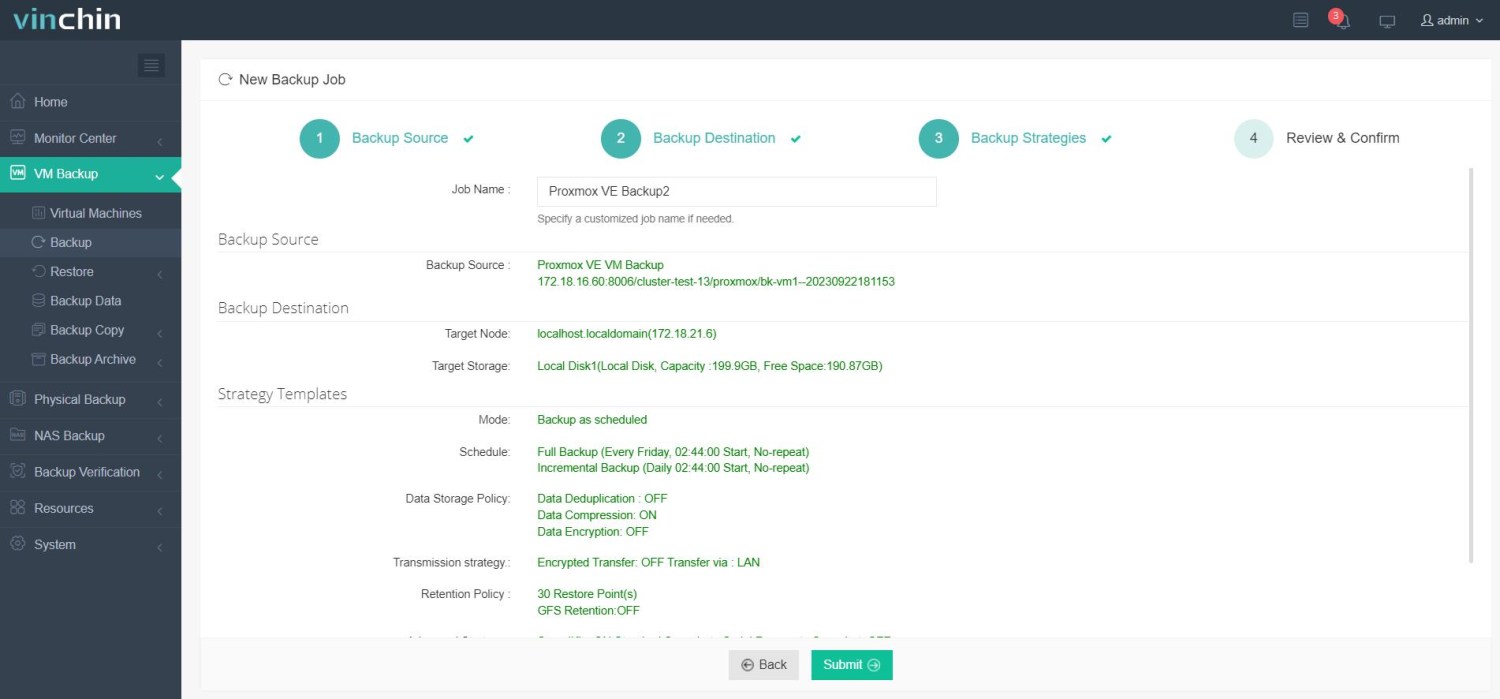
Vinchin Backup & Recovery has been chosen by thousands of companies worldwide. You too can start leveraging this powerful system with a 60-day full-featured trial! Reach out to us with your specific Proxmox VE environment needs, and we will provide a tailored solution that aligns with your IT infrastructure. Our expertise in Proxmox VE ensures that you receive the most effective and reliable backup and recovery strategy for your virtual machines.
Proxmox backup location FAQs
1.Q: Can I use a USB drive as a backup location?
A: Yes, you can use a USB drive as a backup location. In Proxmox, you need to make sure the USB drive is mounted and has the appropriate file system. You can then add it as a storage through Proxmox’s web interface.
2.Is it possible to automate Proxmox’s backup process?
A: Yes, you can automate backups through Proxmox’s web interface or by writing scripts. This simplifies the management process and ensures that backups are performed as planned.
Conclusion
Backup location is a vital component of a comprehensive data protection strategy. By understanding the different types of storage options available and implementing a well-thought-out backup strategy, you can ensure that your virtual environments are resilient against data loss. Remember, the key to successful data management is not just regular backups, but also the ability to restore them with Vinchin Backup & Recovery when needed.
Share on:


