-
Why SSH into EC2 instance?
-
Prerequisites
-
SSH into an EC2 Instance from Windows
-
SSH into an EC2 Instance from Linux
-
Troubleshooting
-
Easily manage EC2 instances with Vinchin Backup & Recovery
-
SSH into EC2 instance FAQs
-
Conclusion
Amazon EC2 offers scalable computing capacity in the cloud, allowing users to launch virtual servers on-demand. To interact with these instances, particularly for system administration tasks, SSH is the preferred method due to its robust security features and versatility. SSH enables secure remote access to EC2 instances, facilitating file transfers, command execution, and session management.
Why SSH into EC2 instance?
Remote Access: SSH allows you to remotely access and manage your EC2 instance from anywhere. This is crucial for administrators who need to monitor and control servers that are physically located elsewhere.
Troubleshooting: If there are issues with your application or server, SSH enables you to diagnose and resolve problems quickly. You can check logs, restart services, or modify configurations without needing physical access to the machine.
Automation and Scripting: You can automate tasks and run scripts on your EC2 instance via SSH. This is particularly useful for deploying applications, scaling resources, or performing routine maintenance tasks.
Data Transfer: SSH can also be used to securely transfer files between your local machine and the EC2 instance using SFTP or SCP.
Security: SSH uses encryption for all communication, which makes it a secure way to access your EC2 instance over untrusted networks. This protects your data and commands from being intercepted.
Prerequisites
Before initiating an SSH connection to your EC2 instance, ensure you have the following prerequisites:
AWS Account: An active AWS account to access the EC2 service.
EC2 Instance: A running EC2 instance with public IP or public DNS.
Key Pair: A private key file (.pem) that matches the key pair associated with your EC2 instance.
SSH Client: An SSH client installed on your local machine. For Linux and macOS, the terminal application includes SSH by default. Windows users can use PuTTY or the built-in OpenSSH client.
Download your Private Key File:
Download Key Pair
Go to the EC2 Management Console.
Click on Key Pairs in the left navigation menu.
Find the key pair you want to use and click Download Key Pair. Make sure you save it in a secure location.
Change the permissions of the private key file to restrict access to it. Use the command:
chmod 400 /path/to/your-key-pair.pem
SSH into an EC2 Instance from Windows
For Windows users, you typically need additional software since Windows does not come with SSH pre-installed. Here’s how you can do it:
Using PuTTY
1.Download PuTTY: Visit the official and download PuTTY.
2. Convert your .pem file to .ppk format:
Download PuTTYgen from the same site as PuTTY.
Open PuTTYgen and select Conversions > Import Key.
Browse to your .pem file and open it.
Save the key as a .ppk file by going to Conversions > Export OpenSSH key.
3. Start PuTTY:
Open PuTTY.
Enter the hostname or IP address of your EC2 instance in the Host Name (or IP address) field.
Under Connection > SSH > Auth, click Browse next to Private key file for authentication and select your .ppk file.
4. Connect to your EC2 instance:
Click Open to start the connection.
When prompted for a password, enter the passphrase for your key file (if any).
Using Windows PowerShell or Command Prompt with OpenSSH
Microsoft includes OpenSSH client utilities by default. You can enable it through the Windows Features:
1. Enable OpenSSH Client:
Open Control Panel > Programs > Turn Windows features on or off.
Check OpenSSH Client and click OK.
2. Convert your .pem file to .ppk format(optional):
This step is not strictly necessary for OpenSSH but might be needed for other tools. Follow the PuTTY section above if needed.
3. Connect to your EC2 instance:
Open PowerShell or Command Prompt.
Use the command:
ssh -i "C:\path\to\your-key-pair.pem" ec2-user@your-instance-public-dns-name
Note: On Windows, you may need to use double quotes around the path to your key file due to spaces in paths.
SSH into an EC2 Instance from Linux
On most Linux distributions, SSH comes pre-installed. Here’s how you can do it:
1. Make sure your private key file has the correct permissions:
Open Terminal and run:
chmod 400 /path/to/your-key-pair.pem
2. Connect to your EC2 instance:
In the terminal, run:
ssh -i /path/to/your-key-pair.pem ec2-user@your-instance-public-dns-name
Remember to replace “ec2-user”, “your-instance-public-dns-name”, and “/path/to/your-key-pair.pem” with the appropriate values for your setup. If you encounter any issues, ensure your security group allows incoming SSH connections and that your instance is running.
Troubleshooting
If you receive an error like "Permission denied (publickey)", make sure your private key file has the correct permissions and that you're using the correct key pair.
If you get a "Connection refused" error, check if your instance's firewall or security group rules are blocking the connection.
Easily manage EC2 instances with Vinchin Backup & Recovery
Vinchin Backup & Recovery is a comprehensive data protection solution designed to simplify and streamline the process of managing VM backups and recoveries for your virtualization environment including Amazon EC2 instances.
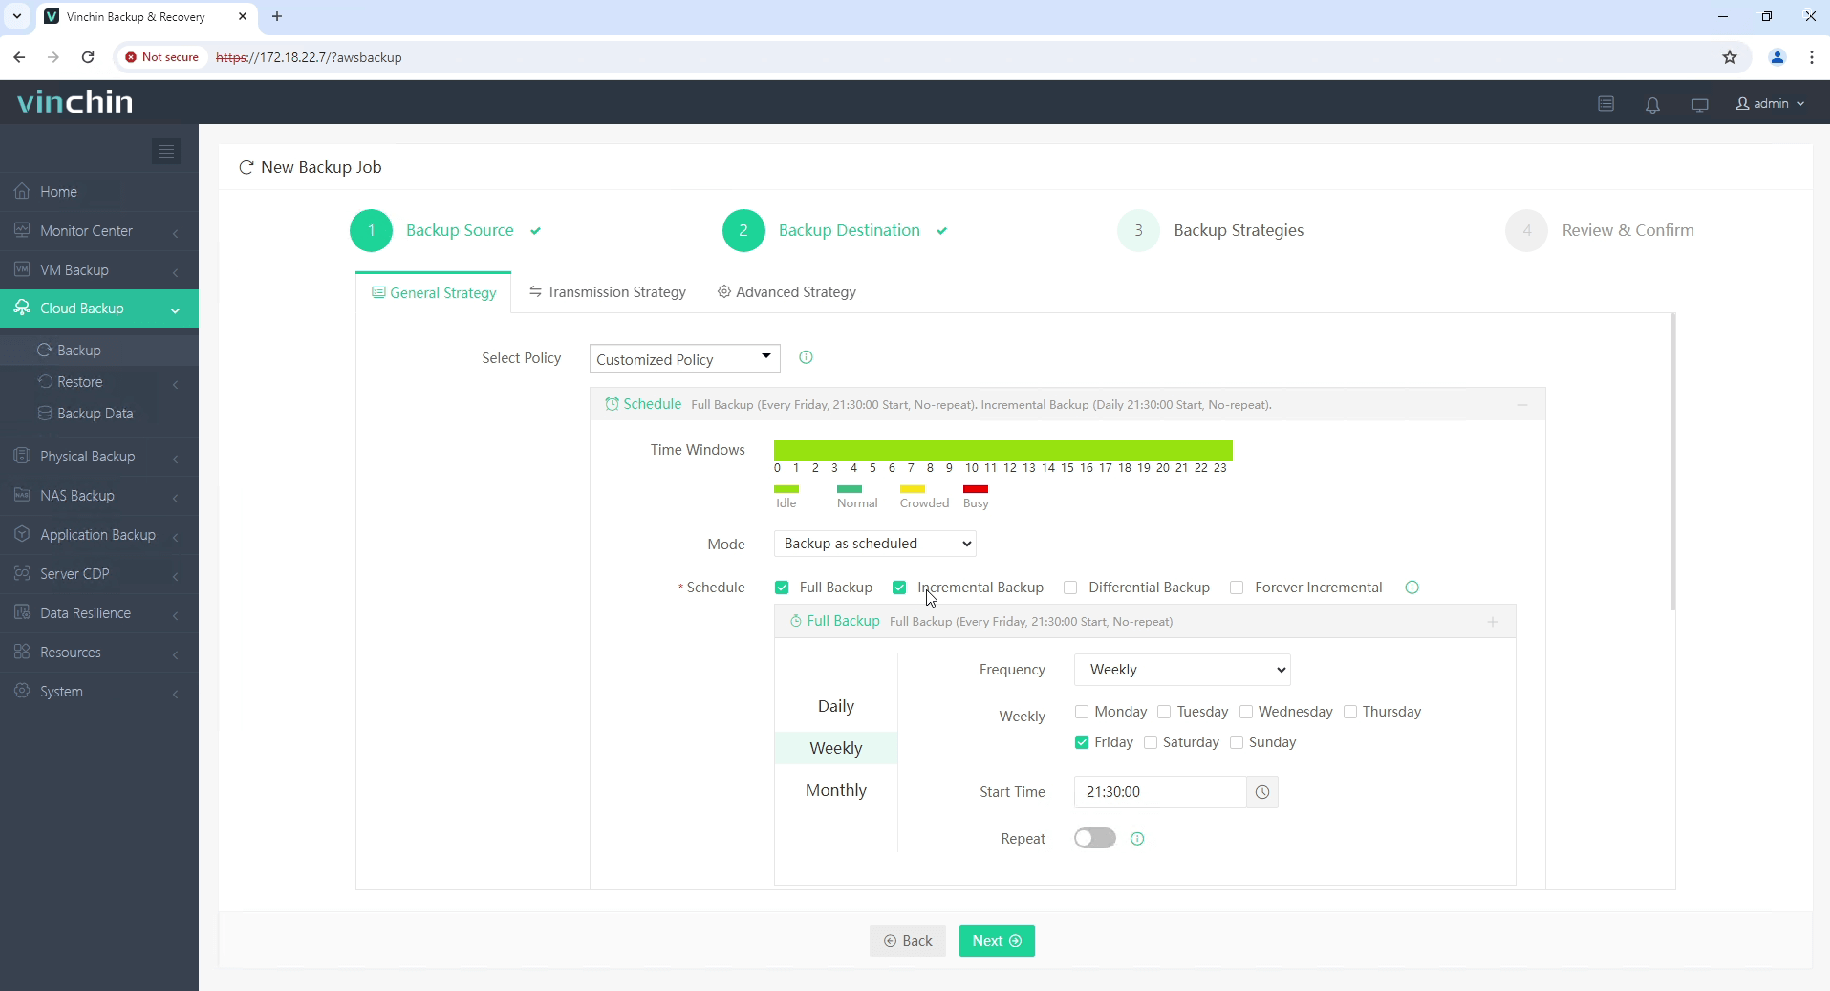
Vinchin Backup & Recovery offers a streamlined solution for managing EC2 backups across various AWS regions, supporting customizable strategies with full, incremental, and differential backup options. It facilitates flexible recovery including entire instances or specific files, with the ability to restore to different regions or even migrate to other virtualization platforms like VMware and Hyper-V. Integrating with Amazon S3 for cost-effective archival storage, Vinchin also simplifies infrastructure management through an intuitive UI, enabling efficient backup configuration and seamless V2V migrations, thus enhancing cloud data protection and business continuity.
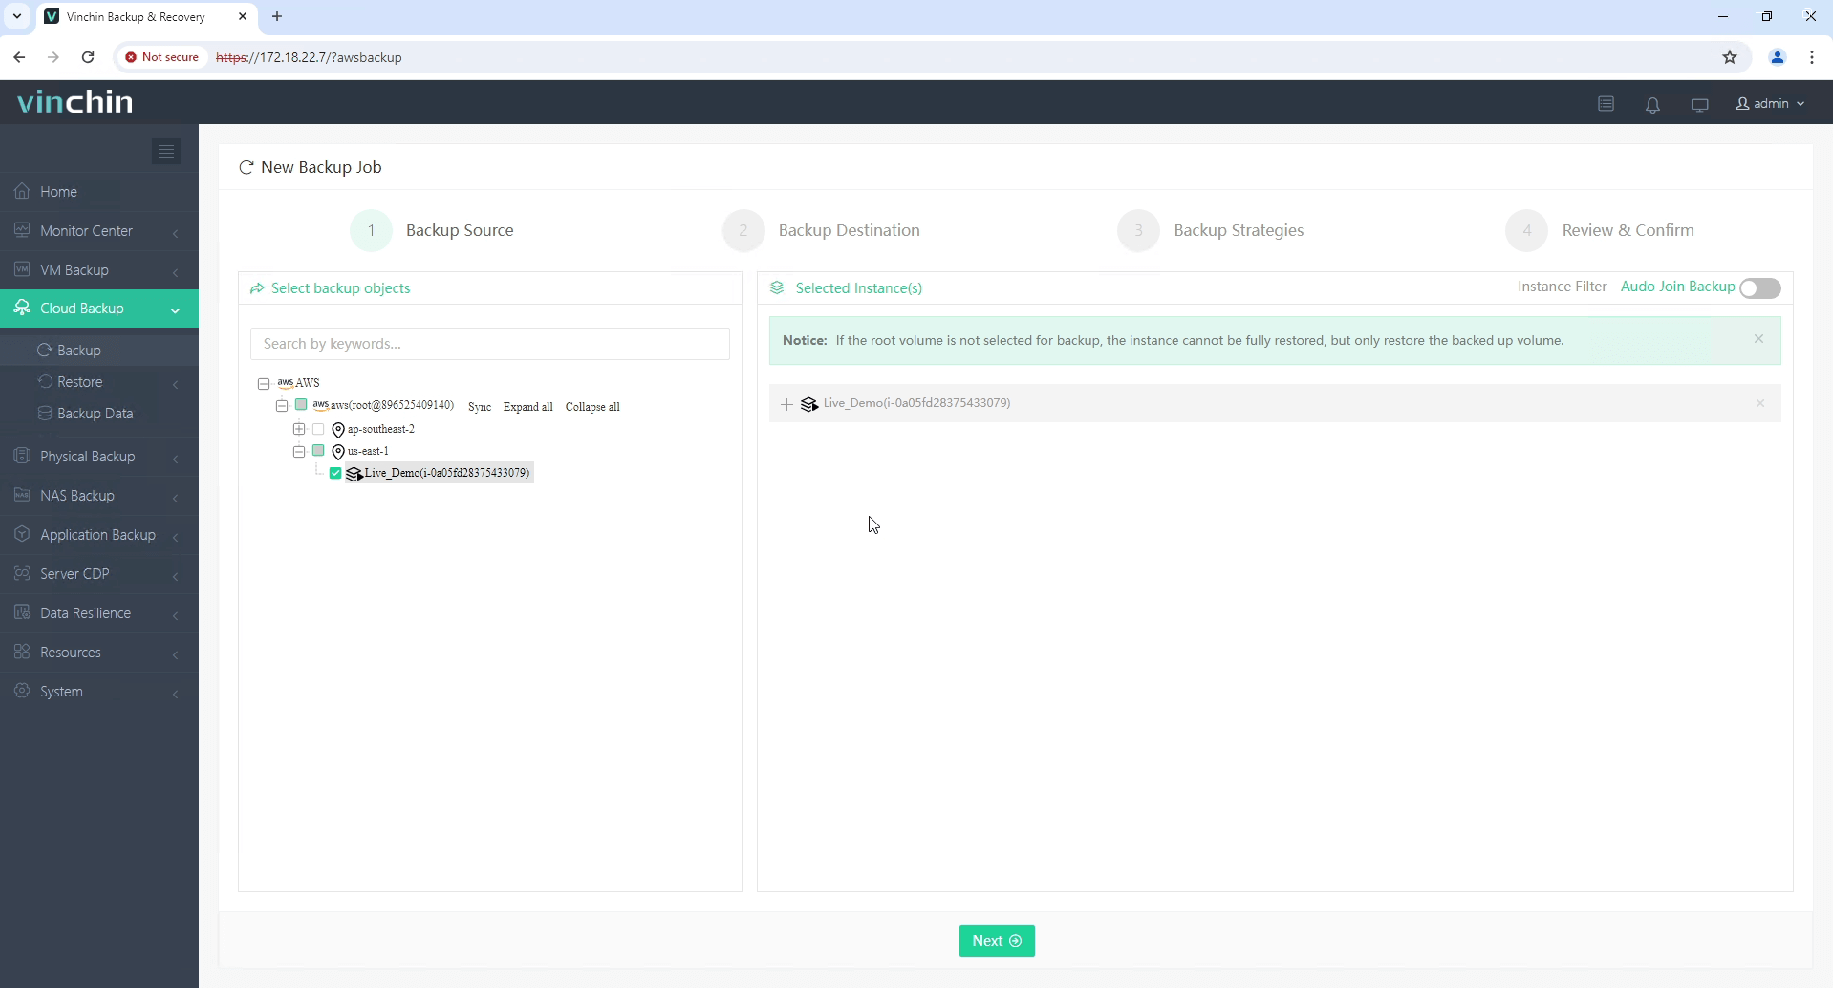
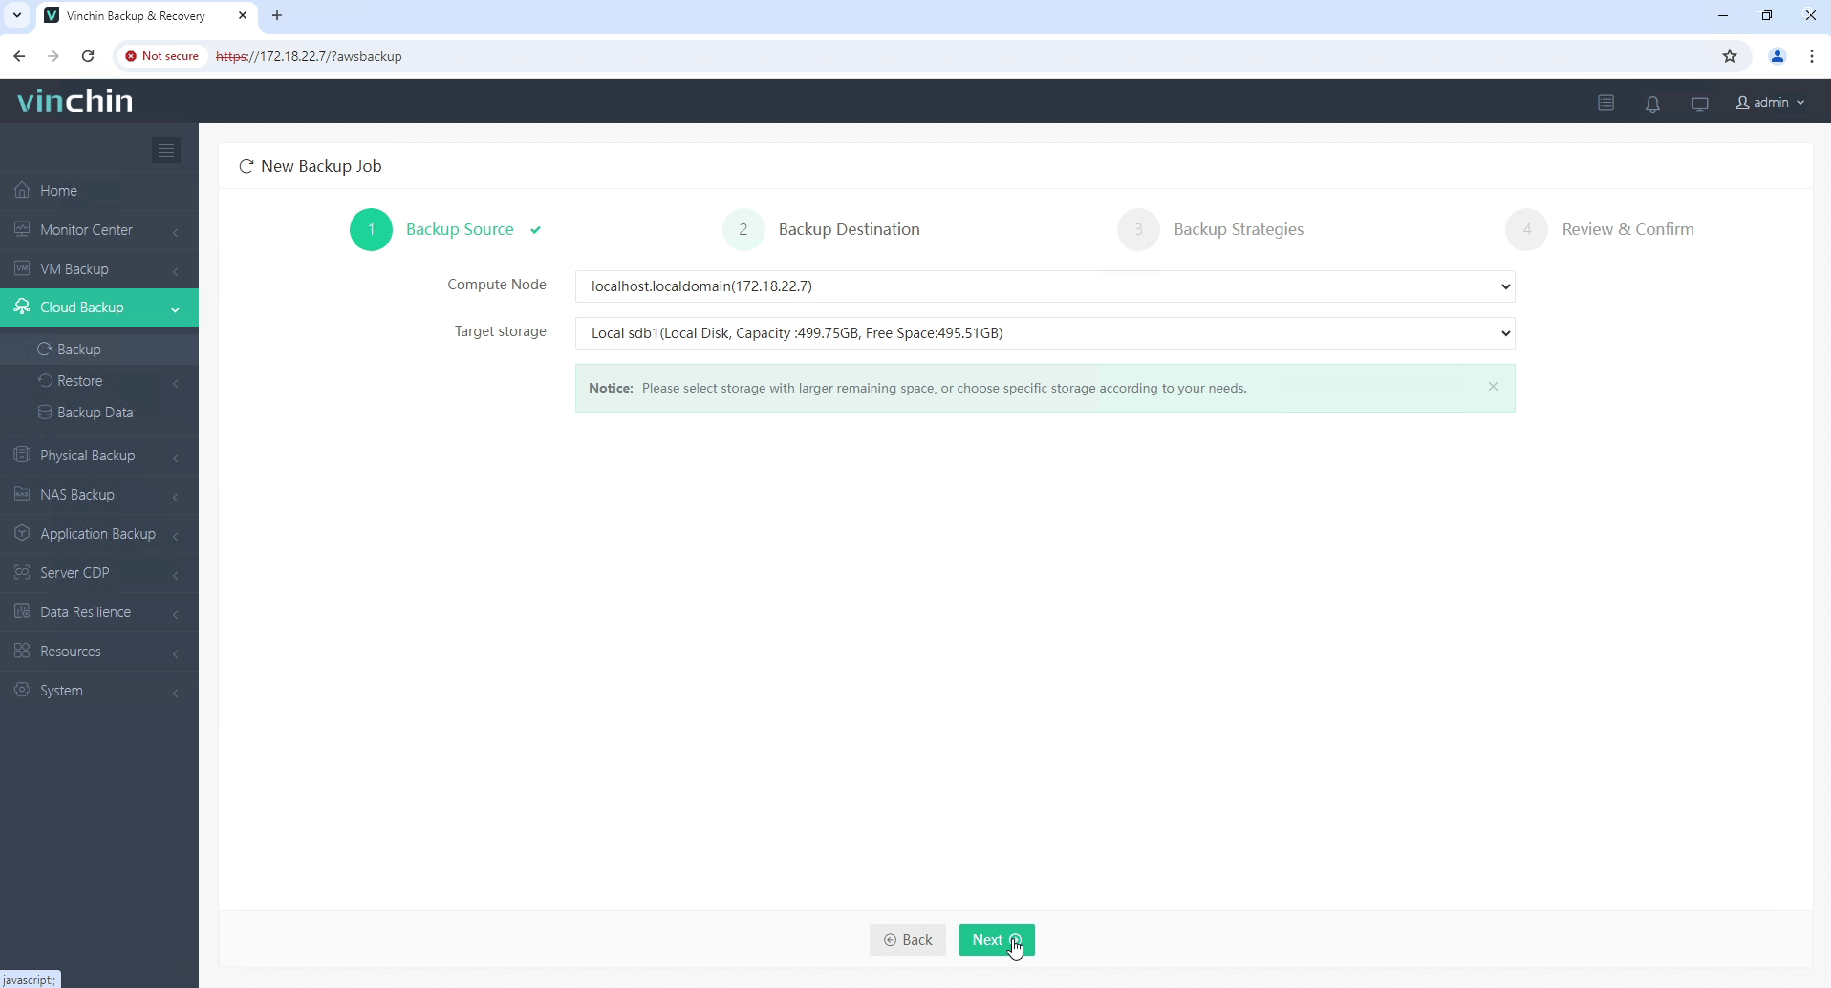
To backup EC2 instance with Vinchin Backup & Recovery, follow these steps:
1. Select the EC2 instance to be backed up.

2. Select the backup destination.

3. Select the backup strategies.

4. Review and submit the job.
Start your 60-day free trial of Vinchin Backup & Recovery to experience its secure, resource-efficient backup solutions. Or, contact us for a customized plan tailored to your IT needs.
SSH into EC2 instance FAQs
1. Q: How can I transfer files to/from my EC2 instance?
A: You can use SCP or SFTP:
Using SCP:
scp -i /path/to/your-key-pair.pem /local/path/to/file ec2-user@your-ec2-instance-public-dns:/remote/path
Using SFTP:
sftp -i /path/to/your-key-pair.pem ec2-user@your-ec2-instance-public-dns
2. Q: How do I connect to my instance without a public IP?
A: You can connect to your instance using a VPN connection, AWS Direct Connect, or an AWS Systems Manager Session Manager which doesn’t require an SSH key.
Conclusion
Establishing a secure and reliable SSH connection to your EC2 instances is crucial for effective cloud resource management. By following this article, you can confidently access and manage your EC2 instances, enhancing your productivity and maintaining high levels of security.
Share on:


