-
Method 1: Migrate VMware to OpenStack Using VirtIO drivers
-
Method 2: Migrate VMware to OpenStack Using qemu-img tool
-
Method 3: Migrate VMware to OpenStack Using the one-and-done solution
-
VMware to OpenStack FAQs
-
Conclusion
After Broadcom's acquisition of VMware on October 30, 2023, the introduction of significant price increases and a shift from perpetual licenses to a subscription-based model led to widespread customer dissatisfaction, particularly due to increased costs and reduced flexibility. As a result, many organizations began considering migration to alternative platforms like OpenStack, Proxmox VE, and XCP-ng to lower their total cost of ownership and regain control over their IT infrastructure.
As an open-source cloud computing platform with flexibility and adaptability, OpenStack comes to their notice. By switching virtual machines from VMware to OpenStack, they may drastically lower the TCO of setting up and maintaining their IT infrastructure. Economic comparison between OpenStack and VMware reveals that, in some cases, costs can be reduced by a full order of magnitude.
Without further ado, let’s come straight to the point. Data migration from VMware to OpenStack can be divided into 3 ways as follows, you can choose what works best for your business.
Method 1: Migrate VMware to OpenStack Using VirtIO drivers
1. Add VirtIO drivers
Since some systems don’t boot from VirtIO hardware by default, you may take extra steps to install the VirtIO drivers into them.
2. Expand partitions (optional)
This step is for the servers with limited free disk space on their partition. Use the VMware-vdisk manager tool with the ‘-x’ argument to increase the disk size. The partition must then be expanded from the operating system. In the following stage, when customizing the virtual machine, you can accomplish that.
3. Customize Virtual Machine (optional)
You may want to remove some software (such VMware Tools and drivers) and other things to get the operating system ready to work in OpenStack. Writing a script that performs this for you will allow you to automate the process. The script and files should be able to be added to the virtual drive using the virt-copy-in command.
4. Create Cinder volumes
Create a Cinder volume of the same size as each disk you want to import.
Create the volume with following command lines:
cinder create --display-name <name_of_disk> <size> --volume-type <volumetype>
In order to proceed with the next step, we will need the volume ids, which you can also find by running the following command.
cinder list | grep <name_of_disk>
5. Transform VMDK into Ceph
Remove the actual Ceph disk named the volume ids we noted in the previous step from the Ceph pool.
rbd -p <ceph_pool> rm volume-<volume-id>
Convert the VMDK file into the volume on Ceph (repeat this step for all virtual disk of the VM). The full path to the VMDK file is contained in the VMDK disk file variable. The ID that you previously noticed is volume-id.
qemu-img convert -p <vmdk_disk_file> -O rbd rbd:<ceph_pool>/volume-<volume-id>
6. Create a Neutron port (optional)
Build a port with neutron and use it in the next step (note its id). You need to know the network name as the label. Add security groups based on this command line:
--security-group <security_group_name>
Add this parameter for each security group:
neutron port-create --fixed-ip ip_address=<ip_address> --mac-address <mac_address> <network_name> --name <port_name>
7. Create and launch the instance in OpenStack
To find the flavor-id of the desired flavor, use the nova flavor-list command.
Now create and launch the new instance.
nova boot <instance_name> --flavor <flavor_id> --boot-volume <boot_volume_id> --nic port-id=<neutron_port_id>
Remember the instance ID. Add each subsequent instance disk by the command (if there are other volumes you wish to add):
nova volume-attach <instance_ID> <volume_id>
Method 2: Migrate VMware to OpenStack Using qemu-img tool
1. Export the VMware VM in OVF format.
Extract the CentOS1- disk1.vmdk file from the.ovf using the decompression tool tar -xvf, and then upload the file to the OpenStack server.
2. Convert VMDK to qcow2 format using qemu-img tool.
qemu-img convert -f vmdk CentOS1-disk1.vmdk -O qcow2 CentOS1JMH.qcow2
3. Import it to OpenStack.
openstack image create "CentOS1-fvmware"
--file CentOS1JMH qcow2c
--disk-format qcow2 --container-format bare
--public
4. Create an instance.
Create an instance from the CentOS1JMH image you just uploaded. If it fails, delete the failed instance and select the newly created CentOS1 volume and launch as an instance from it.
Problems like disk couldn’t be found can be fixed through the following steps:
Click the SendAltCtrl in the upper right corner of the control, and click several times to restart VMware.
Choose to boot from the second CentOS rescue when VMware boots to Grub.
After activating safe mode, log in to the virtual machine using SSH.
Check whether the vda1 hard disk of OpenStack is mounted to the /boot directory. mount /dev/vda1 /boot.
Create a boot area:
sudo dracut -f /boot/initramfs-$(uname -r).img $(uname -r)
Then, reboot it. Check out logs if it fails.
Instance startup log:
sudo journalctl -a -u devstack@n-cpu.service | grep ERROR
Volume creation log:
sudo journalctl -a -u devstack@c-vol.service | grep ERROR
Method 3: Migrate VMware to OpenStack Using the one-and-done solution
Vinchin Backup & Recovery is a versatile data solution for 10+ main stream virtualizations including VMware and OpenStack, whose Cross-Platform Recovery features as the integrated V2V migration tool that allows the seamless data migration across these platforms without other instruments.
It performs robust backup and recovery functionality including fast incremental backup, image-based, agentless backup, LAN-Free backup and recovery, offsite backup copy, multithreading transmission, ransomware protection and more, to comprehensively secure your critical data. Instant Restore will allowing restarting a failed VM in 15 seconds, greatly reducing RTO.
By creating backups of the source virtualization and restoring them to the target virtualization, Vinchin Backup & Recovery simply completes the V2V migration that takes other methods numerous steps.
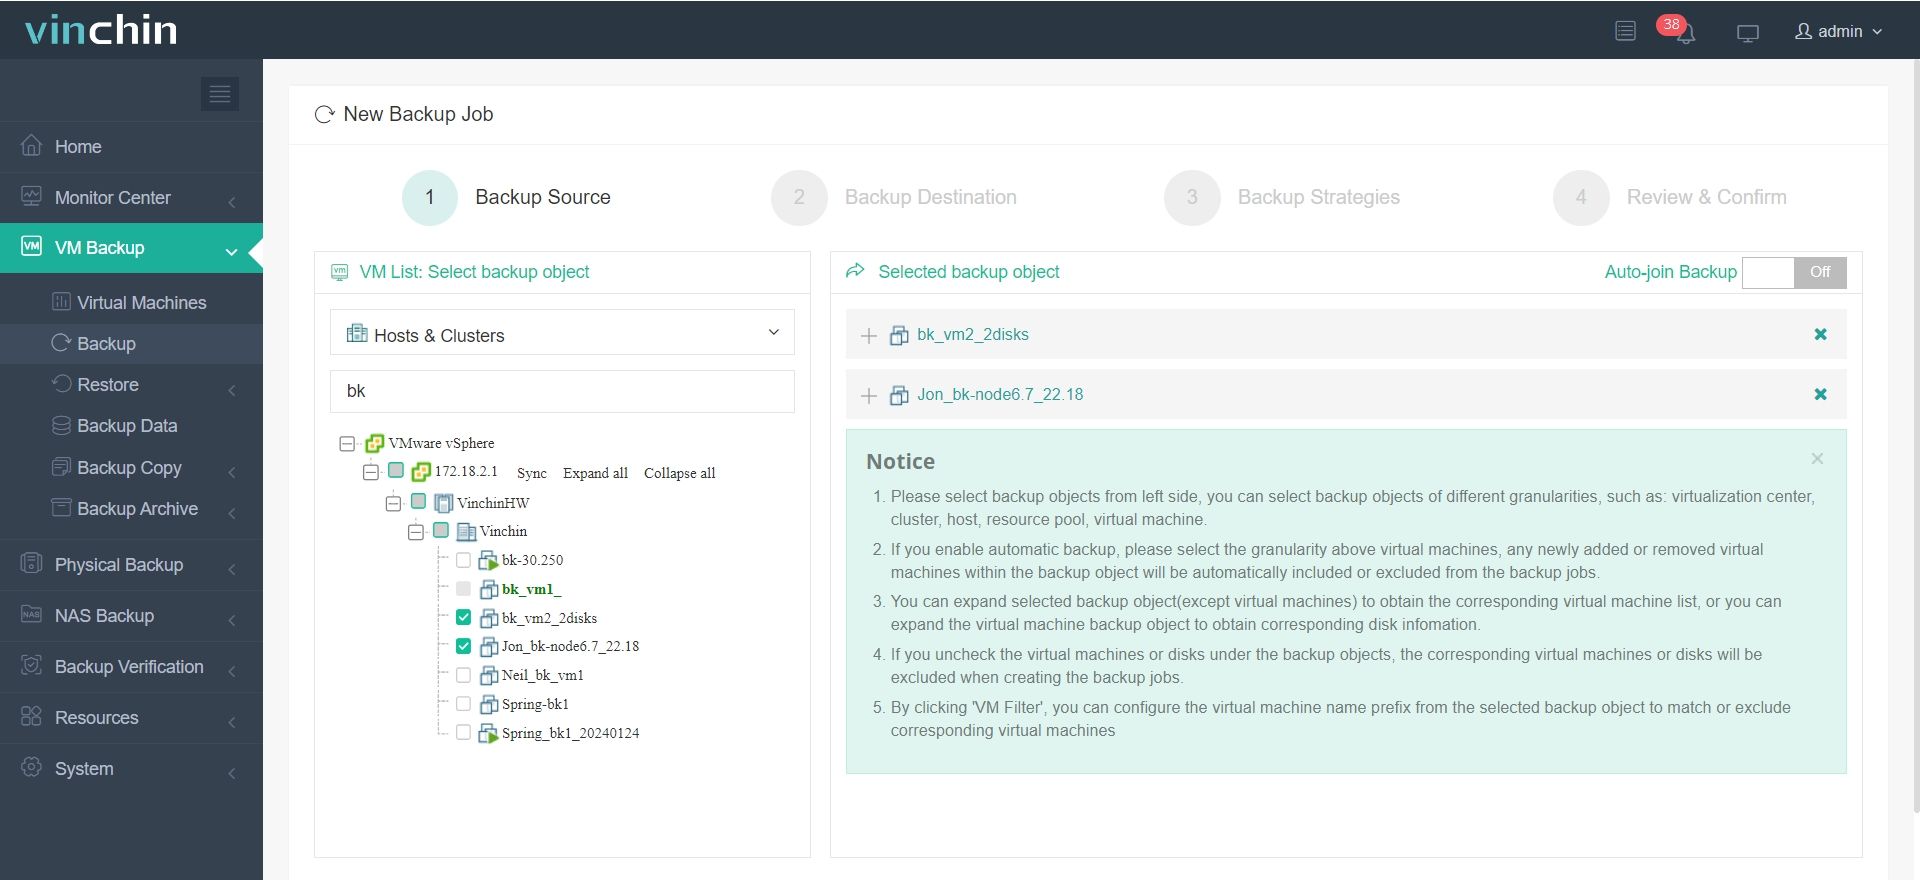
1.Backup your VMware VM, choose the backup destination and Backup strategies, then Submit it.

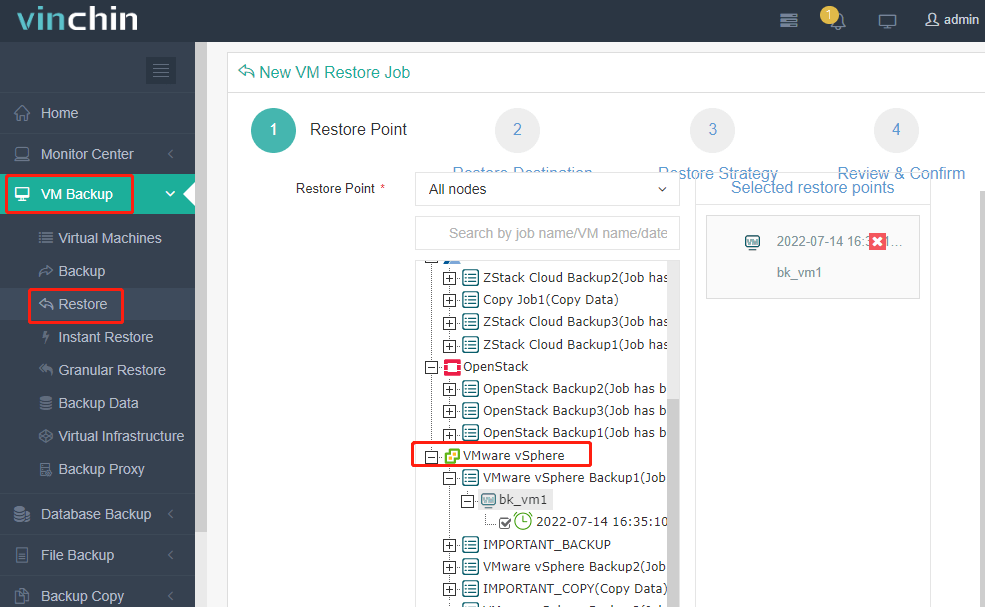
2.Choose the VM you want to restore.

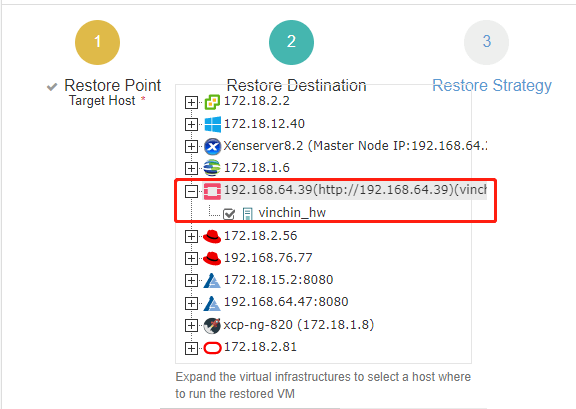
3.Select the OpenStack host to run the restored VM

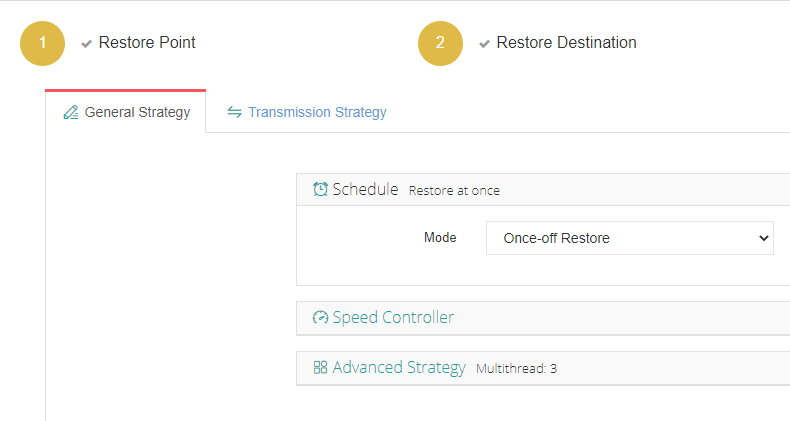
4.Configure the restore strategy

5.Review and submit the job
Vinchin Backup & Recovery integrates VM backup, data recovery, and V2V migration into one software to maximize operational efficiency. You can try the full-featured 60-day free trial of the it and explore more practical features now.
VMware to OpenStack FAQs
1. Q: How does the architecture of OpenStack differ from VMware?
A: OpenStack is a collection of open-source tools for building and managing cloud computing platforms. It is modular, allowing for greater flexibility in design and deployment. VMware is more of a closed, integrated solution, with a focus on stability and enterprise support, often at the cost of flexibility.
2. How do I ensure high availability (HA) in OpenStack as I had in VMware?
A: OpenStack supports HA, but the implementation is different. OpenStack HA typically involves setting up redundant services and leveraging technologies like Ceph for storage redundancy. It requires more manual setup compared to VMware’s more integrated HA solutions.
Conclusion
Whether you're seeking to modernize your IT infrastructure, reduce operational costs, or embrace open standards, OpenStack provides a robust and versatile solution for your cloud computing needs. And Vinchin is a strong backing to protect your data!
Share on:


