-
Understanding VMDK Files
-
How to import VMDK to Proxmox?
-
Simplify your Proxmox VE VM protection
-
Proxmox import VMDK FAQs
-
Conclusion
Proxmox VE is an open-source server management platform for your enterprise virtualization. It integrates KVM for virtual machines and LXC for containers, along with advanced features for network and storage management. Many IT professionals choose to migrate their existing virtual machines to Proxmox to take advantage of its features. One common task is importing VMDK files, which are typically associated with VMware, into Proxmox. This article provides a comprehensive guide on how to import VMDK files into Proxmox VE.
Understanding VMDK Files
VMDK stands for Virtual Machine Disk, which is a file format for virtual hard disk drives to be used for VMware virtual machines, but it can also be used by other virtualization software.
These files store the contents of the virtual machine's hard disk drive. They can contain an operating system, installed programs, and other data associated with a virtual machine. VMDK files can be configured to act as real hard drives, which means they can be partitioned, formatted, and have file systems set up within them just like a physical hard drive.
A VMDK file can consist of multiple files and can be split into multiple parts to make it easier to manage and move. It can also be a single file for simpler configuration and improved performance on certain systems.
If you're transitioning from a VMware-based environment to Proxmox, you will have virtual machines in VMDK format that you need to move over. When migrating to Proxmox, these files need to be converted to a format compatible with QEMU, the hypervisor used by Proxmox.
How to import VMDK to Proxmox?
Proxmox uses the QEMU hypervisor, which supports a variety of image formats, including VMDK, but it’s common to convert the VMDK to the native QEMU format (qcow2) for better performance and integration.
Here are the general steps you would follow to import a VMDK into Proxmox:
1. Upload the VMDK to Proxmox
Use SCP, SFTP to upload the VMDK file to your Proxmox server. If you’re using the command line, you can use “scp” like this:
scp /path/to/local/vmdk/file.vmdk root@proxmox_server:/path/to/storage/location
Make sure to upload the VMDK to a storage location that is accessible by Proxmox, such as “/var/lib/vz/template/iso” or another directory that you have configured for VM storage.
2.Convert the VMDK to QCOW2 (Optional)
While Proxmox can use VMDK files directly, converting to QCOW2 can be beneficial. To convert the VMDK to a QCOW2 file, use the “qemu-img” command:
qemu-img convert -f vmdk /path/to/original.vmdk -O qcow2 /path/to/converted.qcow2
This will convert the VMDK file to a QCOW2 file, which is the default format for QEMU/KVM virtual machines.
Or, to convert to raw format:
qemu-img convert -f vmdk -O raw original.vmdk converted.img
Replace original.vmdk with the name of your VMDK file and converted.qcow2 or converted.img with the desired name for the converted file.
3. Create a New VM
Create a new VM in Proxmox using the web interface but do not create a new disk for it; you will attach the uploaded disk latter.
4.Move the Converted Disk to the VM's Directory
You should move the converted disk file to the appropriate storage directory for VMs. This is typically /var/lib/vz/images/<VMID>/ for local storage. You can do this with the mv command:
mv /path/to/converted.qcow2 /var/lib/vz/images/<VMID>/vm-<VMID>-disk-1.qcow2
Replace <VMID> with your actual VM ID and adjust the paths and filenames as necessary.
5.Attach the Disk Using qm Command
Proxmox comes with a command-line tool called qm to manage VMs. Use this tool to attach the disk to your VM:
qm set <VMID> -virtio0 /var/lib/vz/images/<VMID>/vm-<VMID>-disk-1.qcow2
6.Verify the Disk in the Web Interface
After attaching the disk via the command line, you can verify it in the Proxmox web interface. Select the VM from the list on the left-hand side. Go to the “Hardware” tab. And you should now see the disk listed there.
7.Start and Verify the VM
Now you can start the VM and open the console from the Proxmox web interface to check that the VM boots correctly from the imported disk.
Simplify your Proxmox VE VM protection
Always ensure that you have backups of your VMs before attempting any conversions or importing, as these operations can sometimes lead to data loss if something goes wrong.
Vinchin Backup & Recovery is a professional solution for virtual machine backup and recovery that provides comprehensive data protection solutions for virtualized environments. It is a robust Proxmox VE environment protection solution, which provides advanced backup features, including automatic VM backup, agentless backup, LAN/LAN-Free backup, offsite copy, instant recovery, effective data reduction, cloud archive and etc., strictly following 3-2-1 golden backup architecture to comprehensively secure your data security and integrity in Proxmox VE beyond replication.
Besides, data encryption and anti-ransomware protection offer you dual insurance to protect your Proxmox VE VM backups. You can also simply migrate data from a Proxmox host to another virtual platform and vice versa.
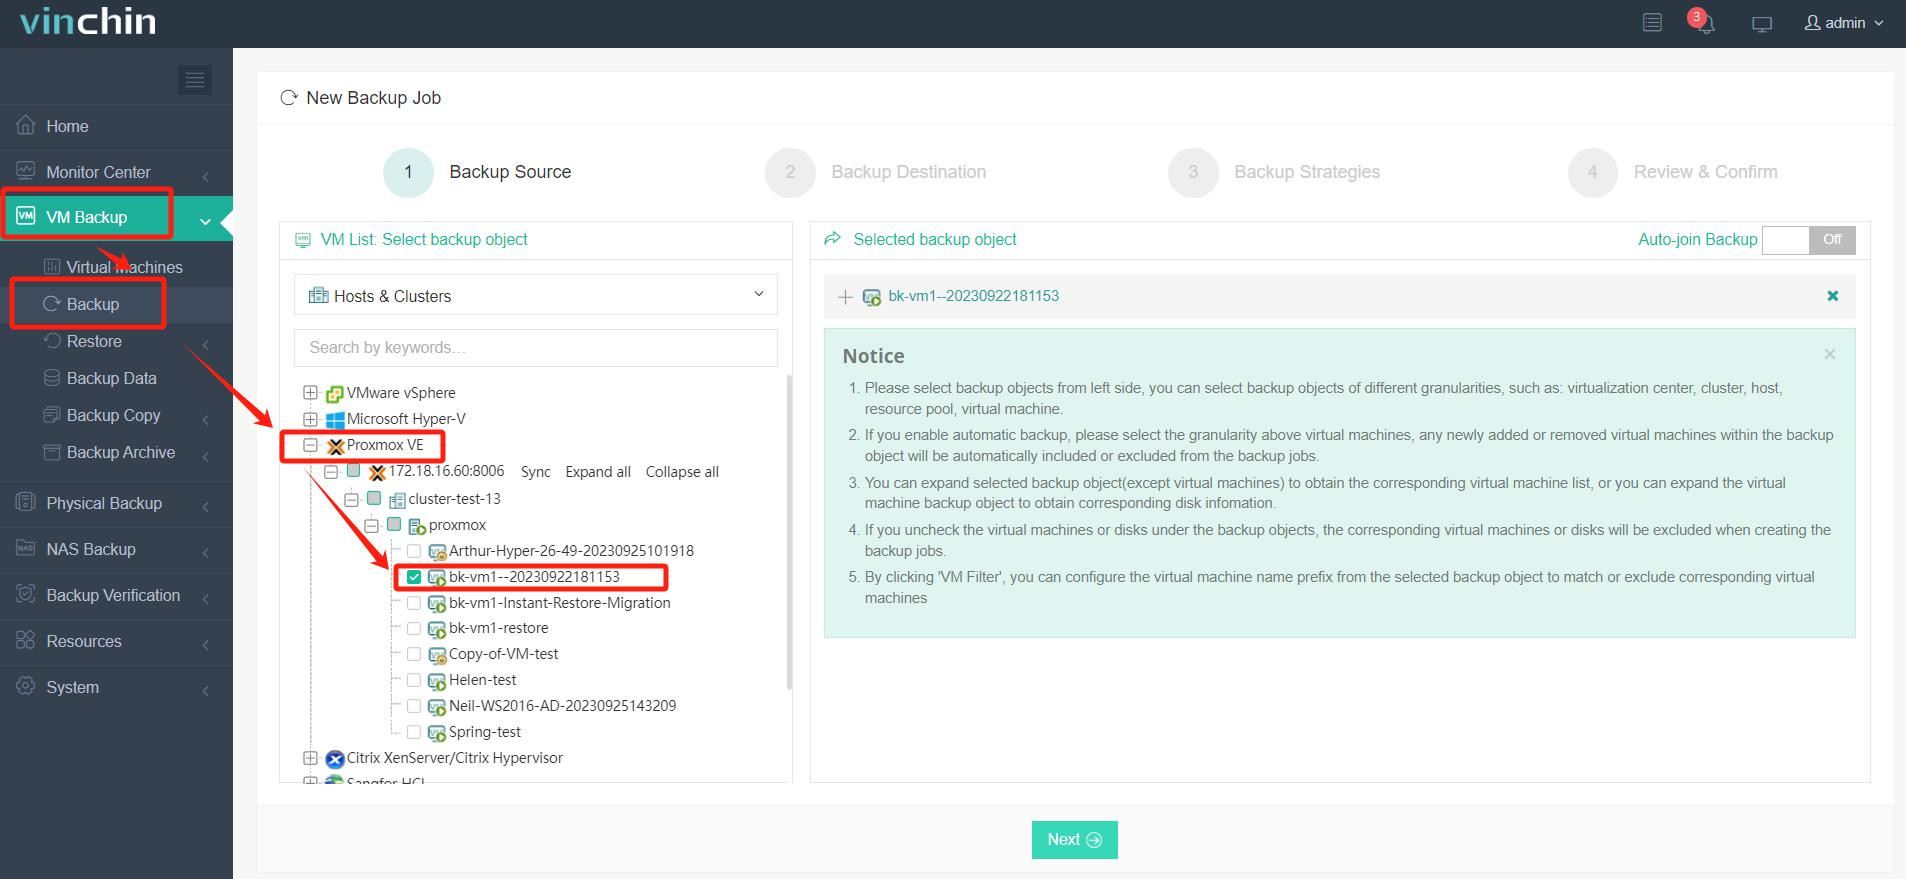
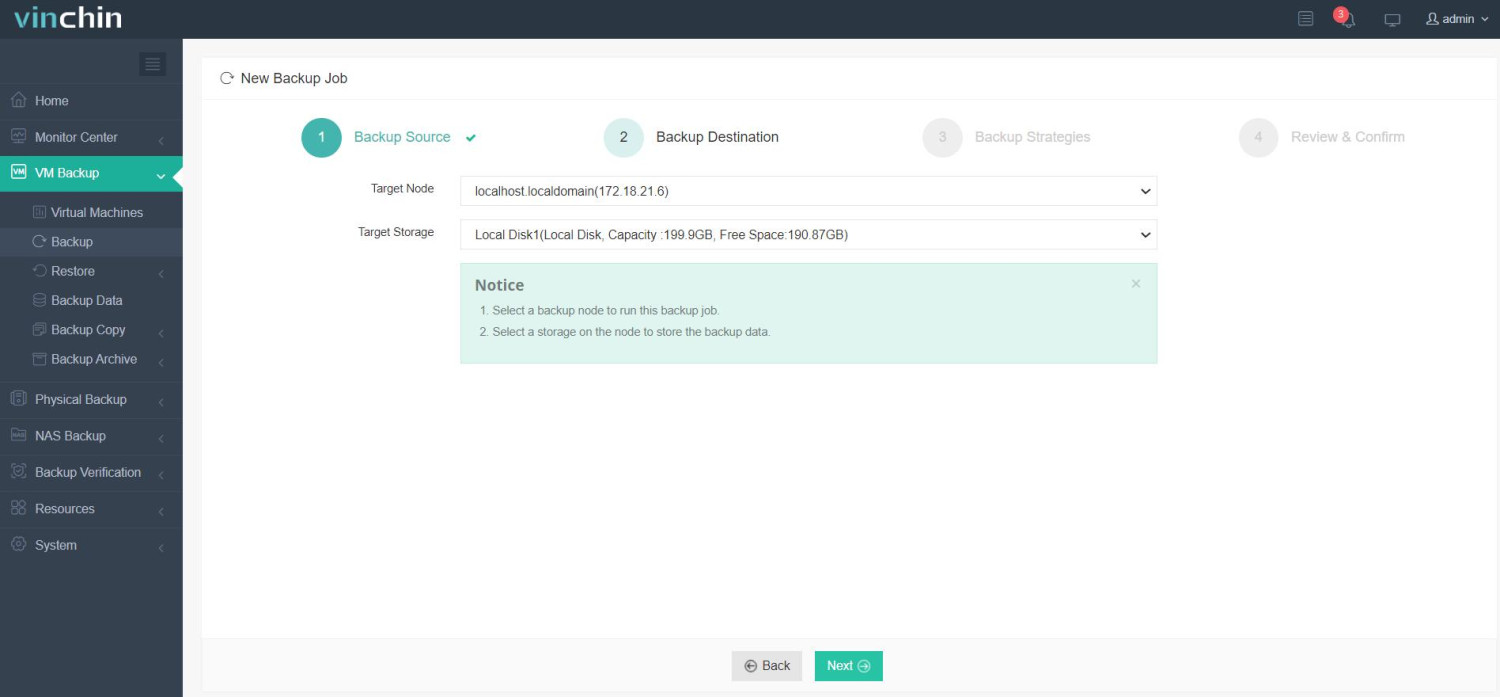
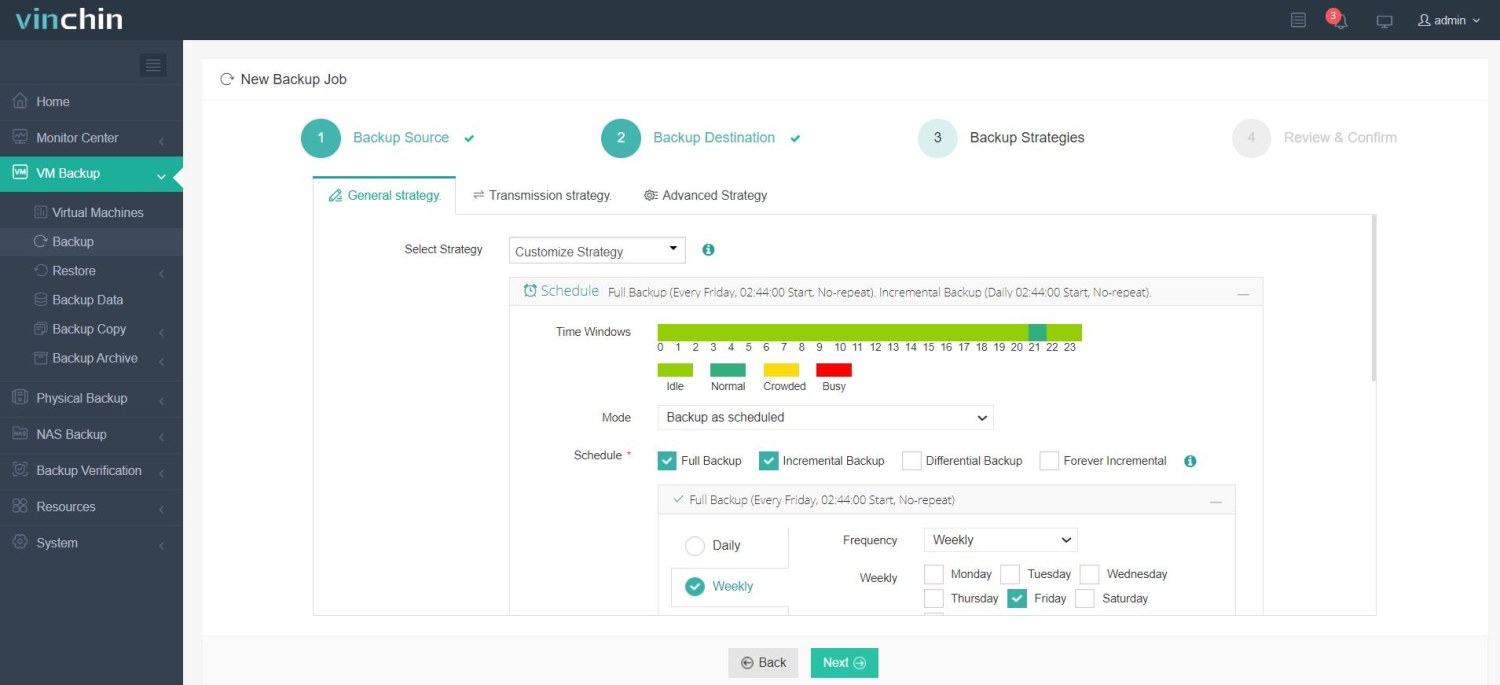
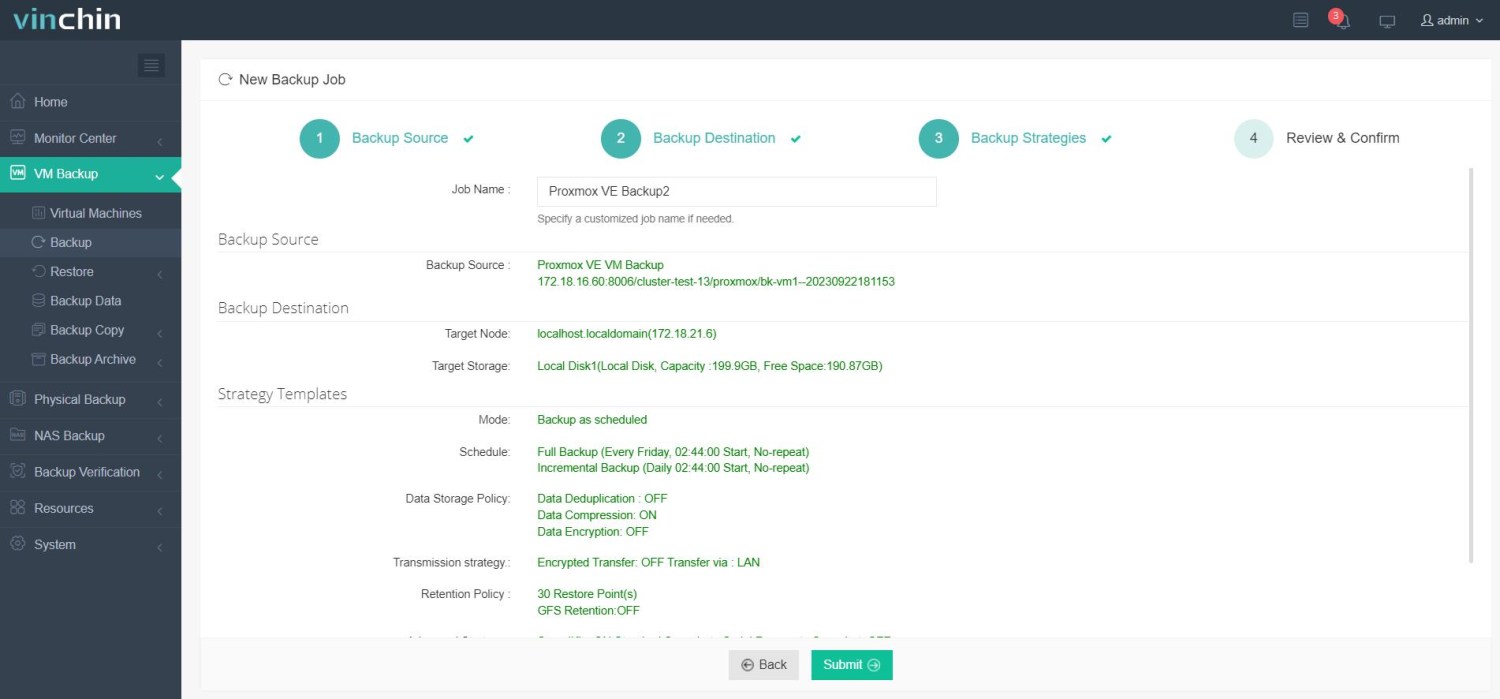
It only takes 4 steps for you to backup Proxmox VE VMs:
1. Select the backup object.

2. Select backup destination.

3. Select backup strategies.

4. Review and submit the job.

Vinchin Backup & Recovery has been chosen by thousands of companies worldwide. You can start leveraging this powerful system with a 60-day full-featured trial! Share your specific Proxmox VE environment needs with us, and we will provide a custom solution that fits seamlessly with your IT infrastructure.
Proxmox import VMDK FAQs
1. Q: Can I import OVA into Proxmox?
A: Yes, while Proxmox VE does not directly support OVA/OVF files, they can be imported into Proxmox after conversion to a supported format. You can import OVA into Proxmox with similar steps like this blog mentioned above.
2. Q: How to convert VMDK to VHD/VHDX to migrate to Hyper-V?
A: If you want to just convert the virtual disk from VMDK to VHD/VHDX, you can try Qemu-img. Additionally, Microsoft Virtual Machine Converter can also help you easily virtualize physical machine and move VM from other platforms like VMware to Hyper-V host. But the most recommended way is to use Vinchin Backup & Recovery.
3. Q: How can I migrate Proxmox VM to VMware?
A: To migrate Proxmox VM to VMware, you can use command to convert QCOW2 to VMDK format and then import it to VMware via SSH. Or, you can migrate VMs with an easier way---using Vinchin Backup & Recovery.
Conclusion
Importing a VMDK file into Proxmox VE involves several steps, from uploading the original file to converting it and attaching it to a new VM. By following this guide, you should be able to successfully migrate your virtual machines from VMware or other platforms that use VMDK files to Proxmox, allowing you to leverage Proxmox’s robust virtualization environment. Remember to always back up your data with Vinchin Backup & Recovery before attempting any migrations to avoid any potential data loss.
Share on:


