-
Why migrate to VMware ESXi?
-
Prepare for data migration
-
Precautions
-
Method 1: Migrate with VMware vSphere Converter Standalone
-
Method 2: Export OVF/OVA Template and Import into ESXi
-
Vinchin Easy V2V Migration from XenSever to VMware
-
XenServer to VMware FAQs
-
Conclusion
With the rapid growth of virtualization technology, numerous manufacturers’ virtualization products are also in full bloom. In the early stage of development, enterprises and government agencies had access to a variety of virtualization products. As virtualization technology matures, it enables the unified planning and construction of enterprise private cloud and government cloud; and then the unified integration and transformation of existing virtualization products.
Among them, XenServer is a cloud-proven open-source virtualization platform based on Xen used by major cloud orchestration platforms, including CloudPlatform, Apache CloudStack, and OpenStack. While VMware vSphere is the industry-leading cloud computing virtualization platform delivered by VMware. In this article I'll dwell on the data migration from XenServer to VMware ESXi.
Why migrate to VMware ESXi?
VMware ESXi is known for its robust feature set, including advanced management tools, HA, DRS, Motion, and comprehensive integrations with other VMware products such as vSphere, vCenter Server, and vSAN. If an organization requires these advanced features or better aligns with their IT strategy, they may decide to migrate from XenServer. Besides, its strong market presence often translates into better compatibility, more extensive community support, and a broader range of certified professionals available for hire, making it an attractive choice for organizations seeking stability and scalability.
Prepare for data migration
Environments:
Source virtualization environment: Citrix Xen server 6.1;
Target virtualization environment: VMware ESXi 6.7.0 U1;
OS type of migrating virtual machine: CentOS 6.4, windows 2008, windows 2003;
Migration tool: VMware converter;
VMware converter server OS type: window2012 R2.
Data migration processes:
Because all of them are production business system migrations, they should be carried out in accordance with the following procedures prior to the migration:
1. Check on the source virtual machine OS version;
2. Download VMware vCenter converter and install it on the converter server;
3. Examine the network connection and ports of the source virtual machine and the converter server; Then migrate;
4. Modify the configuration files such as grub of the virtual machine after the data migration;
5. Start the virtual machine and tune virtual machine network vlan configuration;
6. Install tools.
Precautions
1. Install VMware converter server;
2. Check the business type and operating system version of the source virtual machine to confirm whether it is in the converter compatibility list:
-
If the source is a domain controller, special consideration should be given. VMware does not recommend using vCenter converter to virtualize active domain controllers;
-
If the source is Microsoft Exchange, SQL or other database servers such as DB2 and Oracle, VMware, I suggest shutting down the application (Microsoft Exchange / SQL) and database services before conversion. This will minimize any chance of damaging database or invalidating data in the target virtual machine;
-
Disable real-time anti-virus scanning during conversion.
3. Before data migration, close the firewall related to VMware converter server and virtual machine source.
Method 1: Migrate with VMware vSphere Converter Standalone
This Linux virtual machine hot clone migration is divided into two parts:
Part 1: Hot clone migration of virtual machines using VMware converter;
Part 2: Change the system configuration files of XenServer virtual machine, otherwise the system cannot be started on VMware platform.
1. Log in to the source Linux virtual machine on XenServer and close the database, middleware and other applications on the virtual machine to prevent the failure to start database after migration because of incremental data in the hot cloning process;
2. Log in to the VMware converter server and open the converter software;
3. Select Convert Machine;
4. Select Powered on > Remote Linux machine and enter the source system information, IP address, user name and password;
5. Select Yes to install the script on the client;
6. Input VMware VC information;
7. Input the name of the new virtual machine and select the storage location, version and cluster host;
8. Configure the virtual machine information and select the corresponding network of the virtual network card;
9. Configure helper information and assign IP address to helper. It is recommended to assign IP address of the same network segment of source virtual machine;
10. Confirm configuration overview and the hot clone starts to migrate.
Modify the migrated virtual machine configuration files:
Change the migrated virtual machine kernel, otherwise the virtual machine cannot work, because the Linux kernel modified by XenServer virtualization cannot run on the VMkernel.
1. Guide the corresponding ISO system of the Linux source version into the rescue mode for modification;
2. The cloned virtual machine adds the ISO image files and enters BIOS setting;
3. Set first boot as CD-ROM drive;
4. Select Linux rescue mode to install;
Input # chroot /mnt/sysimage
6. Force to update non-Xen kernel files:
rpm –Uvh –force /mnt/cdrom/CentOS/ Packages/ kernel-2.6.32-358. el6. x86_ 64.rpm
7. Uninstall Xen server related tools;
8. Modify the system boot grub conf configuration files:
vi /boot/grub/grub. Conf kernel /boot/vmlinuz-2.6.32-358. el6. x86_ 64 ro root=/dev/sda2 rhgb quiet
9. Edit the / etc / inittab file, vi / etc / inittab file, remove 0-6;
10. Reboot the operating system and the system can start normally;
11. Install VMware tools on the virtual machine.
Method 2: Export OVF/OVA Template and Import into ESXi
1. Export the Virtual Machine:
Log in to XenCenter and select the virtual machine you wish to migrate.
Export the virtual machine as an OVF or OVA template. Save the exported OVF/OVA file to a local or network shared location, ensuring that the target ESXi host has access to this file.
2. Import the OVF/OVA Template into ESXi:
Log in to the vSphere Client to manage your ESXi host. Select the target ESXi host or cluster.
In the section for importing OVF/OVA templates, specify the path to the previously exported OVF/OVA file. Follow the wizard to configure the properties of the virtual machine (such as its name, resource allocation, network connections, etc.) and designate the target data storage location.
3. Complete the Import Wizard:
Upon finishing the import wizard, ESXi will create a new virtual machine with configurations identical to those of the original virtual machine on the XenServer. This newly imported VM will now be ready for use within the ESXi environment, maintaining its configuration and data from the original XenServer instance.
Vinchin Easy V2V Migration from XenSever to VMware
V2V converter makes the conversion easier and users don’t have to stick with one virtualization platform any more, however, it’s also a third-party tool that requires installation twice. So, is there any way that we don’t install any third-party agent to complete the conversion?
Vinchin Backup & Recovery is not only a professional backup solution for virtual machine, but also an advanced VM migration solution, supporting VMware vSphere, Hyper-V, Proxmox, XenServer, XCP-ng, oVirt, OLVM, RHV, OpenStack, etc. By adding both virtualized platforms into the backup system, you can perform easy agentless V2V migration with a user-friendly web console.
There is the built-in conversion engine in the backup system, you just need to select the VM you need to move it to another virtualized platform.
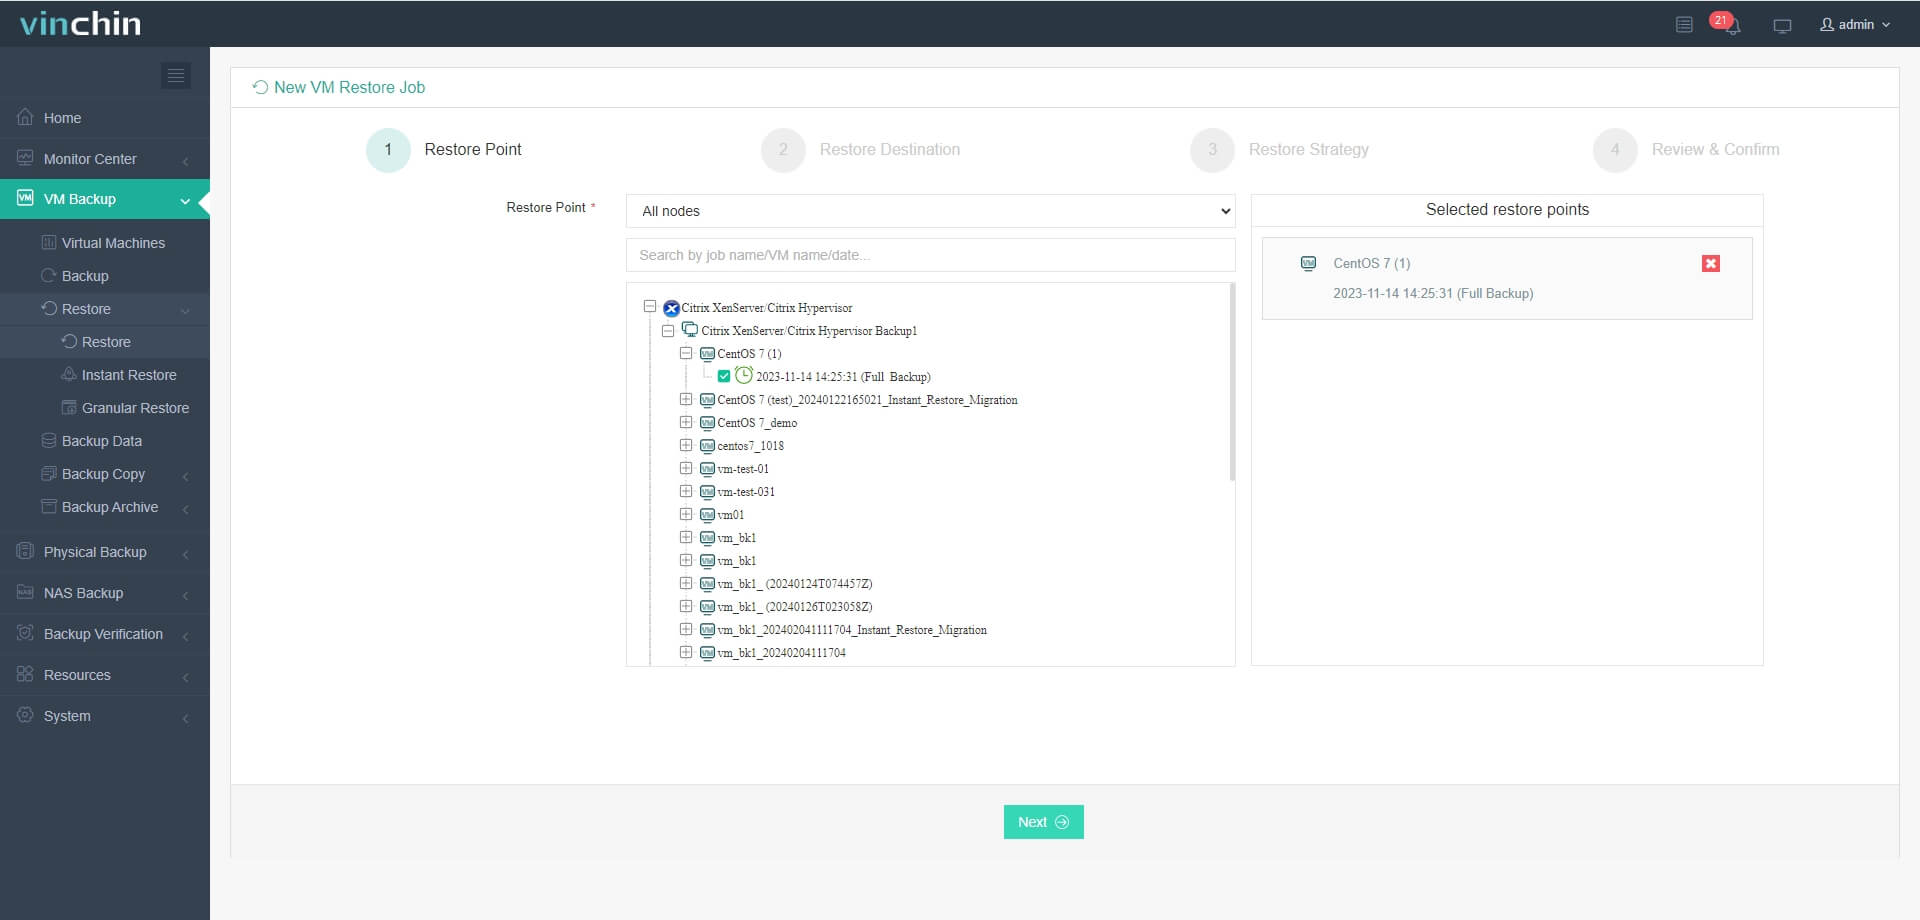
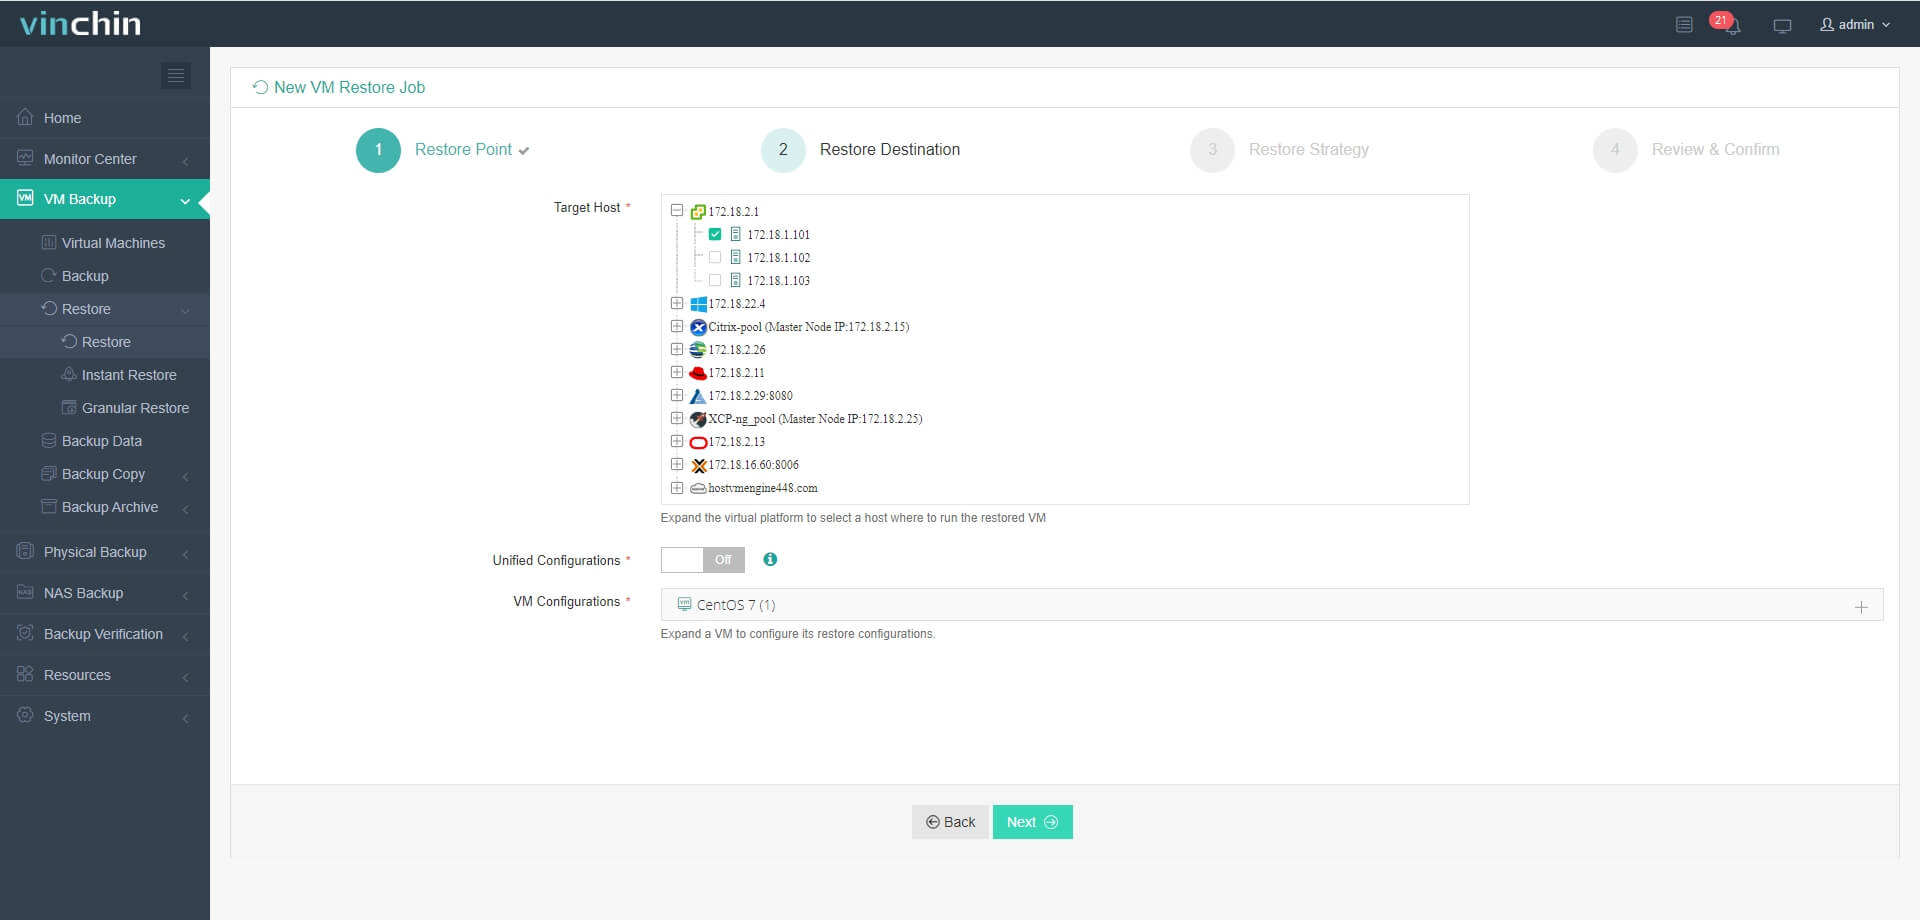
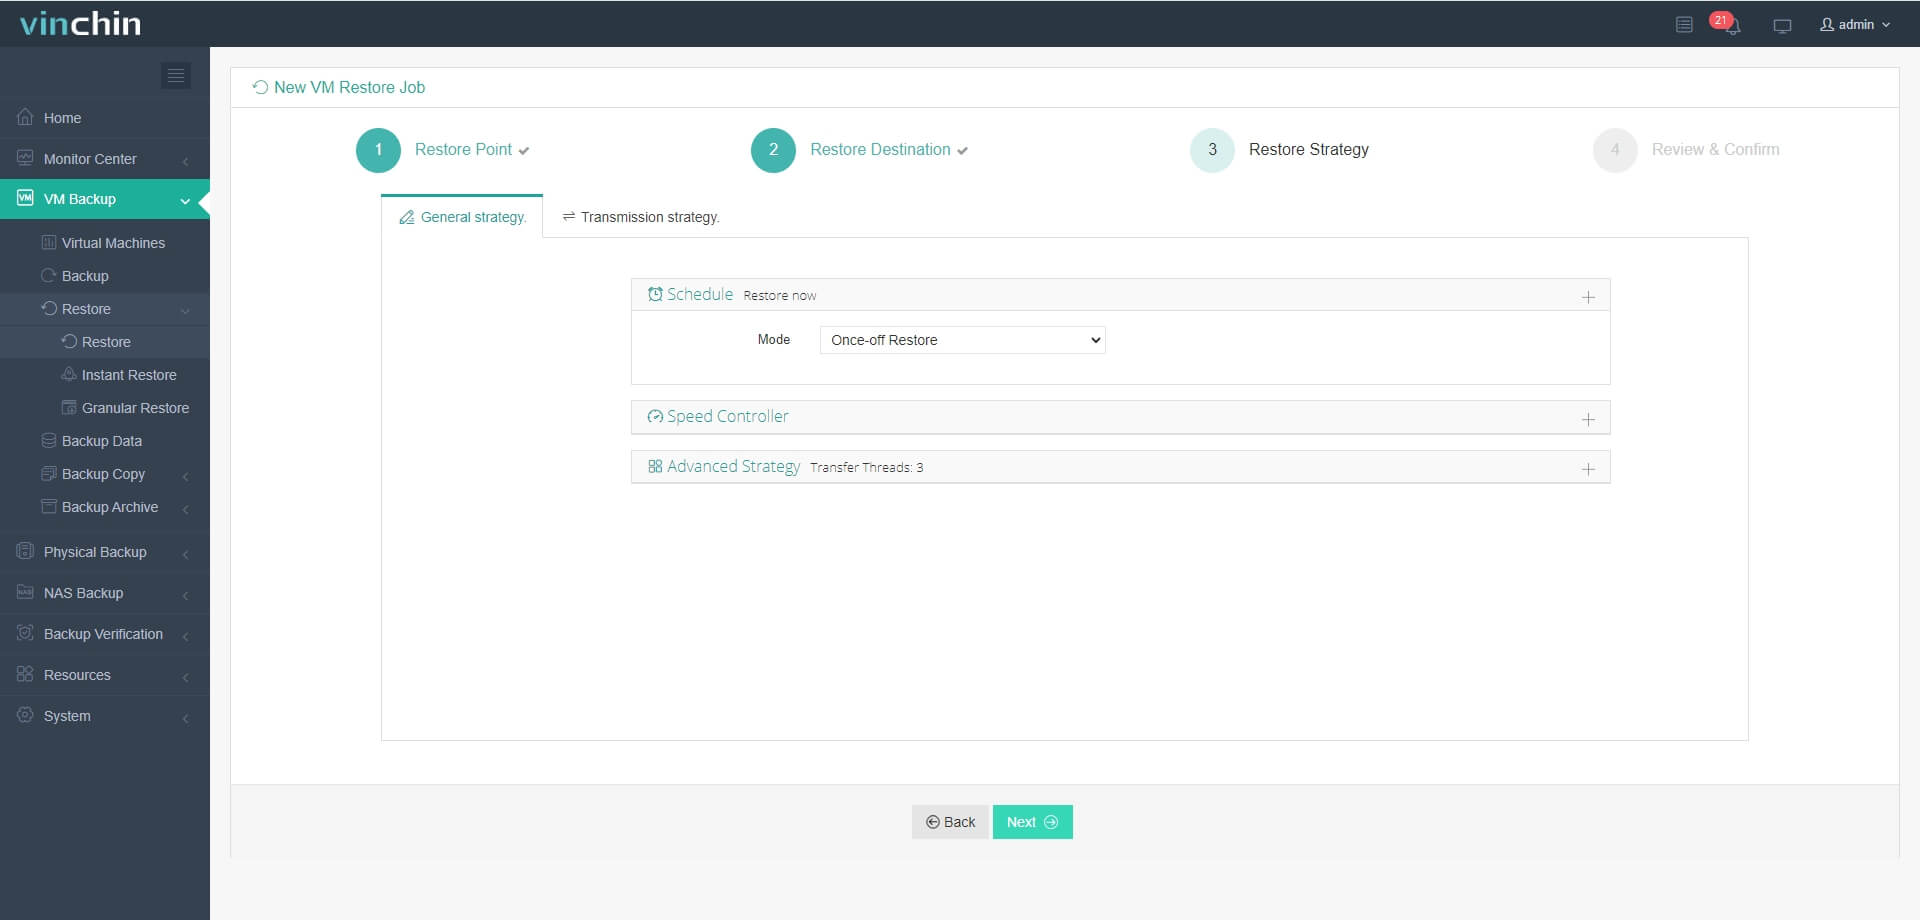
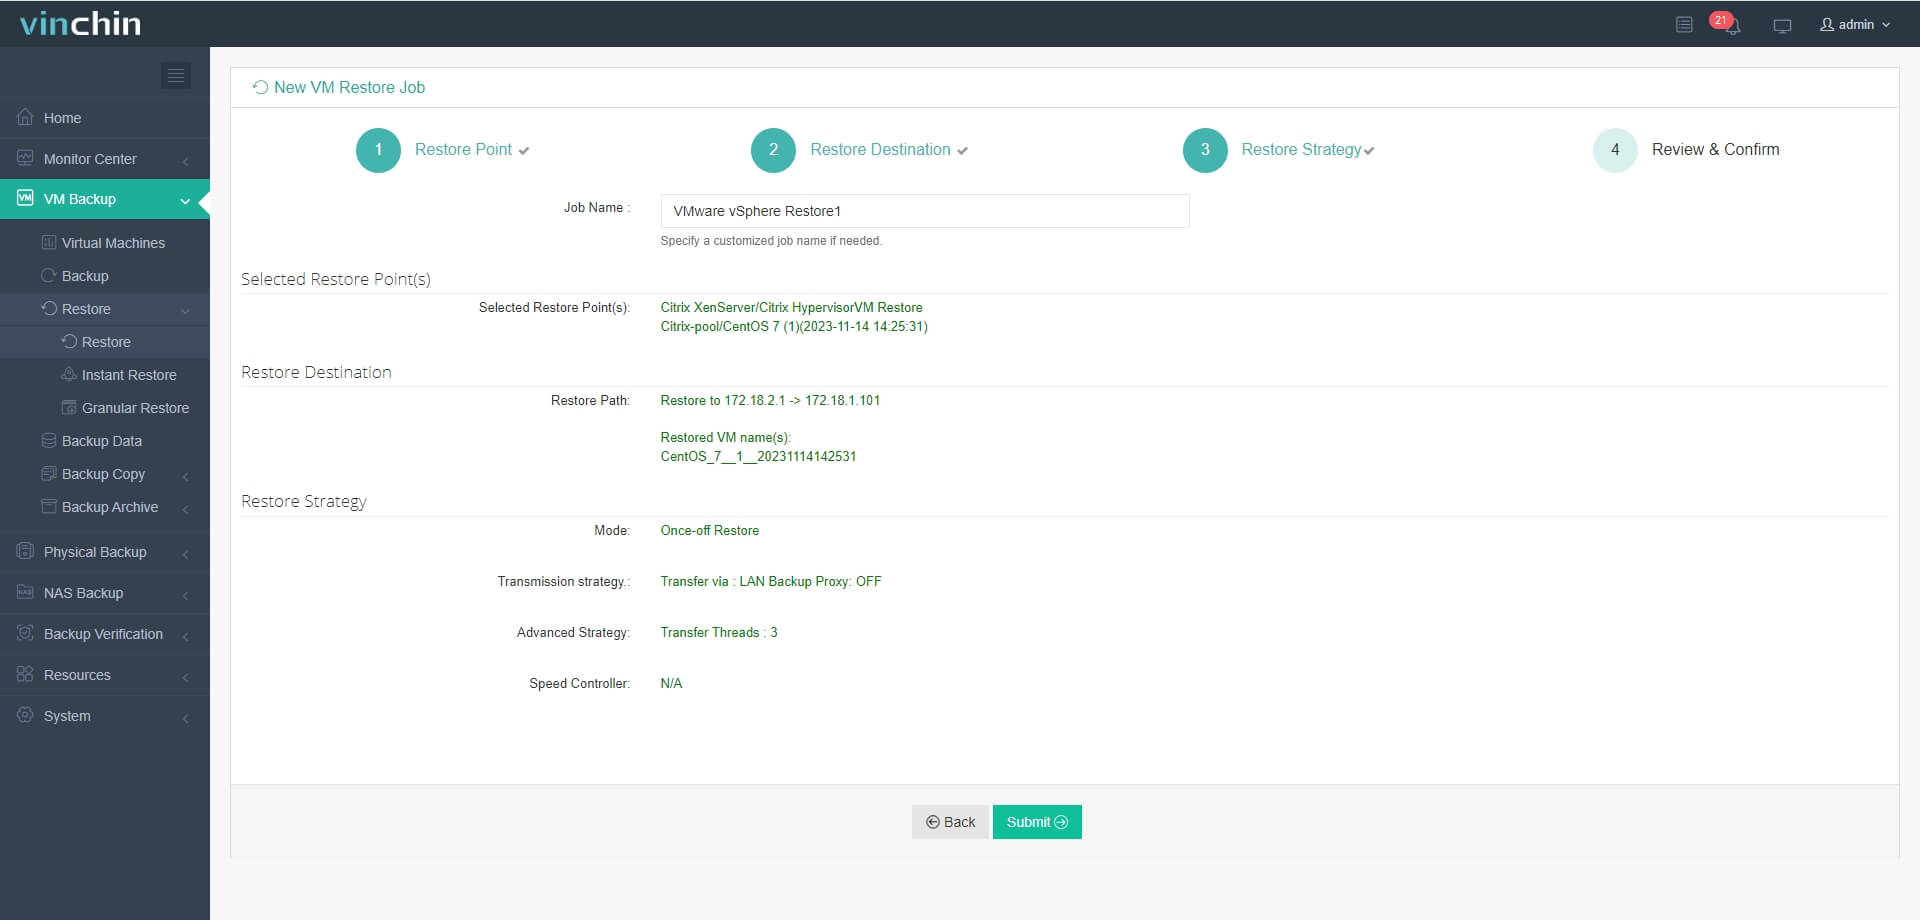
It only takes 4 steps to migrate VMs from XenServer to VMware:
1.Choose the VM you want to restore.

2.Select the VMware host to run the restored VM.

3.Select the restore strategy.

4.Review and submit the job.

Vinchin Backup & Recovery safeguards your virtual environment and facilitates VM migration across hypervisors. Try it fully-featured for 60 days. Share your needs with us for a tailored solution.
XenServer to VMware FAQs
1. Q: What are the primary differences between XenServer and VMware?
A: XenServer is based on the Xen hypervisor, while VMware uses its own proprietary hypervisor called ESXi. VMware typically offers more advanced management features and a broader ecosystem of supported software.
2. Q: How can I ensure compatibility between XenServer and VMware storage systems?
A: XenServer and VMware support various storage protocols and technologies. Before migrating, ensure that your VMware environment can access and utilize the same storage systems as your XenServer environment. Consider factors such as storage formats, drivers, and network connectivity.
Conclusion
As virtualization technology matures, VMware ESXi emerges as a top choice for its advanced features and strong ecosystem. Migrating from XenServer to VMware ESXi requires careful planning and execution. Whether using VMware Converter or exporting/importing OVF/OVA templates, organizations must ensure compatibility and make necessary system adjustments. By following best practices, organizations can seamlessly transition to VMware ESXi, benefiting from its robust capabilities and market-leading support.
Share on:


