-
Reasons that SSH cannot connect to EC2
-
Connection Timeout
-
Permission Issues
-
Choose a secure EC2 backup solution
-
Conclusion
Some users new to AWS might encounter issues when connecting to a Linux EC2 instance via SSH. Don't worry, this article will help you troubleshoot common reasons!
Reasons that SSH cannot connect to EC2
Common reasons for being unable to connect to EC2 via SSH generally fall into two categories: connection timeout and permission errors.
Connection Timeout: Error messages usually contain keywords like “connect”, such as "Connection Timed Out". This is generally due to improper network settings, requiring checks on the IP, security group, ACL, subnet route table, and the network environment of the user.
Permission Errors: Error messages usually contain keywords like “permission” or “key”, such as "Permission Denied" or warnings about keys not being registered or not existing. This is generally due to improper use of keys or usernames.
Connection Timeout
Problem Description
You have created and started an Amazon EC2 Linux instance but cannot connect to the instance using SSH or tools like PuTTY. When connecting to the instance, you encounter a connection timeout error, such as "Network error: Connection timed out" or "Error connecting to [instance], reason: -> Connection timed out: connect". This issue is usually caused by incorrect settings of network components such as security groups, route tables, and network ACLs. Please follow the troubleshooting steps below to check the network environment.
Troubleshooting
1. Check Security Groups
In the security group of the EC2 instance, ensure that inbound traffic for the SSH protocol (default port 22) is allowed.
If in an office LAN, your IP address may not be fixed and can change each time you connect. In this case, it is recommended to set the source to your office network's IP range rather than a single IP.
Note: By default, the instance cannot be pinged either. If you want to ping this instance, you need to add a rule allowing the ICMP protocol in a similar manner.
Open the Amazon EC2 console.
In the navigation pane, select Instances.
Find the EC2 instance you want to connect to via SSH.
In the Description tab at the bottom of the screen, select the security group of the EC2 instance you want to connect to.
In the Inbound tab in the pane at the bottom of the screen, ensure that a rule is set to allow SSH access from your current public IP address. If the IP address used by your device is not in the list, select Edit, then select Add rule.
For Source, select your current IP address. “0.0.0.0/0” means it is open to all IPs.
Select Save.
2. Check if the Subnet is a Public Subnet
A public subnet is a subnet that allows Internet access. If your EC2 is in a private subnet, external Internet cannot actively connect, and SSH will fail.
Open the Amazon VPC console.
In the navigation pane, select Route Tables, then select your VPC route table from the list.
In the Routes tab, ensure there is a default route pointing to the Internet gateway.
If not, select Internet Gateways from the navigation pane and copy your Internet gateway ID. If there is no Internet gateway, create one and attach it to your VPC. Ensure to copy the new Internet gateway ID.
Return to Route Tables, then select the Routes tab.
Edit and create a route that directs “0.0.0.0/0” to your Internet gateway ID.
Save the route table.
3. Check the Subnet’s Network Access Control List (ACL)
The ACL is a firewall at the subnet level. The default network ACL allows all inbound and outbound traffic. If you have not made any changes to the ACL, skip this step.
Open the Amazon VPC console.
In the navigation pane, select Subnets, then select your subnet.
In the Description tab, find Network ACL, then select its ID (acl-xxxxxxxx).
Select the network ACL. For Inbound Rules, verify if the rules allow traffic from your computer. If not, delete or modify the rules that block traffic from your computer. For Outbound Rules, verify if the rules allow traffic to your computer. If not, delete or modify the rules that block traffic to your computer.
4. Confirm if the IP Address Has Changed
In the navigation pane, select Instances.
Find the EC2 instance you want to connect to via SSH.
In the Description tab at the bottom of the screen, check if the Public IP matches the IP address you are using. If the IP address has changed, use the new IP address.
5. Check the AMI
Please check if you are currently using an AMI in the Quick Start or in Marketplace. Unless you are certain of the security of a particular AMI, try not to use community images. Community images are released by individuals, and AWS cannot monitor them. Some community images might have special security management and controls, preventing direct SSH access. In this case, stop the current server and start a new one with an official or Marketplace image.
6. Check the Instance Load
The server might be overburdened, causing the sshd service to malfunction and not accept new SSH requests. This can be confirmed by observing CloudWatch metrics. The simplest way at this point is to try rebooting the instance to see if the issue is resolved. If not, use System Manager's Session Manager tool to open a session and perform commands to kill unnecessary resources.
7. Other Reasons
If all the above steps are checked and there is no problem, check the following reasons:
Port 22 is blocked: If you are in an office or hotel public Wi-Fi area, try another network to verify if the public network has blocked port 22.
Check if your computer's firewall is blocking port 22.
Permission Issues
Problem Description
You have created and started an EC2, but cannot connect to the instance via SSH, with error messages such as "Host key not found in [directory]", "Permission denied (publickey)", or "Authentication failed, permission denied". This issue is usually caused by incorrect keys or usernames. The following are specific troubleshooting methods.
Troubleshooting
1. Check if the Key Pair is Correct
Each EC2 instance has a key when it is launched. This key is the only way to log into the EC2 for the first time and can only be downloaded before launching the instance. First, select your instance and check the key pair name on the Description page to ensure you are using the correct key.
If this item is empty, you cannot SSH into the instance. Please stop the instance, start a new instance, and remember to download the key.
2. Incorrect Username
If you are using an official image, the correct usernames are as follows:
AMI | Username |
Amazon Linux 2 or Amazon Linux AMI | ec2-user |
CentOS AMI | centos |
Debian AMI | admin or root |
Fedora AMI | ec2-user or fedora |
RHEL AMI | ec2-user or root |
SUSE AMI | ec2-user or root |
Ubuntu AMI | ubuntu |
If it is a community version of the AMI, the username cannot be guaranteed. Please contact the AMI creator or switch to an official AMI.
3. Check Your Key Format
Generally, the key needed for SSH is in “pem” format. If you are using a Windows machine and logging in with PuTTY, you need to convert from “pem” to “ppk” format.
4. Check Key Permissions
If you encounter the error "bad permissions: ignore key: my_private_key.pem Permission denied (publickey)".
This situation arises because your private key file permissions are too high, allowing any user to read and write. To protect your private key file, SSH ignores your key. The solution is to change the key permissions using the command:
chmod 400 my_private_key.pem
5. known_host Related Errors
This situation is usually seen when switching EIPs, for example, an EIP was mounted on machine A with key A. When the EIP is switched to machine B with key B, the known_host record for this IP does not match.
The solution is to open the known_host file (Linux/mac address: ~/.ssh/known_host) and delete the corresponding record for this IP.
Choose a secure EC2 backup solution
Vinchin Backup & Recovery supports AWS EC2 backups, allowing users to add instances with their AWS access key ID and configure full, incremental, or differential backups. It offers flexible recovery options, including entire instances, individual volumes, and specific files, with direct recovery to other virtualization platforms. Integrating with Amazon S3 for secure archiving, it also enables V2V migrations to platforms like VMware, Hyper-V, and Proxmox. The user-friendly interface simplifies backup management and configuration.
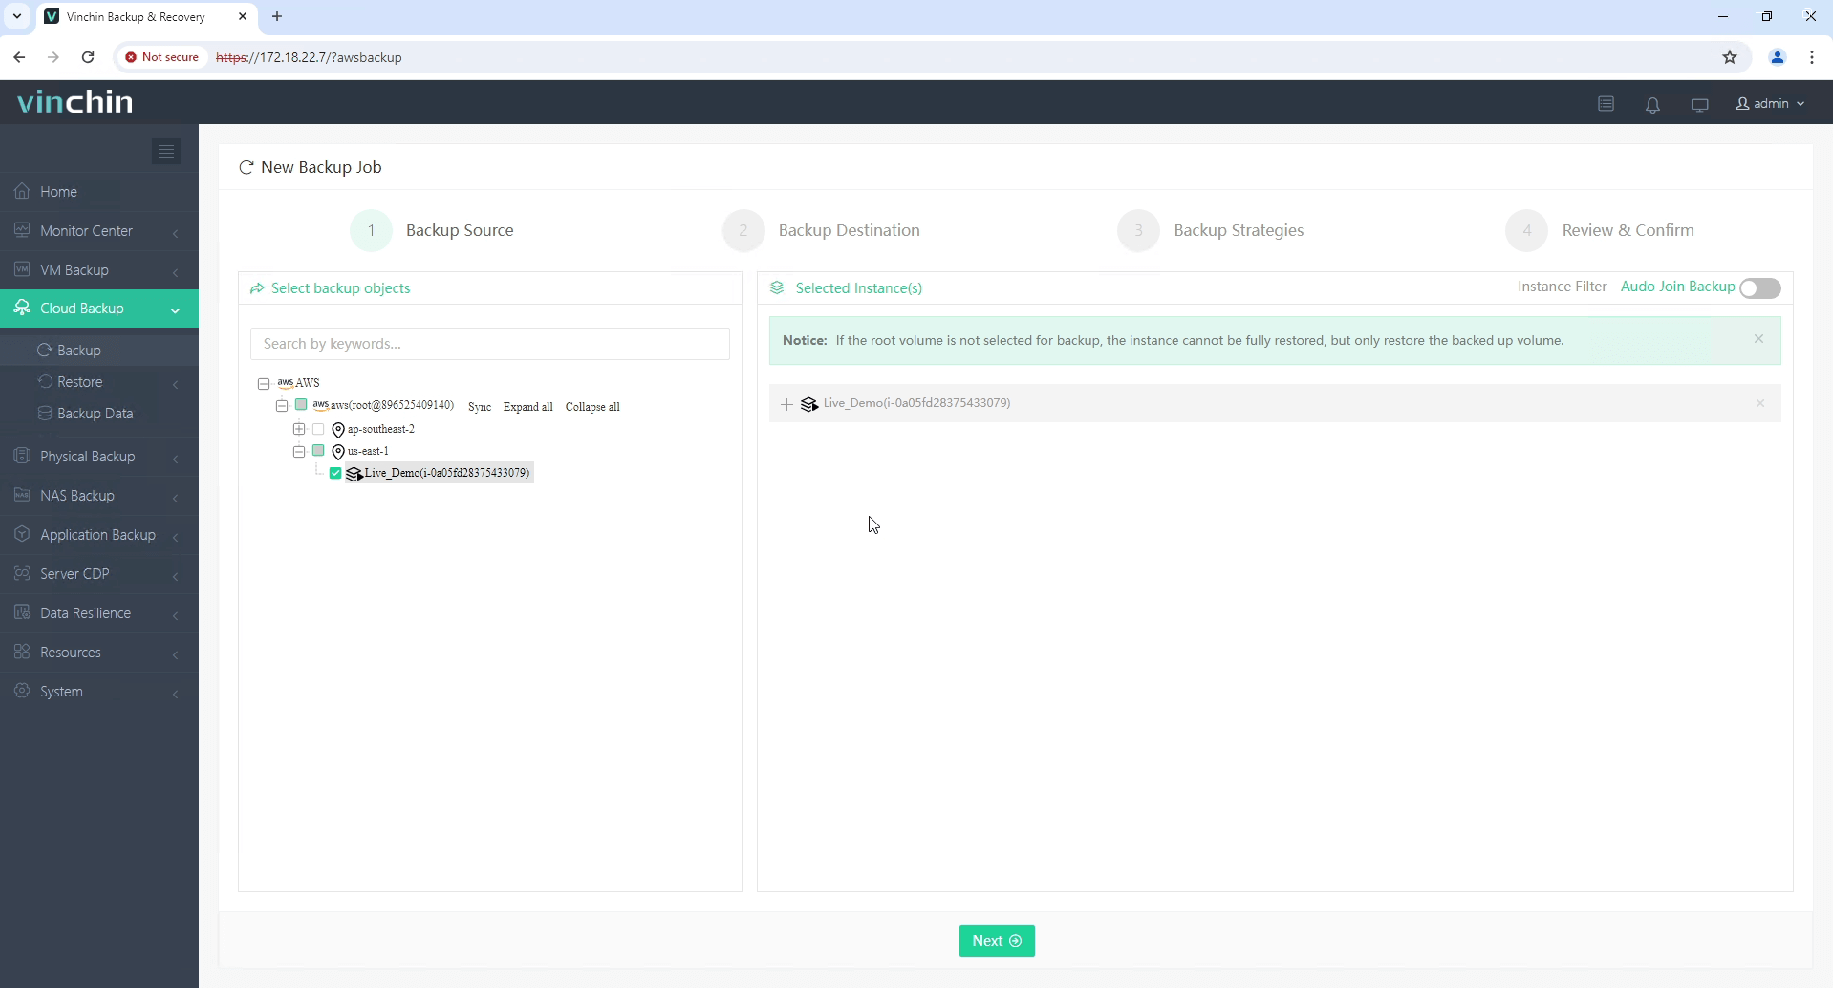
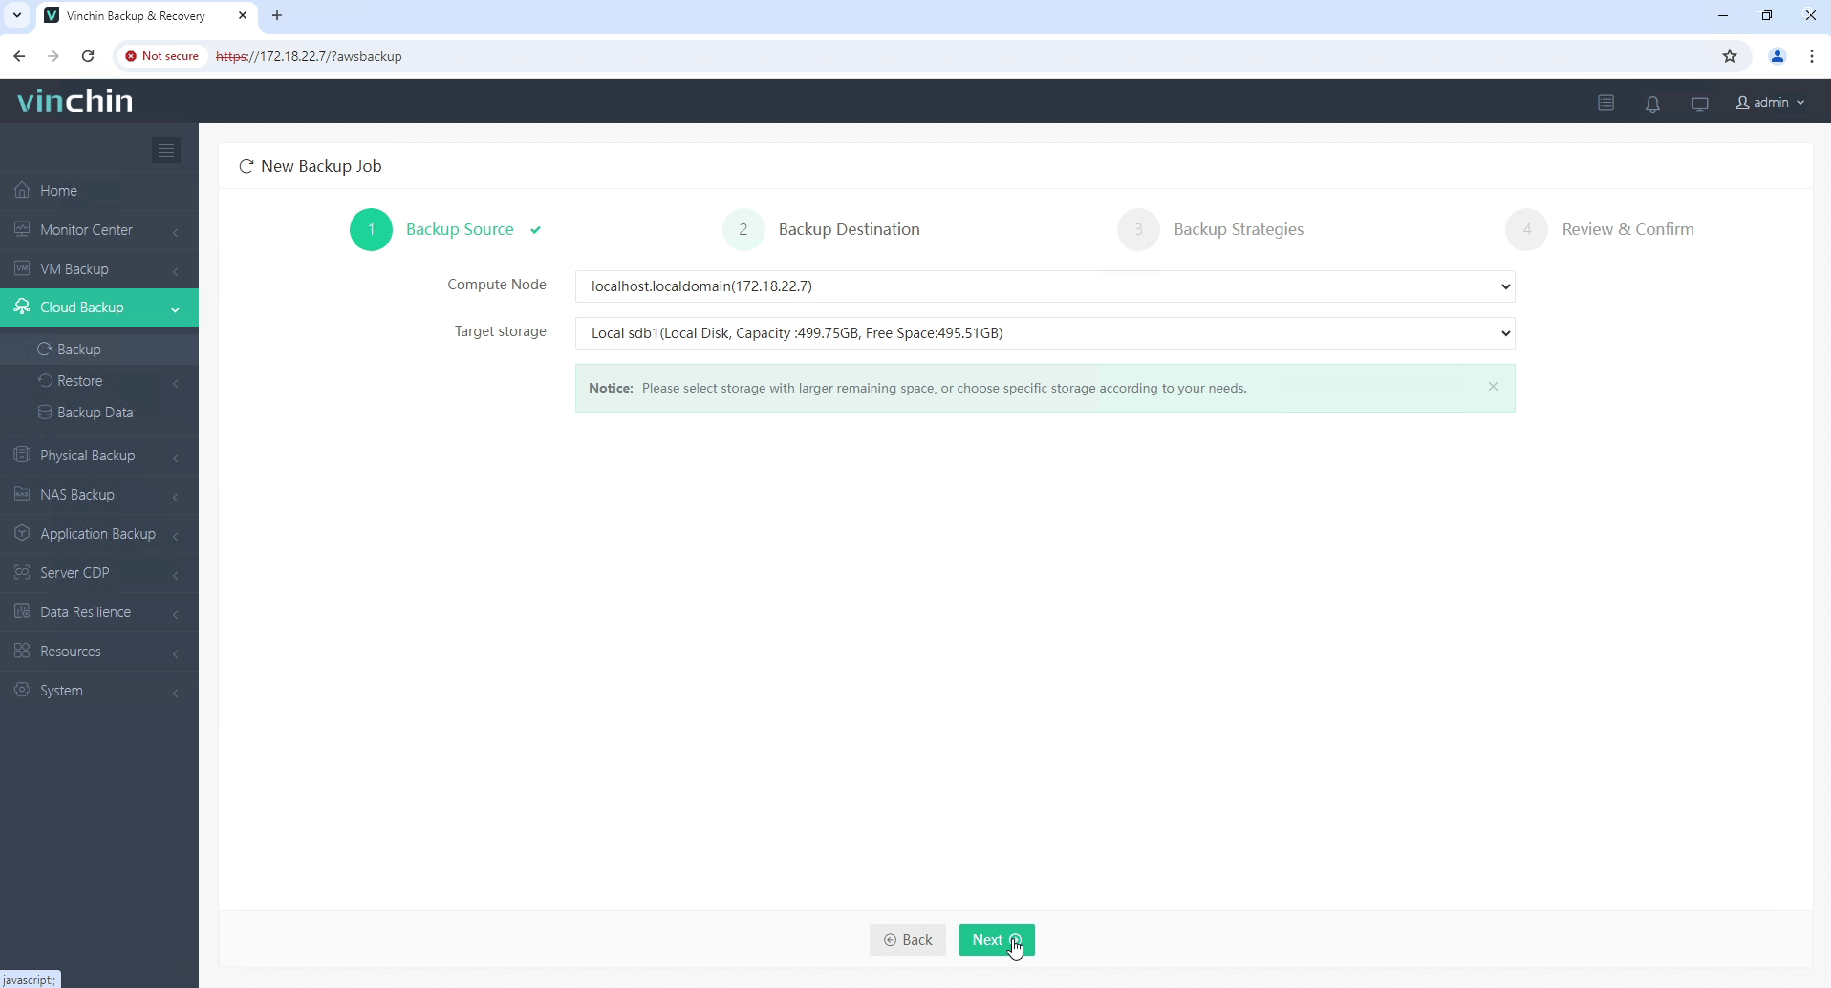
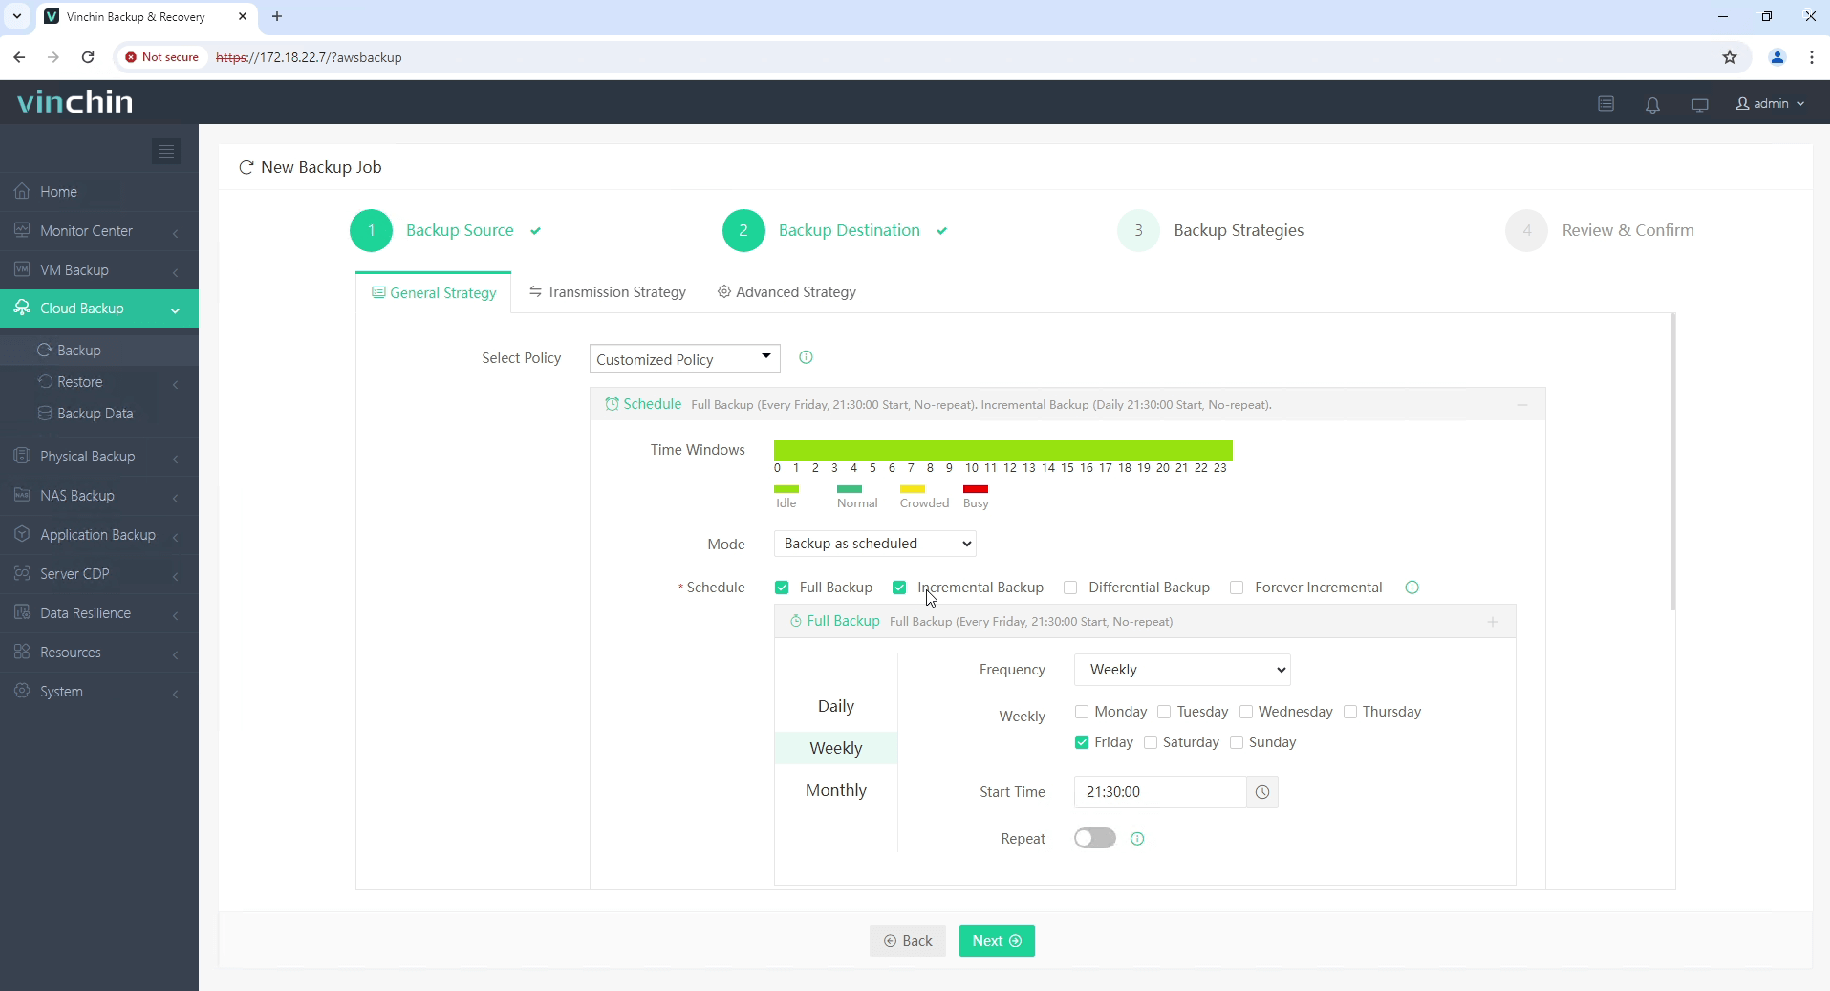
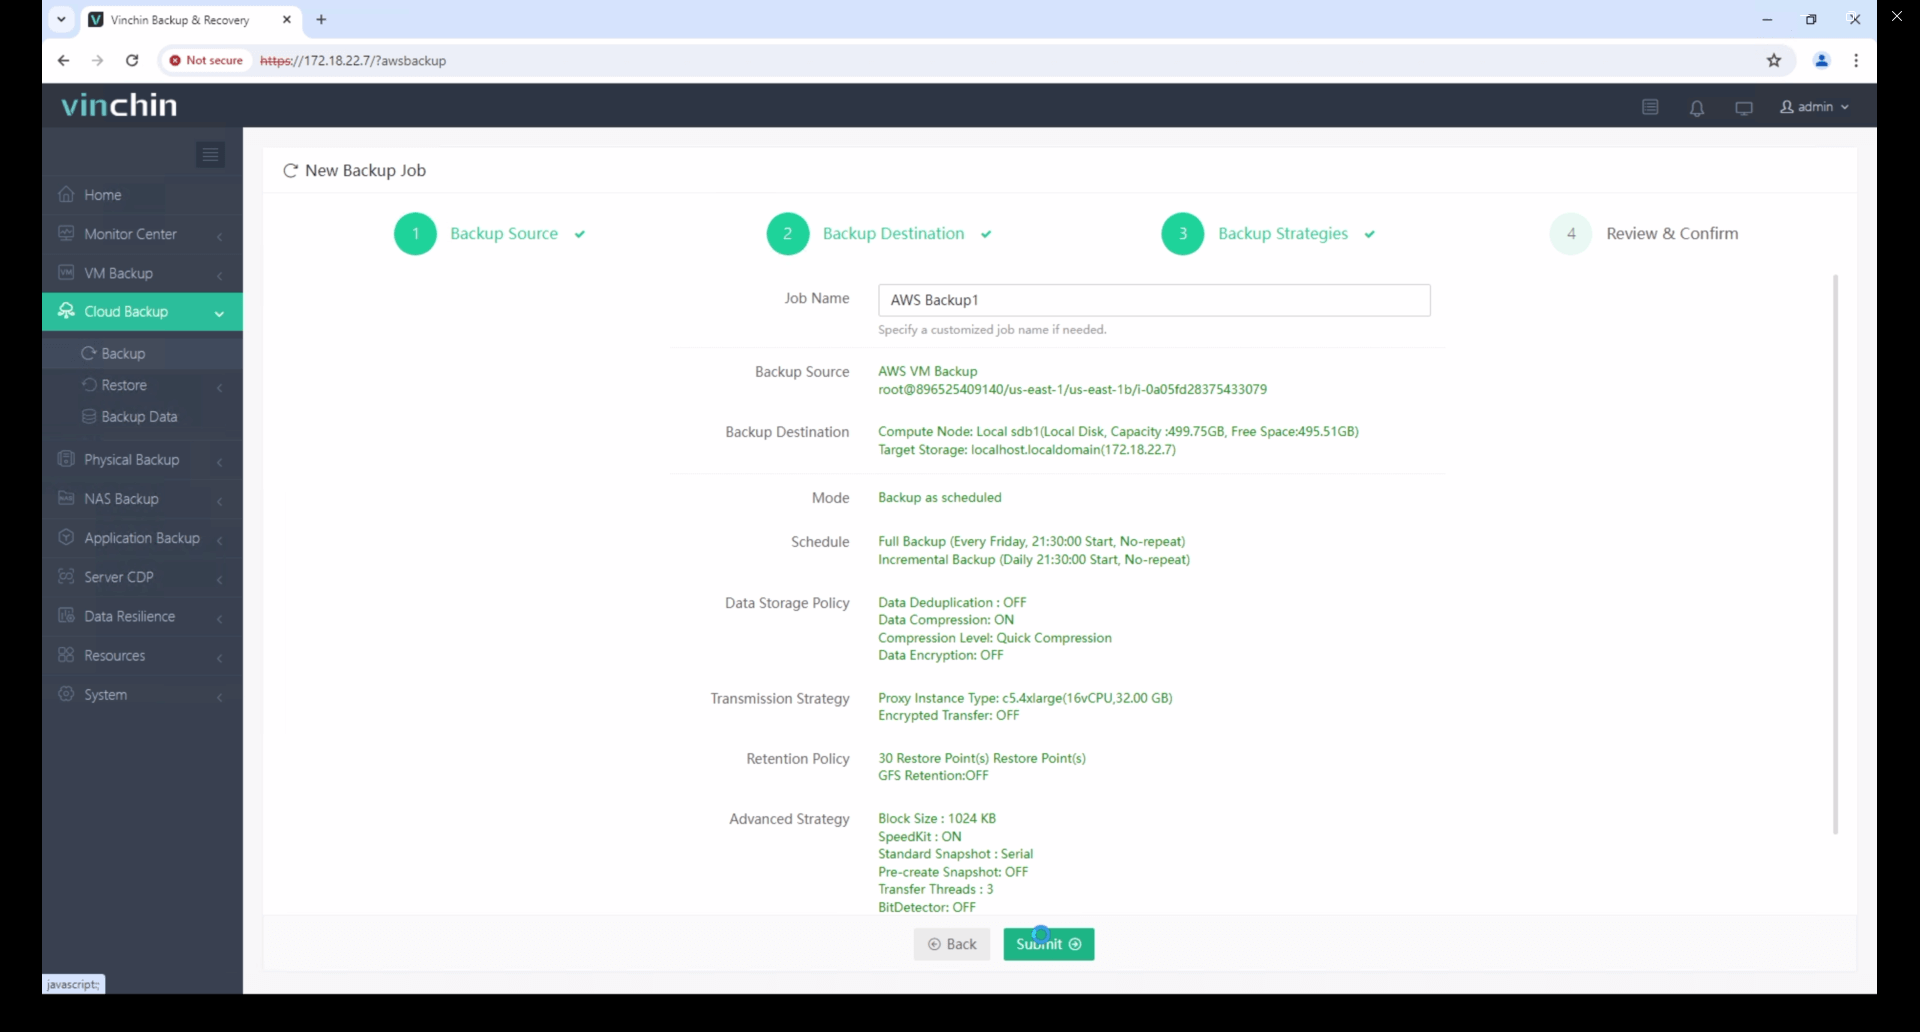
To backup EC2 instance with Vinchin Backup & Recovery, follow these steps:
1. Select the EC2 instance to be backed up.

2. Select the backup destination.

3. Select the backup strategies.

4. Review and submit the job.

Start your 60-day free trial of Vinchin Backup & Recovery to experience its secure, resource-efficient backup solutions. Or, contact us for a customized plan tailored to your IT needs.
Conclusion
By addressing potential issues with the steps above, you can quickly resolve the problem and regain access to your instance. Remember to always practice good security habits, such as restricting access to trusted IP addresses and regularly reviewing your security group and network settings.
Share on:


