-
What is the QEMU Guest Agent?
-
Key Features of the QEMU Guest Agent
-
QEMU Agent Installation and Configuration
-
How to Use QEMU Guest Agent?
-
How to Protect Proxmox VM Efficiently?
-
Proxmox QEMU Agent FAQs
-
Conclusion
For any virtualization platform, there is always a client software that communicates with the host, such as vmware’s vmtools. Under KVM, it is qemu-guest-agent. Because PVE is based on KVM, the client is still qemu-guest-agent.
What is the QEMU Guest Agent?
The QEMU Guest Agent is a daemon that runs inside the guest operating system, providing various services to the host. These services facilitate communication between the host and the guest OS, enabling better management and control of the VM. The agent is particularly useful for tasks that require interaction with the guest OS without necessitating direct user intervention.
Key Features of the QEMU Guest Agent
1. Improved VM Management
The QEMU Guest Agent significantly enhances VM management capabilities. It allows the host to execute commands within the guest OS, enabling a range of administrative tasks such as file system freeze and thaw operations, user login details retrieval, and execution of scripts.
2. Efficient Backup and Restore Operations
One of the standout features of the QEMU Guest Agent is its role in improving the efficiency of backup and restore processes. By using the agent, Proxmox can ensure that the guest file system is in a consistent state before initiating a backup, thereby preventing data corruption and ensuring reliable restoration.
3. Accurate Resource Usage Reporting
The QEMU Guest Agent provides precise data on resource usage within the VM, including CPU and memory utilization, which is invaluable for administrators seeking to optimize resource allocation and ensure balanced workload distribution across the virtualized environment.
4. Enhanced Networking Capabilities
Networking configurations can be complex in virtualized environments. The QEMU Guest Agent simplifies network management by allowing the host to modify network settings within the guest OS dynamically. This feature is particularly useful in scenarios where VMs need to adapt to changing network conditions or requirements.
QEMU Agent Installation and Configuration
To leverage the benefits of the QEMU Guest Agent, it must first be installed and configured properly. Here’s a basic outline:
Install the QEMU Guest Agent Package:
For Debian-based systems:
apt install qemu-guest-agent -y
For Red Hat-based systems:
yum install qemu-guest-agent -y
For Windows:
Use the virtio driver CD to install directly. If it is win7/xp, you need to manually enter the CD, find the agent directory, and select 32-bit and 64-bit.
After the installation is complete, in the virtual machine options, check QEMU Guest Agent
How to Use QEMU Guest Agent?
For VMs with agent installed, the VM network card information will be displayed in its overview interface.
For more comprehensive usage, you need to use the qm agent command. The syntax is as follows
qm agent <vmid> <cmd>
Here vmid is the id of the VM. cmd is the command. I will list them here.
fsfreeze-freeze
fsfreeze-status
fsfreeze-thaw
# View ssd——trim
fstrim
# View disk information
get-fsinfo
# View host name
get-host-name
# View memory block information
get-memory-block-info
# View your memory
get-memory-blocks
# View system information
get-osinfo
# View time
get-time
# View time zone
get-timezone
# Users
get-users
# View the number of CPUs
get-vcpus
# View supported commands
info
# View network
network-get-interfaces
# Unknown
ping
# Shutdown
shutdown
# Hibernate, save to hard disk
suspend-disk
# Hibernate, hybrid
suspend-hybrid
# Suspend/hibernate memory
suspend-ram
All the above commands support TAB key auto-completion.
For example
# View the network card information of the VM
qm agent 101 network-get-interfaces
# View the host name
root@pve:~# qm agent 105 get-host-name
qm guest command set
qm agent is qm guest. There are four main qm guest commands:
qm guest cmd
qm guest exec
qm guest exec-status
qm guest passwd
1. qm guset cmd
This item is equivalent to qm agent
2. qm guest exec (create process)
This item is the command passed to the VM
qm guest exec <vmid> <vmcmd> --<option>
<vmid>=vmid
<vmcmd>=command in the VM. For example, ip link /docker ps, etc. The command cannot have "-", because if "-" is added, it will be set to the following <option>
<option>=A special operation, with 3 options
pass-stdin=<0/1> Whether to pass stdin to the command being executed within the VM
synchronous=<0/1> If it is 0, it returns pid. If it is 1, it returns the output result in json format
timeout=<integer> timeout duration
Give a few examples
Check the usr directory
qm guest exec 108 ls /usr
Check whether nginx is running
qm guest exec 108 ps aux|grep nginx
Returning a bunch of means it is running, and no return if it is not running.
3. qm guest exec-status
Usage is as follows
qm guest exec-status <vmid> <pid>
This item can view the process PID status of the VM.
Note that the qm guest exec-status command is to be used in conjunction with qm guest exec. Invalid when used alone
4. qm guest passwd (reset password)
This item is very useful and the syntax is as follows:
qm guest passwd <vmid> <username> [OPTIONS]
[OPTIONS] has only one---crypted=<0/1> whether to encrypt the password. Default is 0
Example
#Change the password directly
qm guest passwd 108 root
#Applicable to changing the Windows operating system password
qm guest passwd 108 administrator
As for the following --crypted=, it is generally not added, because the password is already encrypted.
How to Protect Proxmox VM Efficiently?
Vinchin Backup & Recovery is a robust backup and disaster recovery solution supporting multiple virtualization platforms like Proxmox, VMware, Hyper-V, XenServer, Red Hat Virtualization, XCP-ng, and Oracle OLVM. It features automatic, agentless, LAN/LAN-Free backups, offsite copies, effective data reduction, and cloud archiving, adhering to the 3-2-1 golden backup rule to ensure data security and integrity. For recovery, it offers instant VM recovery to minimize RTO to 15 seconds and file-level granular restores. Enhanced with data encryption and anti-ransomware protection, it secures Proxmox VE VM backups. Additionally, it facilitates VM migration across over ten virtual platforms, simplifying data transfers between Proxmox and other systems. The user-friendly web console streamlines backup management and VM job creation without manual intervention.
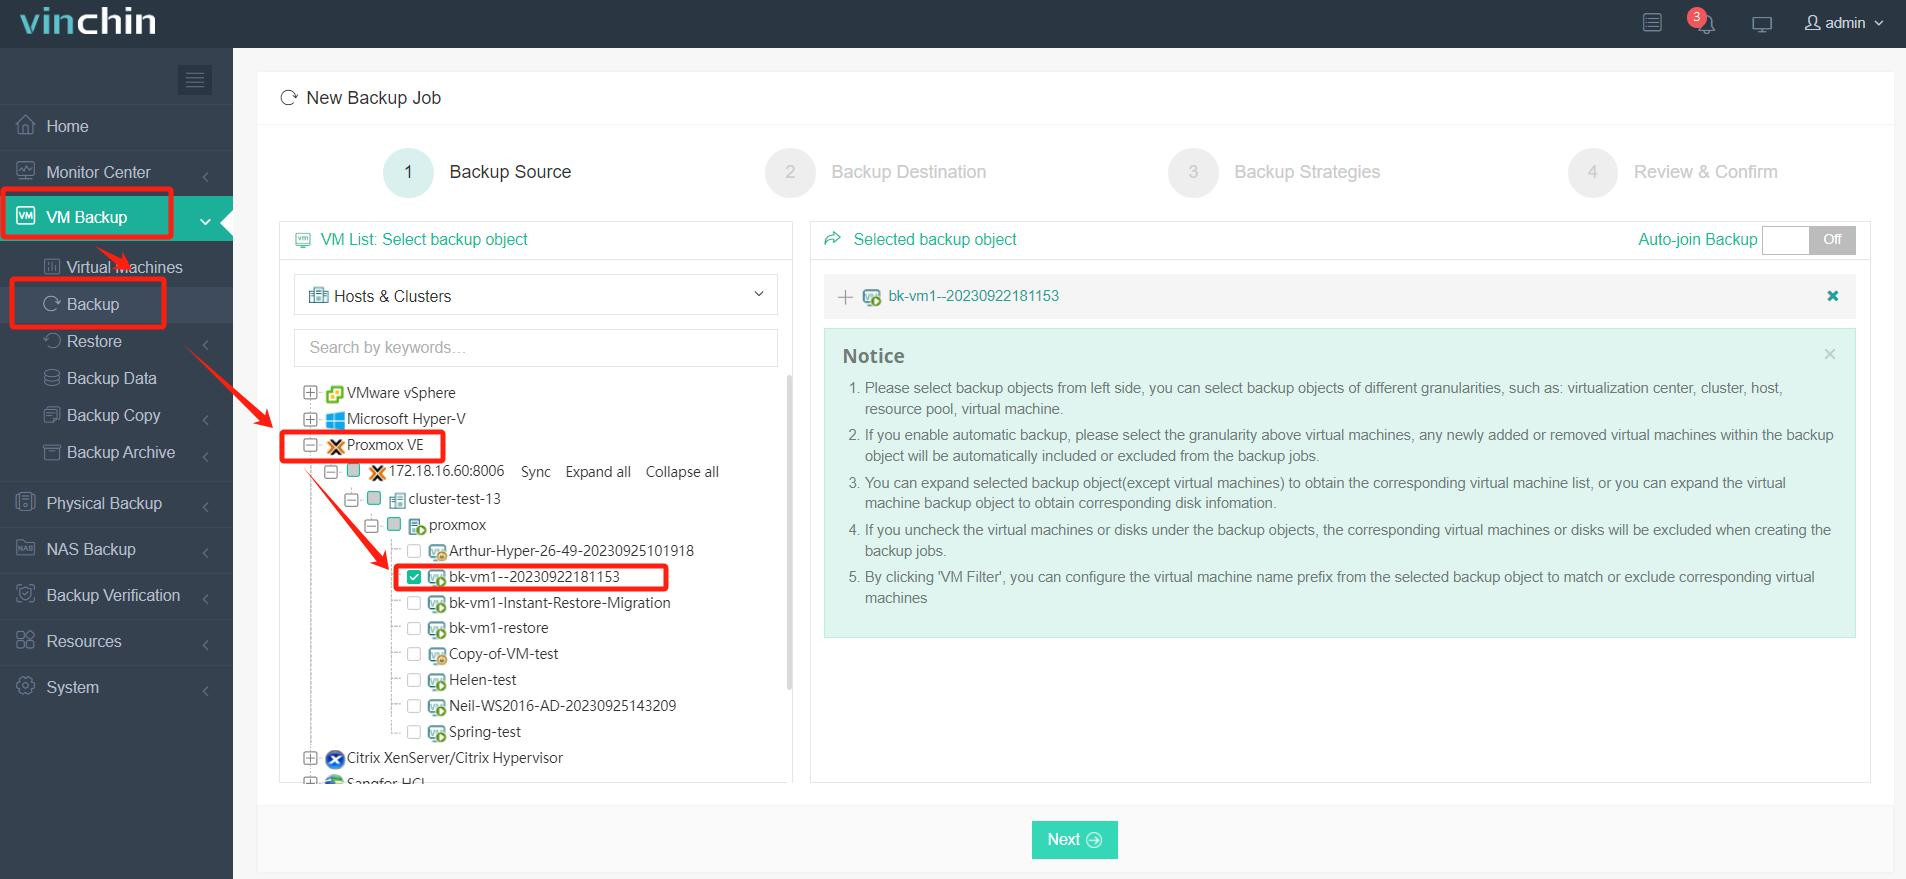
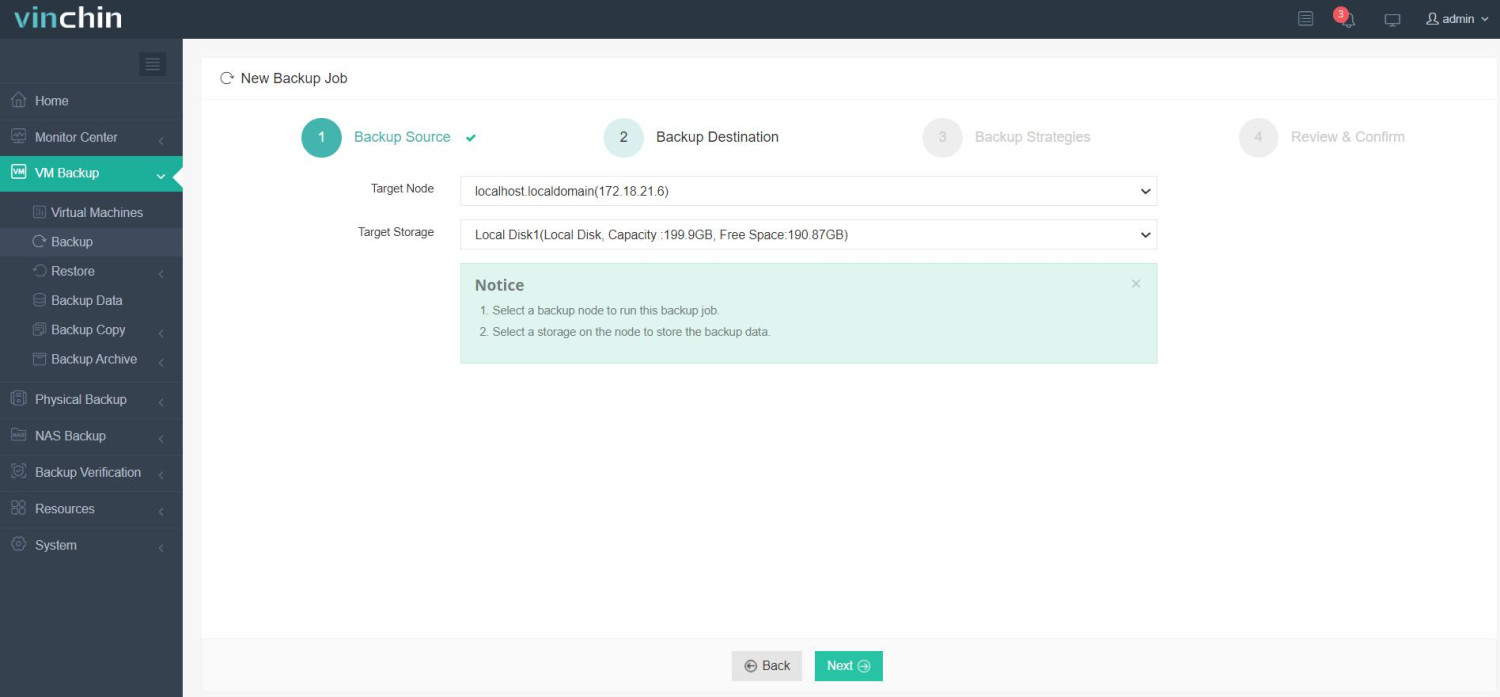
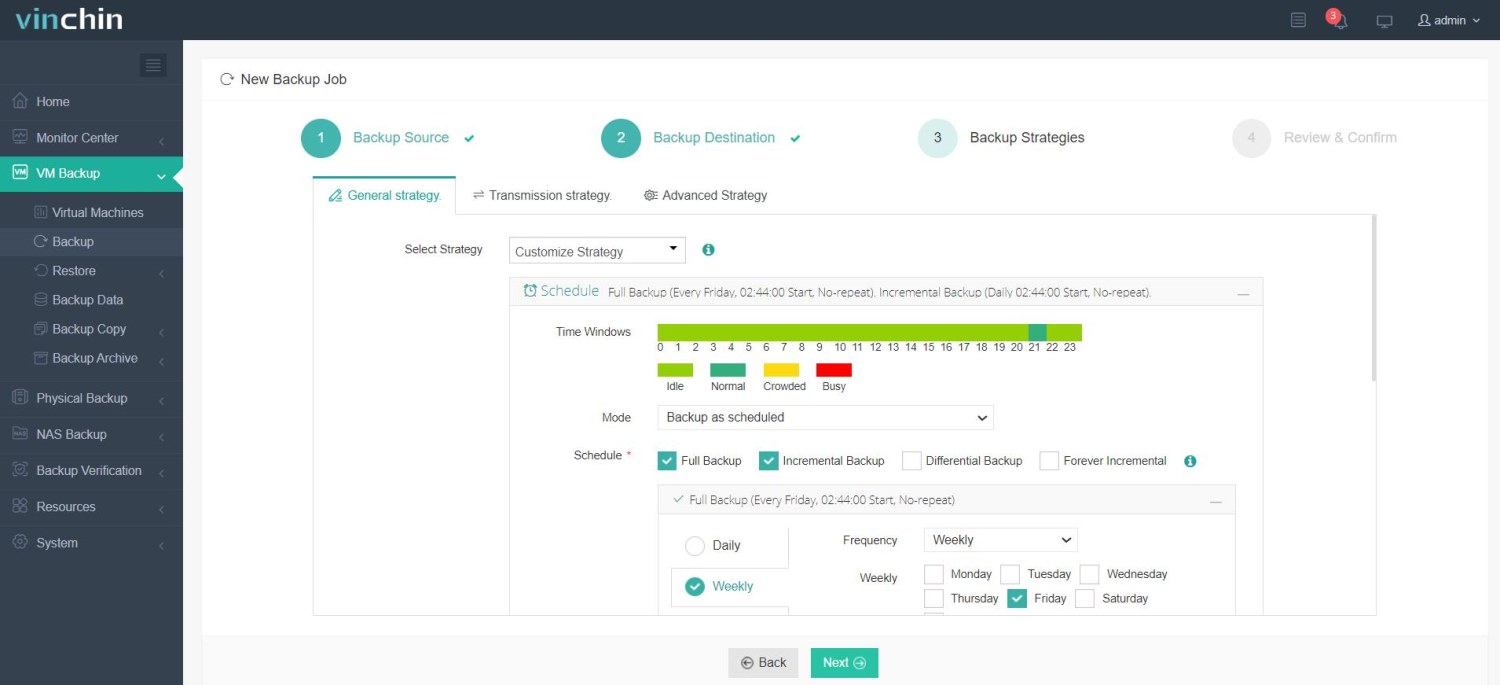
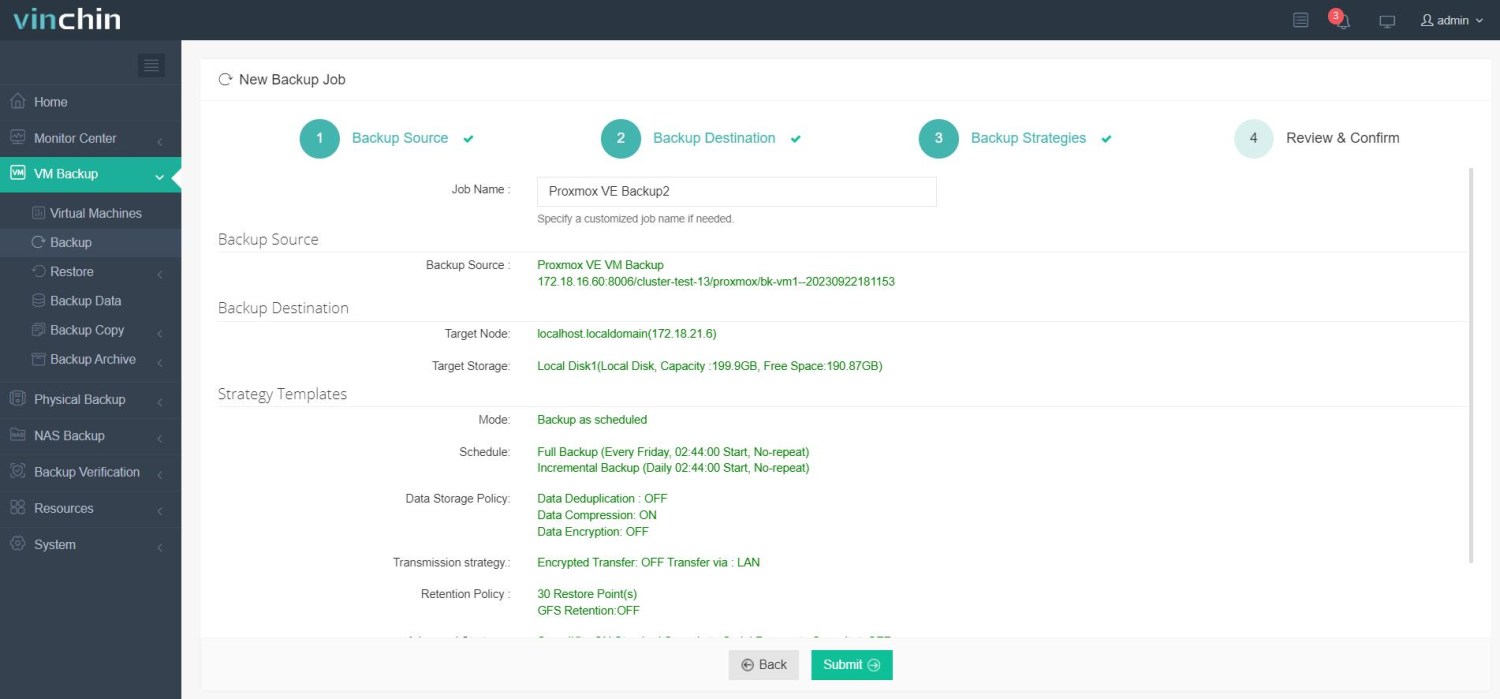
It only takes 4 steps for you to backup Proxmox VE VMs:
1. Select the backup object.

2. Select backup destination.

3. Select backup strategies.

4. Review and submit the job.

Vinchin Backup & Recovery, trusted by thousands of companies worldwide, offers a 60-day full-featured trial. Share your specific Proxmox VE environment needs, and we'll provide a custom solution that integrates seamlessly with your IT infrastructure.
Proxmox QEMU Agent FAQs
1. Q: How to check if QEMU guest agent is installed?
A: To check if the QEMU guest agent is installed, log into the VM and run the command “systemctl status qemu-guest-agent”. If it is installed, you will see the service status; otherwise, you'll get an error indicating the service is not found.
2. Q: What is the difference between Proxmox VE and QEMU?
A: Proxmox VE is a complete open-source server virtualization management solution that integrates KVM hypervisor and LXC containers, offering a web-based interface for managing virtual machines, containers, storage, and networks. QEMU, on the other hand, is a generic and open-source machine emulator and virtualizer that can run operating systems and programs for one machine on a different machine, often used in conjunction with KVM to provide virtualization in Proxmox VE.
Conclusion
The Proxmox QEMU Guest Agent is an essential tool for administrators looking to maximize the efficiency and functionality of their virtualized environments. By facilitating improved VM management, efficient backup processes, accurate resource reporting, and enhanced networking capabilities, the QEMU Guest Agent plays a pivotal role in modern virtualization solutions.
Share on:


