-
The main advantages provided by Scale-Out File Server in Windows Server 2012:
-
How to build a Scale-Out File Server and use it for Hyper-V ?
-
Protecting your Hyper-V VMs with a professional solution
-
Conclusion
In Windows Server 2012, the design of Scale-Out File Server aims to provide scale-out file shares, which allows file-based server applications to store data continuously. Scale-out file shares enable the sharing of the same folder from multiple nodes within the same cluster. For instance, in a four-node file server cluster utilizing SMB scale-out introduced in Windows Server 2012, computers running Windows Server 2012 can access the file shares through any of the four nodes. This functionality is achieved by leveraging the new Windows Server Failover Clustering capabilities and the new features in the Windows File Server protocol - SMB 3.0.
File server administrators can provide scale-out file shares and continuously available file services to server applications by simply adding more online servers to quickly respond to increased demands. All of these features can be implemented in a production environment and remain completely transparent to server applications.
The main advantages provided by Scale-Out File Server in Windows Server 2012:
1. All cluster nodes accept SMB client requests, providing simultaneous access to file shares for transparent failover during maintenance or failures.
2. The maximum shared bandwidth is determined by the storage system capacity, allowing for increased total bandwidth by adding cluster nodes.
3. CHKDSK in Windows Server 2012 has been significantly enhanced, reducing the time required for offline maintenance of the file system.
4. CSV introduced read caching support in Windows Server 2012, resulting in substantial performance improvements, particularly in scenarios such as Virtual Desktop Infrastructure (VDI).
5. It helps to creat scale-out file servers and allowing the use of CSV and file shares, eliminating the need for multiple cluster file servers and complex placement policies.
How to build a Scale-Out File Server and use it for Hyper-V ?
1. Create a two-node failover cluster.
2. Log in to the server "BJ-VMHost-05" and open the Failover Cluster Manager. Right-click on Roles and select Configure Role.
3. On the High Availability Wizard page, read the relevant information and click Next.
4. On the Select Role page, choose File Server and click Next.
5. On the File Server Type page, select "Scale-Out File Server for application data" and click Next.
6. On the Client Access Point page, enter the appropriate name like “Scale-Out-FS” and click Next.
7. On the Confirmation page, review the information and click Next.
8. On the Configure High Availability page, wait for the creation to complete.
9. On the Summary page, click View Report to verify that all information is correct, and then click Finish.
10. Return to the Failover Cluster Manager page and view the created Scale-Out File Server.
11. Right-click on "Scale-Out-FS" and select Add File Share.
12. On the New Share Wizard page, select "SMB 3.0 - Application" and click Next.
13. Select the server and the path for this share and click Next.
14. On the Specify Share Name page, enter the share name and share path, and click Next.
15. On the Configure Share Settings page, confirm that continuous availability is enabled.
16. On the Permissions page, configure the appropriate permissions based on your specific use case:
a) If you are using this Scale-Out File Server file share for Hyper-V, you must grant Full Control permissions to all Hyper-V computer accounts, the SYSTEM account, the cluster computer account for any Hyper-V clusters, and all Hyper-V administrators on the share and file system.
b) If you are using the Scale-Out File Server with Microsoft SQL Server, you must grant Full Control permissions to the SQL Server service account on the share and file system.
17. After confirming the settings are correct, click Create.
18. Return to the Failover Cluster Manager and view the created shared folder.
19. Log in to the Hyper-V host, open Hyper-V Manager, and create a new virtual machine. Choose the shared directory of the Scale-Out File Server as the file storage directory.
Protecting your Hyper-V VMs with a professional solution
Overall, using a Scale-Out File Server with Hyper-V virtual machines provides enhanced availability, scalability, performance, and management capabilities. But it is also highly recommended to backup Hyper-V VMs to protect your critical data.
Vinchin Backup & Recovery is a professional solution which supports data backup of VM like VMware vSphere, Hyper-V, XenServer, XCP-ng, oVirt, RHV, OpenStack, etc. and other data like database, NAS, file server, Linux & Windows Server, etc.
Vinchin Backup & Recovery performs robust Hyper-V backup and recovery functionality including agentless incremental backup, effective data reduction, backup node expansion, offsite backup copy and more, to comprehensively secure Hyper-V environments.
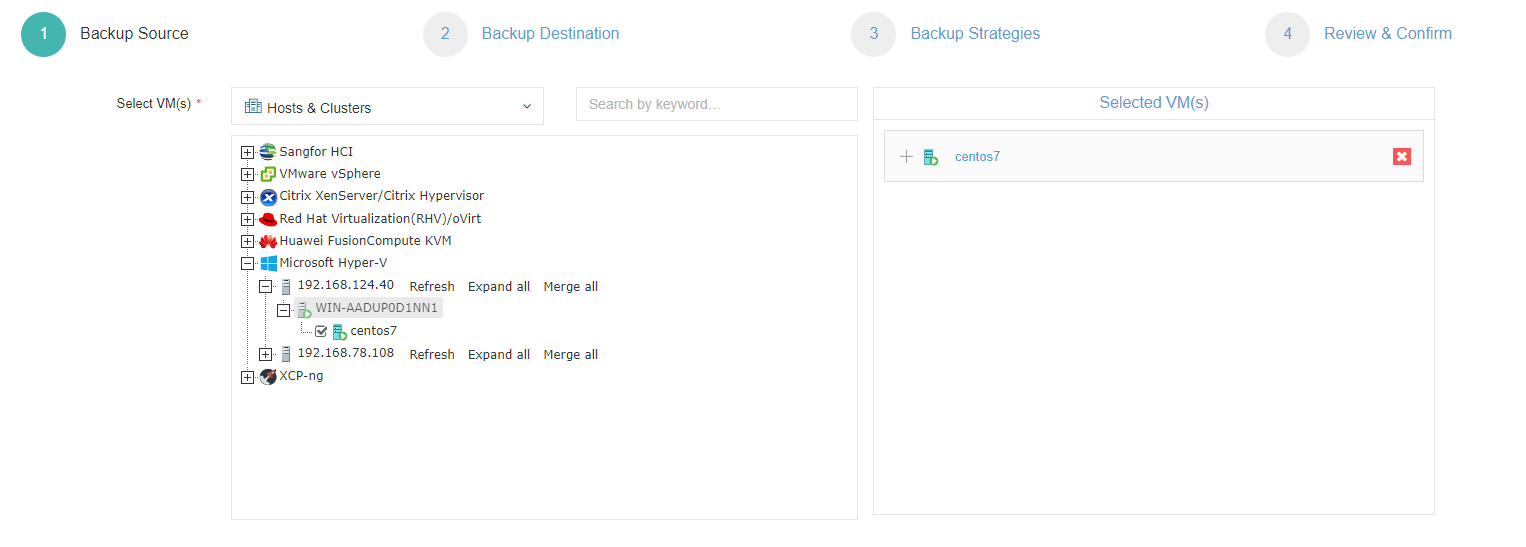
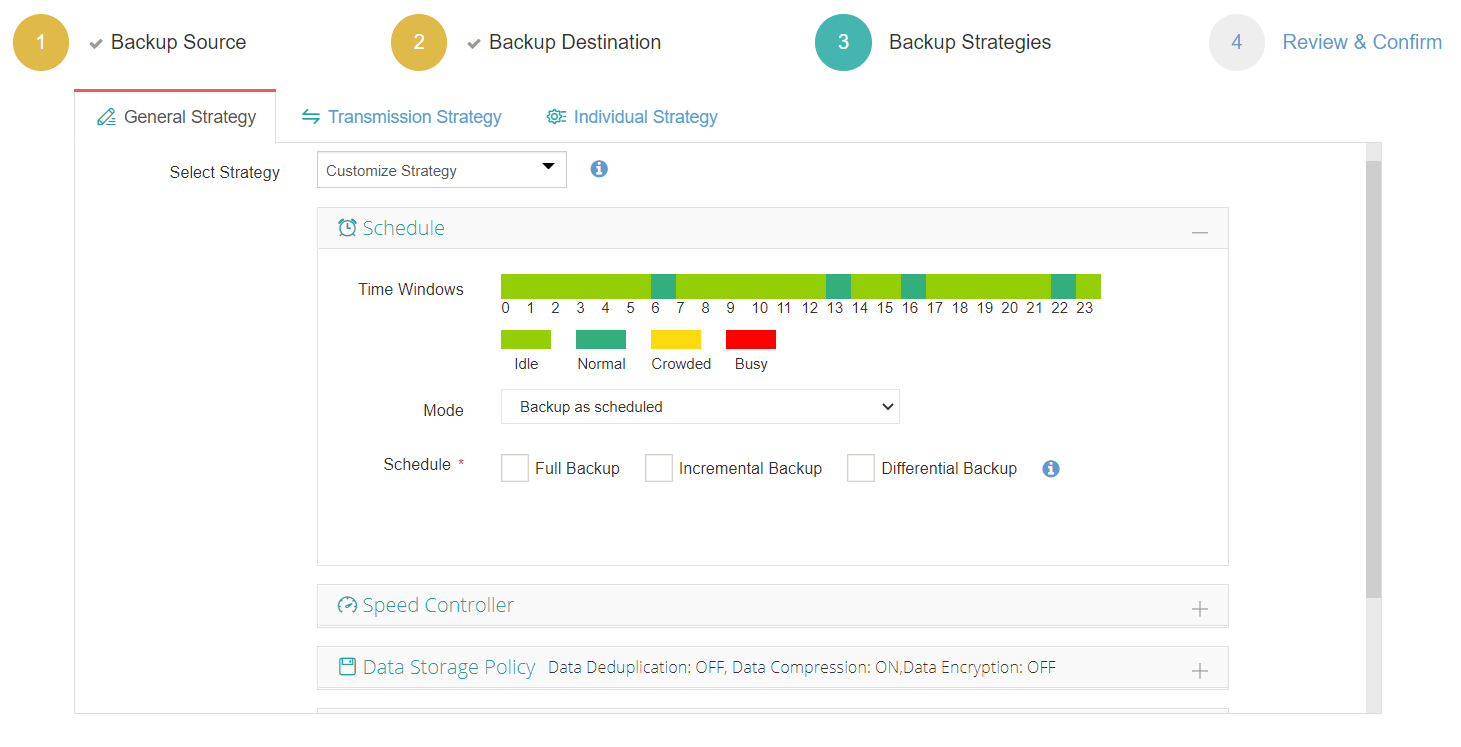
To backup Hyper-V VM, you just need to:
1. Select Hyper-V VM

2. Select backup storage

3. Select backup strategies

4. Submit the job
Vinchin Backup & Recovery has been selected by thousands of companies and you can also start to use this powerful system with a 60-day full-featured trial! Also, contact us and leave your needs, and then you will receive a solution according to your IT environment.
Conclusion
Building a Scale-Out File Server (SOFS) allows you to create a highly available and scalable file server solution in a Windows environment. It enables multiple servers to share the same file share simultaneously, providing increased performance and fault tolerance.
To efficiently protect Hyper-V VMs, you can choose Vinchin Backup & Recovery to easily backup and recover your VMs. Don’t miss the free trial.
Share on:


