-
Convert OVA/OVF to VHD/VHDX with Powershell
-
Convert VMware virtual disk to VHD/VHDX with qemu-img
-
Convert virtual disk for Hyper-V with VirtualBox
-
Migrate VMware and Hyper-V VMs with Vinchin Backup & Recovery
-
OVA/OVF to VHD/VHDX FAQs
-
Sum Up
Virtual environment helps companies a lot but for IT administrators it requires new knowledge to manage VMs. Virtual machine management is different from physical machine management, especially in server migration.
Migrating physical machine requires complicated procedures to prepare hardware and copy data but virtual machine just consists of multiple files so moving virtual machine just requires exporting and importing data.
The difficulty during VM migration might be booting VM on another hypervisor because the image often needs to be preprocessed before being imported to another host. In other words, a V2V converter is often needed during the migration procedures.
VMware users can export virtual machine to OVF or OVA template via OVF Tool. OVF is a folder and OVA contains nearly the same information like OVF but it's a zip file. Some virtual machine management tools like Xen Orchestra can directly recognize VMware template but Hyper-V doesn't have such a tool.
You can just import an entire Hyper-V VM or vhd/vhdx virtual disk to Hyper-V host so if you have an OVA or OVF template, you can convert it to vhd/vhdx virtual disk to import it to Hyper-V host.
Convert OVA/OVF to VHD/VHDX with Powershell
The entire VM template contains all the VM data like applications, snapshots, and configuration but all you need is the virtual disk for data migration and VMware virtual disk is saved as vmdk format. You can directly extract the vmdk file from OVF template and for OVA template, you also just need to unzip the file to find the vmdk file.
Now you need to install some applications on the local machine before converting the virtual disk. Make sure Microsoft Virtual Machine Converter 3.0 and PowerShell are installed on the local machine and then you can type the command below in PowerShell.
Import the Microsoft Converter Powershell Module:
Import-Module "C:Program FilesMicrosoft Virtual Machine ConverterMvmcCmdlet.psd1"
Convert the vmdk virtual disk to vhdx format:
ConvertTo-MvmcVirtualHardDisk -SourceLiteralPath "virtual_disk_directory.vmdk" -DestinationLiteralPath "virtual_disk_directory.vhdx" -VhdType DynamicHardDisk -VhdFormat Vhdx
After that, you can create a new VM with the vhdx virtual disk or attach it to an existing VM.
Convert VMware virtual disk to VHD/VHDX with qemu-img
There is another conversion tool for convert the VMware virtual disk in OVF/OVA template, qemu-img, which supports converting multiple formats of virtual disks like vmdk, qcow2, raw, vhdx, etc.
You just need the command below:
qemu-img convert -f vmdk -O vhdx virtual_disk_directory.vmdk virtual_disk_directory.vhdx
Convert virtual disk for Hyper-V with VirtualBox
This doesn't mean you need to deploy related virtual environment. You just need the VirtualBox application and then use the command to convert the virtual disk. You even don't have to open the application after you install it on local machine.
VBoxManage.exe clonehd --format vhd "virtual_disk_directory.vmdk" "virtual_disk_directory.vhd"
Migrate VMware and Hyper-V VMs with Vinchin Backup & Recovery
Traditional migration solutions like converting the VM export to the compatible VM template or virtual disk are tedious and there might be many new compatibility issues during the process so you can try the professional migration solution for virtualized environments.
Vinchin Backup & Recovery is not only a backup solution for virtual machine, but also an advanced VM migration solution, supporting VMware vSphere, Hyper-V, Proxmox, XenServer, XCP-ng, oVirt, OLVM, RHV, OpenStack, etc. By adding both virtualized platforms into the backup system, you can perform easy agentless VM migration with a user-friendly web console.
There is the built-in conversion engine in the backup system, you just need to select the VM you need to move it to another hypervisor.
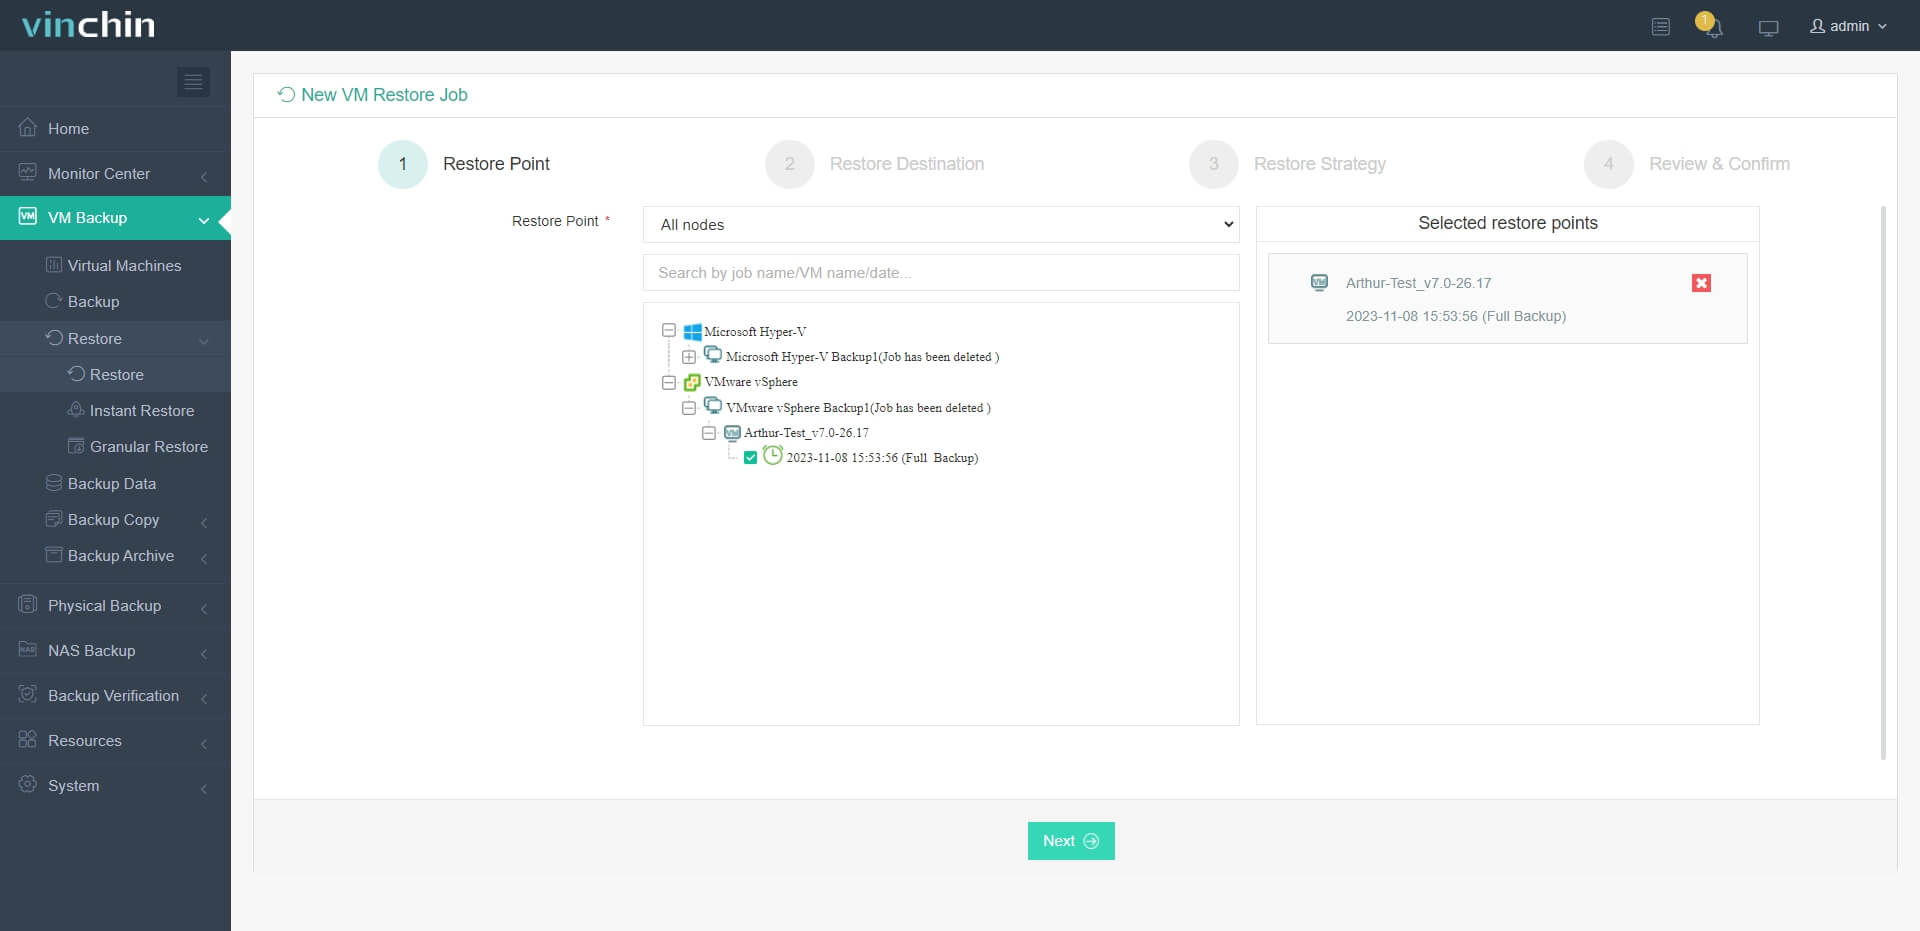
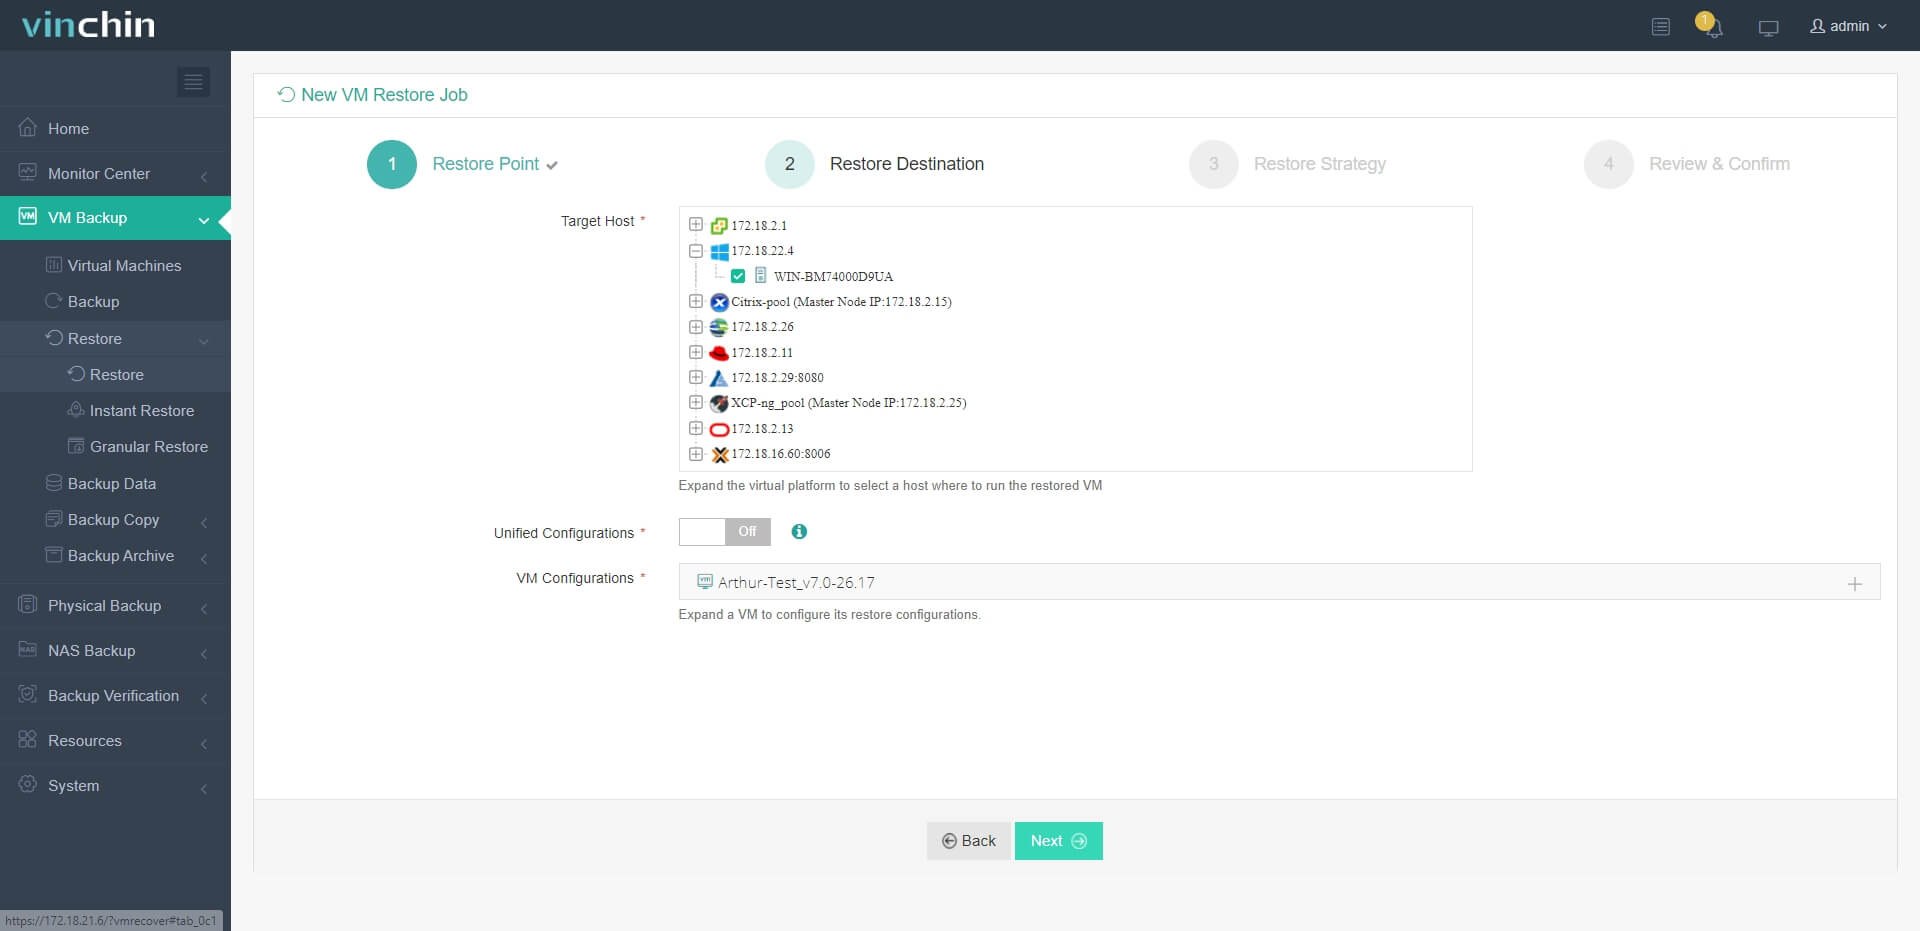
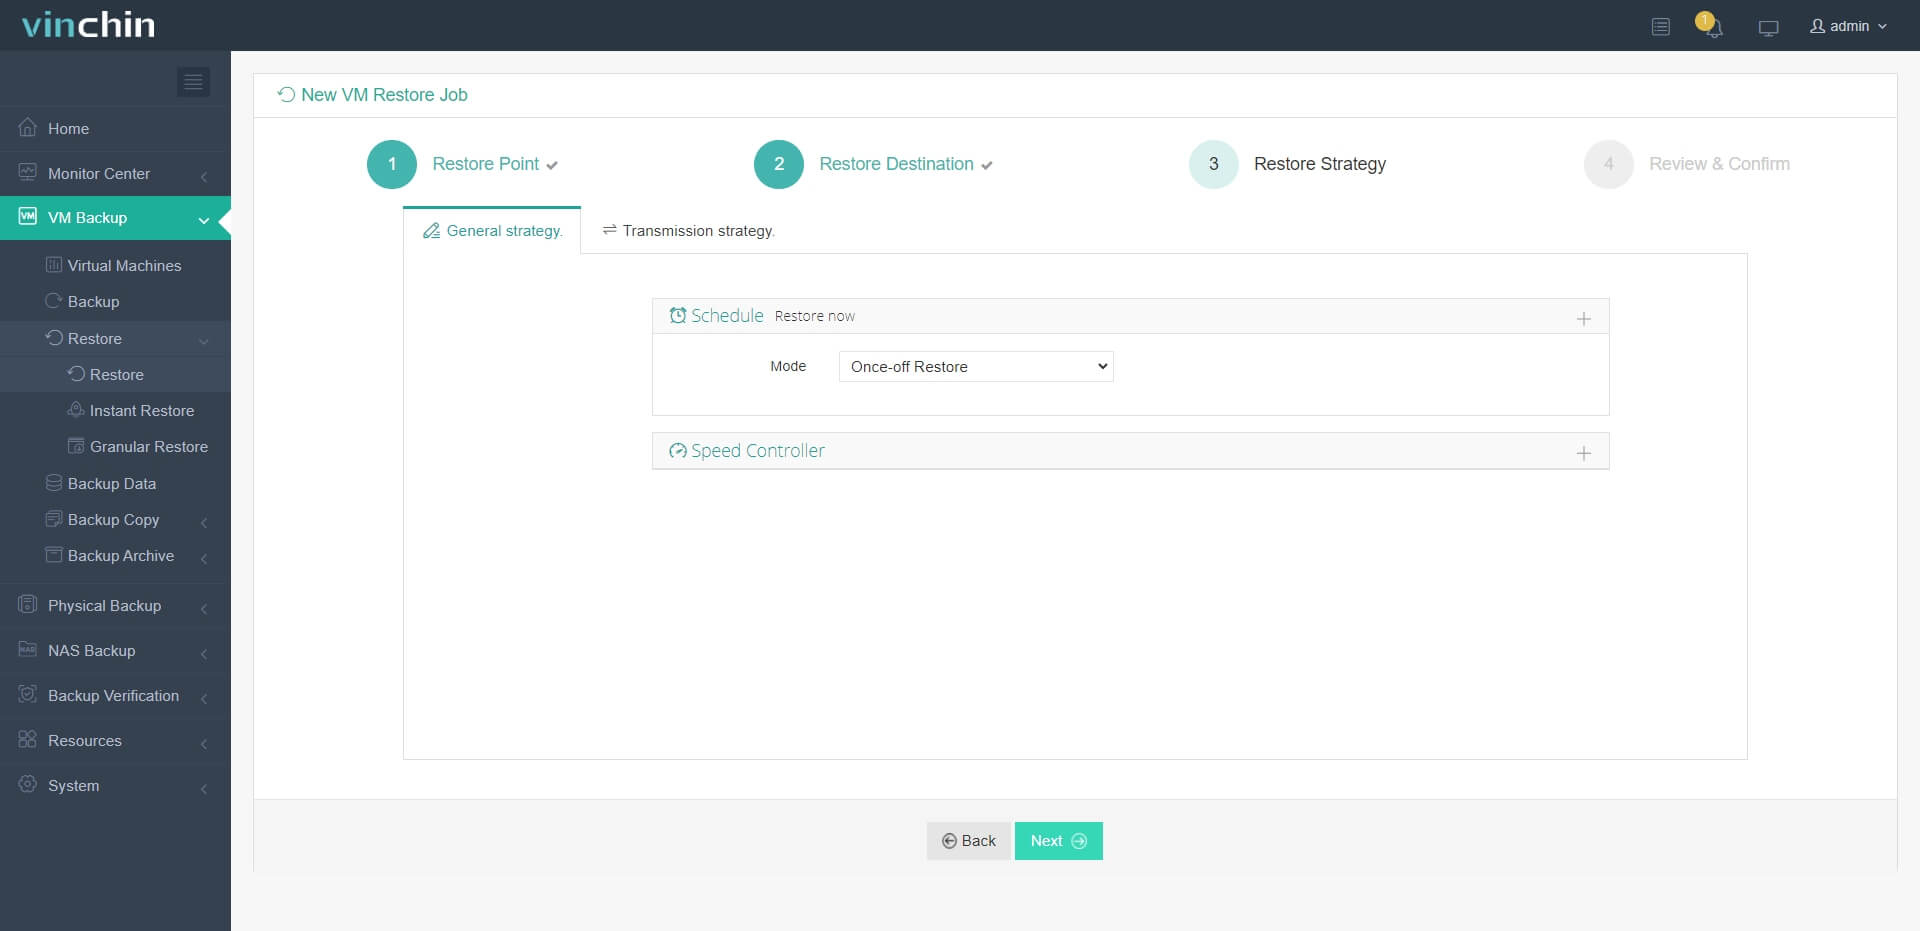
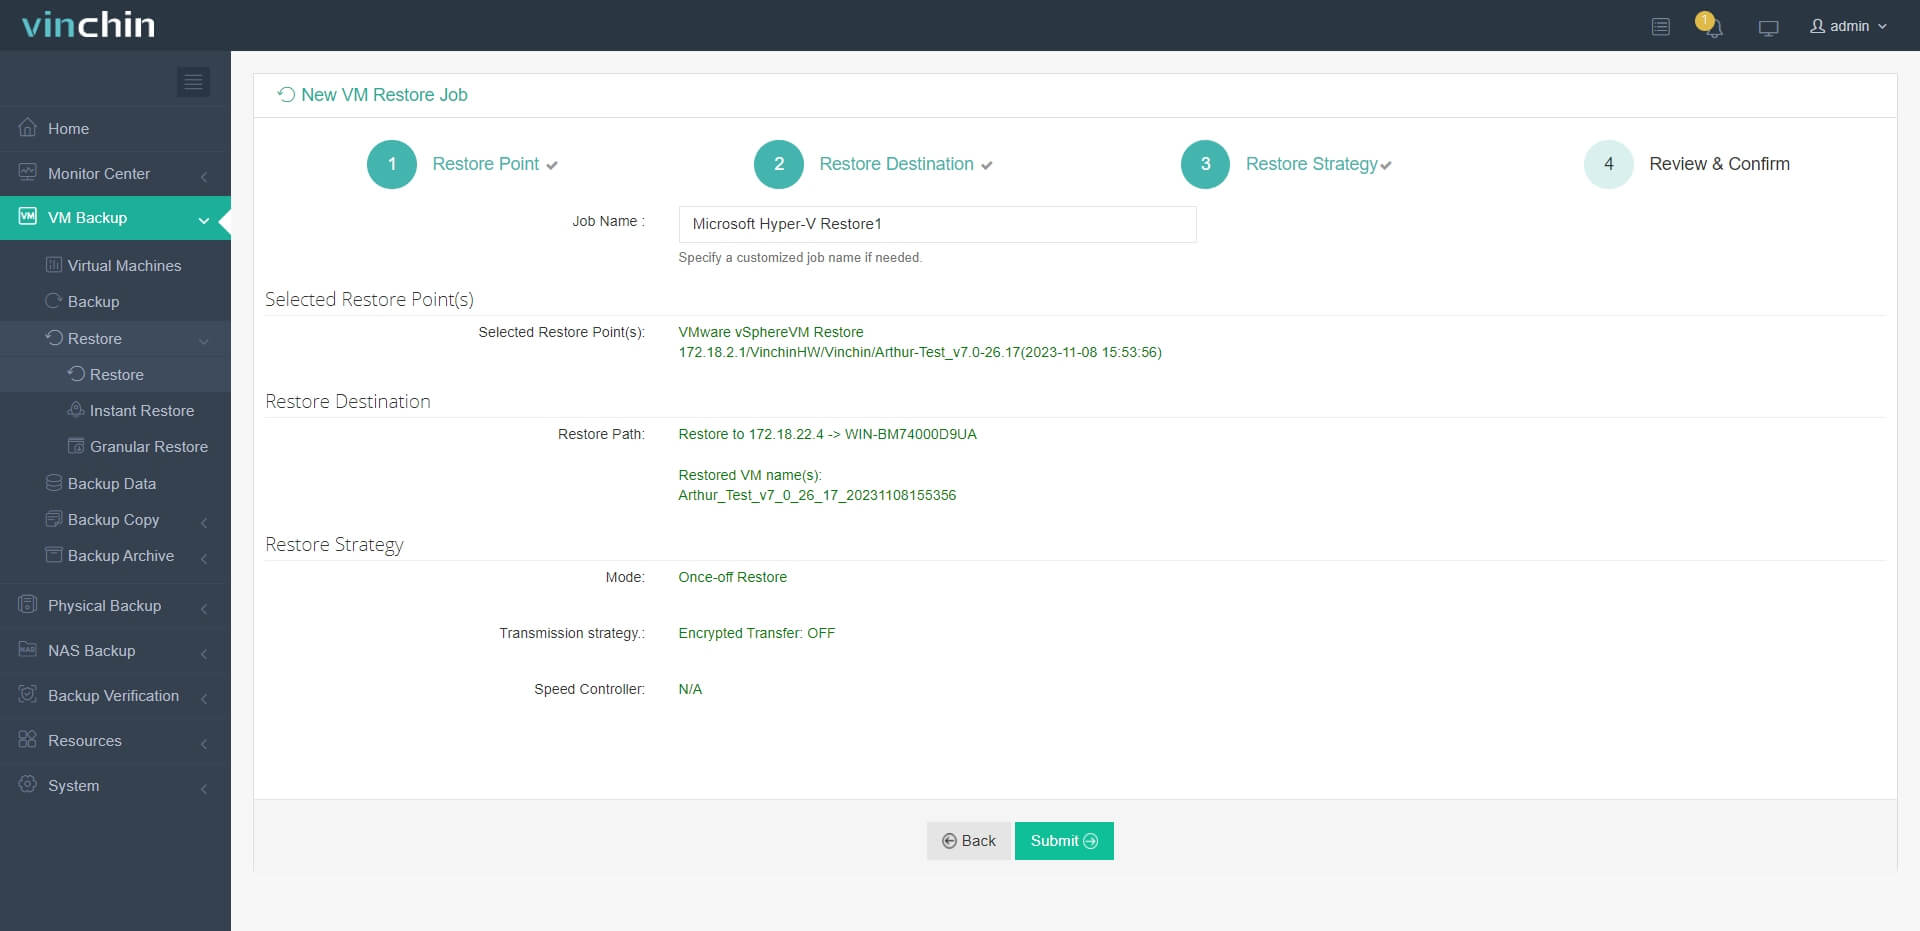
For instance, if you would like to migrate VM from VMware to Hyper-V:
1. Just select the backup of the target VMware VM

2. Select a Hyper-V host as target host

3. Simply set up restore strategies or directly skip this step

4. Just submit the job and then the VMware VM will be quickly restored on the Hyper-V host

Vinchin Backup & Recovery has been selected by thousands of companies and you can also start a 60-day full-featured free trial here. Also, contact us, leave your requirements, and then you will receive your tailored solution. We have established partnerships with reputable companies all over the world so if you would like to do a local business, you can select a local partner here.
OVA/OVF to VHD/VHDX FAQs
1. Can you directly import OVA/OVF template via Hyper-V Manager?
No. Hyper-V Manager can’t recognize OVF or OVF template so you have to extract the virtual disk and convert it to vhd or vhdx format.
2. Can you export OVA/OVF template from a Hyper-V VM?
No. You can just export the virtual disk of Hyper-V VM or its entire folder.
3. What is the easiest way to migrate VMware to Hyper-V?
Vinchin Backup & Recovery is considered the easiest solution to migrate VMware to Hyper-V, because it just requires backing up the source VM and then directly restore it on the target Hypervisor.
Sum Up
Data migration in virtual environment is different from physical server migration because different virtual platforms will generate and accept different files. VMware will generate OVA and OVF template and Hyper-V will generate and accept entire VM and vhd/vhdx virtual disk. You can convert the file to migrate from VMware to Hyper-V.
Also, it is recommended to use Vinchin Backup & Recovery to migrate VM between VMware and Hyper-V. VM migration will be much easier with it so don't miss the free trial.
Share on:


