-
What is a RAW disk?
-
How to import a RAW disk image into Proxmox?
-
Comprehensive backup and disaster recovery with Vinchin for Proxmox?
-
Proxmox import RAW disk image FAQs
-
Conclusion
Proxmox VE (Virtual Environment) is a powerful open-source platform for managing virtual machines and containers. One of the key features of Proxmox is its ability to import and manage disk images, including RAW disk images, which are commonly used in virtualized environments.
What is a RAW disk?
A RAW disk is a basic disk image format that represents a direct, unmodified copy of a storage device's data. It contains all the raw bytes of the original disk, with no additional features like compression or snapshots. RAW disks are simple, widely compatible with virtual environments like Proxmox, and are useful for transferring or backing up data in its purest form.
In this guide, it will focus on how to import a RAW disk image into Proxmox and attach it to a virtual machine. A RAW disk image is an exact byte-for-byte copy of a disk and can be used to replicate physical disks or create a consistent virtual machine setup. This process is valuable when migrating virtual machines from other platforms, restoring backups, or creating custom VM images.
How to import a RAW disk image into Proxmox?
Create a RAW disk image
Use the vmdebootstrap utility to generate a RAW disk image with a base configuration:
vmdebootstrap --verbose \
--size 10GiB --serial-console \
--grub --no-extlinux \
--package openssh-server \
--package avahi-daemon \
--package qemu-guest-agent \
--hostname vm600 --enable-dhcp \
--customize=./copy_pub_ssh.sh \
--sparse --image vm600.raw
--size: Set the disk size.
--serial-console: Enable serial console for debugging.
--grub: Install GRUB bootloader.
--package: Specify the package to install (e.g. openssh-server for remote login).
--hostname: Set the virtual machine hostname.
--customize: customize the script (e.g. copy SSH public key).
A disk image file named vm600.raw will be generated upon completion.
Create a virtual machine
Creates a new virtual machine in Proxmox:
qm create 600 --net0 virtio,bridge=vmbr0 \
--name vm600 --serial0 socket \
--bootdisk scsi0 --scsihw virtio-scsi-pci --ostype l26
600: VM ID.
--net0: Configure the network interface, use VirtIO, and bridge vmbr0.
--name: VM name.
--bootdisk and --scsihw: Specify to use VirtIO-SCSI disk controller.
--ostype: operating system type (l26 for Linux 2.6 or newer).
Import a disk image
Import the created RAW disk image into Proxmox's storage:
qm importdisk 600 vm600.raw pvedir
600: virtual machine ID.
vm600.raw: path to the disk image file.
pvedir: Proxmox storage pool name (can be checked with pvesm status).
After the import is complete, the disk will appear in the VM configuration as unused0.
Mount a disk to a virtual machine
Mount the disk to the virtual machine's SCSI controller:
qm set 600 --scsi0 pvedir:600/vm-600-disk-1.raw
600: The virtual machine ID.
pvedir:600/vm-600-disk-1.raw: disk path (automatically generated by importdisk)
Start the virtual machine
After completing the disk mount, start the virtual machine for configuration and use:
qm start 600
Comprehensive backup and disaster recovery with Vinchin for Proxmox?
In addition to managing virtual machines and importing RAW disk images, it is crucial to ensure the security and availability of your VMs through regular backups. For this, Vinchin Backup & Recovery is an excellent solution for Proxmox environments.
Vinchin provides a comprehensive backup and disaster recovery solution tailored for virtualized environments, including Proxmox. It supports full VM backups, incremental backups, and restores, making it a reliable option for protecting your virtual machines. Whether you're backing up a VM created from a RAW disk image or other virtual machine formats, Vinchin ensures that your data is safe and can be quickly restored in case of system failures or migrations.
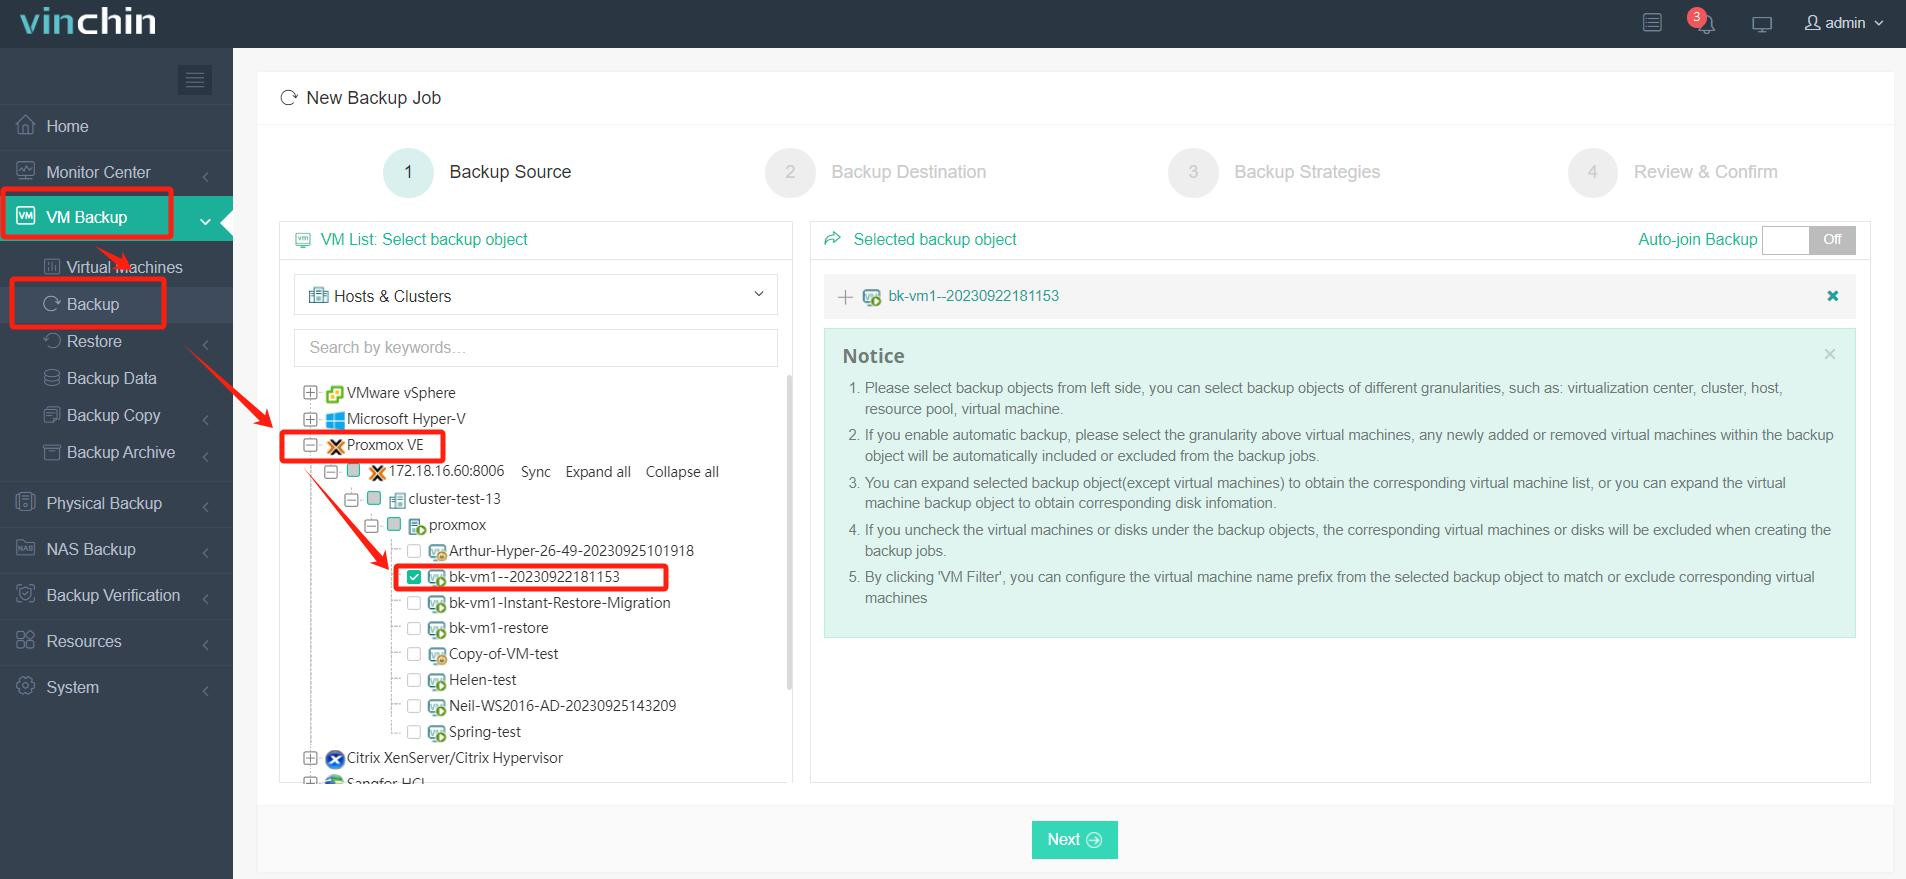
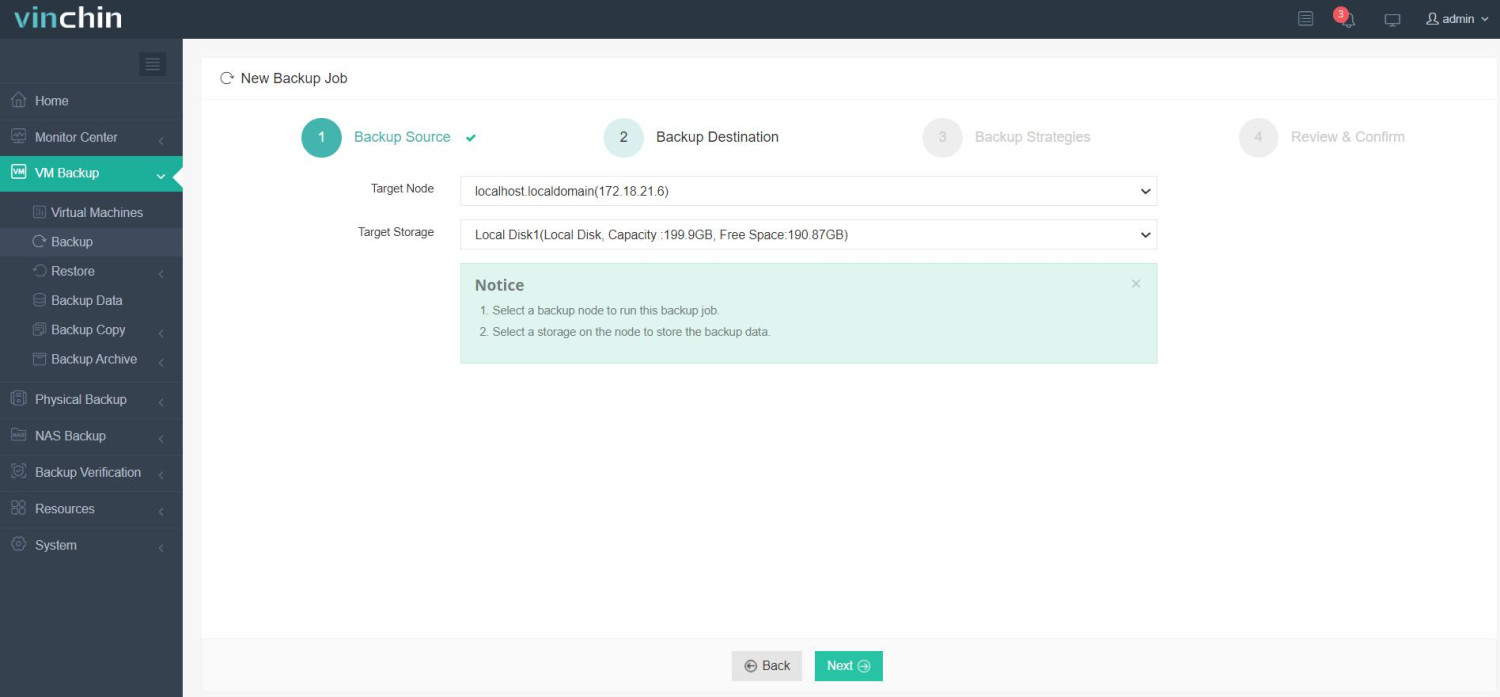
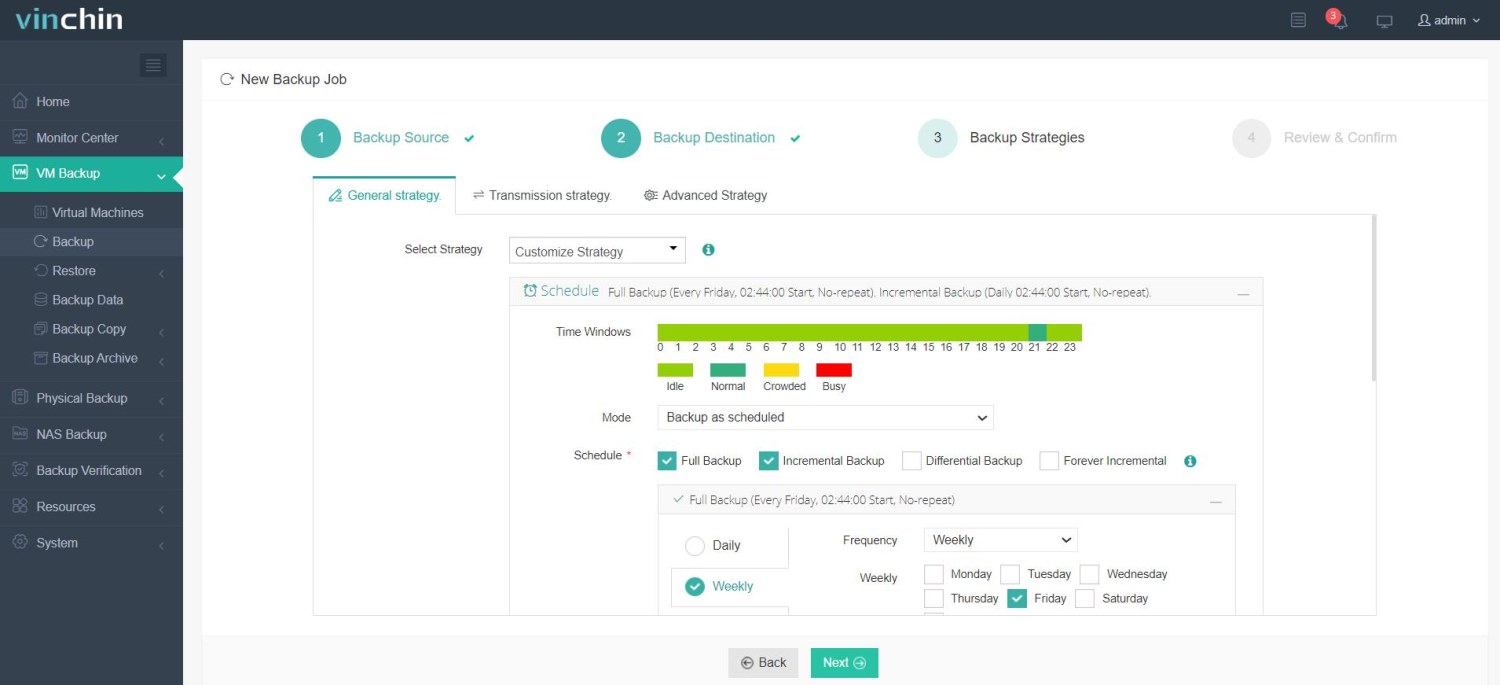
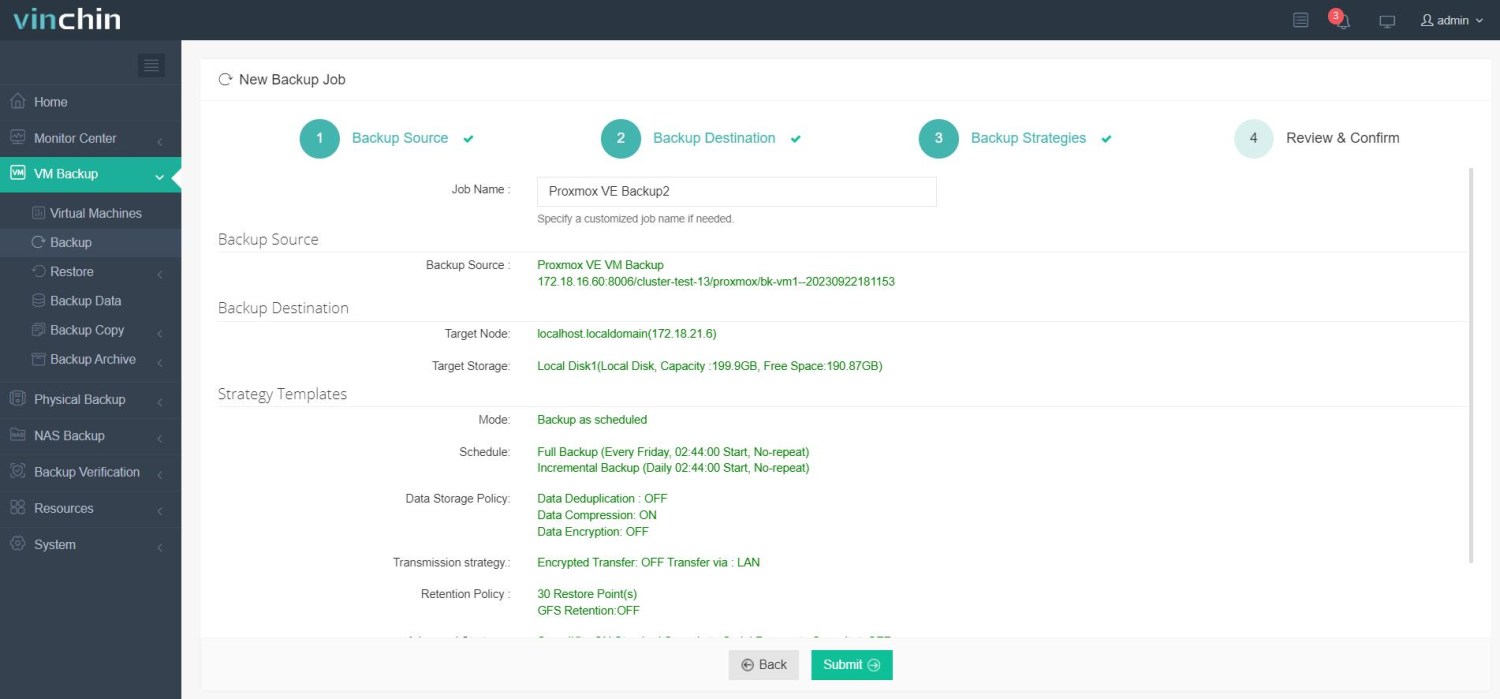
Vinchin Backup & Recovery's operation is very simple, just a few simple steps.
1.Just select VMs on the host

2.Then select backup destination

3.Select strategies

4.Finally submit the job

By integrating Vinchin with your Proxmox environment, you can safeguard your VMs, including those running from RAW disk images proxmox import raw disk image, while ensuring quick recovery in case of unexpected events. This makes Vinchin an essential tool for efficiently managing and protecting your Proxmox infrastructure. Vinchin offers a 60-day free trial for users to experience its functionality in a real-world environment. For more information, you can reach out to us for support.
Proxmox import RAW disk image FAQs
Q1: How to upload raw disk images to Proxmox?
A1: You can upload larger files via SCP, rsync or directly through Proxmox's web interface. If the files are very large, it is recommended to use command line tools such as SCP or rsync, because the web interface may have upload size limitation.
Q2: What should be done after importing a raw disk image?
A2: After the upload is complete, you need to create a new virtual machine and select the uploaded .raw file as the disk when configuring storage. Make sure to set the correct disk controller type (e.g. IDE, VirtIO, etc.) to match the configuration of the raw VM.
Conclusion
In conclusion, Proxmox offers powerful tools for managing virtual machines and importing RAW disk images into Proxmox, while Vinchin Backup & Recovery ensures robust protection and quick recovery for your VMs. Integrating these solutions provides enhanced security and efficiency for your Proxmox infrastructure.
Share on:


