-
Three Disk Modes in VMware vSphere
-
Thin Provisioning to Thick Provisioning Conversion
-
Thick Provisioning to Thin Provisioning Conversion
-
Professional VMware Disaster Recovery Tool
-
Conversion Between Thick Provisioning and Thin Provisioning FAQs
-
Conclusion
Virtual machine storage provisioning is a critical aspect of managing virtualized environments. VMware offers two primary storage provisioning methods: Thick Provisioning and Thin Provisioning. Understanding the differences between these methods and the conversion process between them is essential for optimizing storage utilization and performance.
Three Disk Modes in VMware vSphere
In VMware vSphere, when creating a virtual machine, you need to choose a disk provisioning type. The options are:
Thick Provisioned Lazy Zeroed
Thick Provisioned Eager Zeroed
Thin Provision
Each type of disk has differences in how it is created and its performance. Below are the distinctions.
Thin Provision
This method saves storage space. When a virtual machine is created, thin-provisioned virtual disks allocate and zero out the required space as needed. Unused space can be utilized by other virtual machines. Thin provisioning allows disk storage to be allocated among multiple users in a flexible manner based on the minimum space needed at any given time. Implementing thin provisioning at customer sites can significantly save costs by improving storage utilization.
Advantages:
Fastest configuration when installing a VM
Reduces storage costs
Allows efficient use of storage space
Disadvantages:
Slowest performance due to metadata allocation overhead and additional overhead during initial write operations
Over-provisioning storage may cause application interruptions or downtime when actual resources are exhausted
Does not support clustering features
Management overhead from an administrator's perspective
Thick Provisioned Lazy Zeroed
Thick Lazy Zeroed provisioning creates virtual machine disks in the default thick format. It reserves disk space during VM creation but only clears old data on the storage device when new data is written to the disk. It is a traditional storage configuration model. Thick provisioning reserves a large amount of storage space for future needs, but this space may remain unused, leading to wasted storage capacity.
Advantages:
Faster configuration compared to Thick Provisioned Eager Zeroed
Better performance than Thin Provisioned
Disadvantages:
Wastes storage space
Slightly slower configuration compared to Thin Provisioned
Slower performance compared to Thick Provisioned Eager Zeroed
Does not support clustering features
Thick Provisioned Eager Zeroed
Thick Provisioned Eager Zeroed supports clustering features such as Fault Tolerance. It reserves all the space required for the virtual disk file during VM creation, and the physical storage device’s hard disk blocks are zeroed out to overwrite any old data.
Advantages:
Excellent performance
Reduces potential security risks by zeroing allocated disk space
Supports clustering features like Microsoft Cluster Server (MSCS) and VMware Fault Tolerance
Disadvantages:
Takes more time to provision
Based on the characteristics of these three types of disks, their performance ranking is:
Thick Provisioned Eager Zeroed > Thick Provisioned Lazy Zeroed > Thin Provision
Thick Provisioned Eager Zeroed and Thick Provisioned Lazy Zeroed provide the fastest disk space usage, while Thin Provision saves the most disk space but poses a higher risk of disk "over-provisioning."
Thin Provisioning to Thick Provisioning Conversion
Sometimes, due to performance issues or storage space requirements, it is necessary to convert virtual machine disks between these two modes. Although this cannot be directly modified in the virtual machine configuration page, it is indeed possible to make the change.
Note: Before converting the disk, the virtual machine must be powered off!!!
1. Click the Summary tab of the virtual machine.
2. Under Resources, right-click the datastore where the virtual machine resides, then click Browse Datastore. 3. Double-click the virtual machine folder to display the “.vmdk” files.
4. Right-click the “.vmdk” file and then click Inflate. The Inflate option will convert the disk to thick provisioning.
If the Inflate button is grayed out, it might be due to one of the following reasons:
1. The virtual machine is not powered off.
2. The disk is already thick provisioned.
Thick Provisioning to Thin Provisioning Conversion
Method 1: VMware Recommended Method
To convert a base disk from thick provisioning to thin provisioning by changing the datastore and performing an offline virtual machine migration, follow these steps:
Note: This process requires multiple datastores. If only one datastore is available, you can clone the virtual machine to the target virtual machine with thin-provisioned disks instead of performing a migration.
1. Power off the virtual machine.
2. Right-click the virtual machine and click Migrate.
3. Click Change Datastore.
4. Click Next, then select a datastore different from the current one.
5. In the drop-down menu, select the Thin Provisioned virtual disk format.
6. Click Next and then click Finish. You can monitor the conversion progress in the Tasks and Events view in vCenter Server.
Steps to perform Storage vMotion from the vSphere Web Client:
1. Right-click the virtual machine and select Migrate.
2. Locate the virtual machine by selecting its Datacenter, Folder, Cluster, Resource Pool, Host, or vApp.
3. Click the Related Objects tab, then select Virtual Machines.
4. Select Change Datastore, then click Next.
5. Choose Thin Provision for the virtual machine disks, then click Next.
6. From the VM Storage Policy drop-down menu, select the appropriate storage policy, then click Next.
7. Select the destination datastore for the virtual machine files, then click Next.
8. Review the information on the Review Selections page, then click Finish.
Note: If only one datastore is available, the conversion can be performed by cloning:
1. Right-click the virtual machine to be converted, then click Clone.
2. Assign a new name, specify a location, then click Next.
3. Select a host, then click Next.
4. In the storage selection step, use the drop-down menu to select Thin Provisioned, then click Next and complete the subsequent steps as needed.
Method 2: Using “esxcli”
For those without multiple datastores or who do not wish to clone the virtual machine, the ESXi CLI provides an effective solution.
1. Enable SSH on the ESXi server: Navigate to Host > Configuration > Security Profile > Properties > SSH > Options > Start.
2. Use SSH software such as PuTTY or SecureCRT to connect to the server.
Using “vmkfstools” to Convert Disk Files:
# vmkfstools -i <Source-File> -d {thick|thin} <Dest-File>-i: Clone disk image.
Source-File: Source file, e.g., “XXX.vmdk”.
-d: Target file option; specify “thick” or “thin”.
Dest-File: Target file, e.g., “XXX.vmdk”.
Example:
If the original file is “old.vmdk” (thick provisioned) and “old-flat.vmdk”, use the following command to convert it to thin provisioning:
# vmkfstools -i old.vmdk -d thin new.vmdk
After completion, two new files (“new.vmdk” and “new-flat.vmdk”) will be generated. The “flat.vmdk” reference in the “.vmdk” file will automatically update to the new file name.
Adjusting Configuration:
1. Rename “new.vmdk” and “new-flat.vmdk” to “old.vmdk” and “old-flat.vmdk”.
2. Modify the “.vmx” file to reference the new disk files.
Once these steps are completed, the disk conversion is finalized.
Professional VMware Disaster Recovery Tool
Vinchin Backup & Recovery is a robust VMware environment protection solution, which provides advanced backup features, including automatic VM backup, agentless backup, LAN/LAN-Free backup, offsite copy, instant recovery, effective data reduction, cloud archive and etc., strictly following 3-2-1 golden backup architecture to comprehensively secure your data security and integrity in Proxmox VE beyond replication.
Besides, data encryption and anti-ransomware protection offer you dual insurance to protect your VMware VM backups. You can also simply migrate data from a VMware host to another virtual platform and vice versa.
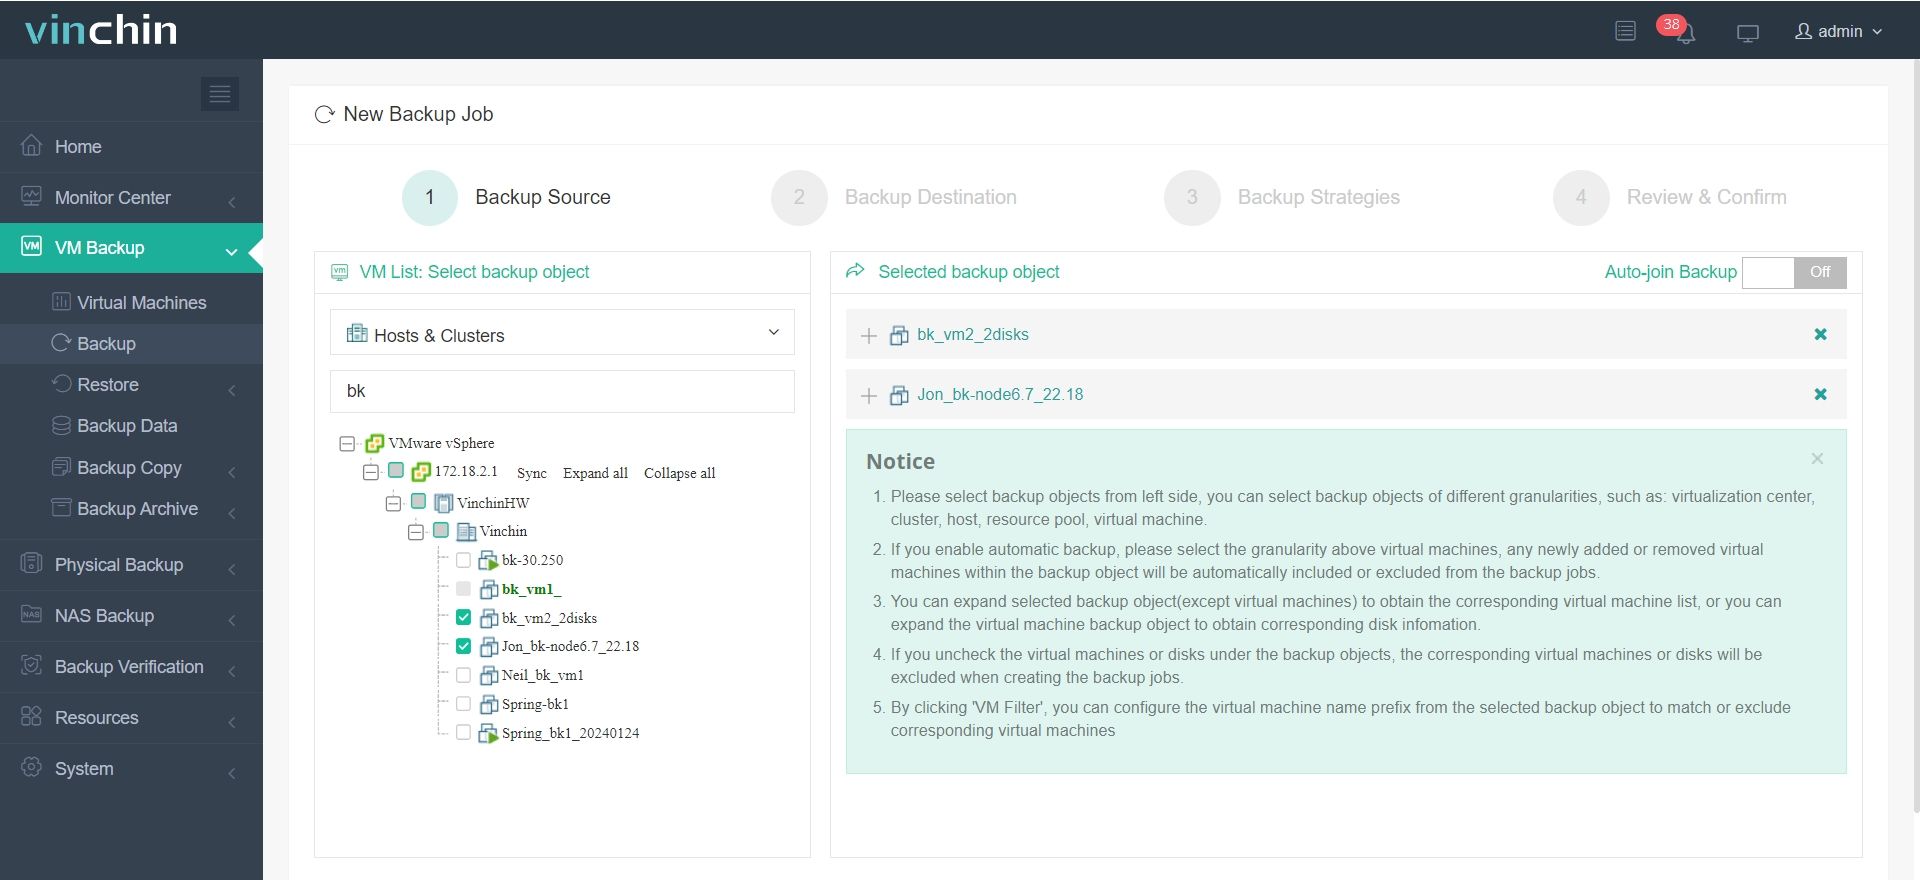
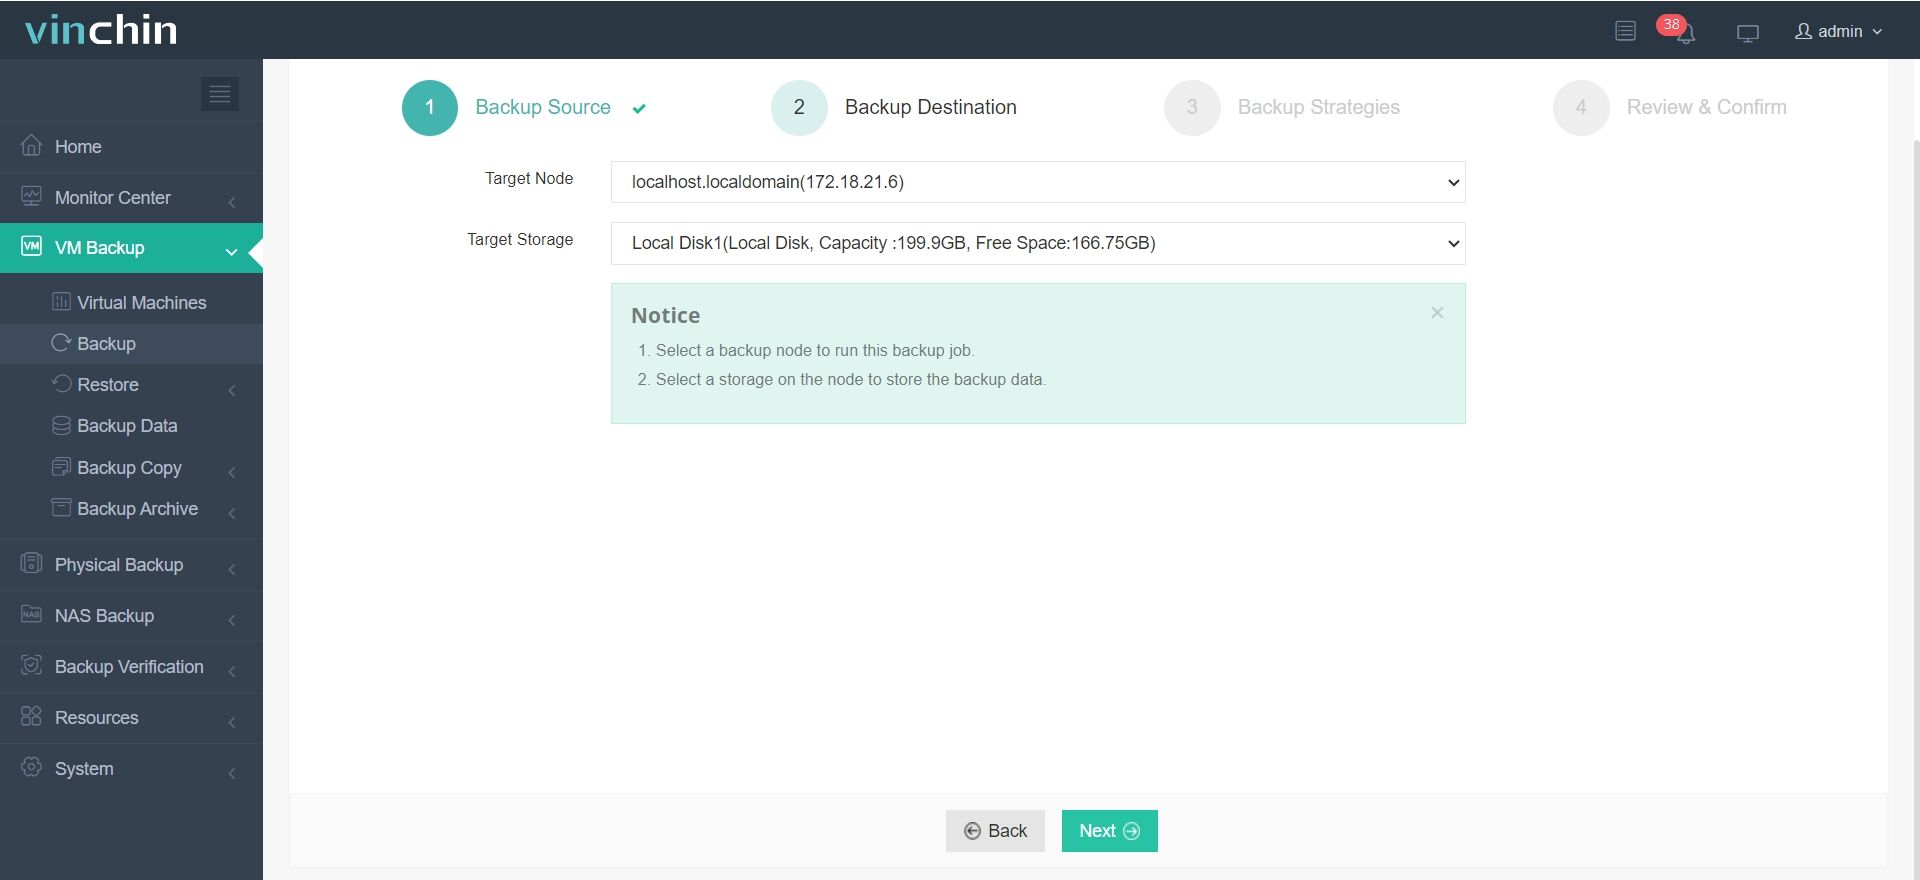
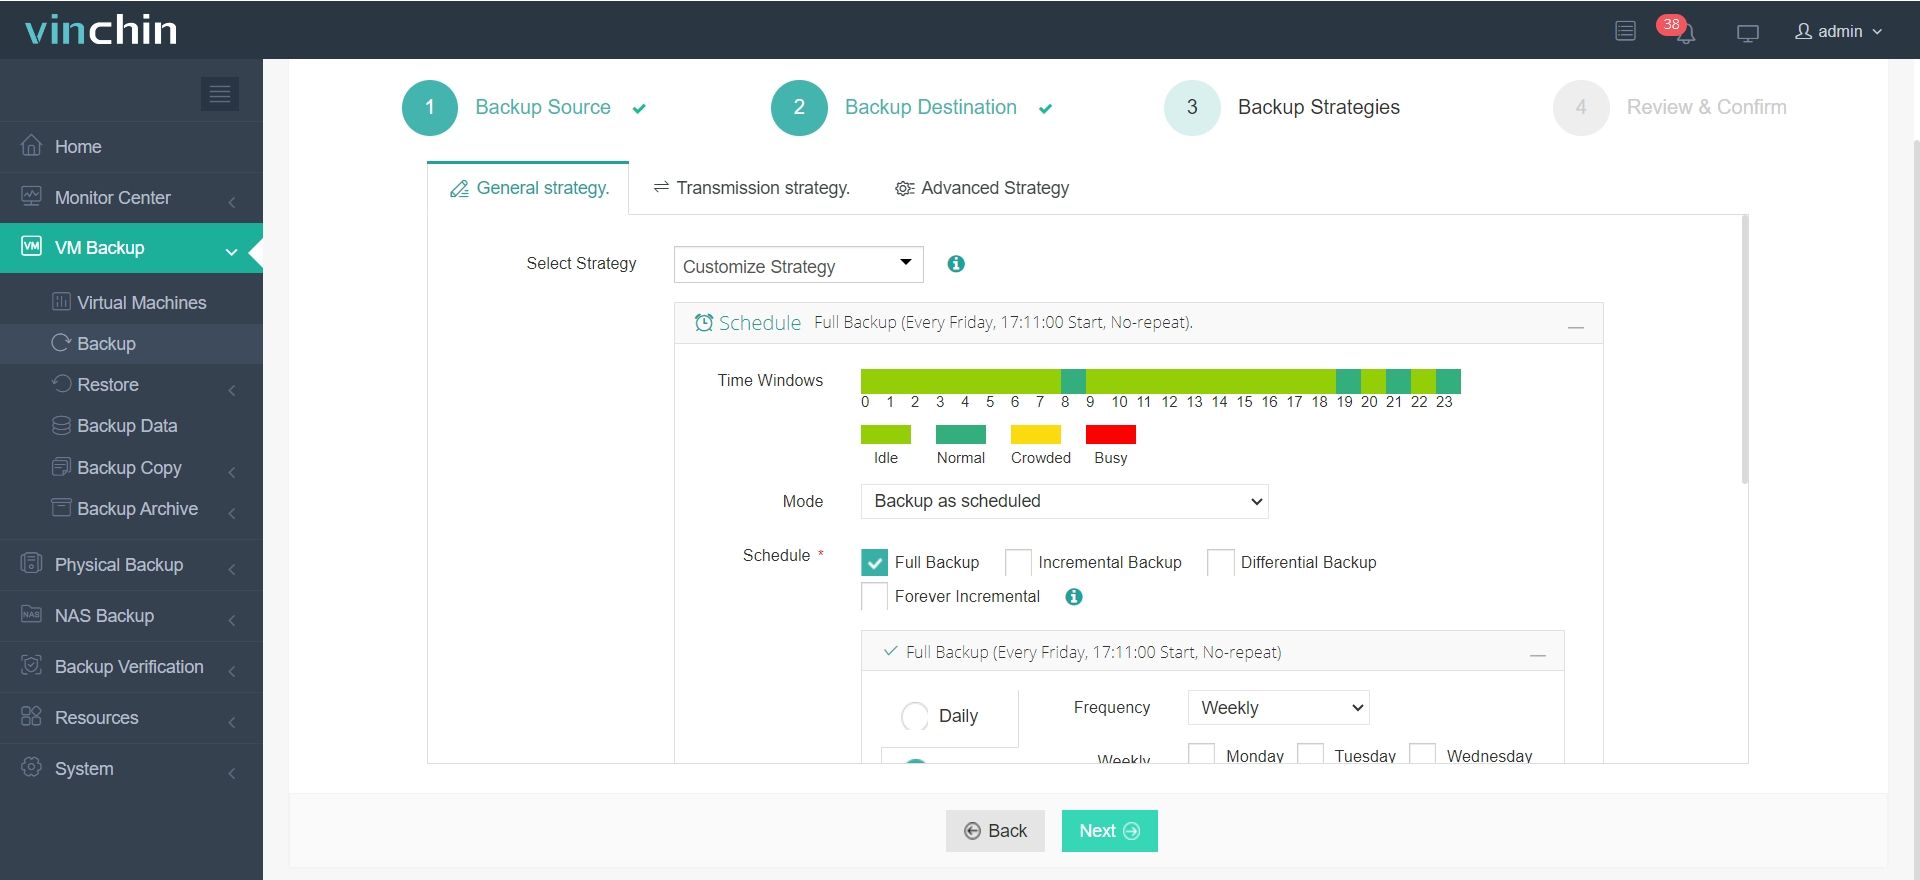
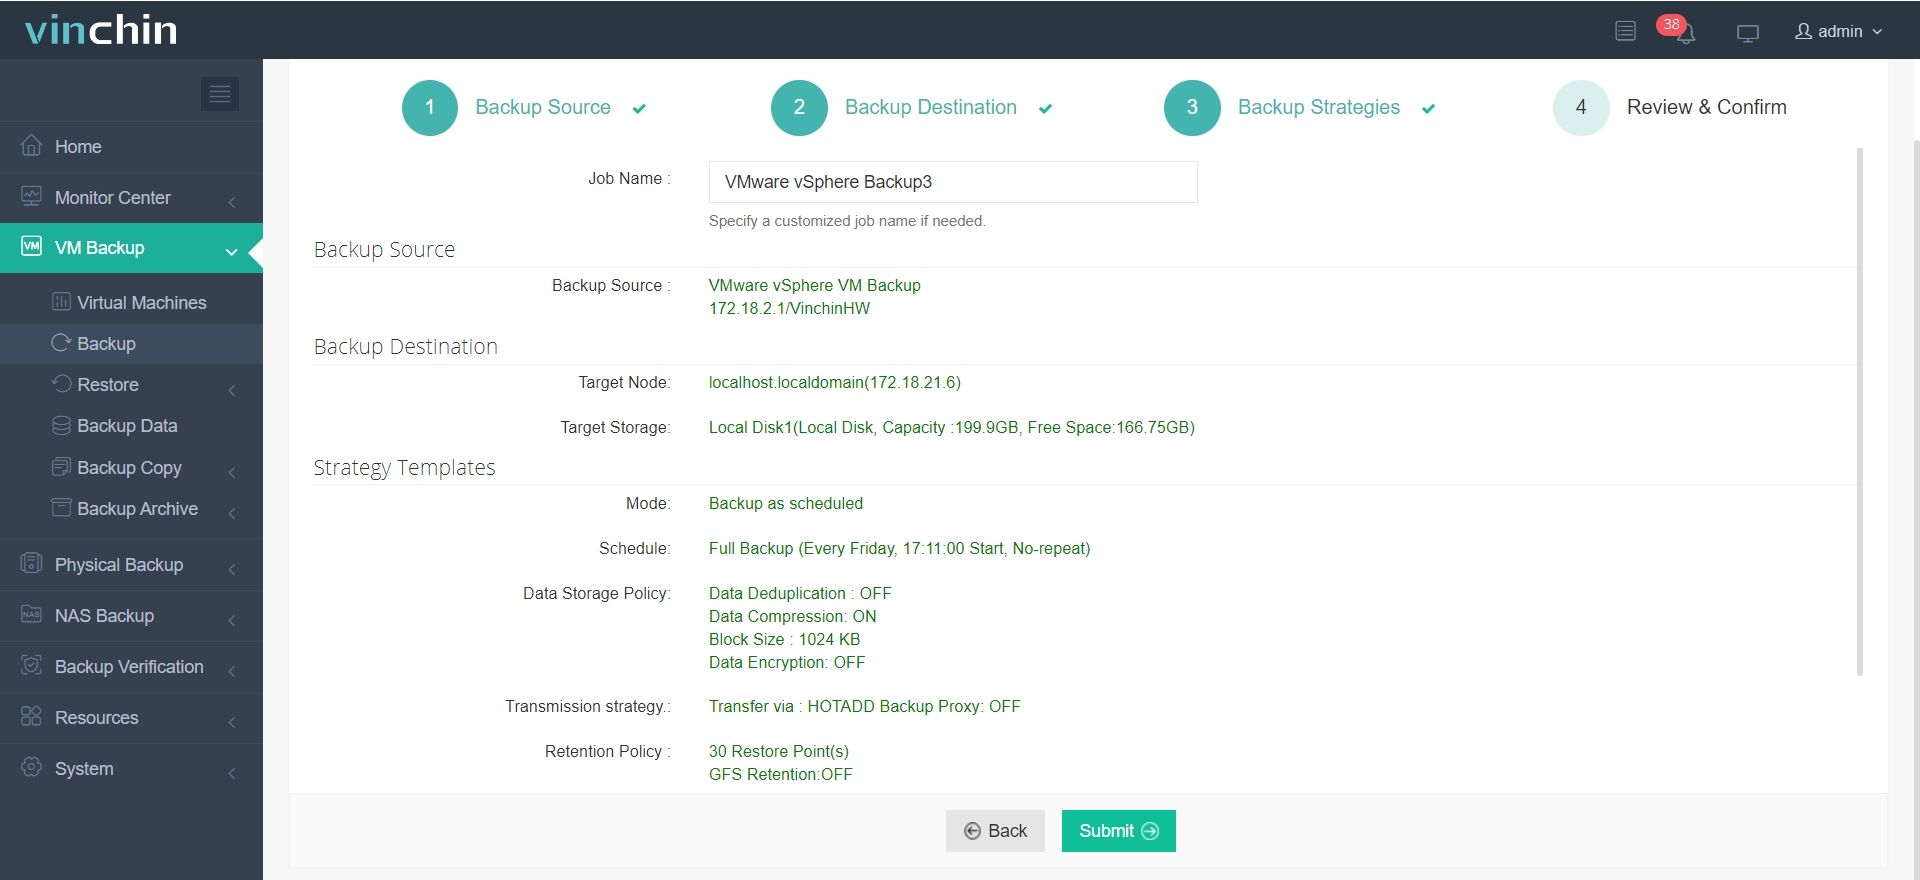
It only takes 4 steps for you to backup VMware VMs:
1. Select the backup object.

2. Select backup destination.

3. Configure backup strategies.

4. Review and submit the job.

Try the 60-day full featured free trail of Vinchin Backup & Recovery now to easily protect your VMware data and achieve automated backup and fast recovery!
Conversion Between Thick Provisioning and Thin Provisioning FAQs
1. Q: Does converting from thick to thin provisioning affect VM data?
No, the conversion process does not alter the VM's data. However, always ensure a backup is available before making changes.
2. Q: Can a VM have a mix of thick and thin-provisioned disks?
Yes, a VM can have a mix of thick and thin-provisioned disks. For example, you might use a thick eager zeroed disk for database performance and a thin-provisioned disk for logs or backups.
Conclusion
Understanding and managing the conversion between Thick and Thin provisioning is vital for VMware administrators aiming to balance storage efficiency and performance. Whether optimizing for space or speed, VMware's flexible provisioning options provide the tools needed to tailor virtual environments to specific needs.
Share on:


