-
ZStack
-
VMware
-
ZStack vs VMware
-
Convert VMware to ZStack
-
Convert ZStack to VMware and Vice Versa
-
Sum up
ZStack is an open-source IaaS software designed to enable private and hybrid cloud features and add-on services. While VMware is a virtualization and computing software giant that owns a suite of applications and cloud products.
Although they are both made for the virtualized environment to run workloads eventually, they vary from one another. In this blog, we’re going to learn how exactly they differ from each other and how to convert between them easily.
ZStack
ZStack is a scalable up-and-comer born in 2015 based on KVM (Kernel-Bases Virtual Machine), which is loaded into Linux kernel and converts the Linux OS into a Type-1 hypervisor. ZStack offers a web UI that can run in a high availability mode with active and passive setups to manage resources. The platform gobbles up the spotlight with the following features.
Pros
Lower learning curve: Easy to install and deploy within 30m in a proof-of-concept environment. User-friendly and simple UI.
Effortless update: One-click cross-versions update.
Compatibility: Support all kinds of OS like CentOS, Windows, Fedora, openSUSE, Ubuntu, and more.
Scalability: Create 100+ VM instances in minutes and manages 10,000+ hosts and 100,000 VM instances on a management node.
High availability: Backup management nodes will be used immediately if the management node is disconnected, which is isolated from data planes.
Cheaper: Much lower prices than VMware.
Cons
Weaker ecological service compared to that of VMware.
Weaker brand capability.
Cloud intelligent operation and maintenance is relatively poor.
Mostly online support.
VMware
VMware has the Type-1 hypervisor ESXi that uses the proprietary VMkernel including hardware, guest systems, and the service console (Console OS). VMware vCenter is a web client to create VMs, add hosts, and manage various resources.
Pros
Great customer support, brand awareness, and ecological community.
Free up IT resources that are made only for infrastructure management.
The integration and compatibility with other products such as AWS reduces the cost of the learning curve and increases productivity.
Provide one hub to manage cloud resources and a sub-hub for VMware software to reduce IT costs.
Move data to the cloud without disruption.
Flexible on adding or removing hosts and clusters.
Cons
High license fees and country restrictions.
Upgrade needs to be compatible with certain versions.
Limited AWS selection and administrative control such as instant types and advanced features.
High learning curve for the newbies.
NSX has a simplified mode rather than an advanced mode.
ZStack vs VMware
| ZStack | VMware | |
| Supported OS | Oracle Linux 6.x, 7.x, 8.x; CentOS 6.x, 7.x, 8.x; Fedora 17, 18, 26, 28; Red Hat Enterprise Linux 6.x, 7.x, 8.x; Windows 2019, 2016, 2012, 2008, 2003... (see the detailed compatibility list.) | AlmaLinux OS 8.x, 9.x; Amazon Linux 2, macOS 10.15x, 11, 12; Asianux 3.0, 4.0, 7.0; Ubuntu 14.04, 14.01, 16.04, 18.04, 20.04, 20.01, 21.04... (for more details, search VMware compatibility guide.) |
| Networking options | Create physical layer-2 connections based on vLANs and no vLANs, create public, private, system, vRouter and VPC networks | vSwitches, vDS (vSphere Distributed Switch) |
| Product Complexity | Fewer products with more integrated features | Complicated with many products |
| Support | IaaS community zstack.io | VMware Communities |
| Update | One-click | Upgrade through Lifecycle Manager and other tools |
| Security | Support the HA of cloud hosts and management, the auto-recovery of cloud after system interruption. | A cloud-hosted service called VMware cloud web security safeguards users and infrastructure when they access SaaS and Internet apps. |
| Gartner Reviews | 5 stars (25 ratings) | 4.4 stars (123 ratings) |
Convert VMware to ZStack
1. Use vmware-vdiskmanager to export VMware.
vmware-vdiskmanager.exe options < disk-name > | < mount-point >
Options:
-c: create a local virtual disk.
-d: defragment the specified local virtual disk.
-k: shrink the specified local disk.
-n < source_disk >: rename the local target virtual disk.
-p: Prepare a mount point.
-r <Source Disk > : convert the local target disk.
-x < new capacity >: extend the local disk to the specified capacity.
-R: Check the consistency of the sparse virtual disk and attempt to repair.
-e: Check the consistency of the disk chain.
-D: Make the disk removable.
-U: Remove/unlink individual disk links.
Other options:
-q: do not log messages.
-a < adapter > : (only with -c) adapter type (ide, buslogic, lsilogic). Pass lsilogic to other adapters.
-s <size >: capacity of the virtual disk.
-t < disk type > : disk type identifier.
disk
0: single growable virtual disk.
1: growable virtual disk split into multiple files.
2: pre-allocated virtual disk.
3: split Preallocated virtual disks split into multiple files.
4: Preallocated ESX-style virtual disks.
5: Compressed disks optimized for streaming.
6: Thinly provisioned virtual disks - ESX 3.x and later.
Use sector, KB, MB, or GB to specify the capacity.
2. Use qemu-img to convert the format.
cd /new_home/
qemu-img info CentOS-32-new.vmdk
qemu-img convert -f vmdk -O qcow2 CentOS-32-new.vmdk CentOS-64-new.qcow2
To check the conversion.
qemu-img check CentOS-32-new.qcow2
3. Import the converted images.
Start ZStack web client, navigate to Cloud resource pool> Image> Add image, then enter the info required: name, description, image type, image format, platform, image server, the image path (choose URL if you have uploaded the images to ZStack server and converted the format on it.), and BIOS mode.
After that, go to Cloud resource pool> Cloud host> Create cloud host, configure the new host, and do not assign IP by ZStack, you’ll see the IP allocation is undertaken by the main router, and VMware has been changed to ZStack.
Convert ZStack to VMware and Vice Versa
Vinchin Backup & Recovery supports the seamless migration without any conversion tool progress for 10+ platforms in 4 steps, including ZStack to VMware and vice versa.
After you have added, licensed, and backed up your virtualizations in Vinchin, you are good to migrate any VMs on the software.
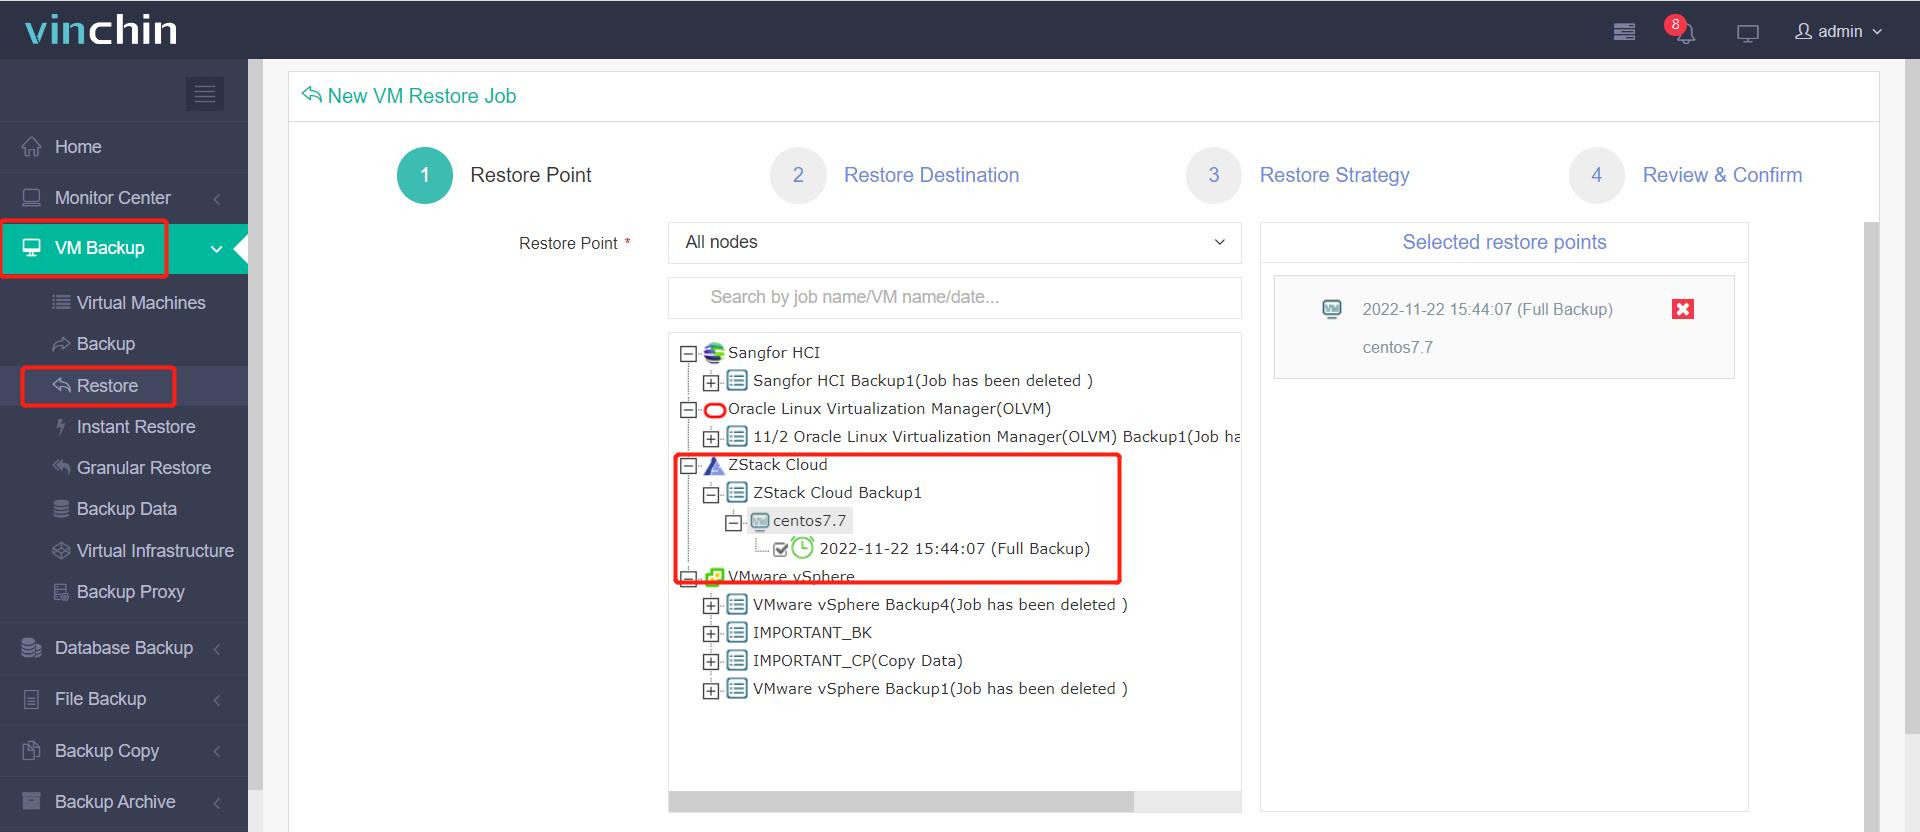
1. Expand VM Backup> Restore, and choose the target ZStack backup as restore points.
2. Choose one VMware target host by expanding the host list.

3. Set up the new VM next to the VM Configurations specifically or apply Unified Configurations.


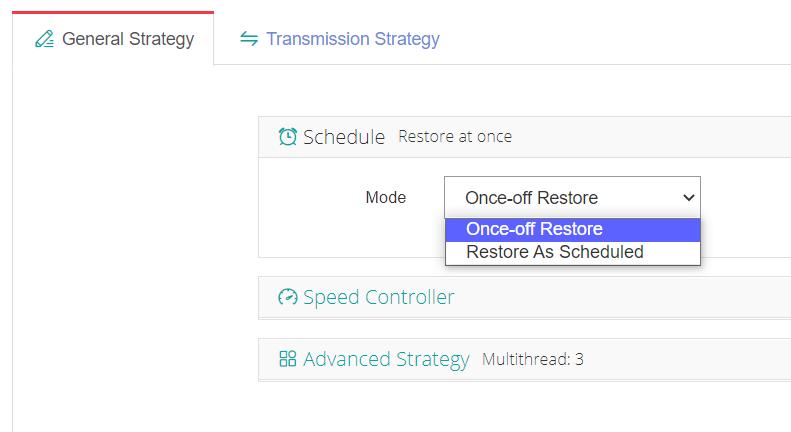
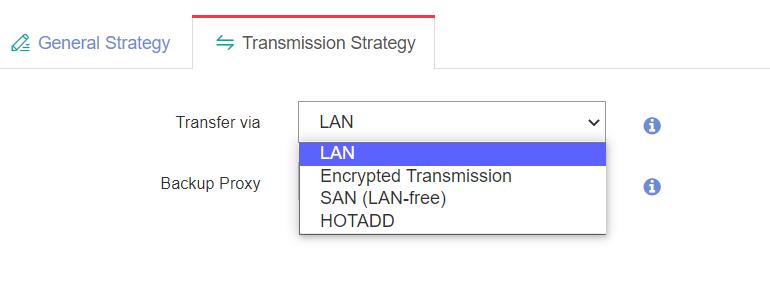
4. Configure the restore strategies.
General Strategy: schedule mode, multi-threaded under the advanced strategy, or speed control.
Transmission Strategy: Transfer via SAN, LAN, HOTADD, and Encrypted Transmission for speedy or safe data transit.
After that, you can review and submit the job. The job status can be seen by clicking its name. Then you can see a new VMware VM in your infrastructure.
Besides this, Vinchin Backup & Recovery also delivers agentless and automatic backup, instant recovery for business continuity, anti-ransomware backup storage protection, and other advanced features, if you are interested, you are welcome to download the 60-day free trial to test.
Sum up
ZStack and VMware are both great platforms to run different workloads, each has its advantages and disadvantages, you could select one to use based on your business needs. If you run a multi-hypervisor environment such as databases, physical servers, and NAS, or want to migrate one virtualization to another, you could use Vinchin Backup & Recovery for simplified operations.
Share on:


