-
Method1: Backup Windows 11 with File History
-
Restore Windows Backup with File History
-
Method 2: Backup Windows 11 with Windows Backup and Restore
-
Restore Windows Backup with Windows Backup and Restore
-
Method 3: Backup Windows 11 with wbAdmin
-
Restore wbAdmin Created Windows Backup
-
Method 4: Windows 11 Backup and Recovery Solution
-
Verdict

Backing up your Windows computer is crucial to protect important data from loss due to hardware failure, malware attacks, or accidental deletion. Regular backups ensure that you can recover your data if something goes wrong, and make restoring your system faster and easier in case of a corrupted or unstable operating system.
You can backup the whole Windows Server or individual files to multiple backup destinations like NAS and other external hard drives, typically used for expanded storage and isolation from the internet. In this blog, I will explain 3 ways to backup the latest Windows 11 to an external hard drive.
Method1: Backup Windows 11 with File History
Windows File History automatically backs up your files to an external hard drive or network location and allows you to recover previous versions of files in case of accidental deletion, modification, or damage.
1. Connect the target external hard drive to your computer.
2. Open System on Windows 11> Storage> Advanced storage settings> Backup Options.
3. Click Add a drive under Back up using File History to choose your external hard drive.
4. Toggle on Automatically back up my files as needed.
5. Click More options to set up the backup frequency, retention time, and the source folders to backup.
6. Save your changes and click Back up now to launch the job.
Or you can use the system image backup of it to take a full backup of Windows 11.
1. Open Start> search Control Panel> System and Security> File History> System Image Backup from the left pane.
2. Click Create a system image on the left.
3. Select the external hard drive added to Windows 11 for backup.
4. Click Start backup> No> Close.
Restore Windows Backup with File History
1. Open System on Windows 11> Storage> Advanced storage settings> Backup Options.
2. Choose Restore files from a current backup at the bottom.
3. Click the left and right arrows to locate the desired backup version or search for it in the search box.
4. Click the restore icon at the bottom to restore backups to the original location, or at the top, click the gear and choose Restore to a new location.
Method 2: Backup Windows 11 with Windows Backup and Restore
Windows Backup and Restore is a built-in legacy solution from Windows 7. This tool backs up data files from libraries, desktop, and Windows folders on a regular schedule, and can create a backup image of the whole system, including OS, applications, and configurations.
1. Navigate to Control Panel> System and Security> Backup and Restore (Windows 7).
2. Click Set up backup on the right of the panel.
3. Select the external hard drive you attached to your PC to save the backup. Enter the admin password if prompted.
4. Select Let Windows choose to back up the files mentioned above or Let me choose for libraries and folders and whether to include a system image in the backup.
5. Click Change Schedule optionally to customize the backup time. By default, it backs up files each Sunday at 7:00 pm.
6. Click Save settings and run backup.
Restore Windows Backup with Windows Backup and Restore
1. Navigate to Settings> Update & Security> Backup> Backup and Restore (Windows 7).
2. Click Restore my files in the bottom right.
3. Click Search to add files to search for the backup file/folder directly, Browse for files to choose the files to restore, and Browse for folders to select the folders to restore. Click Next to start recovery.
Method 3: Backup Windows 11 with wbAdmin
1. Open Start> search Command Prompt> right-click the top result> choose Run as administrator.
2. Create a full backup and press enter.
wbAdmin start backup -backupTarget:drive_letter_for_external_drive: -include:C: -allCritical -quiet
Create a full backup with all drives connected to the system included and press enter.
wbAdmin start backup -backupTarget: drive_letter_for_external_drive: -include:drive1_letter:, drive2_letter:, drive3_letter: -allCritical -quiet
Restore wbAdmin Created Windows Backup
1. Open Settings> System> Recovery> Restart now under Recovery options and click it again.
2. Click Troubleshoot> Advanced options> See more recovery options> System Image Recovery.
3. Choose Use the latest available system image in the Select a system image backup window.
4. Click Next until you see and click Finish.
Method 4: Windows 11 Backup and Recovery Solution
If you are looking for a more flexible backup solution for Windows folders and servers, you can go to Vinchin Backup & Recovery which automates the scheduled backup for 12 virtual platforms, 6 databases, NAS, and Linux & Windows.

With the solution, you can:
Automate unattended file/folder/server backup on schedule with the email notification.
Select from Full, Incremental, Differential, and Forever Incremental Backup with one click.
Reduce half of the backup size with data deduplication and compression and valid data extraction.
Encrypt the backups with the AES-256 algorithm and the transmission with SSL.
Restore Windows backups to the original place or a new location.
Send an offsite backup copy according to the 3-2-1 backup rule.
It is compatible with the following:
File Backup:
Windows Desktop: Windows XP, Windows 7, Windows 8, Windows 10
Windows Server: Server 2003, Server 2008, Server 2012, Server 2016, Server 2019
RHEL (Red Hat Enterprise Linux): 6, 7, 8
CentOS Linux: 6, 7, 8
Debian Linux: 7 to 10
Ubuntu Linux: 12 to 20
Server Backup:
Windows Desktop: Windows XP, Windows 7, Windows 8, Windows 10, Windows 11
Windows Server: Server 2003, Server 2008, Server 2012, Server 2016, Server 2019, Server 2022
RHEL (Red Hat Enterprise Linux): 6, 7, 8
CentOS Linux: 6, 7, 8
Windows 11 Backup
1. Download the 60-day free trial.
2. Go to Physical Backup> Server Backup> Backup and select a Windows host. You can choose the specific partition to backup under the host.
3. Choose a backup storage and node. You can select NAS here if you’ve added it.
4. Configure backup strategies.

5. Check and finish. The job runs based on the time settings.
Windows 11 Recovery
1. Go to Physical Backup> Server Backup> Restore and choose a backup as a recovery resource.
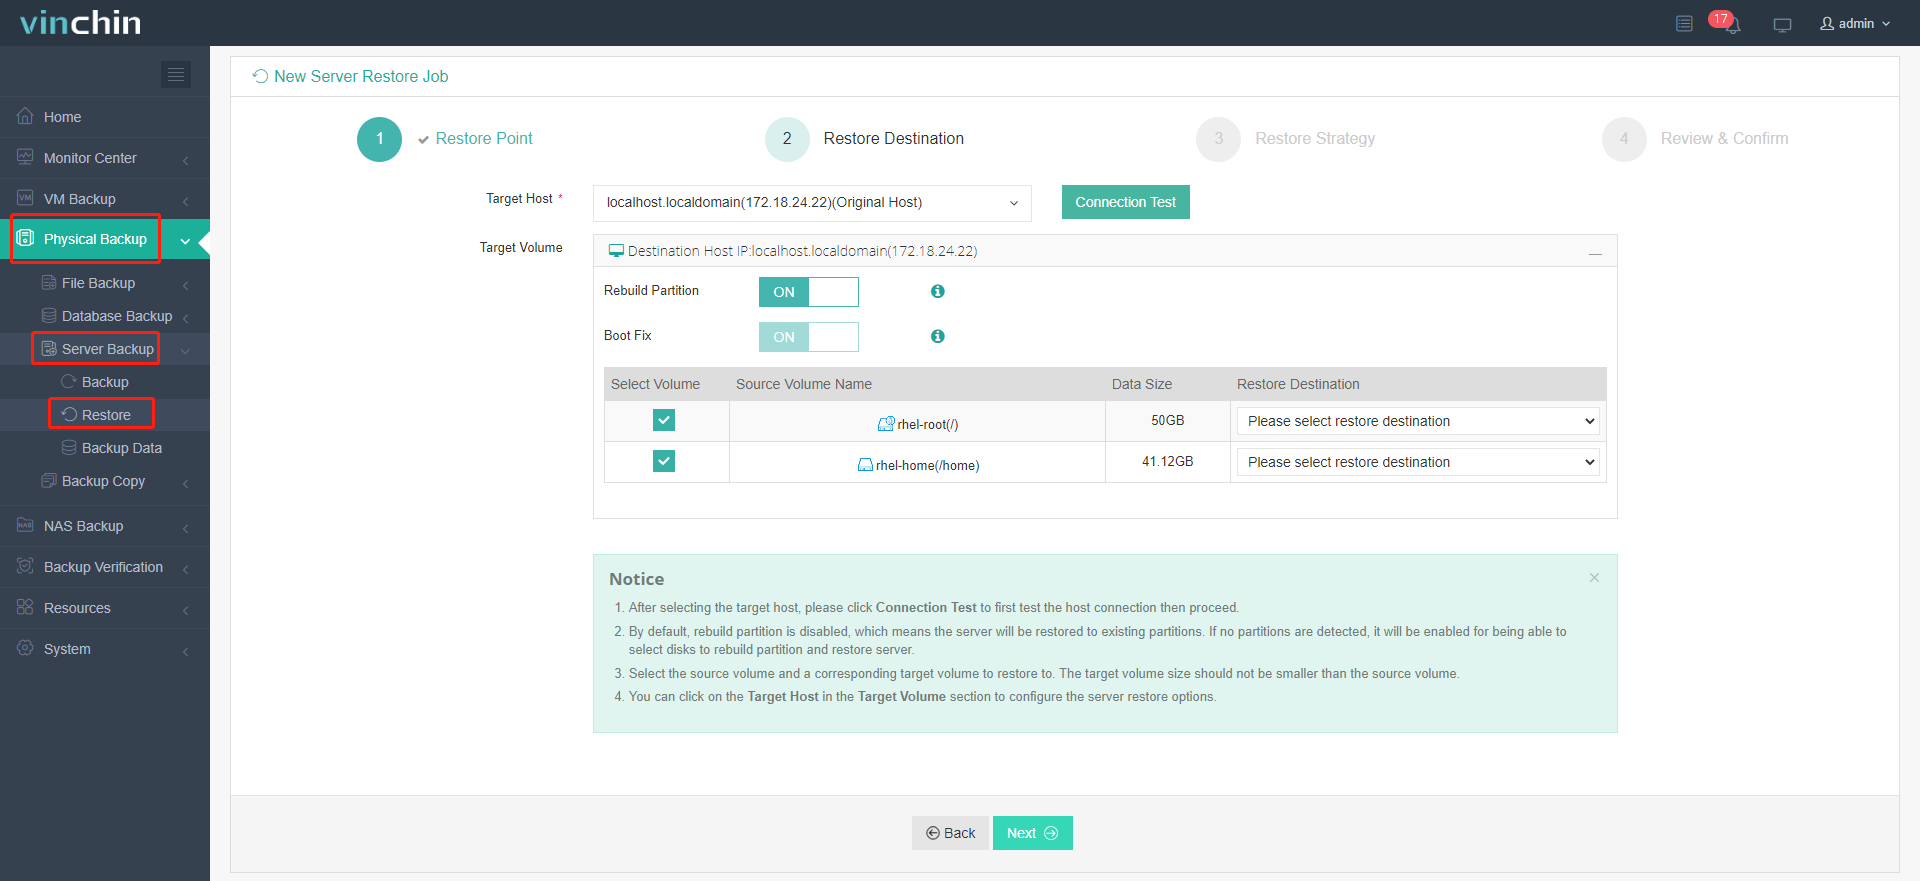
2. Choose a licensed host and click Connection Test. Enable rebuild partition or boot fix optionally, and select restore destination for the volume.

3. Configure recovery strategies such as multiple transfer threads and encrypted transmission.
4. Check and submit the job.
Note: Backup and restore Windows files/folders under File Backup.
Verdict
This post describes 3 ways to back up and restore Windows 11 to an external hard drive using the internal File History, Backup and Restore, and wbAdmin. But an external hard drive isn't that reliable since it's vulnerable to physical damage, loss, and theft. Consider a safe and smart Windows backup solution like Vinchin Backup & Recovery with user-friendly operations and affordable prices.
Share on:


