-
Vmdk and qcow2
-
How to convert vmdk to qcow2 with qemu-img?
-
How to Directly Migrate VM with Vinchin Backup & Recovery?
-
Vmdk to qcow2 FAQs
-
Sum Up
The invention of server virtualization technology has greatly optimized the utilization of hardware resources and work efficiency of IT environment. After several years, there are many kinds of virtualization solutions in the market.
To move VM or migrate data between different platforms, IT administrators often need V2V converter. Although some platforms can directly accept the files from another platform, sometimes VM conversion is still needed.
In the following sections, you will know the way to convert vmdk to qcow2.
Vmdk and qcow2
VMware vSphere is the leading virtualization solution in the world. With ESXi hypervisor installed on the server, users can easily create virtual machines for all kinds of business systems.
Although virtual machine is a small part of the server, it is still as complete as the physical machine which has CPU, storage, network adapter, etc. Physical machine will save application data to hard disks. When it is needed to clone or migrate data, hard disk data is important. In virtual machine, there are virtual hard disks which also contain applications and data. Because of server virtualization technology, virtual hard disks are just files on the server.
In VMware virtual machine file system, the file format of virtual hard disk is .vmdk, short for Virtual Machine Disk. A VMDK file represents a physical hard drive.
Some VM management tools like XenCenter can accept vmdk file without preconversion.
Generally speaking, vmdk. file is often very large, more than several GB. It will be updated whenever user data or server configuration is modified. There is no feature for acquiring incremental data in VMDK so the entire file needs to be backed up again when any file is modified.
To use the powerful features of VMware, vmdk files are often stored in shared storage. You can copy vmdk files to another datastore for later use. To locate the vmdk files of a VM, you can right-click the VM in vSphere client > select Edit Settings > expand Hard disk to see where they are stored.
Qcow2, short for QEMU copy-on-write format 2, is the successor of the first-generation qcow, which has barely satisfying performance, but still cannot be compared with raw format. After optimization to the first generation of qcow, it is close to raw format in performance. Now, qcow2 is one of the mainstream image formats.
To better use data from VMware, you can change the format of virtual hard disk to let it better work in QEMU/KVM environment like Proxmox, oVirt, RHV, OLVM, OpenStack, etc.
How to convert vmdk to qcow2 with qemu-img?
Qemu-img is an image converter which supports multiple image formats including vhd, qcow2,raw, vhdx, qcow, vdi, qed, zvh and zvhd2. It is needed to add the directory to environment variables like JDK or Python.
In Windows environment:
1. Download the installation package and install it
2. After installation, add the directory to path environment variables
3. Verify the installation by typing the command below:
qemu-img --help
If the version information of qemu-img is presented in the output, the installation is successful
4. Converting the image by typing the command below:
qemu-img convert -p -f vmdk -O qcow2 my_centos7.vmdk my_centos7.qcow2
-p: presenting the conversion progress
-f: format of the source image
-O: format of the target image
In Linux environment:
1. Select the command to install it according to your operating system
For Ubuntu/Debian, type the command below:
apt install qemu-img
For CentOS/Red Hat/Oracle, type the command below:
yum install qemu-img
For SUSE/OpenSUSE, type the command below:
zypper install qemu-img
2. Verify the installation by typing the command below:
qemu-img -v
If the version information of qemu-img is presented in the output, the installation is successful
3. Converting the image by typing the command below:
qemu-img convert -p -f vmdk -O qcow2 ./my_centos7.vmdk ./my_centos7.qcow2
Qemu-img convert can be also used to convert qcow2 to vmdk.
How to Directly Migrate VM with Vinchin Backup & Recovery?
If you would like to migrate VM with a professional solution, you can choose Vinchin Backup & Recovery to migrate VM without converting virtual disk.
Vinchin Virutal Machine Convert Engine supports V2V migration between virtualization platforms like VMware, Proxmox, Hyper-V, Red Hat Virtualization, oVirt, Oracle Linux KVM, OpenStack, etc. (Native KVM is not supported for now)
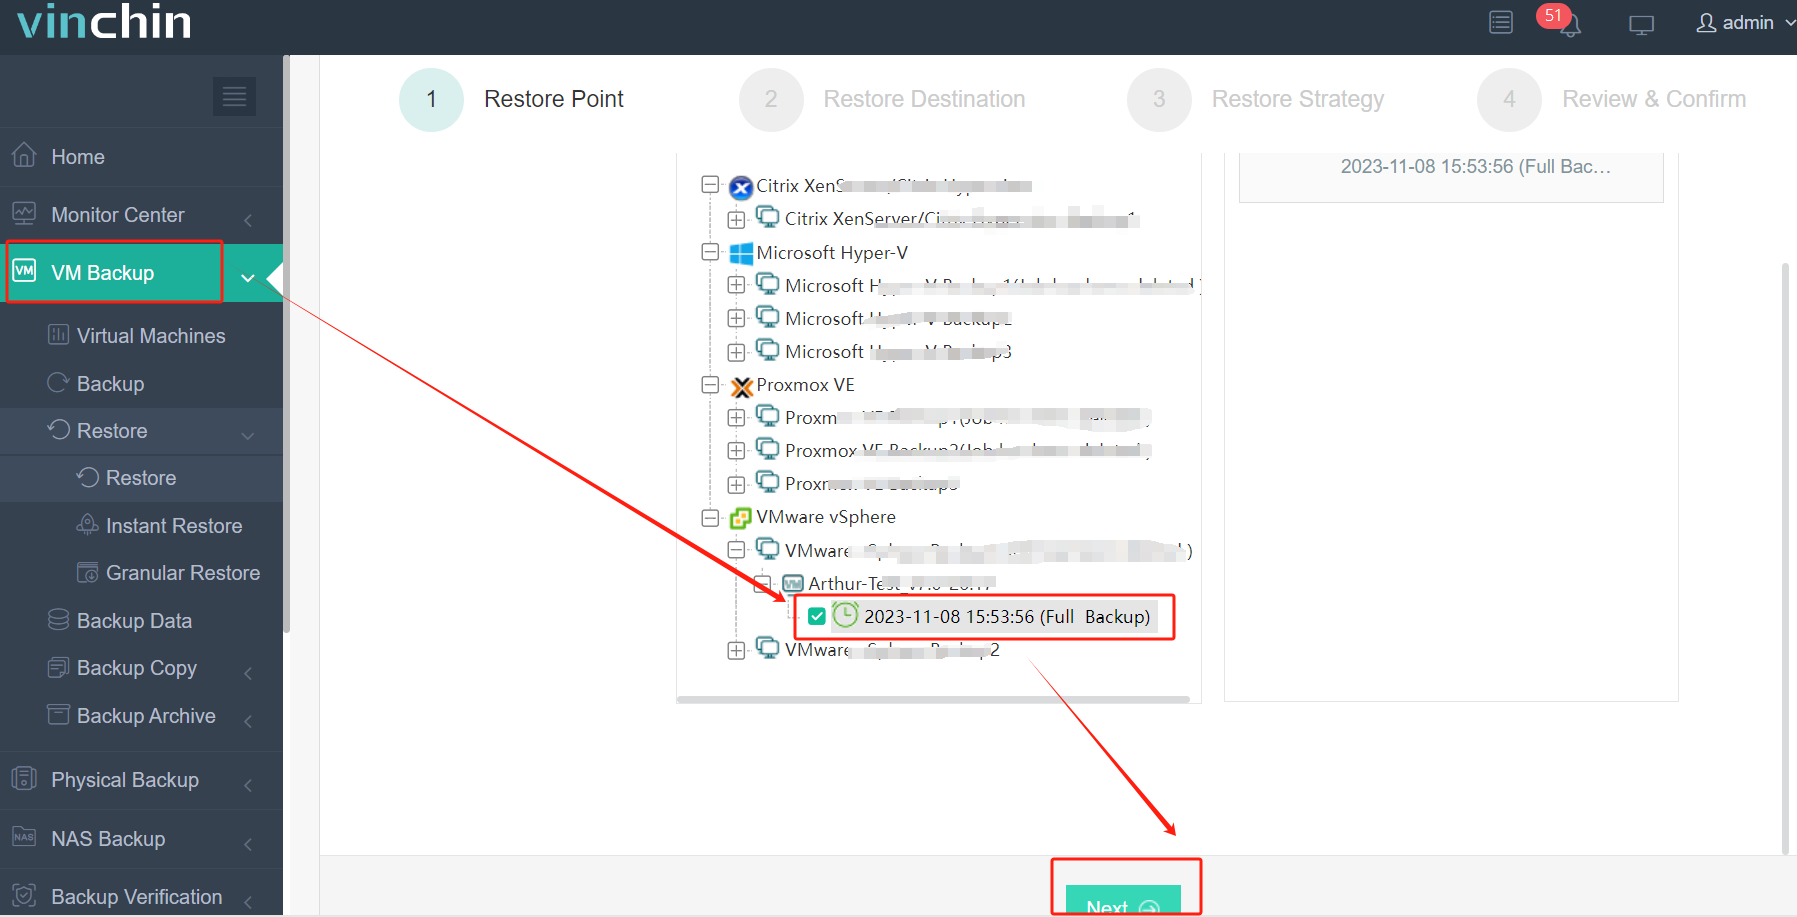
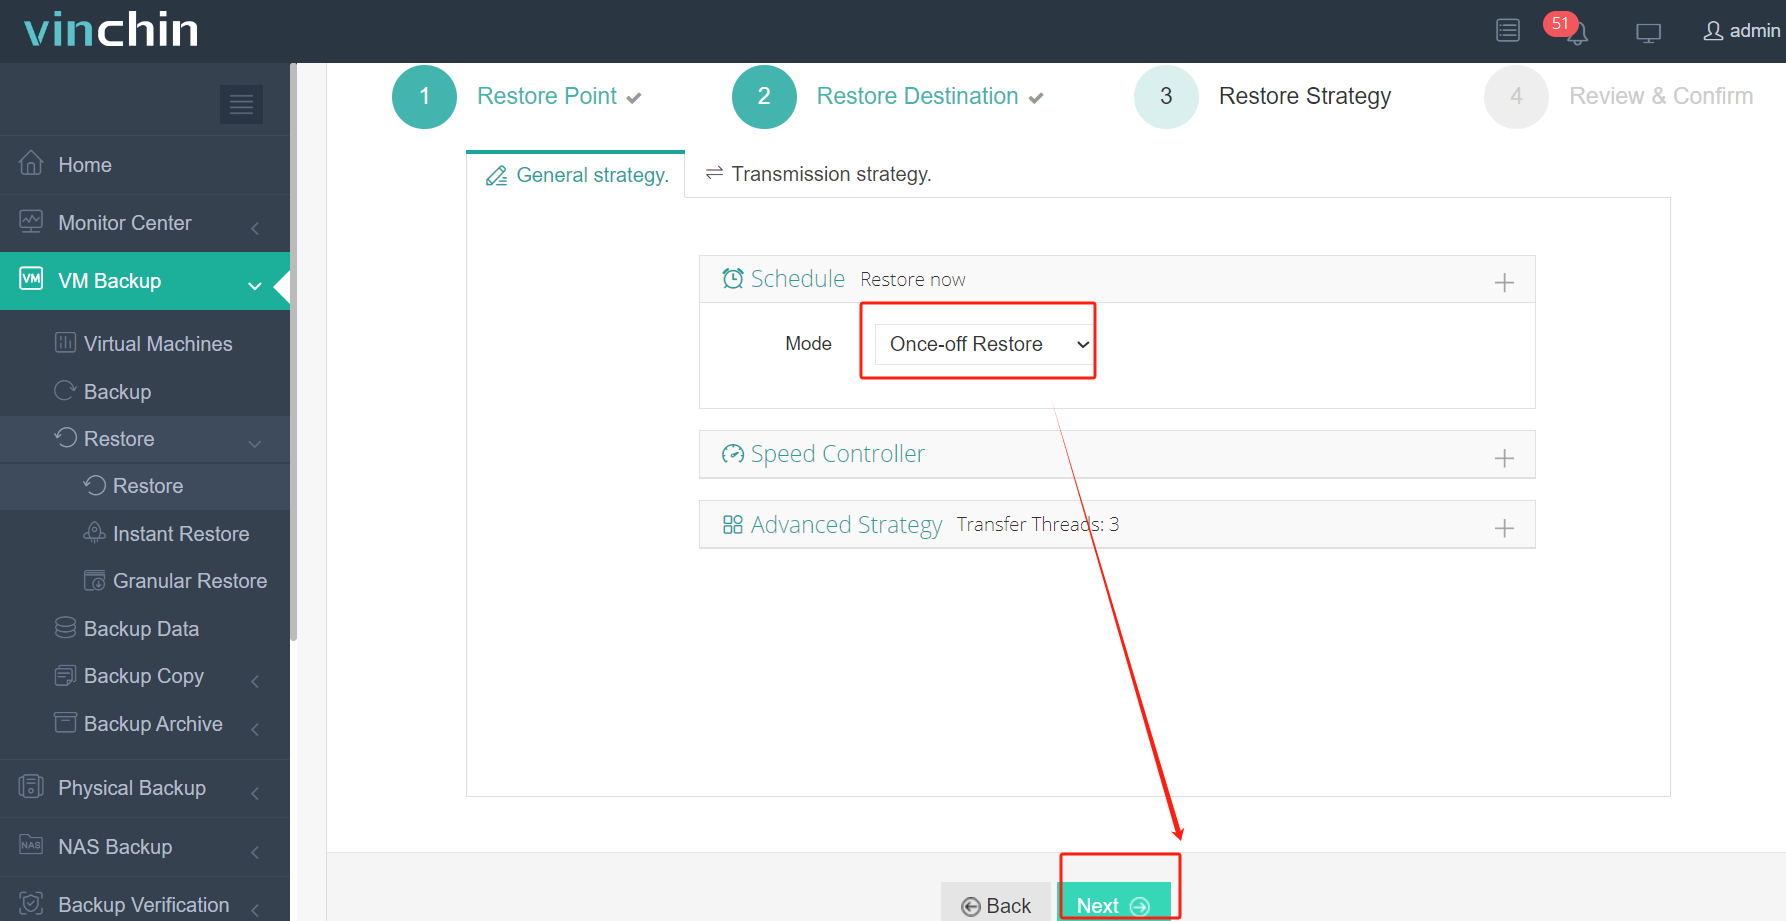
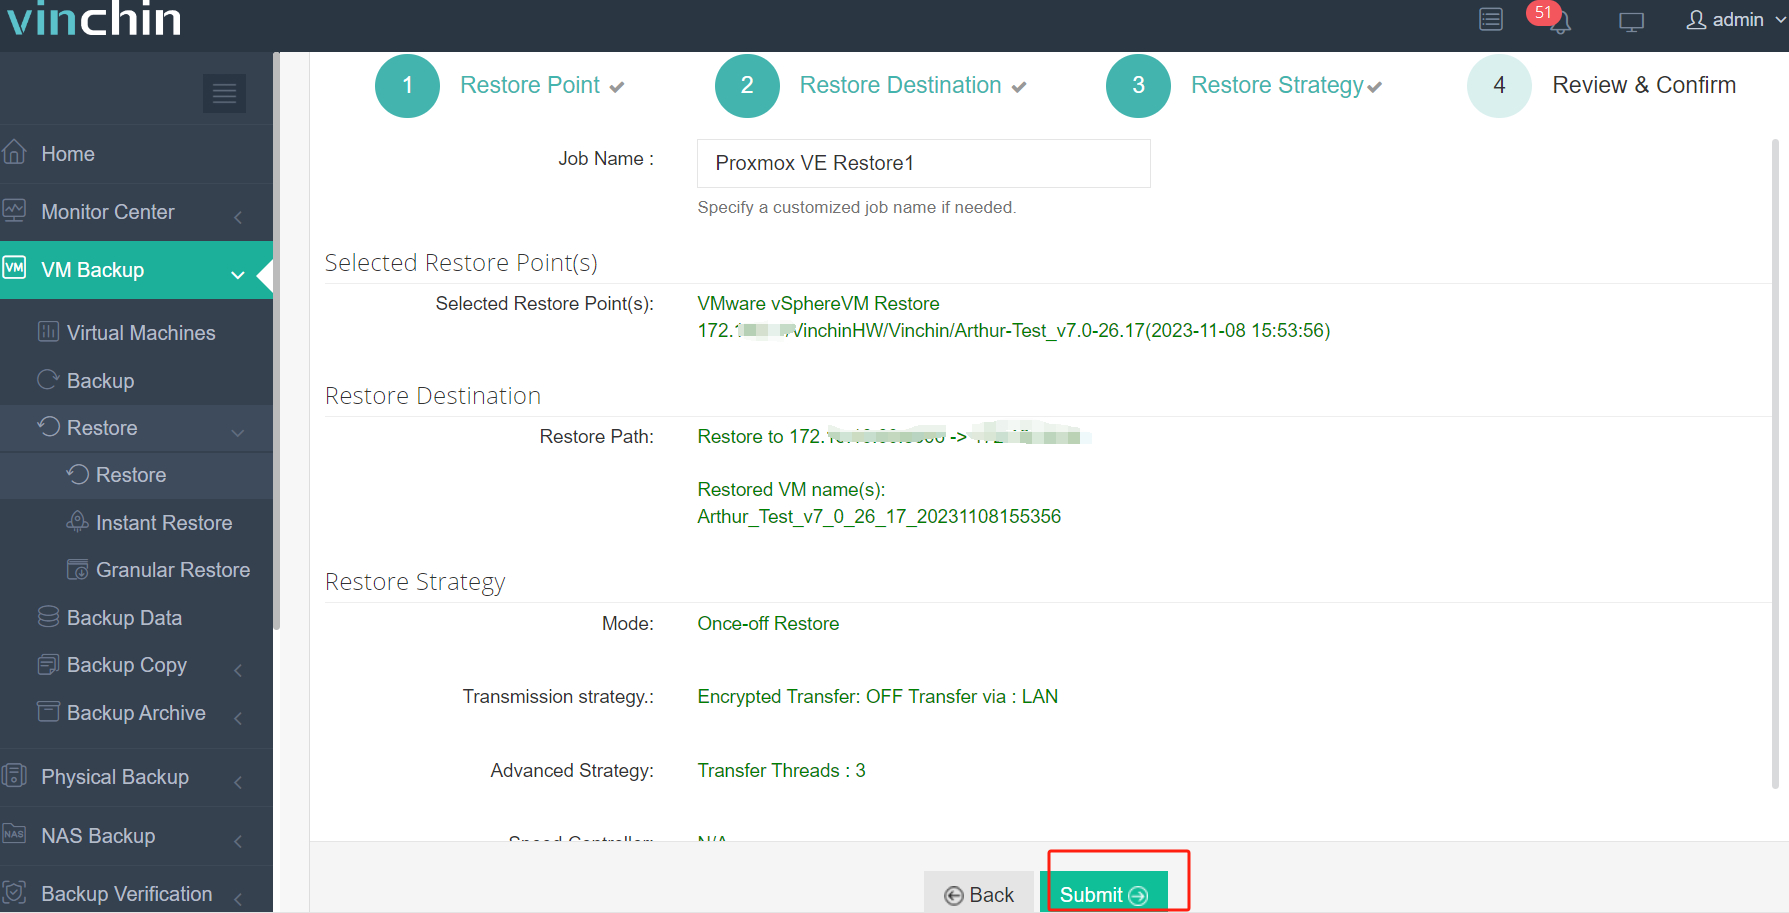
You don't need to install agent on every VM, but use the backup and restore features to directly migrate VM. For example, there are just 4 steps to migrate VMware VM to Proxmox in a user-friendly web console.
1. Select the VMware VM

2. Select the Proxmox host

3. Setect the restore strategies or skip this step

4. Submit the job

Vinchin Backup & Recovery has helped many companies migrate VM without losing data and you can also start a 60-day full-featured free trial here to see how convenient it is for VM migration. If you need any help, contact us at any moment. If you would like to do a local business, you can select a local partner here.
Vmdk to qcow2 FAQs
1. Can you convert vmdk to qcow2 on different operating systems?
Yes. With QEMU-convert can be installed on both Windows and Linux OS so you can choose a proper one to convert the virtual disk.
2. Will the virtual disk size grow after conversion?
It is possible that the coverted virtual disk is bigger than the original one so you can use the professional VM migration solution Vinchin Backup & Recovery to avoid that.
Sum Up
There are many virtualization platforms in the world. To migrate data to another platform, IT administrators often need to do conversion job to the source VM. In this post, the methods of converting vmdk to qcow2 are introduced for IT administrators.
Vinchin Backup & Recovery is a convenient tool for you to import VMDK to KVM without complicated commands. Don't miss the free trial.
Share on:


