-
VM Migration Tools
-
Prerequisites
-
Way 1: Convert a VMware VM to Hyper-V with MVMC
-
Way 2: Converting VMDK to VHDX with PowerShell
-
Way 3: Convert a VMware VM to Hyper-V with SCVMM
-
Way 4: Migrate VMware to Hyper-V with Vinchin Backup & Recovery
-
VMware to Hyper-V Conversion FAQs
-
Sum up
VMware is a virtualization software and cloud computing vendor that enjoys a long history in the industry with a bunch of products and tools for virtual machine operation, recovery, and migration. As a widely popular choice for various IT environments, VMware appeals to global customers because of its high data availability, fault tolerance, fully functioning ecosystem, and other features.
However, due to the acquision of VMware by Broadcom, there have been significant changes to the product line, including the SKUs and licenses so that many companies have to choose a VMware alternative to adapt to the change.
Microsoft Hyper-V is also a bare-metal hypervisor that has migration flexibility between physical hosts, storage migration from a running VM to another, high availability, and server scalability without purchasing new hardware. Best of all, it saves money and is cost-effective for users.
Now, you might want to run a multi-hypervisor environment, do a test, or look for a more rational price. Either way, you need to convert VMware VMs to Hyper-V and Microsoft provides 3 ways to help you complete the data migration or you can select the professional V2V converter to perform VM migration.
VM Migration Tools
Microsoft Virtual Machine Converter (MVMC): A free standalone conversion program with GUI that can turn physical machines into virtual ones, which works for Azure, VMware ESXi VMs conversion to Hyper-V. While it is open to download, its support officially ended on June 03, 2017. So, use this method with caution.
PowerShell: PowerShell can help convert the VMDK virtual disk to VHD(X) virtual disk.This way applies to both VMware Workstation and VMware ESXi when you have the virtual disk files, but not all virtual machine files like VMX configuration files.
System Center Virtual Machine Manager (SCVMM): A management solution and conversion tool for Hyper-V and VMware environments.
Prerequisites
Some measures need to be done previous to the data migration to avoid problems.
Remove any redundant virtual devices like COM and virtual floppy drives and eject virtual CD to avoid any disturbance.
Delete unnecessary files, programs, and components of the virtual hard disks.
Delete or consolidate VM snapshots.
Remove VMware Tools before converting online. MVMC only disables VMware services in offline conversion for Windows OS, so you could uninstall the tools manually.
Way 1: Convert a VMware VM to Hyper-V with MVMC
1. Start the Microsoft Virtual Machine Converter (MVMC), and select Virtual machine conversion as the Machine Type. Click Next.
2. Select Migrate to Hyper-V on the Migration Destination page, then click Next.
3. Enter the name/IP address of the destination host and access the privileged user on the Hyper-V Host page. Click Next to proceed.
4. Set the Disk options and specify a location where the converted virtual hard disks will be stored. Recommend not to use the system disk for storing in production environments. Choose the virtual hard disk type for the converted disk between Fixed size (thick-provisioned) and Dynamically expanding (thin-provisioned). Select the converted disk format between VHD and VHDX. Click Next.
5. Input the address, username, and password on the Source page to connect to ESXi/vCenter server. Click Next.
6. Select the conversion virtual machine from the list on the Virtual Machine page, then click Next.
7. On/Off the Final state of source and destination virtual machines. Provide the root account username and password of the source VM if it has VMware Tools. Click Next.
8. Click Browse... on the Workspace screen to choose a folder where temporary files for the conversion process will be kept, then select Next.
9. Review all the setup details you provided on the Summary screen, and then click Finish to begin the conversion.
10. See the status on the Completion page and click Close when it’s finished.
Way 2: Converting VMDK to VHDX with PowerShell
1. Export target VMware VMs to the OVF template. We need the .vmdk file.
2. Start PowerShell and enter the command to add the converter module.
Import-Module “MVMCfolderpathMicrosoft Virtual Machine ConverterMvmcCmdlet.psd1”
3. Convert VMDK into VHDX:
ConvertTo-MvmcVirtualHardDisk -SourceLiteralPath “VMDKfile-path-and-name.vmdk” -VhdType Fixedsize/DynamicHardDisk -VhdFormat vhd/vhdx -DestinationLiteralPath “newfilepath
ewfilename.vhdx”
4. Attach the converted disk to Hyper-V.
1) Open Hyper-V Manager, go to the Actions pane, and click New > Virtual Machine… to create a new VM.
2) Follow the steps of the New Virtual Machine Wizard and click Next on the Before You Begin page.
3) Specify the new Virtual Machine Name and Location. Click Next.
4) Choose the Generation 1 or 2 base, and click Next.
5) Assign the memory for the VM from the physical PC.
6) On Configure Networking page, select New Virtual Switch or Not Connection (don’t have or want to connect in LAN) from the Connection dropdown list.
7) On Connect Virtual Hard Disk, select Use an existing virtual hard disk and click Browse… to select the hard disk. Click Next.
8) Click Finish.
9) Click twice on New Virtual Machine.
10) Click Power on to start.
Way 3: Convert a VMware VM to Hyper-V with SCVMM
Notes:
VMM 2022 supported VMware servers: ESX/ESXi 6.5, 6.7 and vCenter 6.5, 6.7.
Unsupported conversion subjects: VMware workstations, virtual machines with hard disks connected to an IDE bus, and online conversions.
Power off anti-virus apps and VMware VMs.
Uninstall VMware Tools from the guest OS.
1. Open VMs and Services.
2. On the Home page, click Create Virtual Machine in Create group. Then click Convert Virtual Machine.
3. In the Convert Virtual Machine wizard, click Select Source, Browse and choose the VMware VMs to be converted in Select Virtual Machine Source.
4. On Specify Virtual Machine Identity page, specify the VM name and optional description.
5. On the Virtual Machine Configuration pane, set the number of processors and the memory size (in megabytes or gigabytes).
6. On the Select Host page, choose a Hyper-V host for placement and configure the storage location for the VM in Select Path. The default path is listed, and for another different location, click Browse and the folder. You could also add a path by selecting Add this path to the list of default storage locations on the host.
7. On the Select Networks page, choose from the virtual network, the logical network, and the virtual LAN (VLAN).
8. On Add Properties page, set up the required configurations and review settings in the Summary pane. Select Start the virtual machine after deploying it optionally.
9. Click Create to start. Confirm the Completed job status in the Jobs dialog, then close it.
10. In VMs and Services > Home > Show > VMs, confirm the conversion of the VM.
Way 4: Migrate VMware to Hyper-V with Vinchin Backup & Recovery
Transferring VM outputs using the standard methods may yield difficulties due to possible interoperability issues. As such, employing advanced tools built specifically for the transition of virtual infrastructures can offer a more efficient solution.
Vinchin Backup & Recovery is not only a backup solution for virtual machine, but also an advanced VM migration solution, supporting VMware vSphere, Hyper-V, Proxmox, XenServer, XCP-ng, oVirt, OLVM, RHV, OpenStack, etc. By adding both virtualized platforms into the backup system, you can perform easy agentless VM migration with a user-friendly web console.
There is the built-in conversion engine in the backup system, you just need to select the VM you need to move it to another virtualized platform.
For instance, if you would like to migrate VM from VMware to Hyper-V:
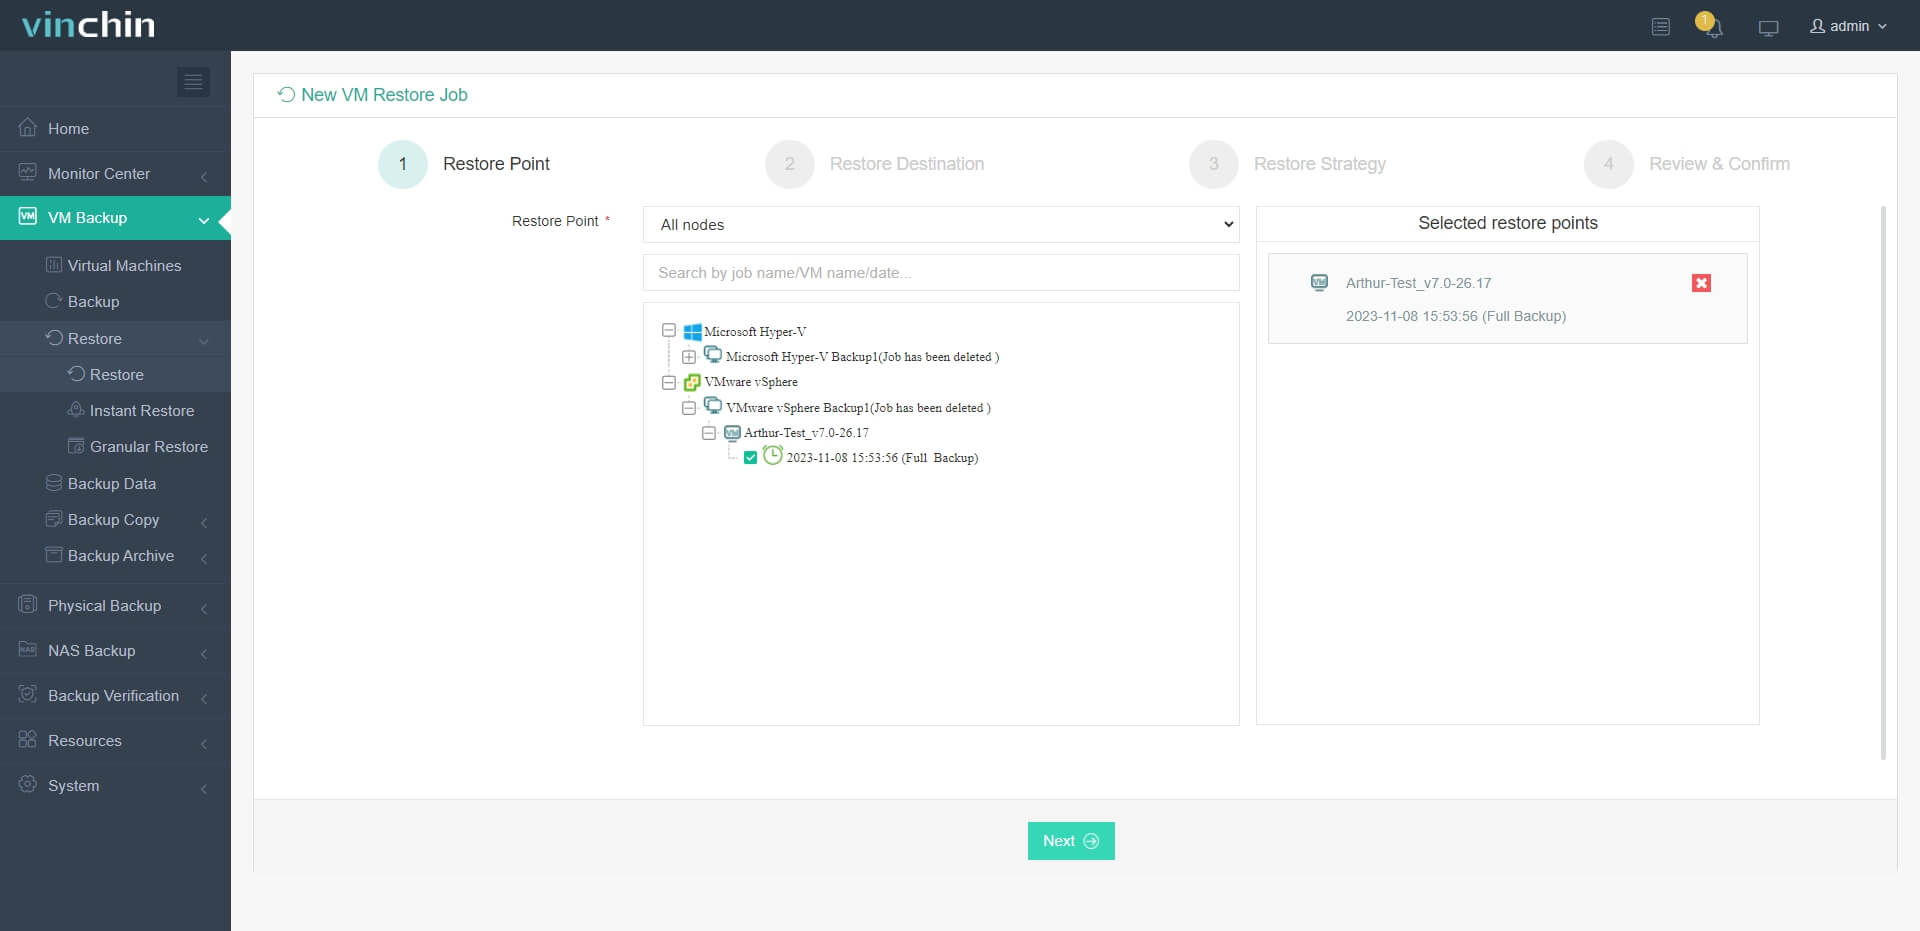
1. Just select the backup of the target VMware VM

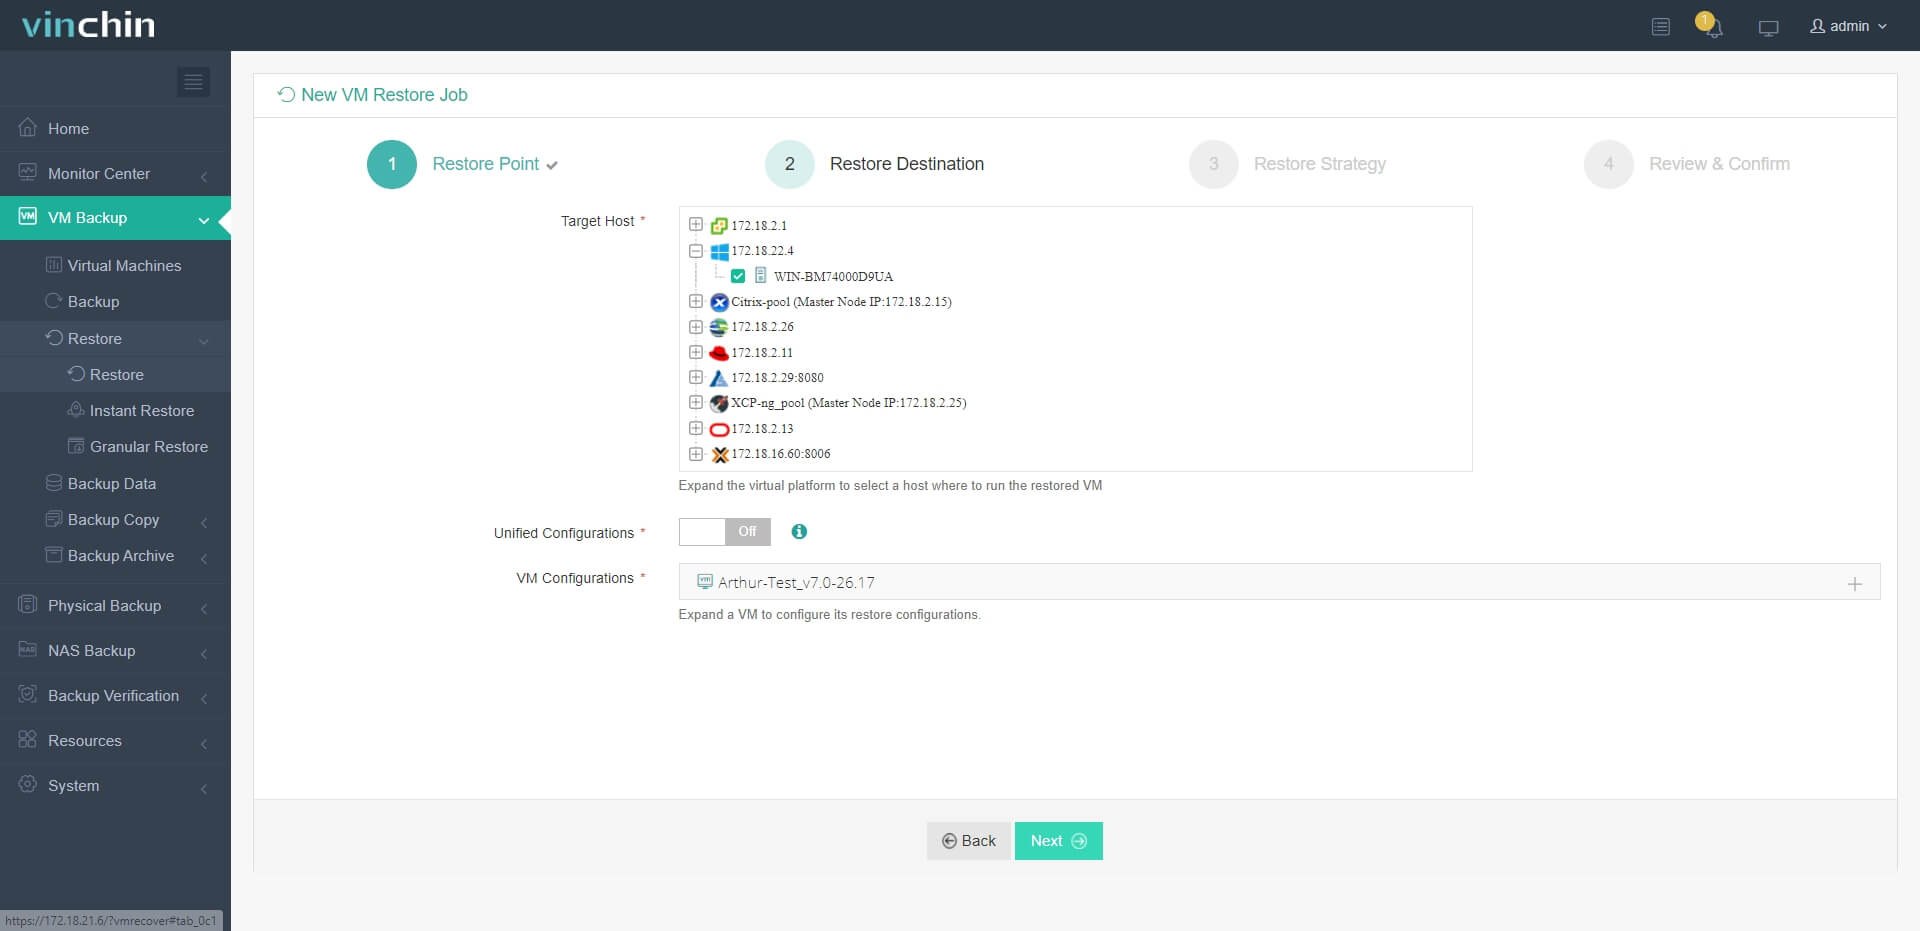
2. Select a Hyper-V host as target host

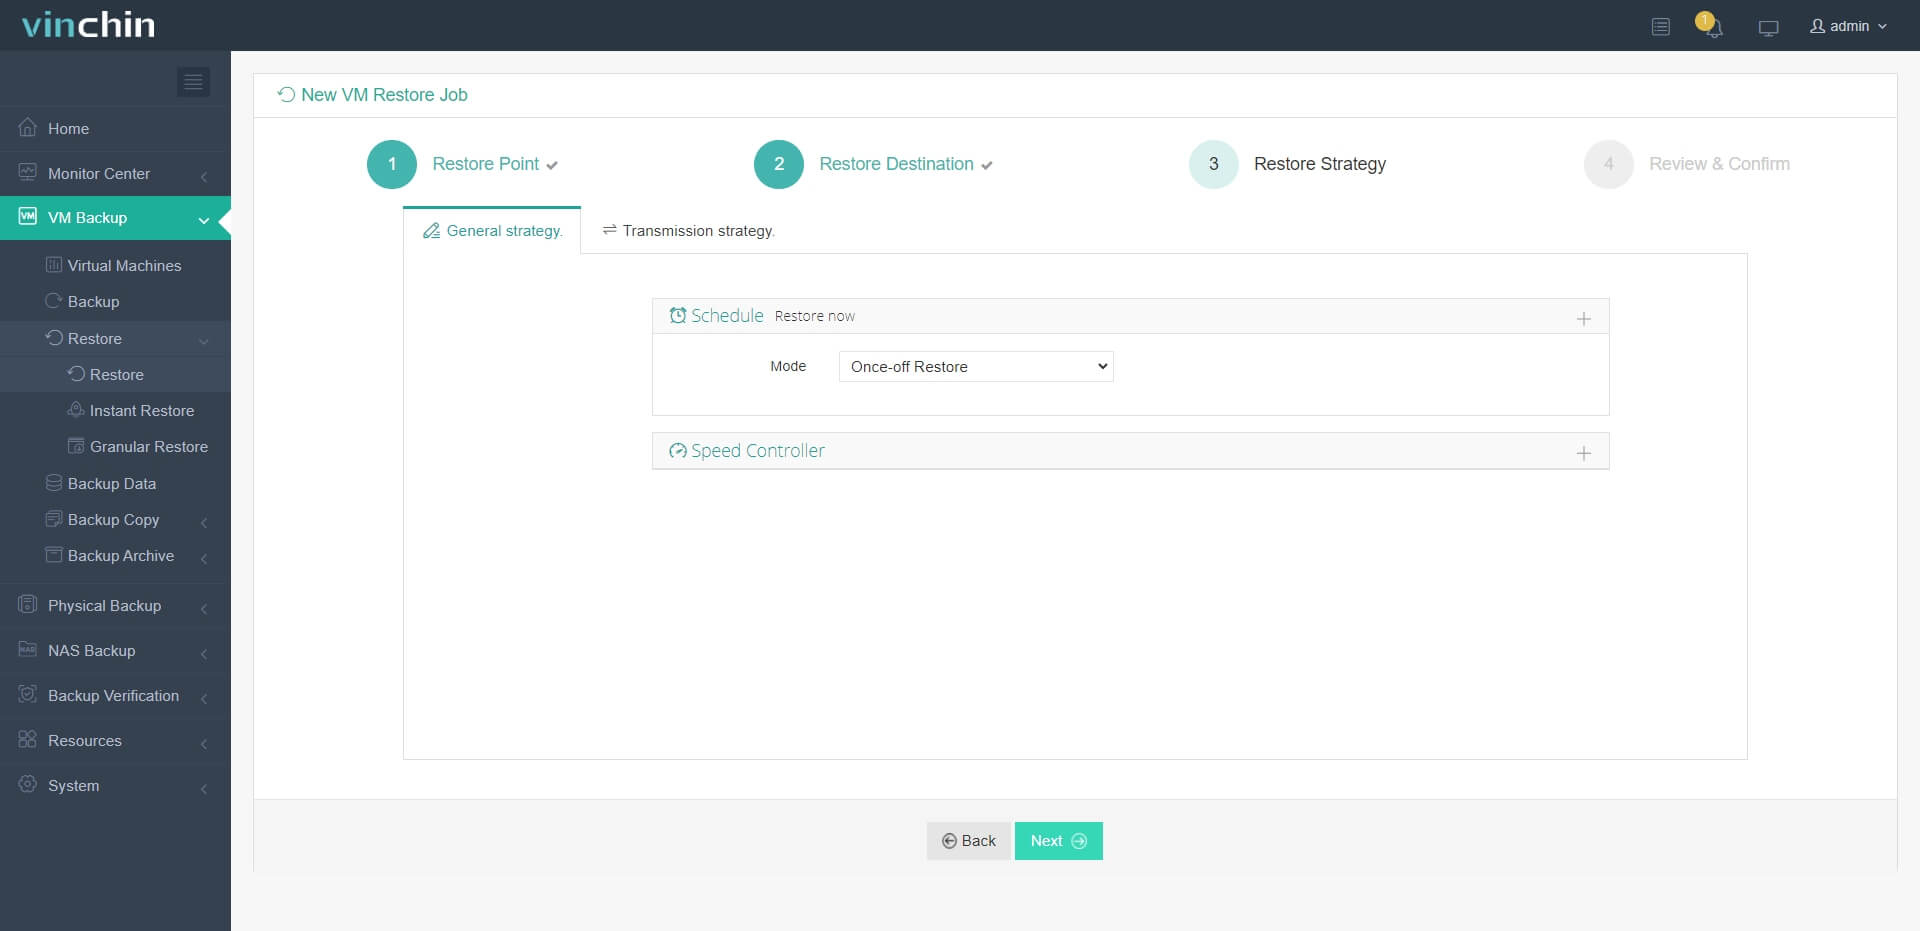
3. Simply set up restore strategies or directly skip this step

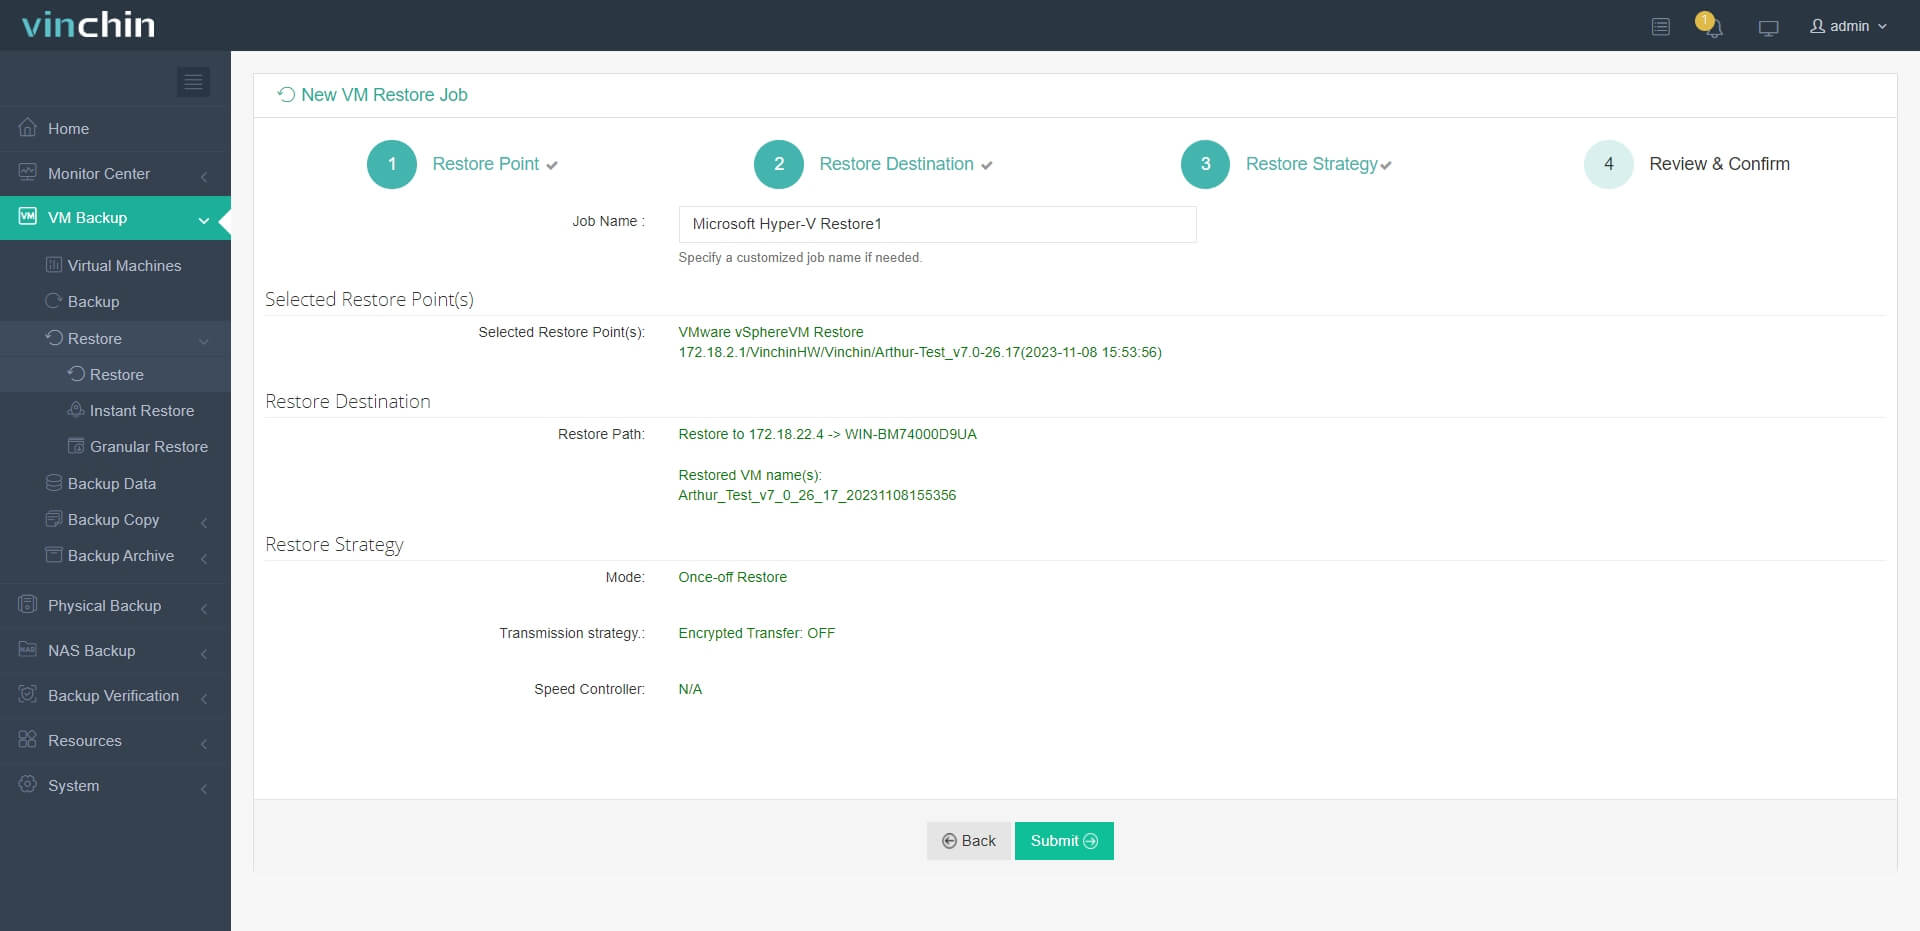
4. Just submit the job and then the VMware VM will be quickly restored on the Hyper-V host

Vinchin Backup & Recovery has been selected by thousands of companies and you can also start a 60-day full-featured free trial here. Also, contact us, leave your requirements, and then you will receive your tailored solution. We have established partnerships with reputable companies all over the world so if you would like to do a local business, you can select a local partner here.
VMware to Hyper-V Conversion FAQs
Does VMware to Hyper-V conversion cause any downtime?
This depends on how you convert the virtual machine. If you select to export VMware from vCenter, this might require you to shut down the VM before exporting it and result in some downtime. Using Vinchin Backup & Recovery will not require that and it will also increase the success rate of virtual machine migration so the downtime will be much shorter.
Can you directly migrate from VMware to Hyper-V?
Most of the conversion method will require VM export and conversion so it is hard to migrate a VM from VMware to Hyper-V.
How do you ensure data integrity during the conversion process?
To ensure data integrity, it is recommended to use the professional migration solution like Vinchin Backup & Recovery or you should at least backup the VM before migration so you can transfer data to the new virtual machine in the event of any issues.
Sum up
In this article, I introduced 4 ways to convert VMware VMs to Hyper-V, which are MVMC, PowerShell, SCVMM, and Vinchin Backup & Recovery. However, remember that MVMC had been discontinued by Microsoft, you could resort to the paid conversion tool SCVMM, or find another third-party way to migrate.
Vinchin Backup & Recovery is relatively professional and better promises the validity of the migrated VM on the new host so don't miss the free trial.
Share on:


