-
Way 1: Sync My Cloud with Google Drive
-
Way 2: Backup My Cloud to External Hard Drive/USB
-
Way 1: Restore My Cloud from a Safepoint
-
Way 2: Restore My Cloud with File History
-
Way 3: Backup and Restore My Cloud Using Vinchin Backup & Recovery
-
Conclusion
NAS devices are preferred as reliable and accessible storage over external hard drives. There are Western Digital, TerraMaster, Asustor, Synology and QNAP, and other NAS brands available on the market. Among them, My Cloud is a popular network-attached storage series for personal and office uses created and sold by Western Digital Corporation, which contains My Cloud Home, My Cloud Pro, My Cloud Expert, etc.
Since NAS users can access the storage any time and everywhere via a network, it is susceptible to network-related threats like the recent data breach affecting My Cloud and SanDisk users on March 26 by an unauthorized third party. This makes effective NAS backup and recovery a necessity.
In this article, I’ll show 3 ways for the backup and recovery of WD Cloud Drive and other NAS series respectively. Keep reading for the methods.
Way 1: Sync My Cloud with Google Drive
1. Download the Google Drive for desktop and log into your account.
2. Find the generated drive in Windows Explorer or Mac Finder.
3. Click the drive icon and select Settings> Preferences.
4. In the Google Drive section, choose Mirror files> Change folder location> choose the WD My Cloud disk> Confirm location.
Note: See backup WD My Cloud with OneDrive and Dropbox.
Way 2: Backup My Cloud to External Hard Drive/USB
1. Connect the external hard drive/USB to your PC.
2. Get access to WD My Cloud by typing the IP address of the NAS server or mapping the My Cloud server to the local computer.
3. Copy target files/folders and paste them to the external storage devices.
Note: Check for 4 ways to backup My Cloud to external hard drives/USB.
Way 1: Restore My Cloud from a Safepoint
1. In the WD My Cloud dashboard, click Safepoints on the navigation bar.
2. Scroll down to Restore Content with a Safepoint and click Start Recovery.
3. Choose the desired storage location for the points, which can be a local USB or scanning for other network resources.
4. Select the device on which the WD My Cloud safepoint is stored and network shares for the device and click Next.
5. Choose the desired safepoint and click Finish.
6. Wait for the restore procedure.
Way 2: Restore My Cloud with File History
1. Download Windows File Recovery in the Microsoft store if unavailable on your PC.
2. Type File Recovery in the search bar and choose Run as administrator.
3. Right-click your C disk and click Properties to see your File system.
| File System | Scenario | Mode |
| NTFS | Recently removed. | Regular |
| NTFS | Deleted for a while. | Extensive |
| NTFS | Following disk formatting. | Extensive |
| NTFS | A damaged disk. | Extensive |
| FAT and exFAT | Any. | Extensive |
4. Common switches.
| Switch | Description | Mode |
| /n | Search for a certain file using a file name/path/type/wildcard, like /n *.docx. | All |
| /y | Recover particular extension groups, separated by commas. | Signature |
| /p | Changes the recovery operation's log file's default location on the recovery drive to a different location. | All |
| /segment | A recovery option for NTFS disks that use file record segments. | Segment |
| /signature | A recovery option for all file system types that use file headers. | Signature |
5. The basic command.
winfr source-drive: destination-drive: [/mode] [/switches]
6. Restore the entire folder.
winfr C: D: /n UsersDawnDocuments
7. Recover files with the string of Example.
winfr C: D: /r /n *Example*
8. Recover .docx files to D drive.
winfr F: D: /extensive /n *.docx
Way 3: Backup and Restore My Cloud Using Vinchin Backup & Recovery
Vinchin Backup & Recovery is an integrated backup solution that backs up and restores All NAS devices under NFS/CIFS protocols whatever brand (WD, Synology, QNAP, Asustor, etc.) it is with an anti-ransomware AES-256 bank-level data encryption. You can:
Backup specific files/folders with a wildcard filter.
Backup to other NAS storage.
Use Full, Incremental, and Differential backup with one click.
Compress data to save storage.
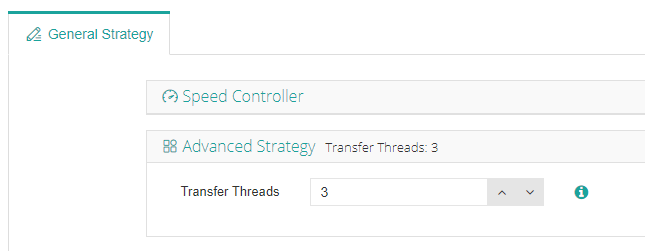
Set multiple transfer and scan threads for speed.
File-level restore to the original or a destination of NAS Share/ File Server.
Send an offsite backup copy to another location.
Reject any unauthorized visits with a real-time IO monitor.
The solution also supports 12 virtual platforms like VMware, Hyper-V, Xen, oVirt/RHEV, 6 databases, cloud archive, and Linux & Windows servers. Download the 60-day free trial to secure your critical data thoroughly.
WD My Cloud Backup
1. Navigate to NAS Backup> Backup, select a NAS Share, and source files/folders. Add an exclusion or inclusion filter as needed under Advanced.

2. Choose the backup node and storage for the job. You can select NAS here if you add one to the Vinchin software.

3. Configure desired backup strategies.
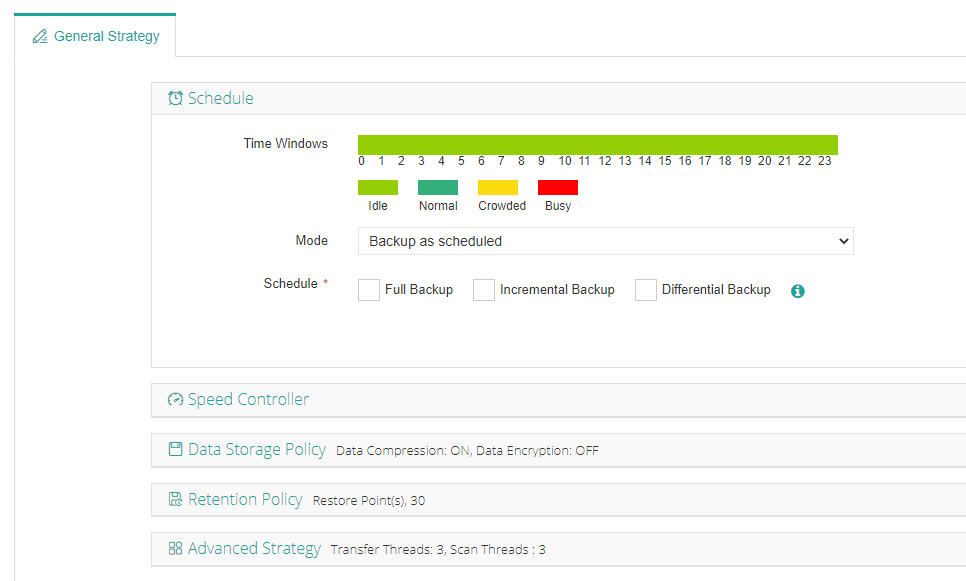
4. View the summary and submit the job. It will run on schedule.
WD My Cloud Recovery
1. Navigate to NAS Backup> Restore and select a restore node and target files/folders.
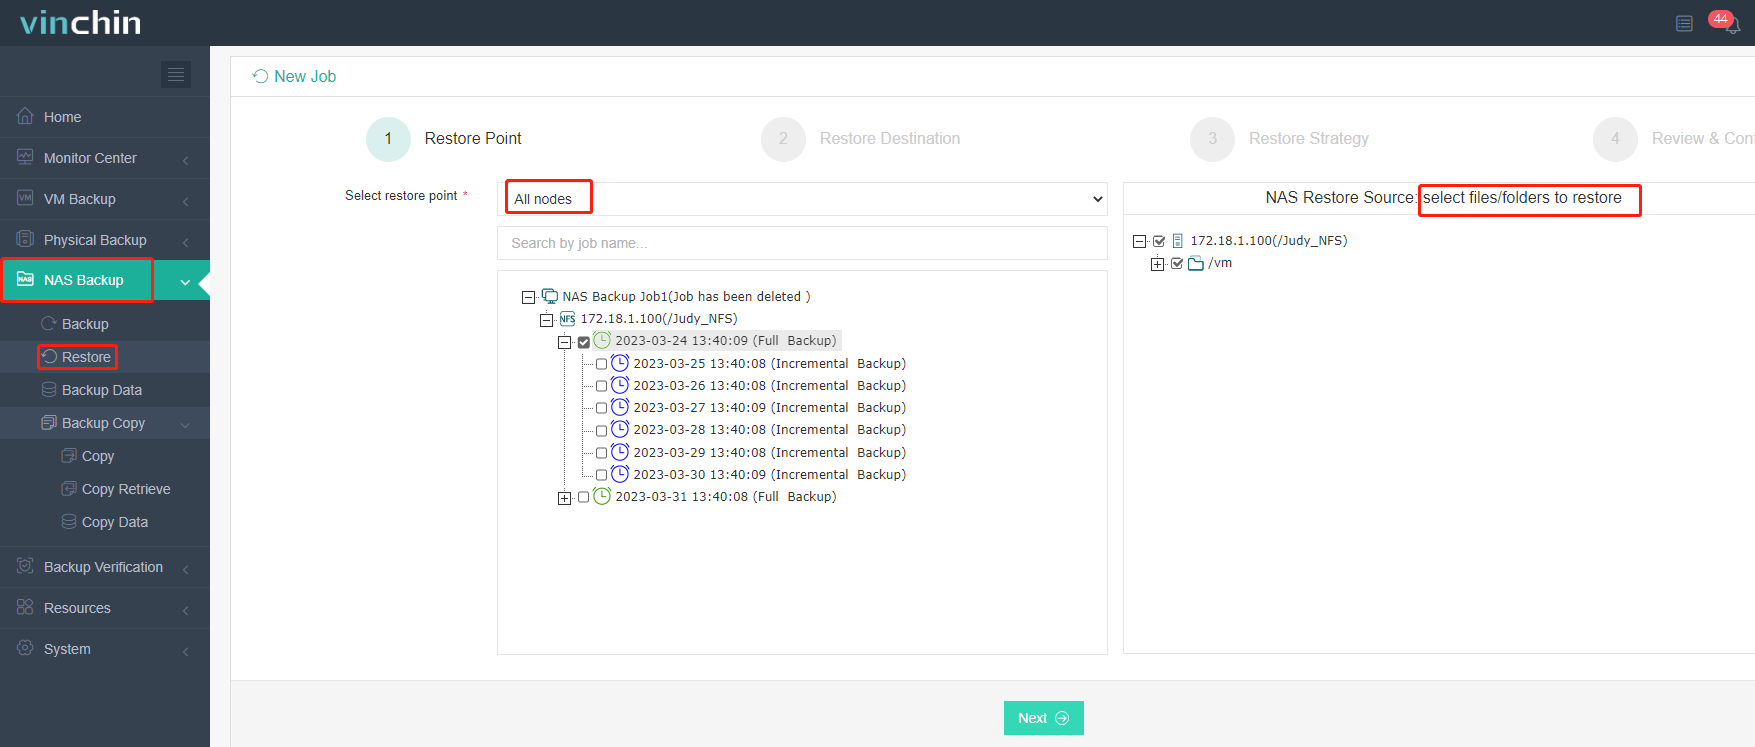
2. Restore to NAS Share/File Server and original/new path.
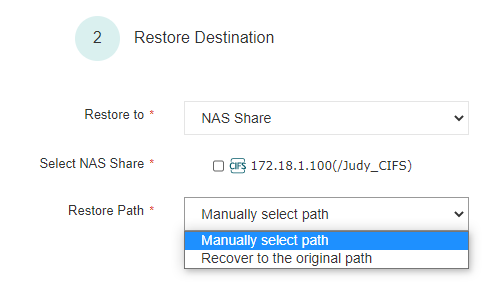
3. Set a speed controller and transfer thread number optionally.
4. Check the details and submit the task.
You can set up a backup copy job under Backup Copy> Copy to send your data copy to a safe place.
Conclusion
Ransomware attacks, accidental deletion, system failure, or downtime, could be devastating to your business-critical data, the only option left here is to perform effective and frequent backups in case of data loss.
You can backup WD My Cloud drives to clouds or external hard drives and restore the data from a Safe point or File History. But the task could be time-consuming and clumsy. Try Vinchin Backup & Recovery which uses smart backup, recovery, and anti-malware techniques to protect data from malicious actors.
Share on:


