-
Move the hard drives from old NAS to new NAS
-
Restore Synology backup to new NAS with Hyper Backup
-
Migrate NAS with Synology Migration Assistant
-
Professional NAS backup and migration solution: Vinchin Backup & Recovery
-
Sum Up
When the old NAS appliance is broken or the capacity is not enough, you might need to have a new NAS but business data on the NAS is important so it is necessary to select a proper migration solution.
There could be billions of files on the NAS so it might take a long time to transfer data and the destination NAS model might influence the migration solution.
Synology is a widely-used NAS appliance in companies so this post will focus on introducing Synology NAS migration. Here you can have 4 migration methods of transferring data on Synology NAS or other NAS appliances.
Move the hard drives from old NAS to new NAS
Like you migrate data from other hardware, you can also migrate Synology NAS data by moving the hard drives. You might be familiar with the procedures but don’t forget 2 things: data backup and compatibility test.
Data backup can effectively prevent data loss during the migration process and compatibility test makes sure old NAS data can be used on the new NAS.
Also, there are some limitations to hard drive migration between NAS appliances, like NAS models, source/destination model pairing, and hard drive compatibility and cache.
If you can find the model of the source NAS in the list below, data can’t be transferred to another NAS of a different model.
RS819, DS418, DS418j, DS218, DS218play, DS118, DS1817, DS1517, DS416, DS416play, DS2015xs, DS1515, DS715, DS415play, DS215+, DS214, DS214play, DS413, DS213+, DS212+, DS112+, DS211+, DS410, DS210+, DS110+
Check your source/destination model pairing in the list below and only “O” means you can safely migrate data between the two NAS appliances.
| Souce/Destination | J Series | Value Series | Plus Series | XS/XS+ Series | SA Series | FS Series |
J Series | O | O | X | X | X | X |
| Value Series | O | O | X | X | X | X |
| Plus Series | X | X | O | O | O | X |
| XS/XS+ Series | X | X | O | O | O | X |
| SA Series | X | X | X | O | O | O |
| FS Series | X | X | X | X | X | O |
If you make sure everything is OK and have made data backup, you can start to move the hard drive to new NAS appliance. If you would like to backup also NAS configuration, you can log into the source NAS > go to Control Panel > Update & Restore > Configuration Backup to backup NAS configuration.
1. Power off the source NAS > remove the drives (Do remember their order) > install the drives in the destination NAS
2. Power on the destination NAS > open Synology Assistant > if the status is Migratable, you can click Connect to move to the next step or data can’t be migrated
3. After you click Connect, you will see the Migrate option. Click it and then follow the wizard to complete the rest of work
Migrating data by moving hard drive to new NAS is fast but there are some limitations. If you don’t want to perform hard drive migration, Synology also provides other migration methods for you.
Restore Synology backup to new NAS with Hyper Backup
Hyper Backup is an internal Synology NAS backup solution, which can help you backup the NAS to the local drive, another NAS, or the cloud drive, and you can directly install it with Package Center. If you would like to migrate Synology NAS with it, you will need to make a backup of the source NAS and then restore data on the destination NAS.
Hyper Backup breaks the limitations of hardware models to let you have more destinations to choose but the deficiency is that there might be some data left on the old NAS because you will directly select files and folders to save them into the backup. In addition, DSM versions on the two NAS appliances matter because packages backed up on higher DSM version can’t be restored to lower DSM version.
1. You need to create a backup on the source NAS. If you don’t know how to use Hyper Backup, we have a post to help you use it step by step.
2. Then you need to move the NAS to the destination NAS. If you have selected the destination NAS to store the backup in the last step, you don’t have to move the data. If you have created a local backup in the last step, you can copy it to the new NAS with external storage.
3. Open Hyper Backup on the destination NAS > select Restore > when choosing data, select Restore from existing repositories > follow the wizard to finish the rest of the steps
Migrate NAS with Synology Migration Assistant
If you have used VMware vSphere, you might have used vMotion to move VM online. Except for moving just hardware or software, Synology also provides a live migration solution to help migrate data from old NAS to new NAS. Using Migration Assistant will let you move the settings and applications without interrupting the services on NAS.
It is simple to use.
1 Install Migration Assistant from Package Center on the destination NAS,
2 Open it > click Next in Migration Wizard > enter the information of the source NAS > click Next > read Initial system check > click Next > there will be the information of both source and destination NAS and the estimated migration time. Confirm the job > click Done
Professional NAS backup and migration solution: Vinchin Backup & Recovery
IT environments in companies are complicated but the internal solutions often can’t handle jobs involving multiple vendors. For example, companies can use Synology, QNAP, and Buffalo at the same time, but 3 management tools might be needed to manage different NAS. In addition, there might be other non-NAS file servers.
To simplify management and maintenance work, you can choose an integrated solution. Vinchin Backup & Recovery is an enterprise backup solution helping you protect and manage NAS, file server, virtual machine and physical machine.
Compared with other solutions, Vinchin Backup & Recovery is better at dealing with massive files and your backup and restore jobs will be greatly speeded up with it.
Like Hyper Backup, Vinchin Backup & Recovery can also backup NAS and restore data to another NAS. A user-friendly web console will help you easily finish the steps.
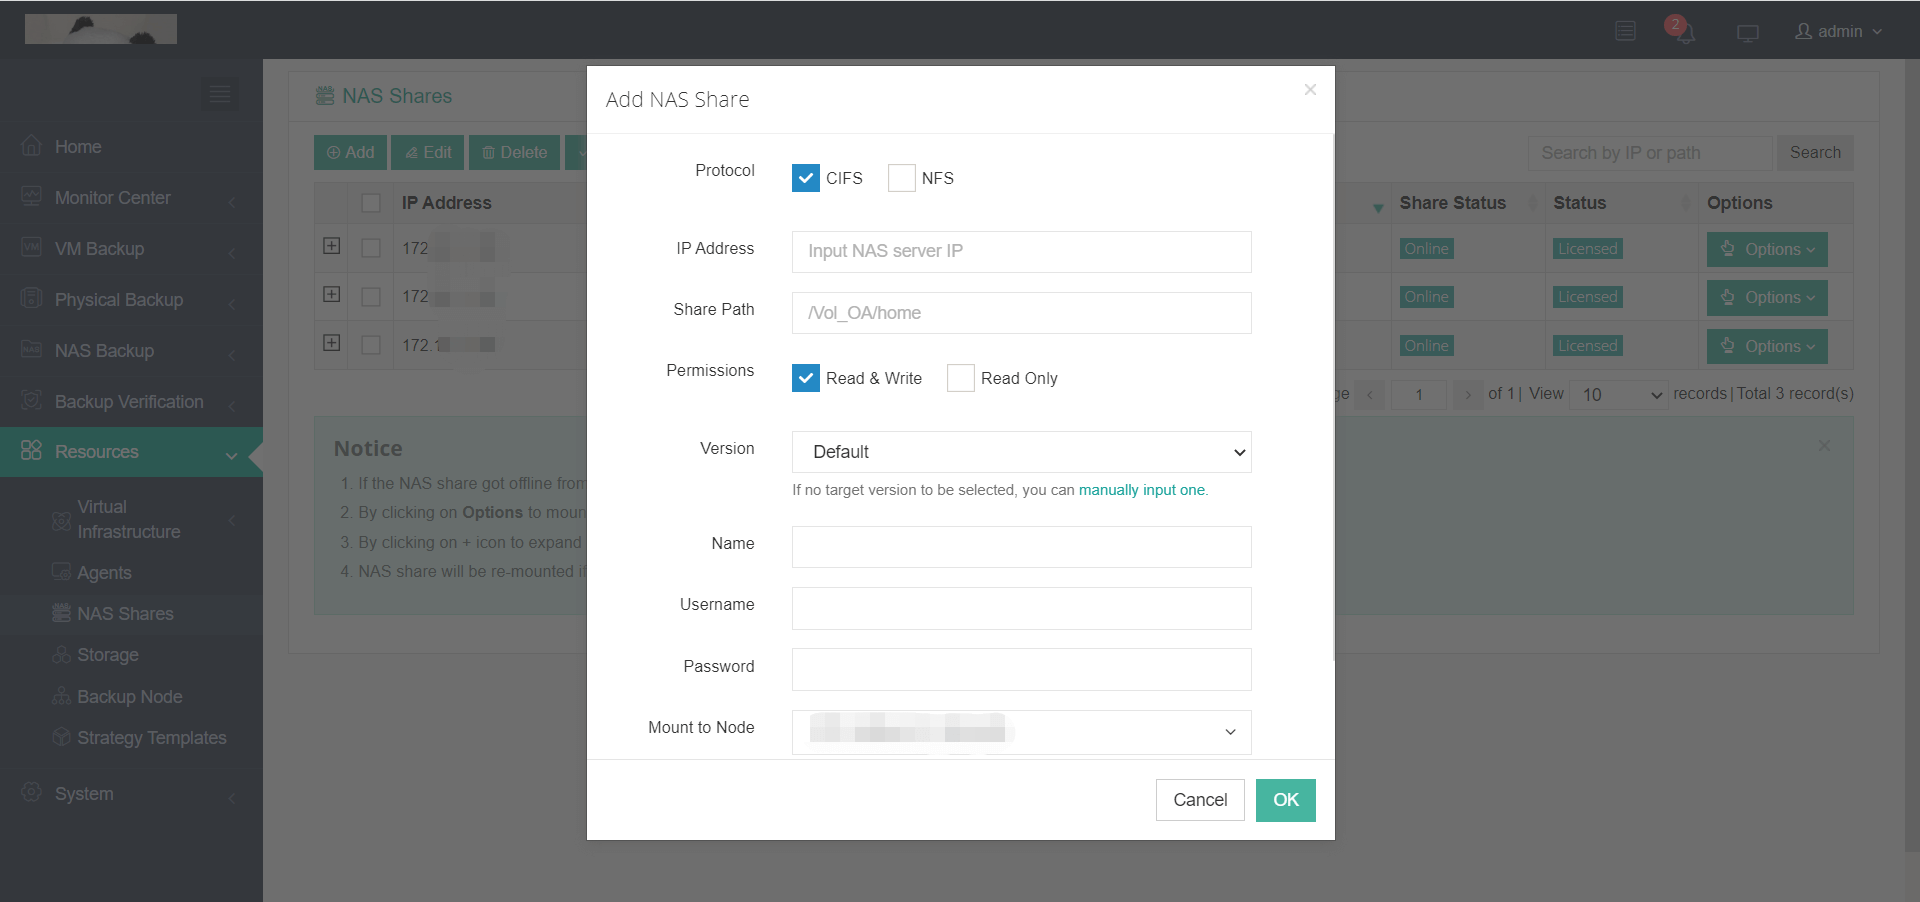
1. Click Restores on the left > select NAS Shares > click Add > enter the credentials of the NAS appliance to add it to the backup system
You can add both source and destination NAS in this way.

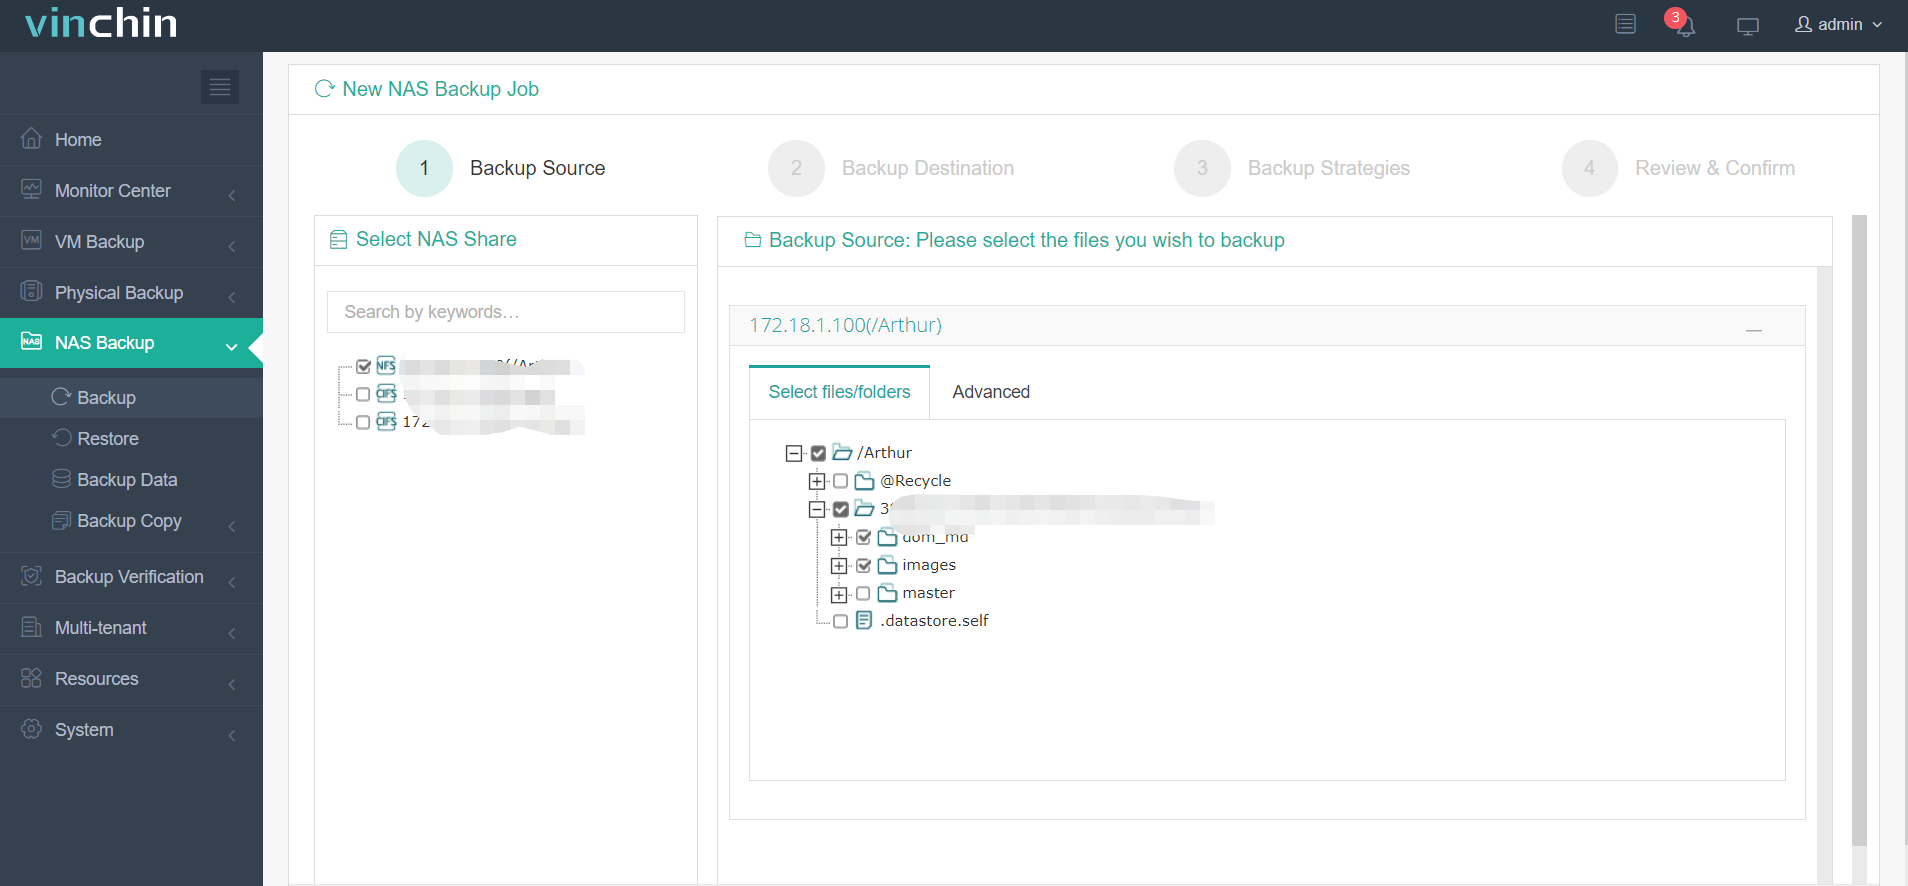
2. Click NAS Backup > select Backup > select the files and folders on the source NAS > select the backup destination > select backup strategies like schedule and incremental backup > confirm the job and submit it

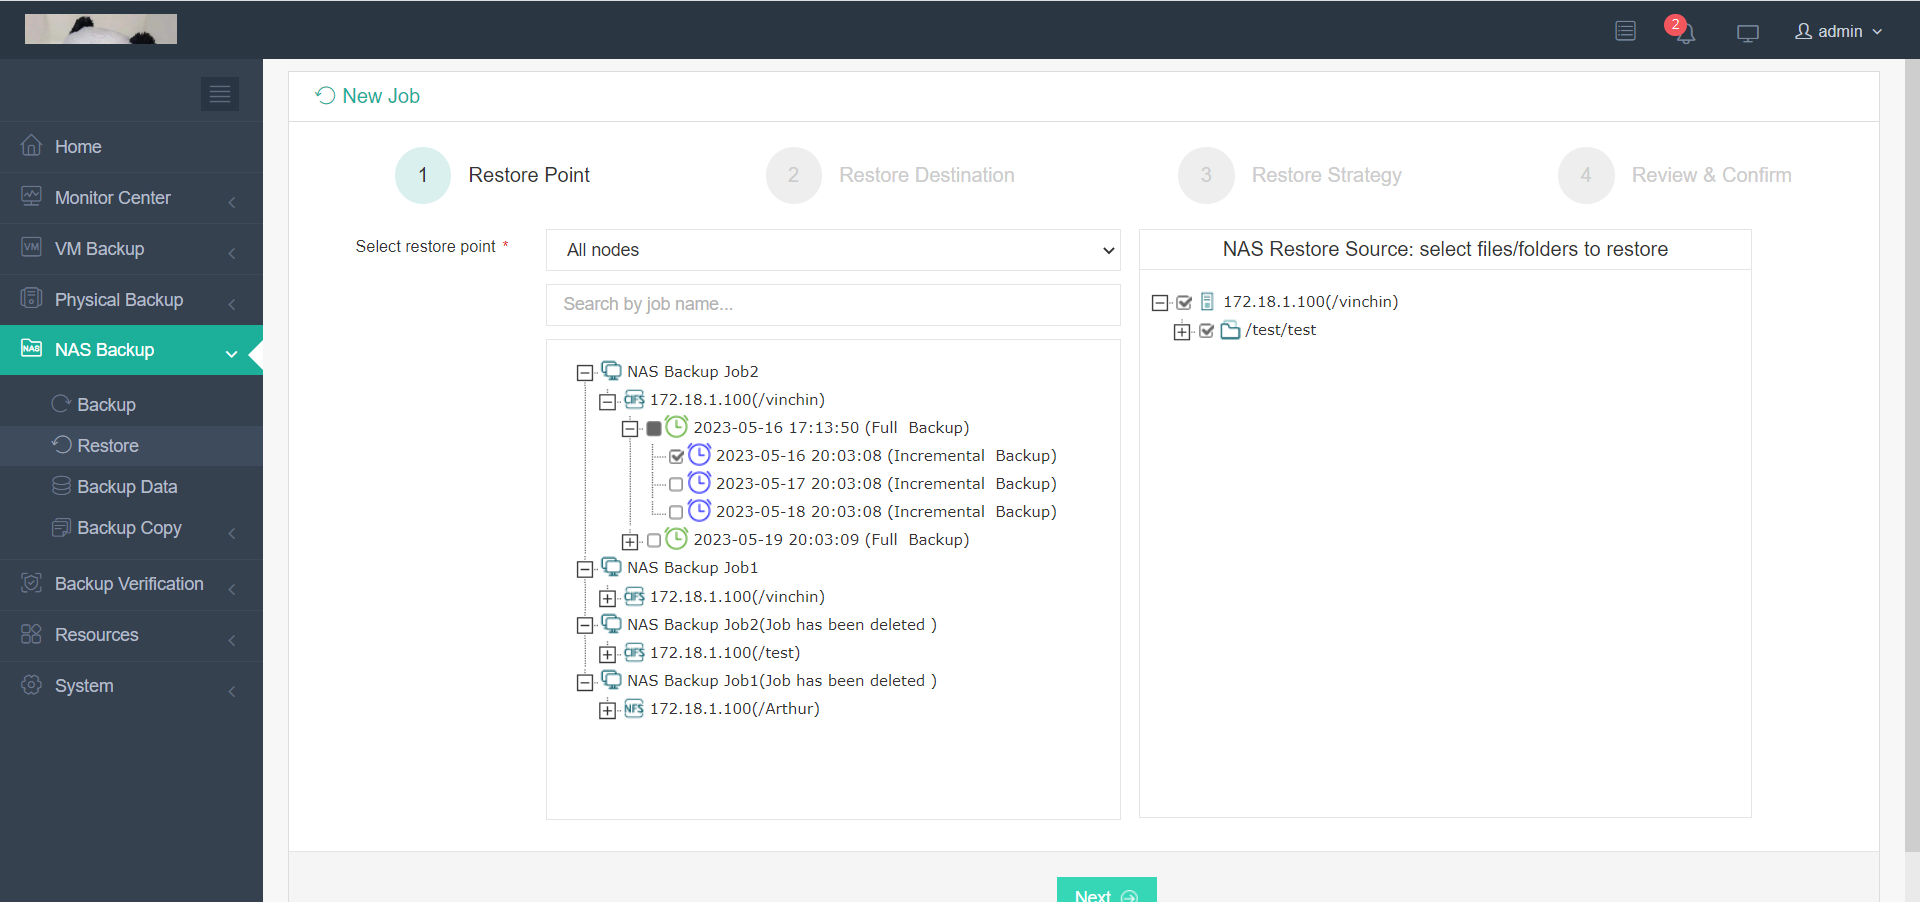
3. Click NAS Backup > select Restore > select the backed up source NAS > click Next > select the destination NAS and the directory > select restore strategies > confirm the job and submit it

Vinchin Backup & Recovery has been selected by thousands of companies and you can also start to use it with a 60-day full-featured free trial. If you have any question, free free to contact us and we will give you the solution according to your IT environment.
Sum Up
NAS is often used by companies to store data. When the hardware is broken or the capacity is not enough, it’s time to upgrade the old appliance. You can find 4 ways to migrate data from old Synology NAS to new Synology NAS including moving the software and hardware.
Vinchin Backup & Recovery is a very professional backup solution for NAS data protection and migration and don’t miss the free trial.
Share on:


