-
Advantages of backing up Proxmox VM
-
How to backup proxmox VM?
-
How to set up Proxmox backup schedule?
-
How to easily backup Proxmox VM with Vinchin Backup & Recovery?
-
Conclusion
Backing up your Proxmox virtual machines is like creating a safe emergency exit for your digital world. This backup channel not only provides an emergency channel for your VMs in case of system crash or accidental data loss, but also acts as a time machine that allows you to keep your business running in case of an upgrade. It also acts as a time machine, allowing you to easily return to a stable state in the event of problems during an upgrade. Backing up your proxmox VMs provides a reliable safeguard for your digital ecosystem, allowing you to stay calm and at ease in the face of digital storms.
Advantages of backing up Proxmox VM
Backing up Proxmox VMs has four main benefits:
Data Protection: Backing up Proxmox virtual machines is like putting a strong security lock on your digital treasure store. Ensure that you can quickly retrieve your VM in case of hardware failure, operational error or malicious attack. Protect important data and system state.
Disaster Recovery: Backups are critical for disaster recovery. If a Proxmox server suffers a catastrophic failure, such as a broken server or a power outage in the data center. Backup files act as your digital emergency response tool, enabling you to quickly redeploy VMs in a new environment, ensuring that your business is running normally again as soon as possible.
Testing and Development: Backups are like creating a secure digital sandbox for testing and developers. By creating new VM instances based on your backups, you can test new applications, configuration changes, or system updates as much as you want. Without worrying about the impact on your production environment. And if something goes wrong inadvertently, easily restoring a backup can bring everything back to its original state. Experimentation and innovation are free and safe.
Migration and Expansion: Backup is not only a data protection measure, but also a flexible relocation tool for Proxmox VMs. With backups and fast recovery on new hardware, you can easily migrate VMs to different hardware platforms without service interruption, enabling convenient system expansion and upgrading.
How to backup proxmox VM?
Ensuring the security of your Proxmox VM is paramount in safeguarding your data and system integrity.
To backup a Proxmox VM, following these steps:
1. In Proxmox web-based management interface, click a VM
2. Choose Backup > hit Backup now

3. Define Storage, Compression, and Mode > click Backup

In Proxmox backup VM , there are three common modes: Suspend, Snapshot and Stop
Suspend: In this mode, the VM will be hung and suspended. The Proxmox backup VM process will freeze the state of the VM and save it to disk. This backup mode is suitable for those cases where you do not want to interrupt the operation of the VM. Because the VM will continue to run after the backup completes, resuming to the hung state.
Snapshot: This mode creates a snapshot of the VM, which is a full copy of the VM at the start of the backup. During the Proxmox backup VM process, the virtual machine can continue to run normally and the snapshot will be used to create the backup. Snapshot backup mode is suitable for situations where frequent backups are required and there is a low requirement for interruption of the running VM.
Stop: In this mode, the VM will be completely stopped and the backup process will be performed when the VM is in the shutdown state. This backup mode is suitable for situations where full consistency of the VM is required, as the VM will not run or modify its state during the backup.

In Proxmox backup VM, there are three compression types:
Characterization | Compression Speed | Efficiency | Compression Ratio | Scenarios and Support |
LZO | Very fast | Relatively low | Medium | Scenarios that require fast processing with relatively little support |
GZIP | Medium | Medium | Medium to high | Broad support for common scenarios |
ZSTD | Fast | Good | Medium to high | ZSTD is suitable for demanding speed and compression scenarios, with support for gradual increases for environments requiring advanced performance. |

Or you can also use command to backup Proxmox VM
To perform Proxmox command, following these steps:
1. Login to Proxmox VE page
2. Click host > choose Shell

Backup storage should normally be configured as a dir (directory) or nfs(NFS) type.
3. So, if you want to add a store, you can enter the following command:
pvesm add dir <storage_id> --path <storage_path> --content <content_type>
pvesm add dir backupdir --path /your/backup/directory --content backup


4. Use this new catalog store for backups
vzdump <vm_id> --storage <storage_name>
vzdump 1233456 --storage backupdir


Here, you have finished the backup of Proxmox VM.
How to set up Proxmox backup schedule?
Designing a Proxmox backup plan is crucial. By properly setting up Proxmox backup schedule, you can increase the security of your system and data. As well as ensuring fast and efficient recovery when needed.
To set up Proxmox backup schedule, following these steps:
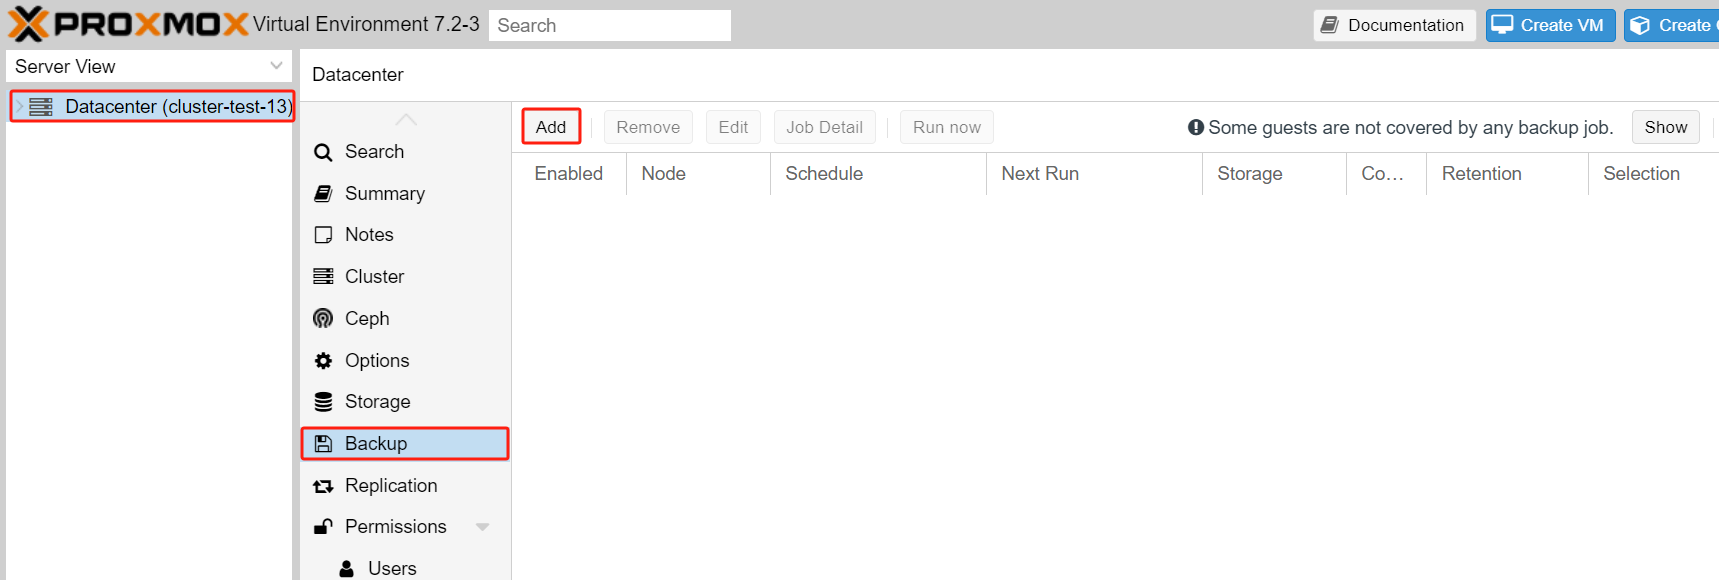
1. Click Datacenter > hit Backup > choose Add

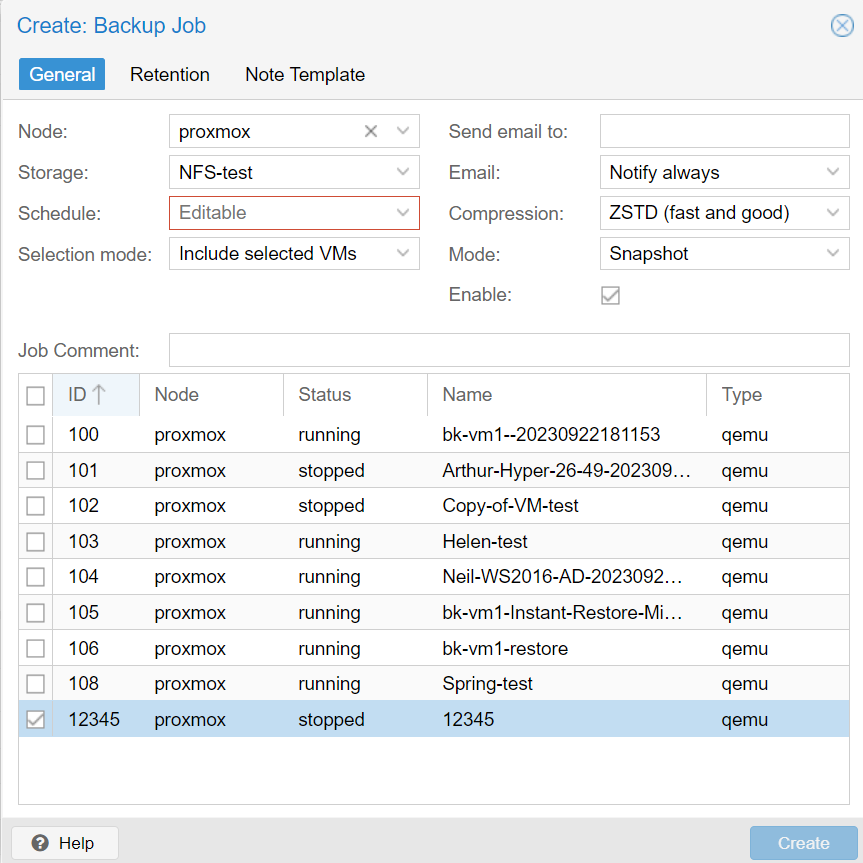
2. Define your backup job > choose the VM below > hit Create

How to easily backup Proxmox VM with Vinchin Backup & Recovery?
Compared to the backup capabilities of Proxmox VE, Vinchin offers more customization options and management features. It enables you to have finer control over the backup process. Its intuitive web interface makes it easy for you to perform complex backup strategies, and monitoring tasks.
Vinchin Backup & Recovery is a backup solution designed for virtual machines of Proxmox, VMware, Hyper-V, XenServer, XCP-ng, oVirt, RHV, etc. It provides comprehensive and powerful VM backup and recovery features like agentless backup, instant recovery, V2V migration designed to protect and manage critical data in the virtualization environment.
Vinchin Backup & Recovery’s operation is very simple. To backup proxmox vm, following these steps:
1. In Vinchin, click VM Backup > hit Backup > choose a VM > hit Next

2. Choose the Backup Destination > hit Next

3. Define the Backup Strategies > hit Next

4. Click Submit

Vinchin offers a free 60-day trial for users to experience the functionality in a real-world environment. For more information, please contact Vinchin directly or contact our local partners.
Conclusion
In conclusion, backing up Proxmox virtual machine is essential for data protection, disaster recovery, testing and development, etc. Following a proper backup process and utilizing third-party tools such as Vinchin Backup & Recovery can increase the safety and efficiency of the backup process.
Share on:


