-
What is VM Cloning?
-
Method 1: Clone VMware ESXi VM with vCenter Server
-
Method 2: Clone VMware ESXi VM with vSphere Web Client
-
Method 3: Clone VMware ESXi VM with Backup Software
-
ESXi Clone VM FAQs
-
Conclusion
Virtualization has become an important part in modern IT infrastructure due its high flexibility and resource utilization rate, which is capable of emulating multiple independent VMs that mount different OS on a single physical server.
There're many virtualization vendors on the market, and VMware is the most popular one among all. The complete and advanced functionality set, VMware vSphere it offers has been preferred by organizations around the world. Besides creating a brand new virtual machine, you can also choose to clone an existing VM in the VMware environment.
What is VM Cloning?
VM cloning is a technique that creates an identical copy of an existing virtual machine. It is mostly used when a company wants to quickly allocates necessary application resources to a department, or builds up a VM cluster to ensure the high availability of servers and network.
Sometimes, the concept of VM cloning may be confused with VM snapshot. The biggest difference is that the cloning creates another virtual machine that can be powered on to run your IT workloads, while snapshot is a technique that captures the system state at a certain point-in-time, which can only be used for simple recovery scenarios.
For VMware users, there’re several methods to clone a VM.
Method 1: Clone VMware ESXi VM with vCenter Server
Step 1: Open the vCenter client, go to Hosts and Clusters page. Find the target VM you want to clone, right-click on it, select Clone > Clone to Virtual Machine.
Step 2: Name the VM and select a location for it in the newly appeared wizard.
Step 3: Select the compute resource and a destination host.
Step 4: Select the storage for the cloned VM. Select the virtual disk format (Thin Provision or Thick Provision) and VM Storage policy. Then, choose a datastore where you want all the VM configuration files to be kept.
Step 5: Select clone options. To get an exact same VM as the old one, it’s recommended to just select Power on virtual machine after creation. Or else, you will need to re-configure the OS and VM’s hardware, which means the created VM will be a new one.
Once done, you can review all the configurations, and submit the VMware cloning task. The whole process has been completed.
To clone a VMware VM is simple with vCenter, but it requires additional license. When taking deployment cost into consideration, there're some alternative solutions.
Method 2: Clone VMware ESXi VM with vSphere Web Client
You can clone a VMware VM without vCenter by using vSphere Web Client.
Step 1: Log in the vSphere Web Client, select the VM you want to clone, check Virtual Hardware section to see the location of the VM’s disk file.
Step 2: click Datastore to find the disk we just checked in step 1 and click Create directory on the top of the toolbar to create a new directory.
Step 3: Back to Datastore page, find the source directory where the original VM’s disk files are kept. Copy the .vmdk and .vmx files there to the newly created folder. Check Recent Tasks window, wait for the copying task to be in Complete status. The larger the orginal disk size is, the longer time it takes for copying.
Step 4: Select Virtual Machines > Create/Register VM > Register an exisitng virtual machine, follow the configuration wizard to get the cloned VM registered.
Step 5: Rename the VM before power it on.
Method 3: Clone VMware ESXi VM with Backup Software
You can also clone a VMware VM without vCenter by using a more affordable backup tool like Vinchin Backup & Recovery to achieve this goal. Compared with the solution that utilizes vSphere Web Client, the configurations can be a lot more easy.
With an intuitive web-based console the software offers, you can do more with less: Easily clone a VMware ESXi host while get the critical data well protected.
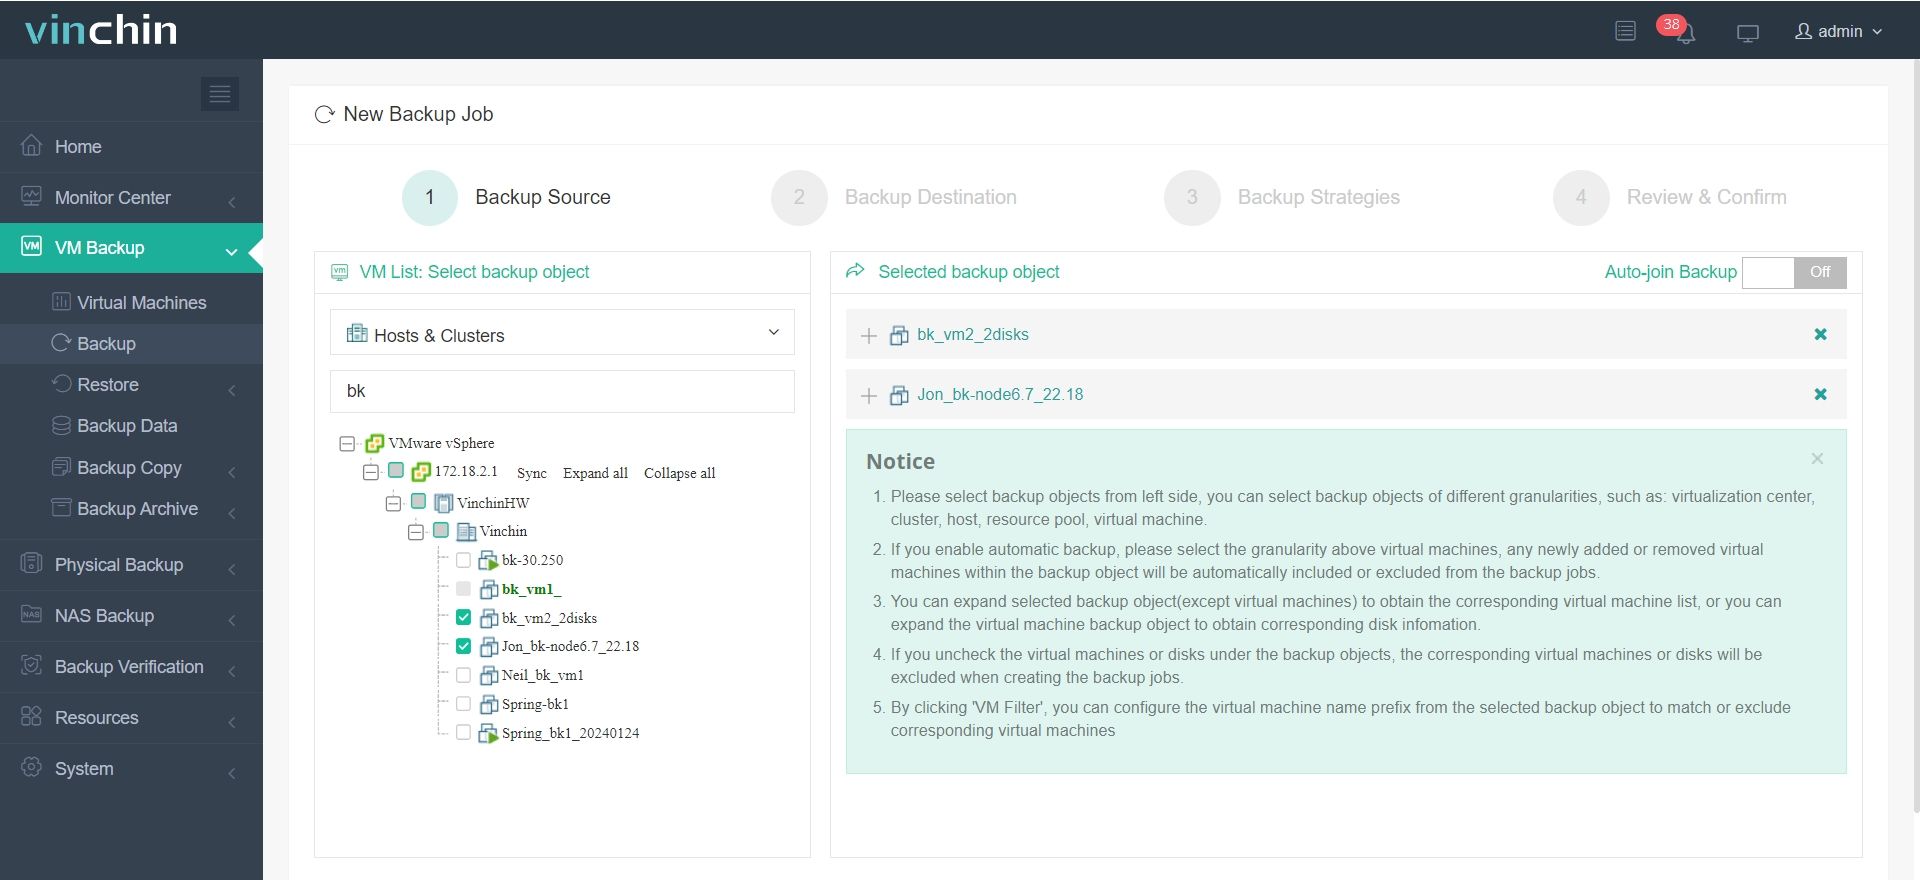
Step 1: Log in the Vinchin backup server web console, go to VM Backup > Backup to setup a backup job for the VM you want to clone. Select the target ESXi host.

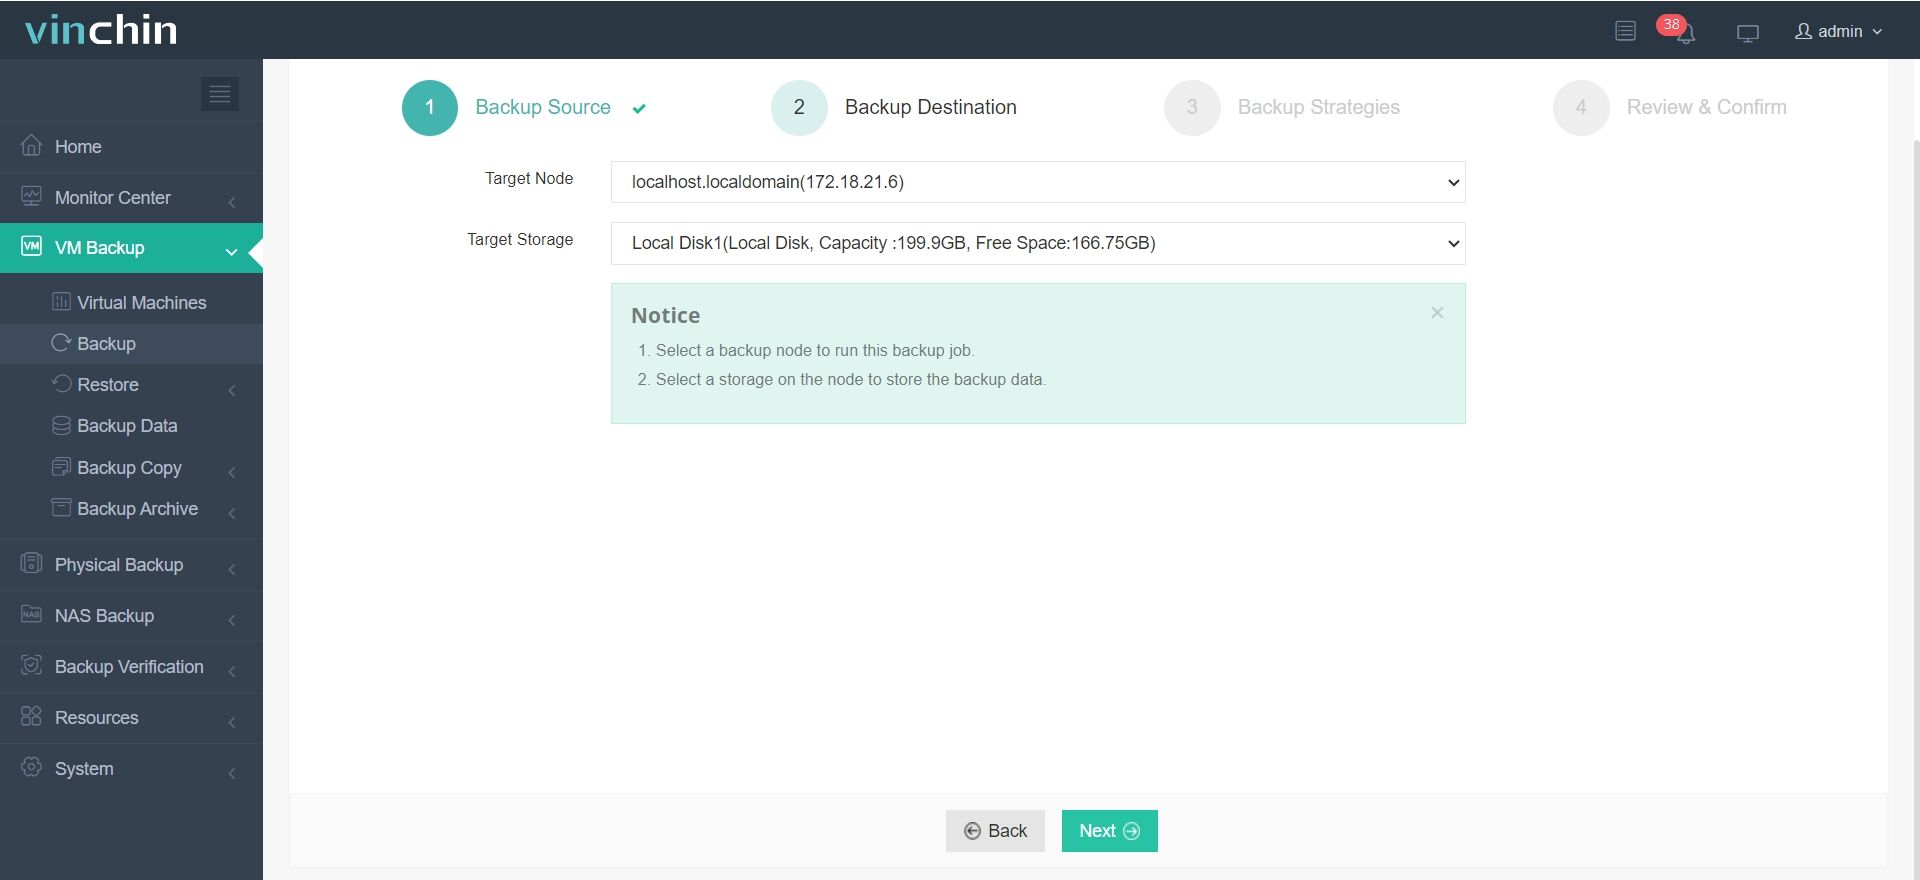
Step 2: Select a backup destination where you want the data to be stored.

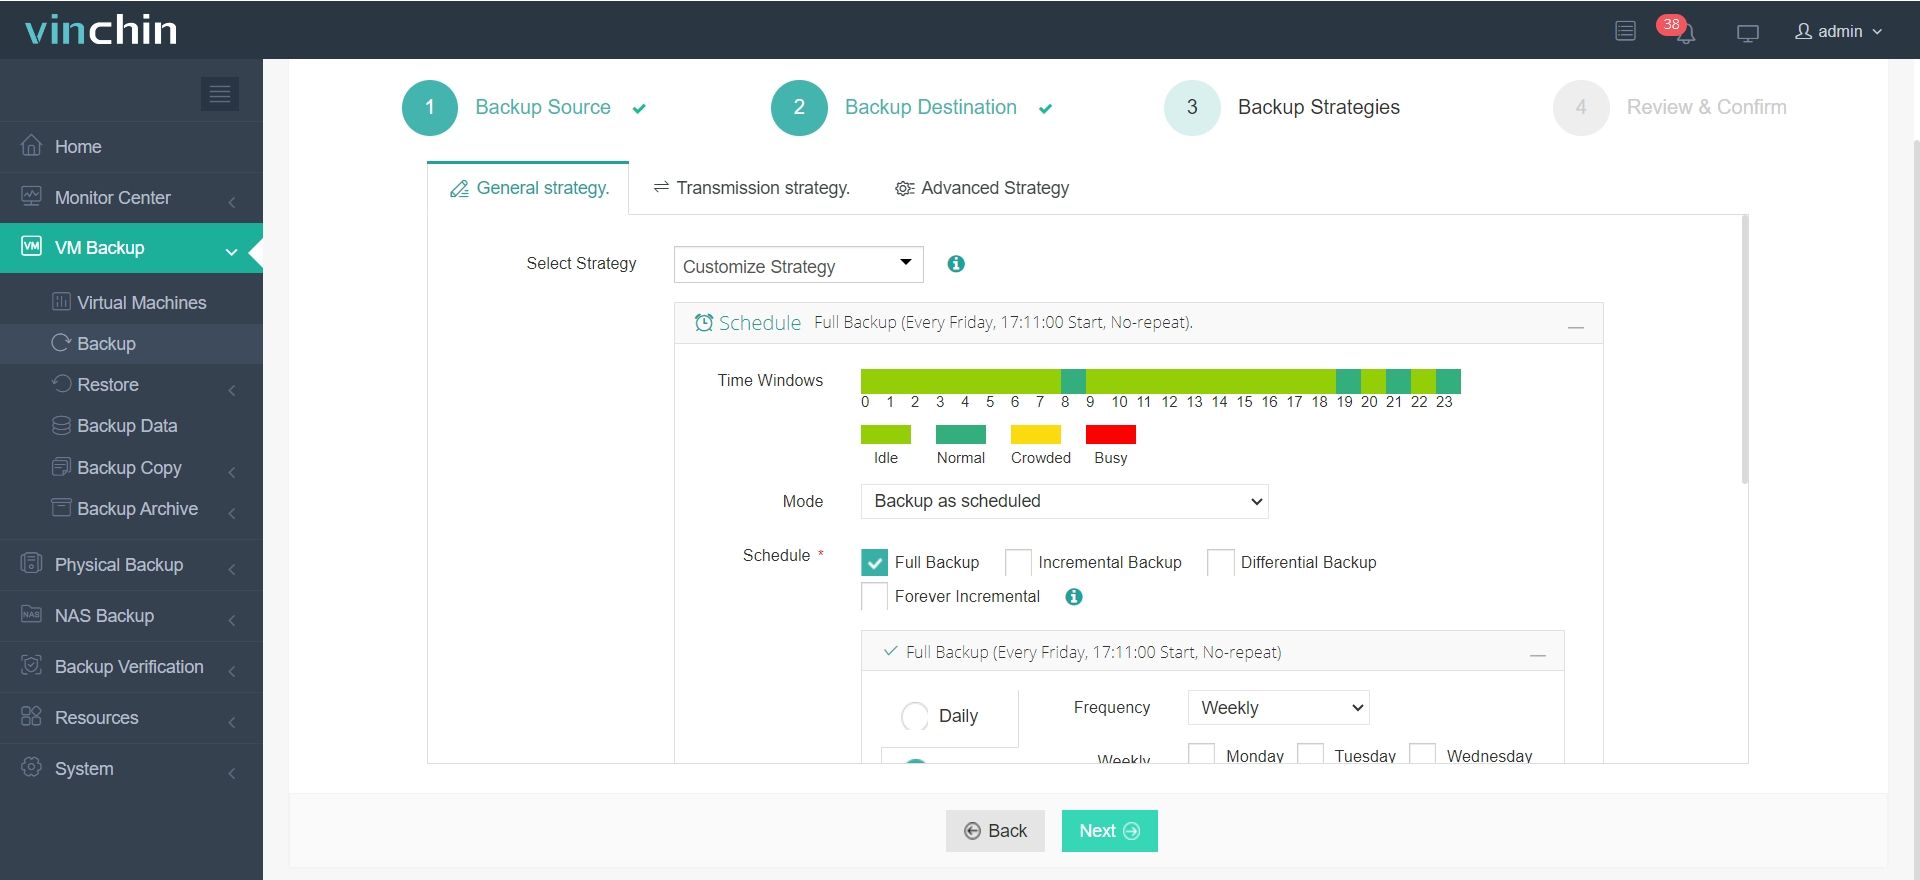
Step 3: Setup backup strategies in details.
Further customize the backup and transmission strategy of the job with a bunch of features, including CBT for faster incremental VMware VM backups, data compression and deduplication, speed controller, etc., all through simple clicks.

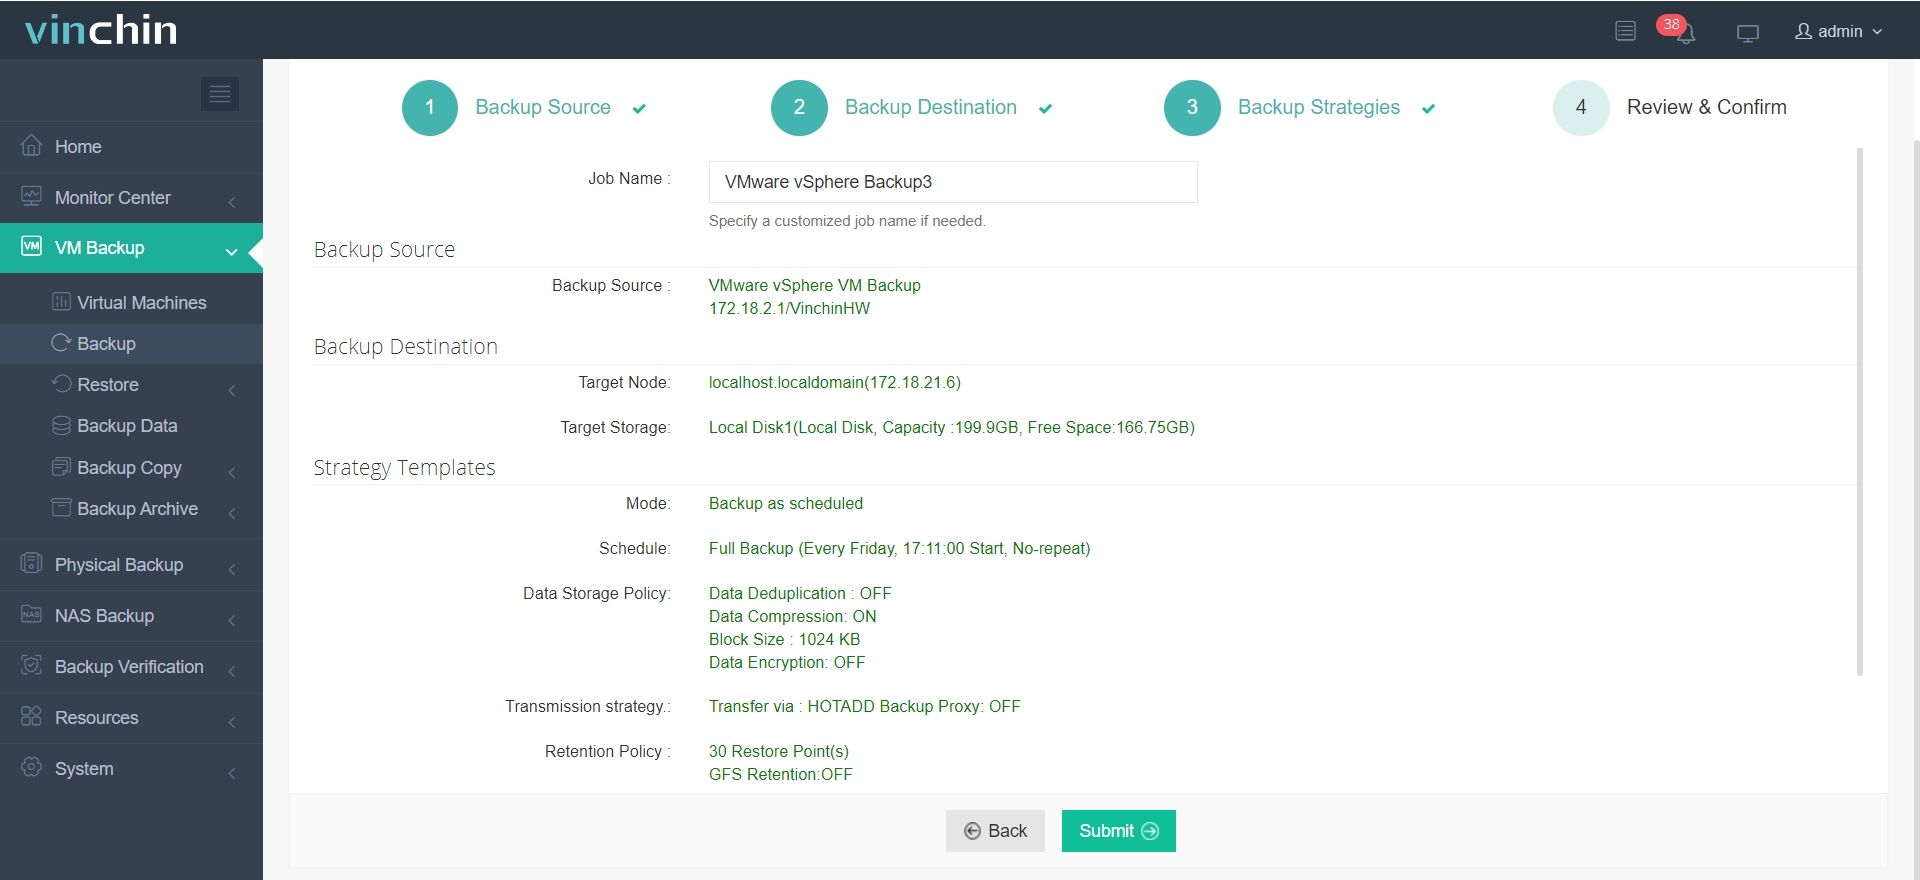
Step 4. Once done, review the configurations and submit the job.

After having the backup data of the original VMware VM in hands, you can go to VM Backup > Restore to quickly recover the data on any host to do a successful VM cloning, which only requires simple configs in the console as well.
Besides VM cloning with backup data, Vinchin Backup & Recovery also supports other advanced features like instant restore for business continuity guarantees, and cross-platform recovery (V2V migration) that supports seamless data migration across 10+ virtualizations including VMware, XenServer, oVirt, and multiple other mainstream KVM platforms. 60-day free full-featured trial is available to download.
ESXi Clone VM FAQs
1. Why you need to clone ESXi VM?
By cloning ESXi VM, VM data is safely stored on another host so you can do test on the original machine or hosts and don’t have to worry about data loss. Also, the critical applications can be directly used on the new host so it is convenient for data migration.
2. Can you clone an ESXi VM while it is running?
Yes, you can create an ESXi VM without powering it off.
3. Can you clone the entire ESXi host?
There is no proper host-level clone solution for ESXi. If you would like to clone the ESXi host, try backing up the ESXi configuration and VMs, installing ESXi on a new server, then restore the data on it.
Conclusion
ESXi VM clone is a necessary skill for virtual environment management. You can directly clone the VM in vCenter or vSphere client to quickly deploy or backup a VM. For advanced management features, you can try Vinchin Backup & Recovery which provides features to clone VM to another virtualization platform for V2V and better protect your data. Don’t miss the free trial.
Share on:


