-
Why you need the ESXi configuration?
-
How to backup and restore ESXi host configuration with ESXi command line?
-
How to restore configuration with ESXi command line?
-
How to backup and restore ESXi host configuration with vSphere CLI?
-
How to backup and restore ESXi host configuration with vSphere PowerCLI?
-
How to backup ESXi guest machine with Vinchin Backup & Recovery?
-
ESXi Configuration Backup FAQs
-
Sum Up
When making a backup plan, ESXi virtual machines, namely the guest machines, are always taken seriously because there are important production data directly stored on them. Except for gust machines, are there any other things worth backing up?
Except for guest-level backup, you can also perform a host-level backup to save data and it means backing up the entire ESXi host to backup the VMs indirectly.
Some IT administrators would like to backup vCenter to save the vCenter Server core configuration, inventory, historical data, etc. Some would also like to backup ESXi host configuration.
Why you need the ESXi configuration?
Like the guest, errors could also happen to ESXi host, having the host configuration might help you fix the errors. The ESXi configuration backup might also help you quickly configure a new ESXi host.
However, there are some limitations to using ESXi backup. For example, you can only use the backup on the host with the same version of ESXi installed so a host backup might be better for this.
How to backup and restore ESXi host configuration with ESXi command line?
1. Connect to ESXi host via SSH.
2. Run the command below:
vim-cmd hostsvc/firmware/sync_config
This command is to make sure that all the changes of configuration would be saved to the target file.
3. Run the command below:
vim-cmd hostsvc/firmware/backup_config
This command is to generate the link to download the file containing the host configuration. It is like http://*/downloads/123456/configBundle-xx.xx.xx.xx.tgz.
You need to be aware that the "*" is the IP or FQDN of the host so you should manually replace it.
4. Open a web browser and copy and paste the link into it. Type Enter.
The backup file would be downloaded then. It could be found in the folder Download whose name contains "configBundle" and host FQDN. That's the way to export ESXi configuration.
How to restore configuration with ESXi command line?
Note: Recovering host configuration in this way would result in an automatic reboot.
1. Rename the backup file into "configBundle.tgz".
2. Run the command below:
vim-cmd hostsvc/maintenance_mode_enter
This command is to put the ESXi host into maintenance mode
3. Copy the backup file to ESXi host
4. Run the command below:
vim-cmd hostsvc/firmware/restore_config /backup_location/configBundle.tgz
You should replace "/backup_location" with the actual directory.
How to backup and restore ESXi host configuration with vSphere CLI?
vSphere CLI, namely the vSphere Command-Line Interface, could run against ESXi or vCenter Server. It could be used as ESXi configuration backup tool. However, it is not supported since vSphere 7.0, so check whether it could be used in your virtual infrastructure.
1. Download vSphere CLI from VMware and install it.
2. Run the command below:
vicfg-cfgbackup --server=ESXi_host_IP_address --username=root -s output_file_name
You should replace "ESXi_host_IP_address" and "output_file_name" with the actual content.
The backup file could be found in the directory of where you run the vicfg-cfgbackup script.
Restore with vSphere CLI
1. Put the host to maintenance mode
2. Go to the server of vSphere CLI, and run the script
vicfg-cfgbackup --server=ESXi_host_IP_address --username=root -l backup_file
You should replace "ESXi_host_IP_address" and "backup_file" with the actual content.
How to backup and restore ESXi host configuration with vSphere PowerCLI?
1. Download vSphere PowerCLI from VMware and install it.
2. Run the command below:
Get-VMHostFirmware -VMHost ESXi_host_IP_address -BackupConfiguration -DestinationPath output_directory
You should replace "ESXi_host_IP_address" and "output_directory" with the actual content.
The backup file could be found in output directory.
Restore with vSphere PowerCLI
1. Run the command below to put the host to maintenance mode:
Set-VMHost -VMHost ESXi_host_IP_address -State 'Maintenance'
You should replace "ESXi_host_IP_address" with the actual content.
2. Run the command below to restore the configuration
Set-VMHostFirmware -VMHost ESXi_host_IP_address -Restore -SourcePath backup_file -HostUser username -HostPassword password
You should replace "ESXi_host_IP_address" "backup_file" and "password" with the actual content.
How to backup ESXi guest machine with Vinchin Backup & Recovery?
To protect business continuity, more IT administrators will choose guest-level backup.
Vinchin Backup & Recovery is a professional backup and disaster recovery solution for virtual environment and can help you backup both the VMs on ESXi host.
The procedures to create backup job in Vinchin Backup & Recovery are simple and a user-friendly web console will help with this so you don’t have to use complicated commands.
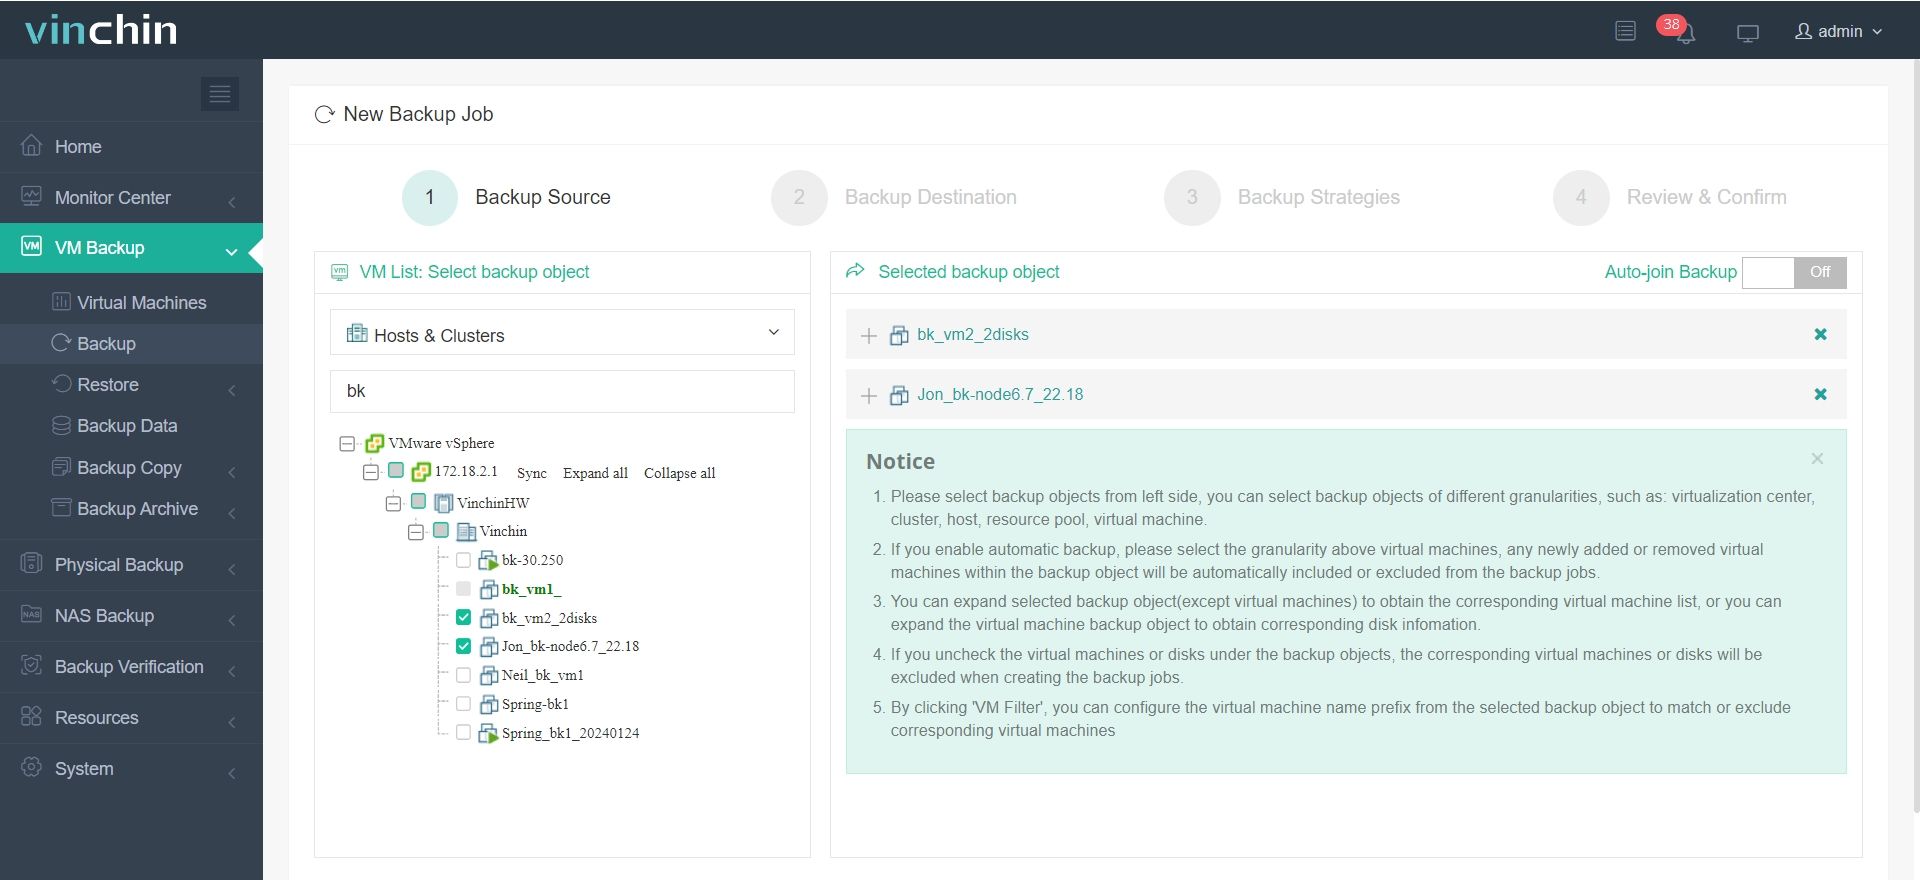
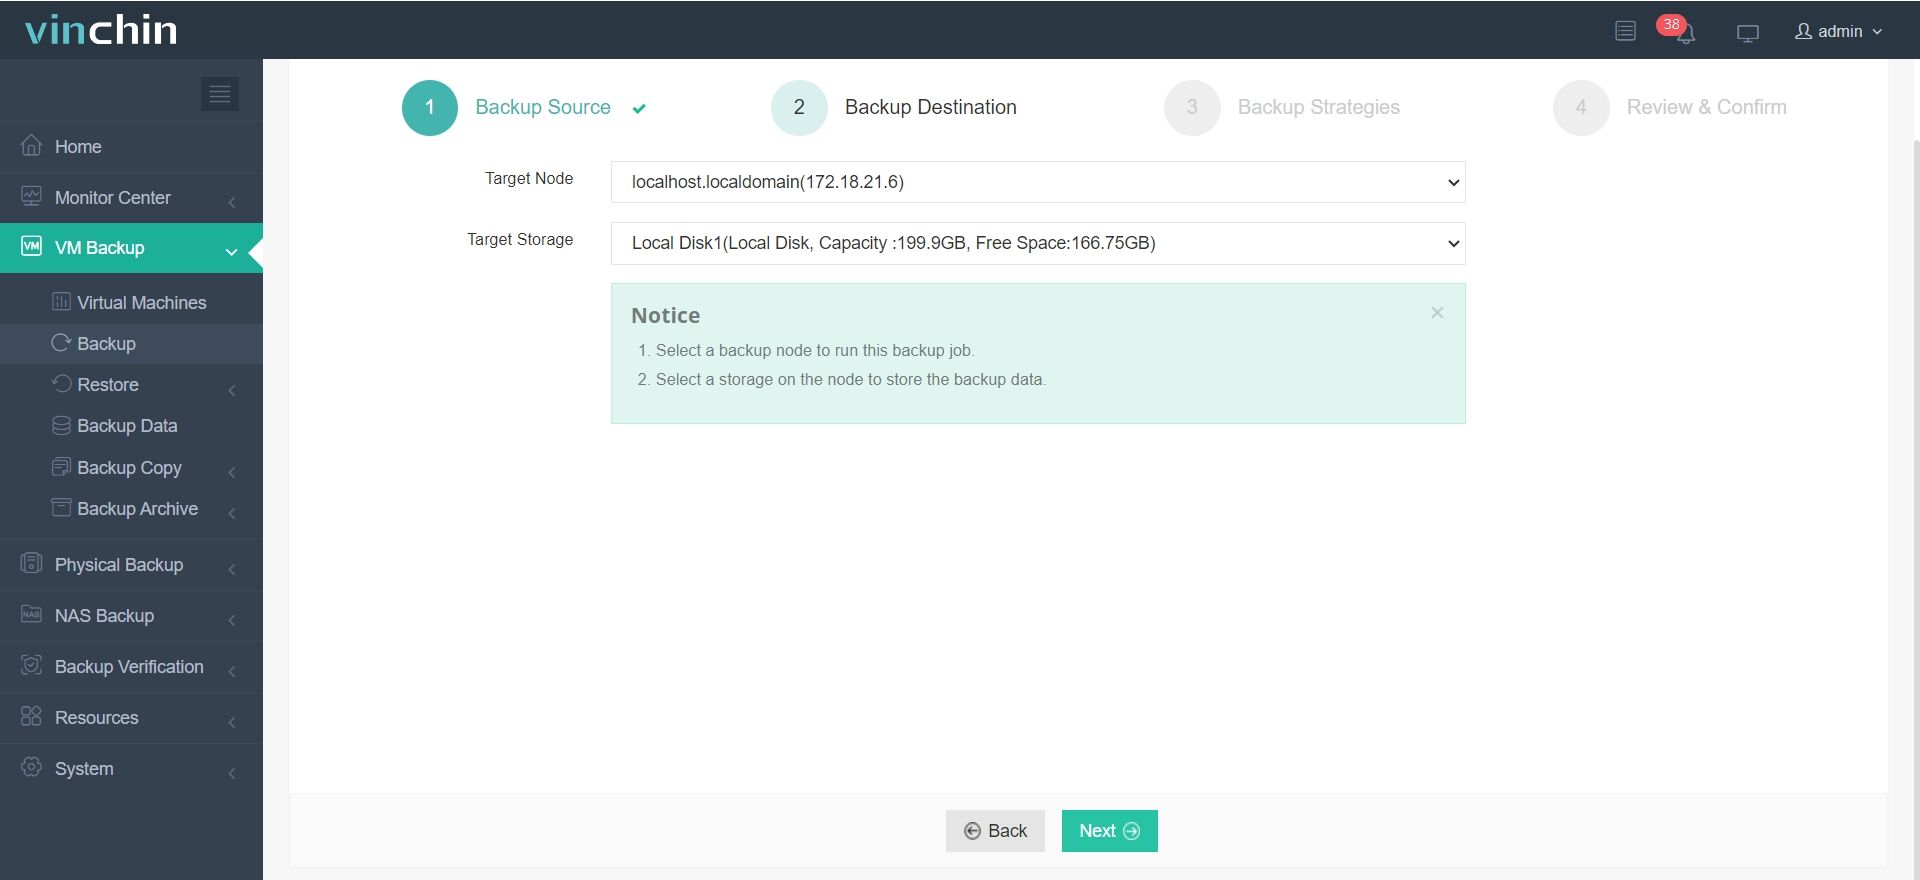
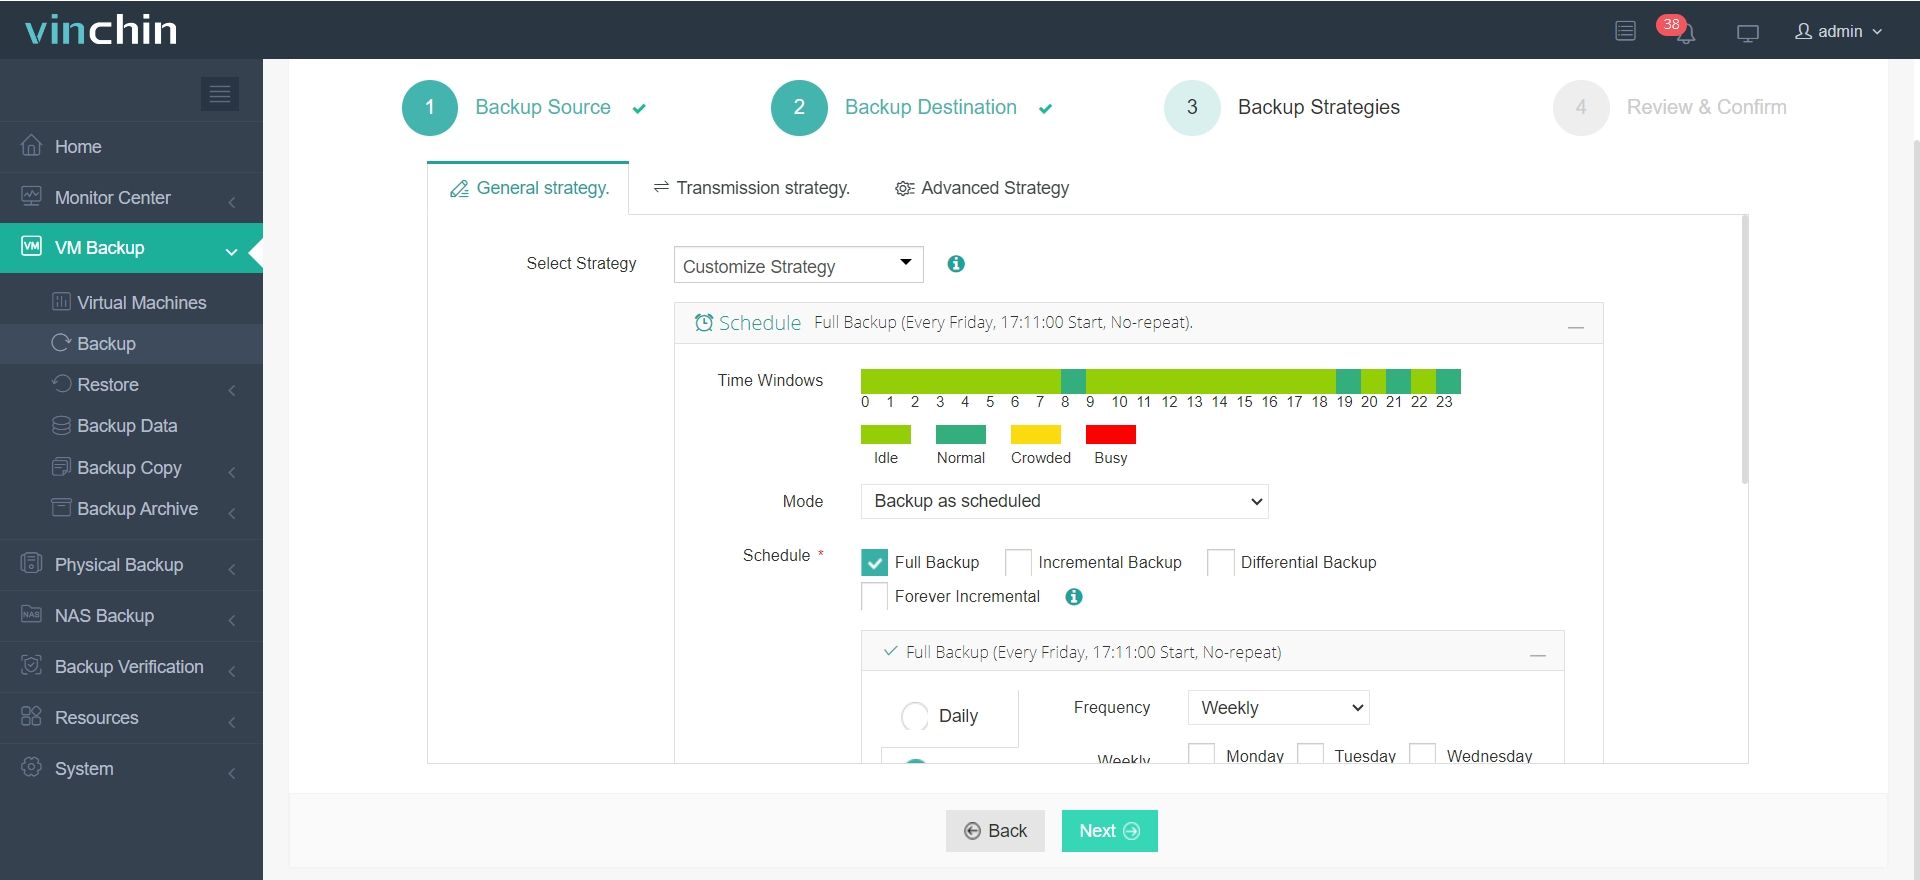
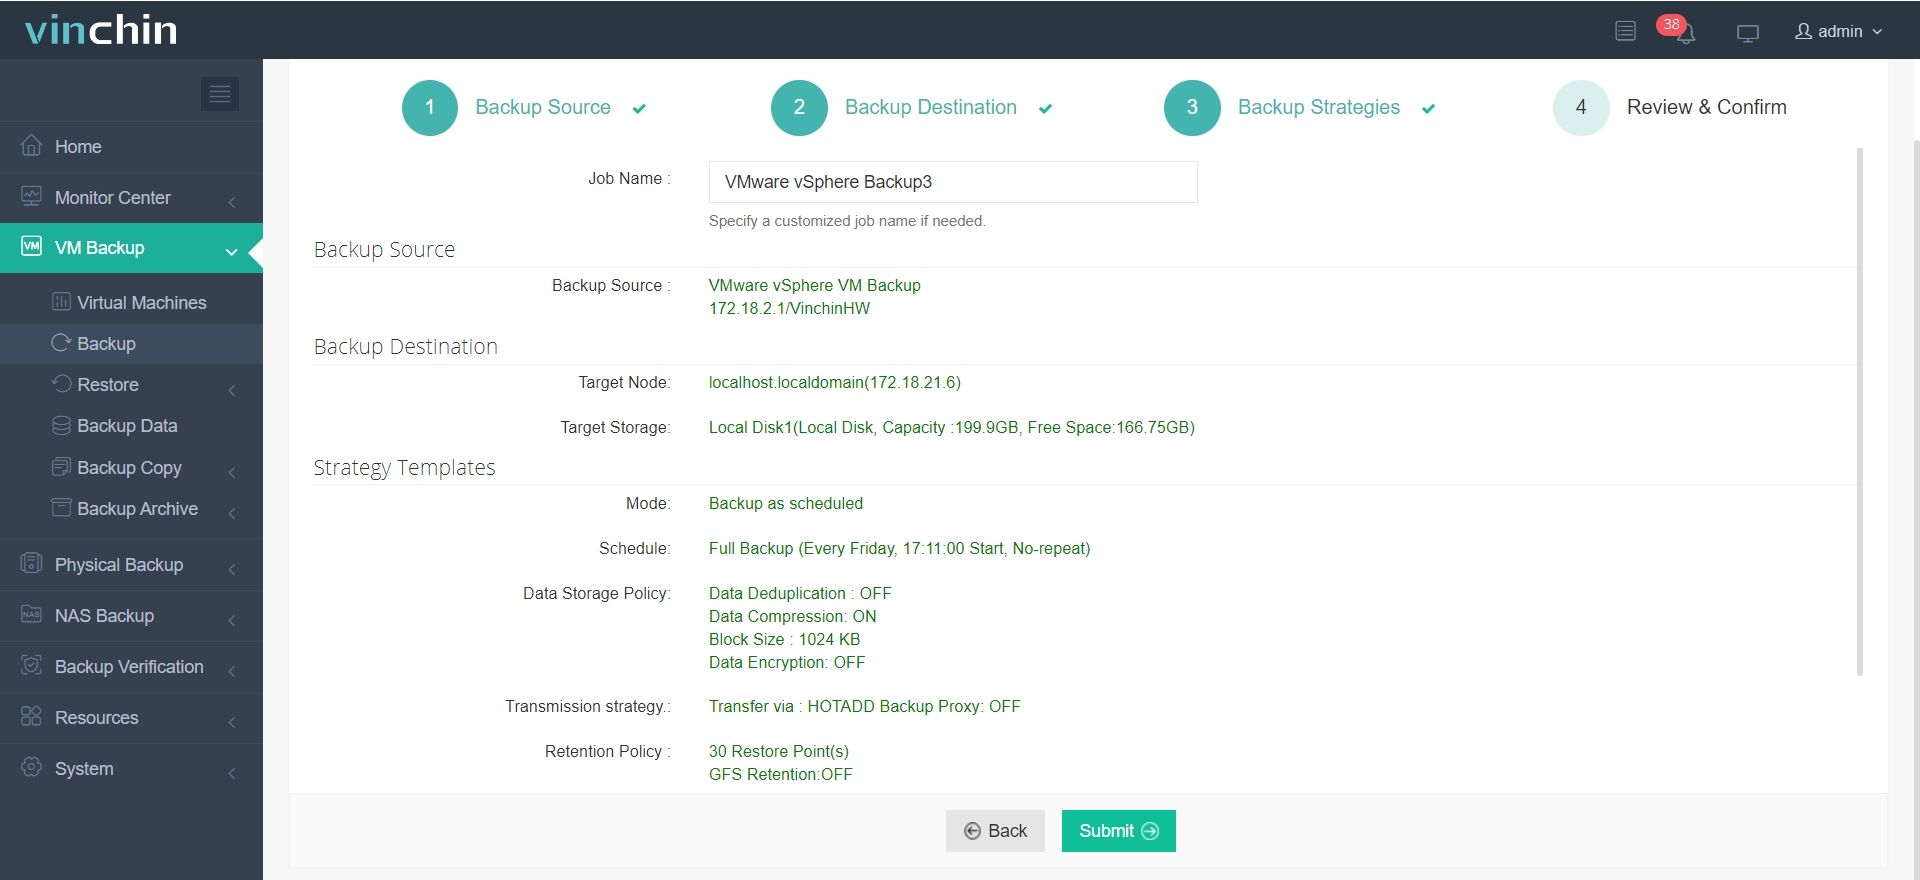
Add the ESXi host to the backup system (agentless backup is supported) > start a backup creation wizard to create the backup job in 4 steps.
1. Select the ESXi VMs

2. Select the backup storage

3. Select the backup strategies. There will be a lot of backup strategies for you like schedule, incremental backup, data compression, etc.

4. Submit the job
Vinchin Backup & Recovery will let you use the backup in more situations. To help improve your disaster recovery plan, Vinchin Backup & Recovery can make you recover a failed VM in 15 seconds from its backup to reduce RTO. If you are using other virtualization solutions like XenServer, XCP-ng, Red Hat Virtualization, oVirt, etc., you can easily move VM between different hosts with VM backup.
Vinchin Backup & Recovery has been selected by thousands of companies and you can also start to use this powerful system with a 60-day full-featured free trial. Just click the button to get the installation package.
ESXi Configuration Backup FAQs
1. What does ESXi configuration backup include?
ESXi configuration backup contains everything that you need to recover the ESXi host configuration but not the VM data. If you wish to recover VMs on the host, please select a guest-level backup solution.
2. Can you restore ESXi configuration to another ESXi host?
No, ESXi configuration backup is usually used to restore the original host because it requires the destination host's build number and UUID to match those of the host in the backup.
3. Can you backup configuration of multiple ESXi hosts at once?
Yes, you can but you have to create a scripts based on the commands above.
Sum Up
Backing up ESXi host configuration makes it convenient to recover or reconfigure the host later and having the VM backup can give you recover data in more situations.
Vinchin Backup & Recovery can help easily backup the guest machine so don’t miss the free trial.
Share on:


