-
Benefits of using backup and restore scripts in XenServer
-
Automated backup XenServer VM with export and import scripts
-
Automated operations for XenServer VM snapshots using scripts
-
Automated backup and restoration of XenServer hosts with scripts
-
Better backup and recovery VMs using Vinchin
-
Conclusion
In the digital era, virtualization technology has become an indispensable part. As an outstanding representative of this technology, XenServer excels in providing efficient resource management and powerful virtual machine functions. However, regardless of the environment, data security and reliability are always crucial.
To fulfill this need, automated backup and restore scripts have become essential tool for XenServer. These scripts not only ensure data security, but also greatly simplify the backup process and reduce the labor burden.
Benefits of using backup and restore scripts in XenServer
The advent of XenServer backup and recovery scripts has reinvigorated data security. These scripts automate operations, reduce the potential risk of human error, and ensure timely and consistent operations. These commands not only securely store data and prevent the problem of accidental data loss, but also enhance the efficiency and security of data processing and storage through compression and encryption.
However, the benefits of XenServer backup and recovery command lines are not limited to this. In a virtualized environment where data is constantly changing and complex, manual operations are not only time-consuming but also easy to create errors. By automating backup and recovery, the risk of data loss can be significantly reduced.
Automated backup XenServer VM with export and import scripts
Backup and recovery are undoubtedly the most important safeguards in virtualization. However, by using scripts for importing and exporting virtual machines, you can not only simplify your operations, but also unleash the power of backup and recovery for comprehensive data protection and reliable recovery.
To export VM to xva file and import VM then using scripts, following these steps:
To export VM all data, following these steps below:
First make sure that the virtual machine you want to export is shut down or in a suspended state
1. Type ssh root@xxxxx(XenServer-IP) > press Enter > enter password > click Enter
2. Enter the following script:
xe vm-export vm=xxxxxxx(VM uuid) filename="C:UsersadminDesktop2323.xva"(filepath and filename.xva)

To import virtual machine,following these steps below:
1. Enter ssh root@xxxxx(XenServer-IP) > press Enter > import password > press Enter
2. Type the following script:
xe vm-import sr=xxxxxxx(SR uuid) filename="C:UsersadminDesktop2323.xva"(filepath and filename.xva)

After executing the command, a uuid (5fabf440xxxxxxxxxxxx) appears as shown in the picture, which indicates that the VM was successfully imported. If you are not sure, you can type script: xe vm-list to see if the uuid is in the list, as shown in the picture below, it means that the import was successful.

Automated operations for XenServer VM snapshots using scripts
A snapshot is like a digital snapshot of your VM at a given moment. It contains the full configuration, disk contents, and memory state of the VM.
Think of it as a safety net that ensures you can always go back to the previous state without worrying about the consequences when you try new settings.
Not only that, the snapshot has an extremely small storage footprint and can be created almost instantly, minimizing interference with the virtual environment.
To create snapshots of XenServer VMs with command line, following these steps:
1. In XenCenter, connect to a Server
2. In Windows search box, type PowerShell > open it
3. Enter ssh root@xxxxx(XenServer-IP) > press Enter > import password > press Enter
4. Type the following code:
xe vm-snapshot vm=xxxxxxx(VM uuid) new-name-label=2023.8.22(Snapshot Name)

After executing the command, a uuid (3550xxxxxxxxxxxx) appears as shown in the picture, which indicates that the snapshot was successfully created. You can import xe snapshot-list to see if you have made it.

Or you can also return to the XenCenter > click the VM > choose Snapshots to see the results.

And when you need to restore the snapshot, type the following command:
xe snapshot-revert snapshot-uuid=xxxxxxx(snapshot uuid)

To delete the snapshot, you can enter the following command line:
Xe snapshot-uninstall snapshot-uuid=xxxxxxxxxx(snapshot uuid)

To export the snapshot to another file, please enter:
xe snapshot-export-to-template snapshot-uuid=xxxxxxx(snapshot uuid) filename=555.xva(filename name.xva)

To import a snapshot, enter the following script:
xe vm-import filename=555.xva(filename name.xva) sr-uuid=xxxxxxx(sr uuid)

Automated backup and restoration of XenServer hosts with scripts
Backup hosts are an important means of protecting critical data in the virtual kingdom. Backups are a preservation of the complete state of the host to ensure that critical data is not lost. In contrast, snapshots are suitable for short-term rollbacks and do not provide long-term data protection. Regularly backing up the host creates a reliable line of defense to ensure that VMs and critical data are fully recovered, guaranteeing business continuity and data integrity.
To backup XenServer hosts, following these steps:
1. ssh root@xxxxx(XenServer-IP) > press Enter > type password > press Enter
2. Type the following script:
xe host-backup host=xxxxx(host uuid) file-name="C:UsersadminDesktop1112backup.xbk" (filepath and filename.xbk)

Of course, the restore process is equally indispensable. When it is necessary to roll back to a previous state, the restore step becomes crucial.
To restore XenServer hosts, following these steps:
xe host-restore file-name="C:UsersadminDesktopest2.xbk"(file name.xbk) host=xxxxx(host uuid)

Better backup and recovery VMs using Vinchin
Unlike script-based backup and restore methods that are cumbersome and complex, Vinchin Backup & Recovery brings a simpler, more advanced approach to VM protection by providing an intuitive and easy-to-use user interface that allows you to set up VM backups and restores in just a few simple steps.
With flexible support for multiple platforms such as Xenserver, VMware, Hyper-V, oVirt, etc., Vinchin's superior VM backup capabilities provide strong support for your data security and business continuity. With Vinchin's advanced technology, you can easily create, manage and restore VM backups, ensuring that you can quickly get back on your feet in the event of an unexpected situation.
To backup and restore VM in Vinchin Backup & Recovery, following these steps:
Backup VM in Vinchin Backup & Recovery
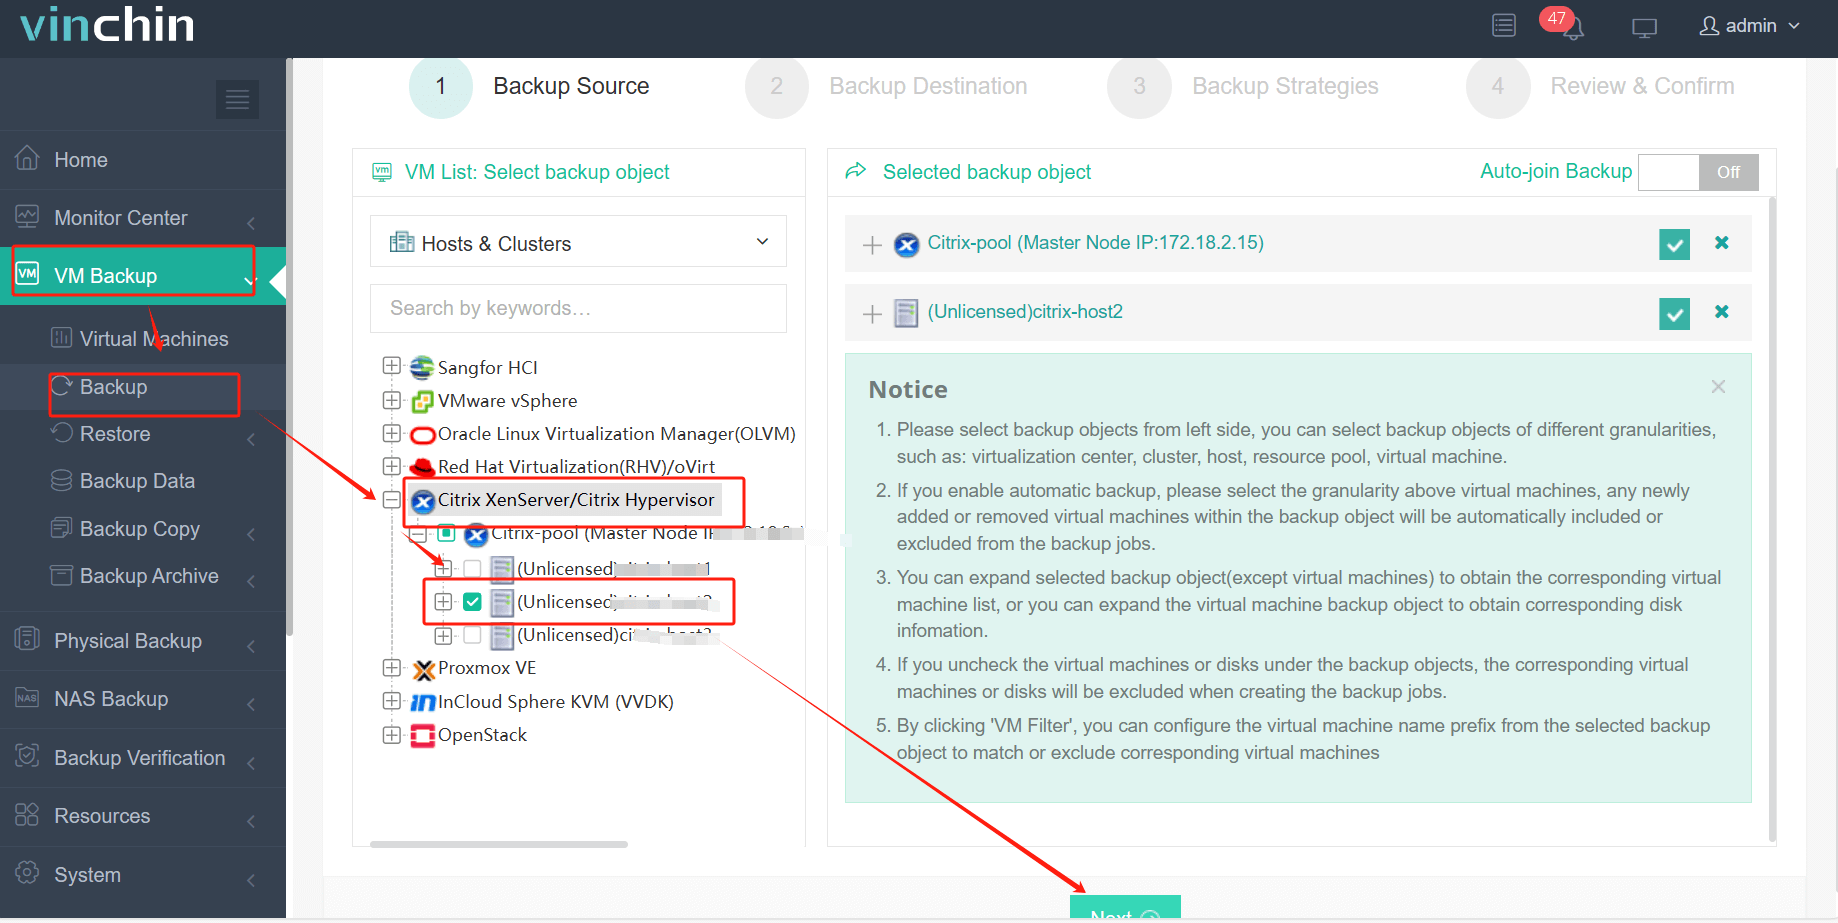
1. Choose the VM to Backup
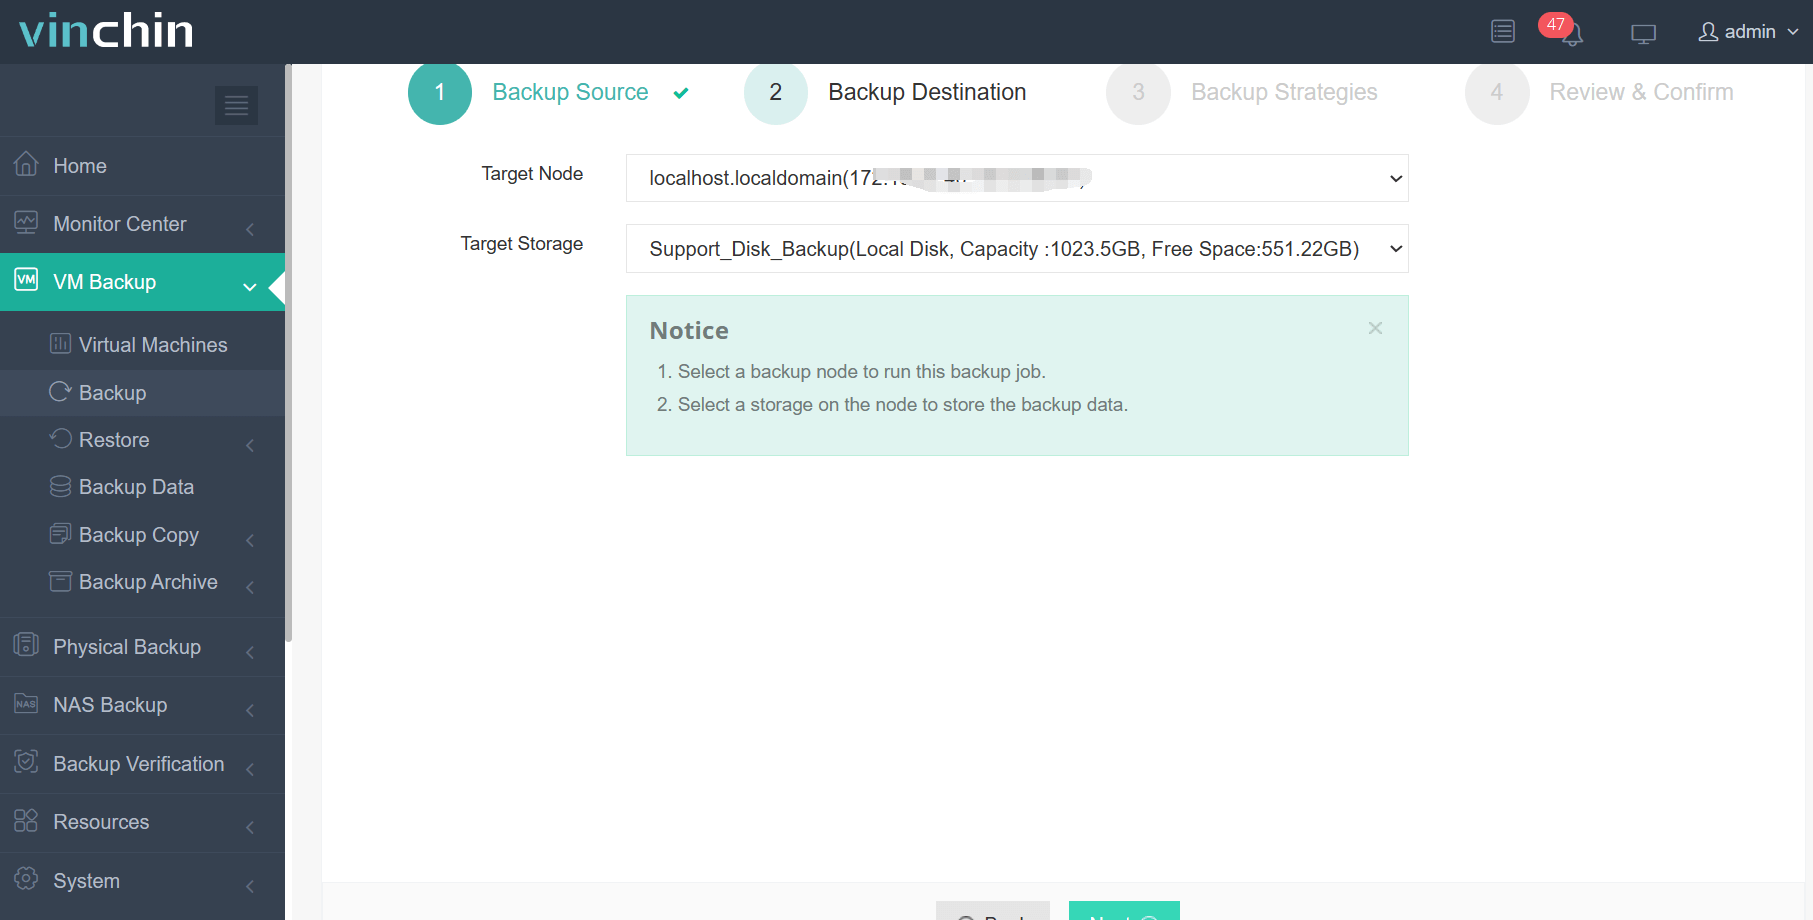
2. Select Backup Destination
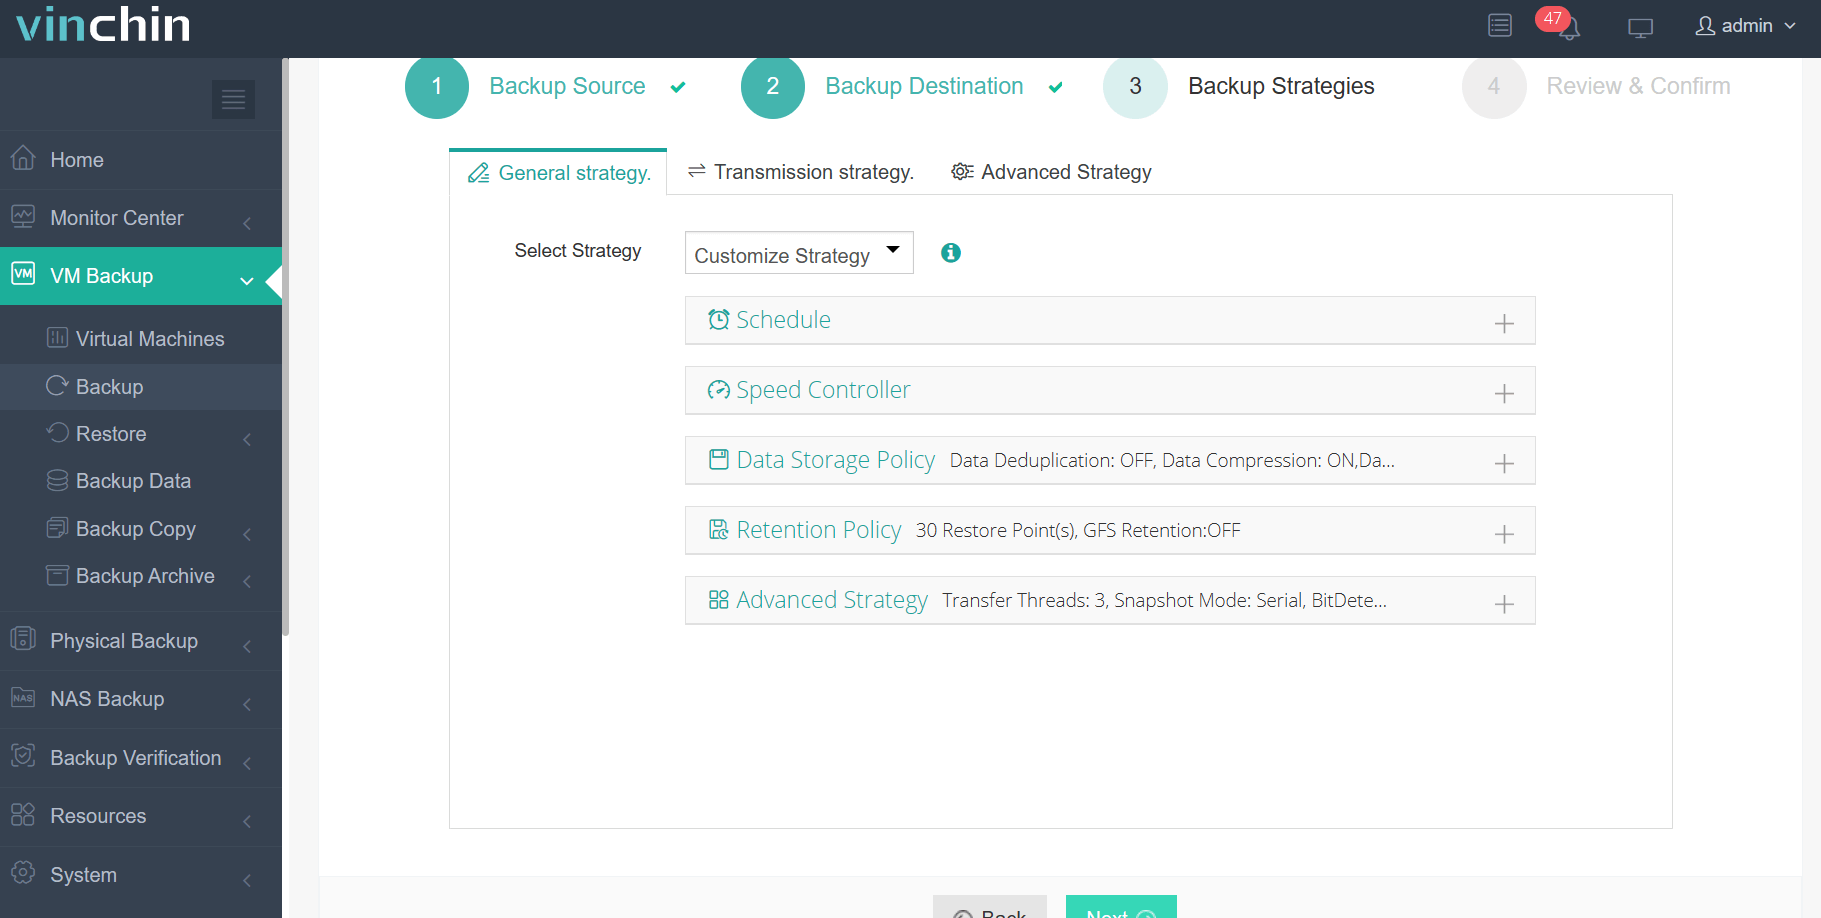
3. Specify Backup Strategies
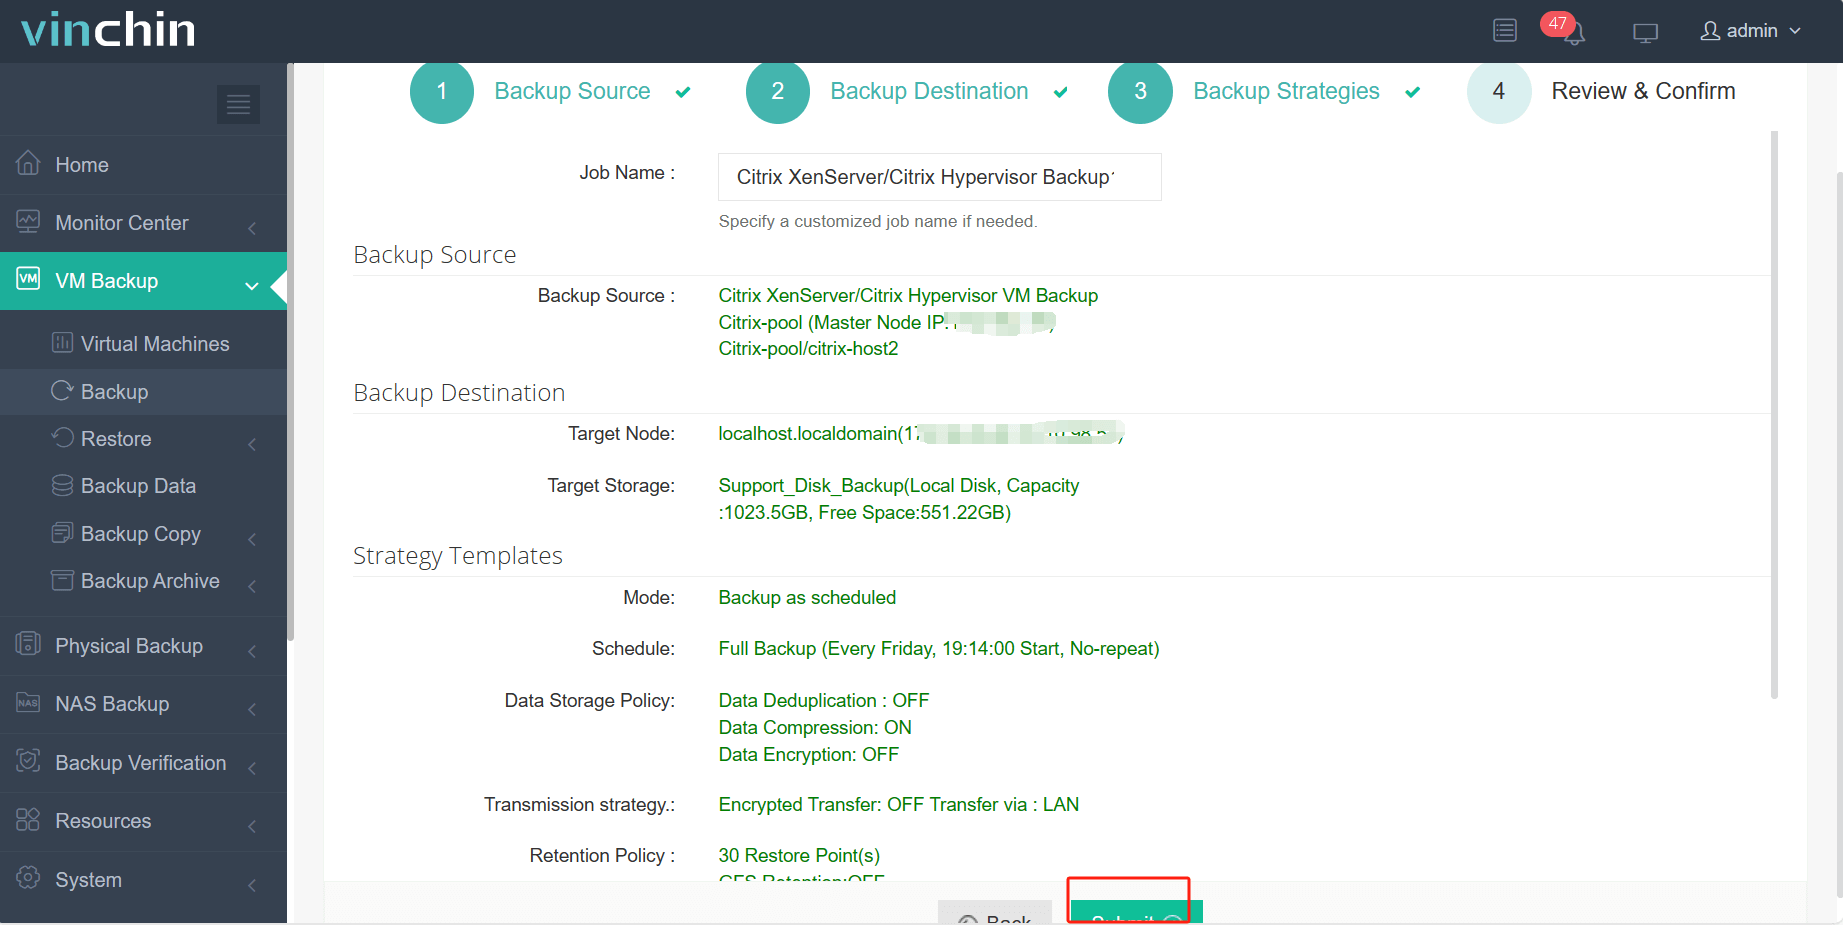
4. Click Submit
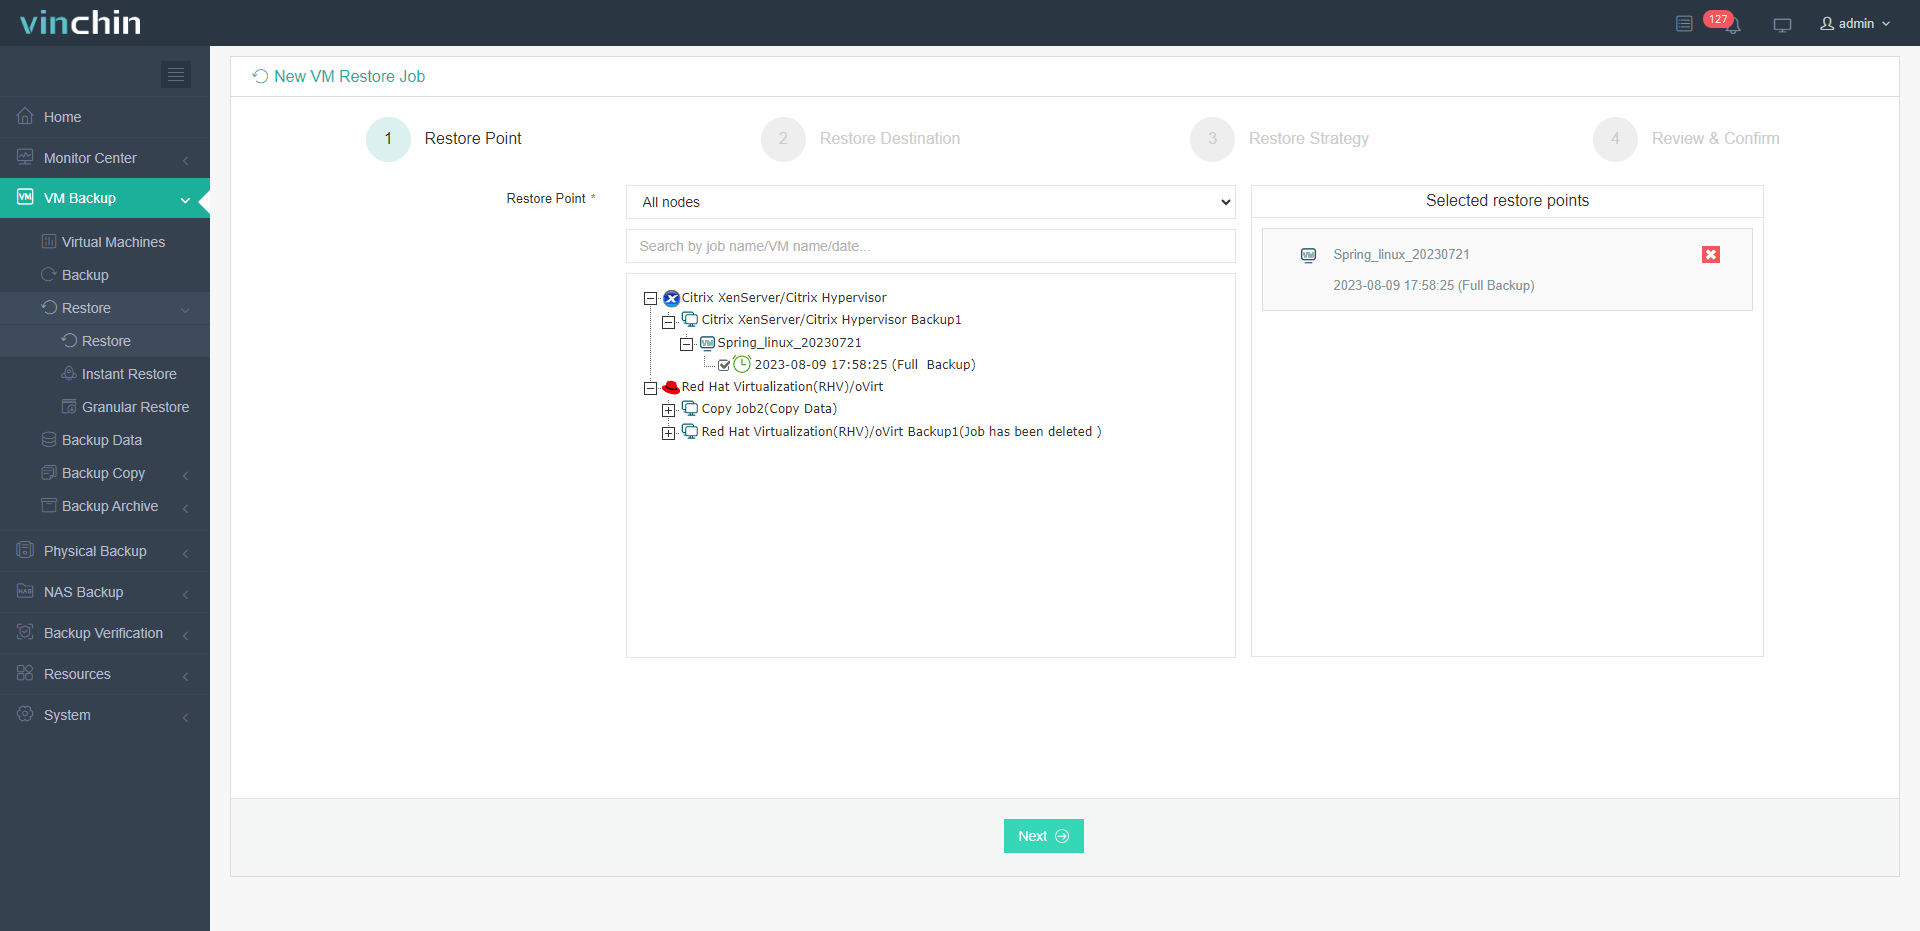
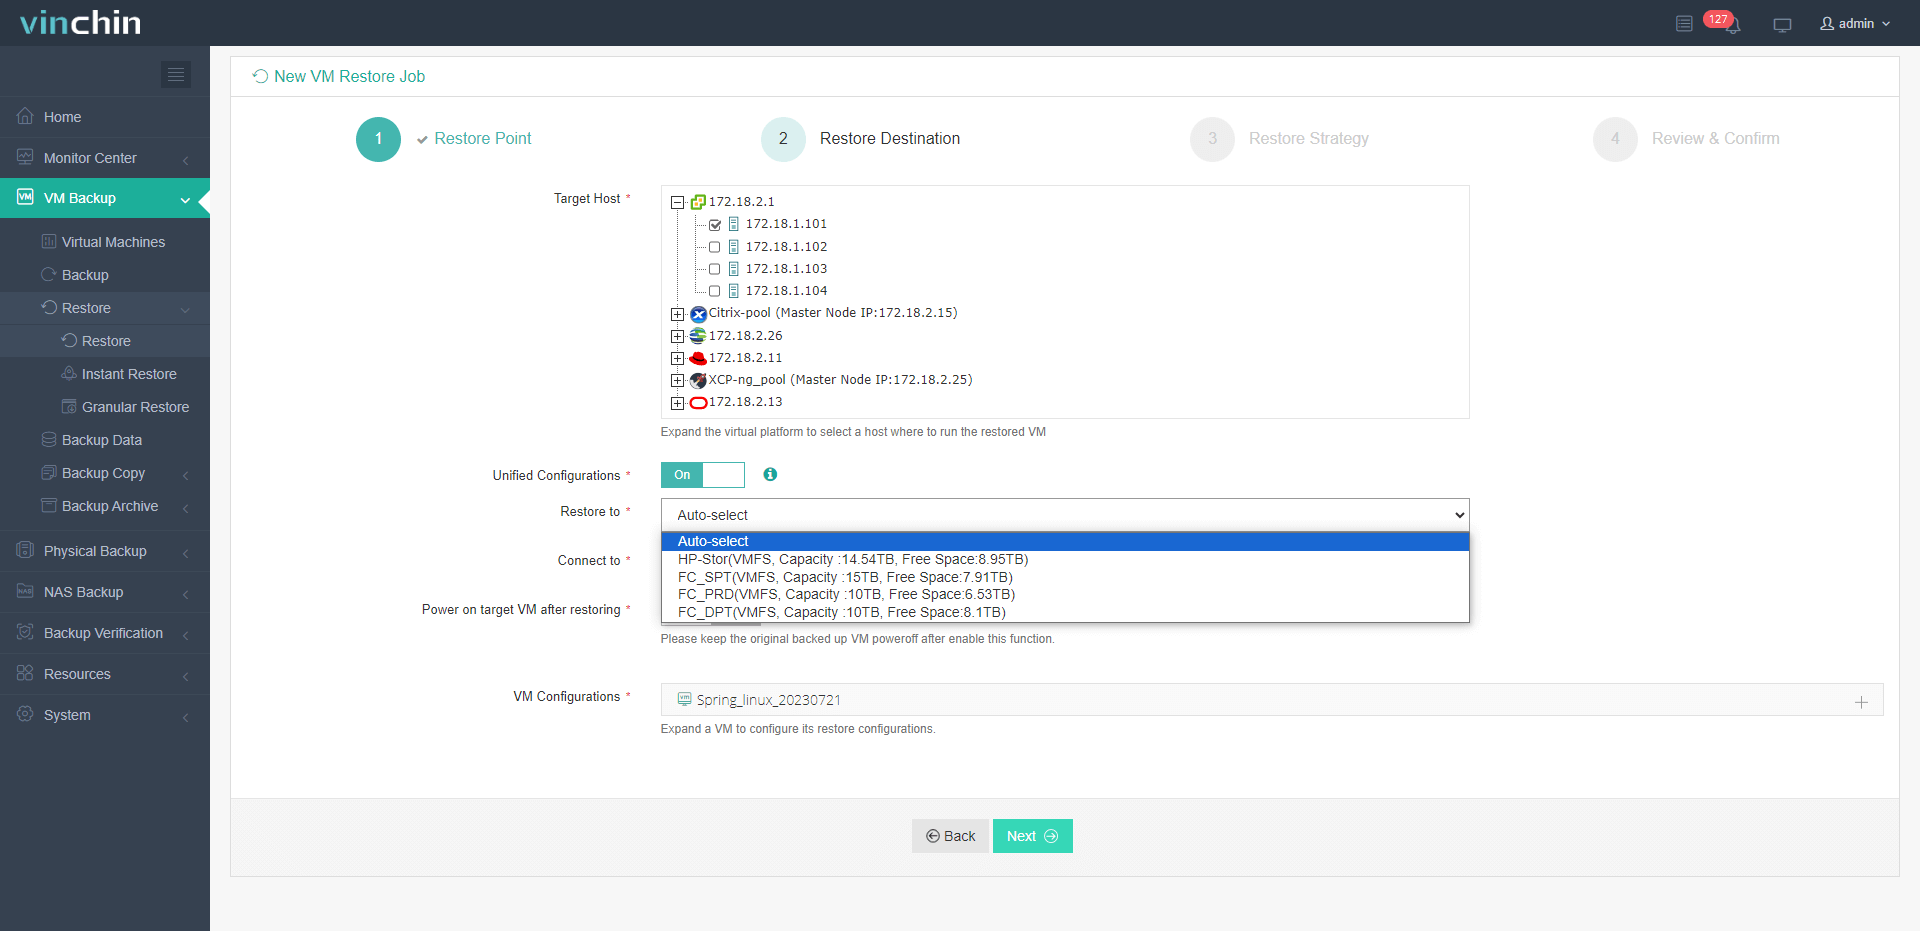
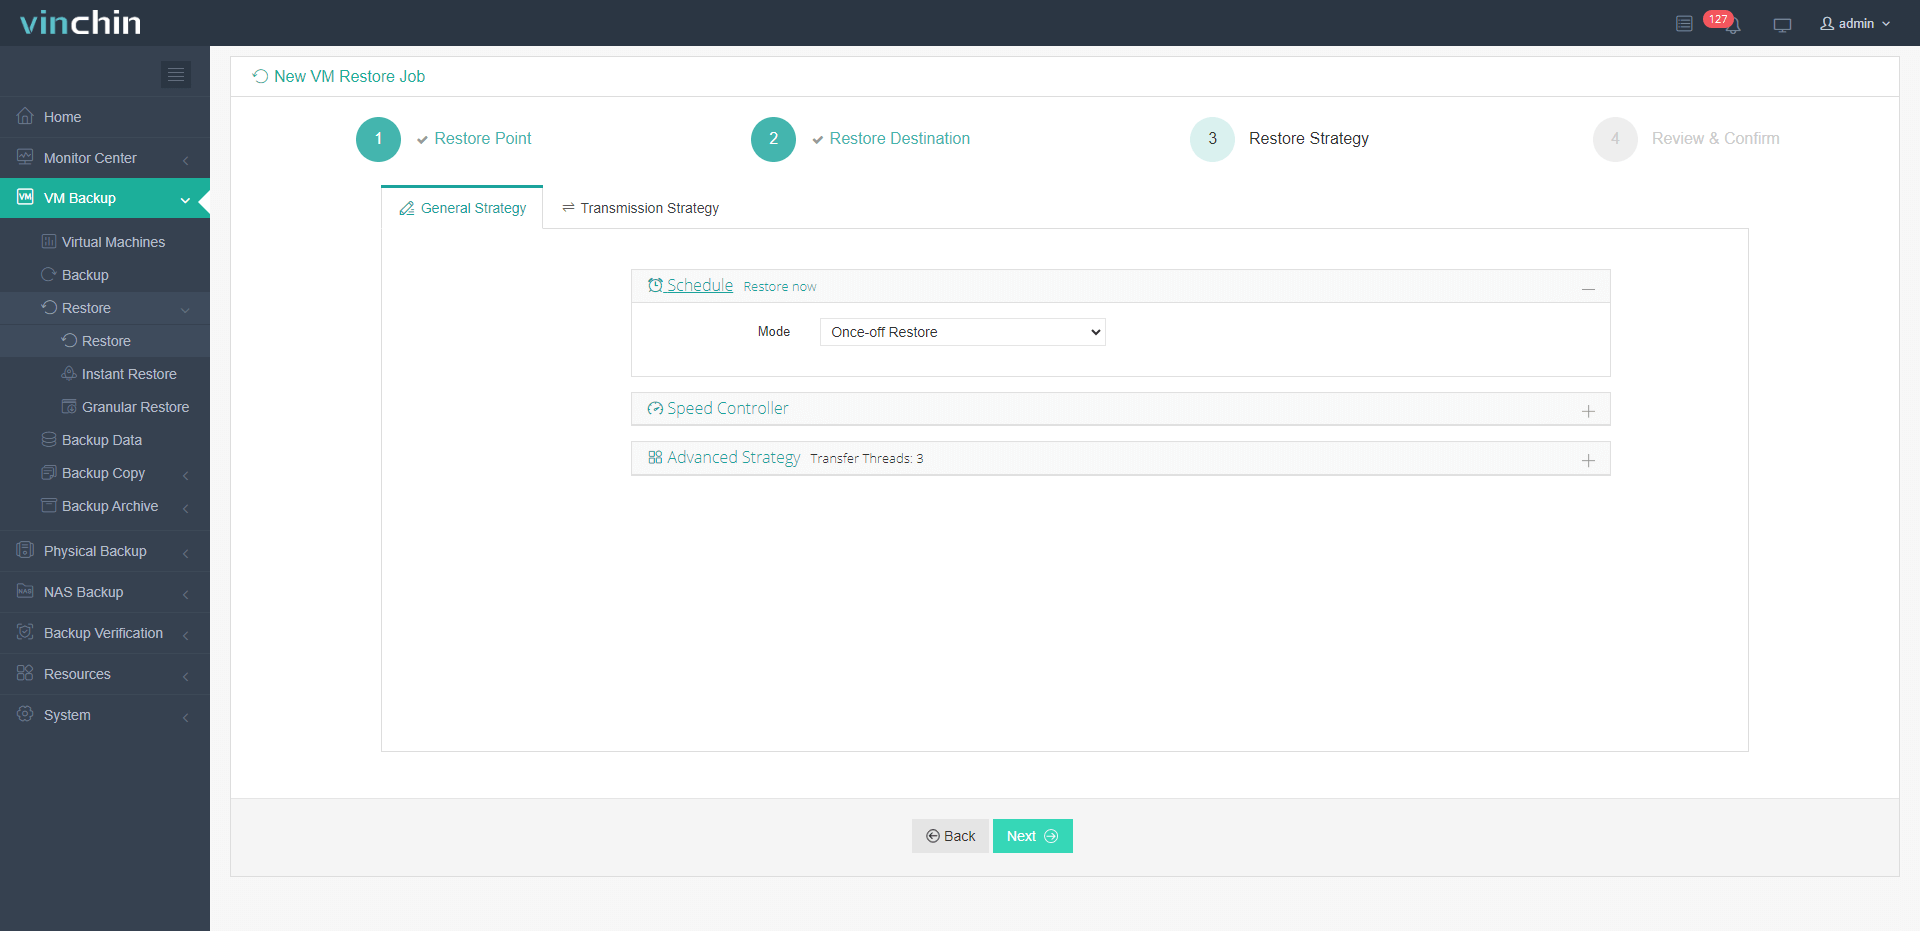
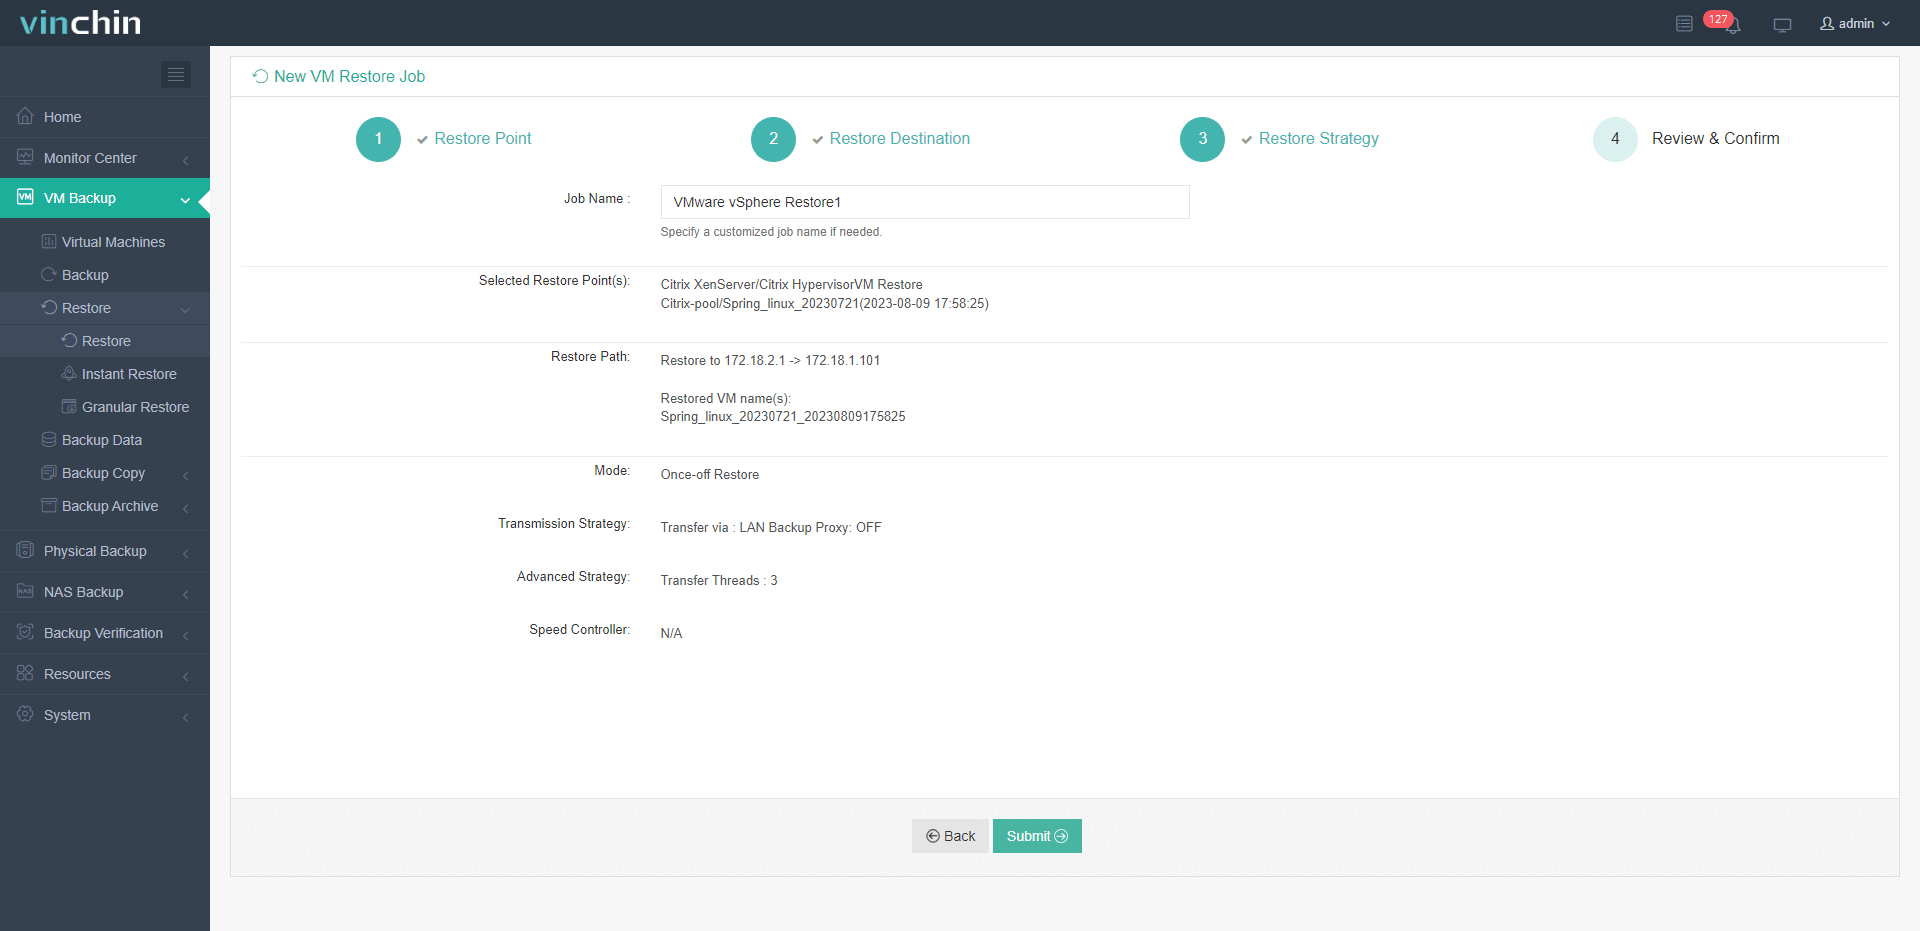
Restore VM in Vinchin Backup & Recovery
1. Choose the Backup to Restore
2. Define Restore Destination
3. Specify Restore Strategies
4.Click Submit
Vinchin offers a 60-day free trial for users to experience its virtual machine backup solution in a real-world environment. Contact Vinchin or their local partner for more information.
Conclusion
In short, automated backup and restore scripts have evolved into an indispensable asset for XenServer. They ensure data security, simplify backups, reduce errors, and increase efficiency. In addition, the use of Vinchin Backup & Recovery introduces a user-centered interface and advanced virtual machine protection features that enhance overall data security and business continuity.
Share on:


