-
vMotion Network Configuration Requirements
-
How to configure the VMware vMotion network?
-
How to migrate VMware VMs using vMotion?
-
How to migrate VMware VMs with Vinchin Backup & Recovery?
-
FAQ
-
Conclusion
The vMotion network is a network specifically set up for virtual machine migration in a virtualized environment. This network is used to transfer VM data between different physical servers without interrupting user access or services. Typically, the vMotion network is a high-speed network to ensure the speed and stability of the migration process. Its main role is to provide the data transfer channels required for VM migration to enable zero downtime migration and to maintain continuity of network connectivity and state of the VMs.
To achieve optimal VMware vMotion performance, it is necessary to configure a dedicated vMotion network on each ESXi host within the cluster or datacenter.
vMotion Network Configuration Requirements
1. Use a physical network adapter: The vMotion network requires at least one physical network adapter to communicate.
2. Dedicated, secure network: The vMotion network should be dedicated and have sufficient bandwidth and security.
3. Adequate bandwidth: A minimum of 250 Mbps of bandwidth is required for each concurrent VM migration. Higher bandwidth provides better performance.
4. Recommended 10 Gbit adapter: Although it is possible to use a 1 Gbit Ethernet network adapter, it is recommended to use a 10 Gbit adapter to improve performance.
4. Low Latency Network: The vMotion network is supposed to be low latency, with a recommended latency of no more than 10 milliseconds.
5. Long distance vMotion: If a long distance vMotion is performed, the maximum round trip time should not exceed 150 ms.
6. Same Subnet Access: The vMotion network on all ESXi hosts participating in the VM migration must have access to the same subnet.
7. Must have a vSphere license: In order to use the vMotion feature, the ESXi host must have the appropriate vSphere license, and that license must support vMotion.
How to configure the VMware vMotion network?
To achieve VMware vMotion network configuration, follow these steps:
Add Networking
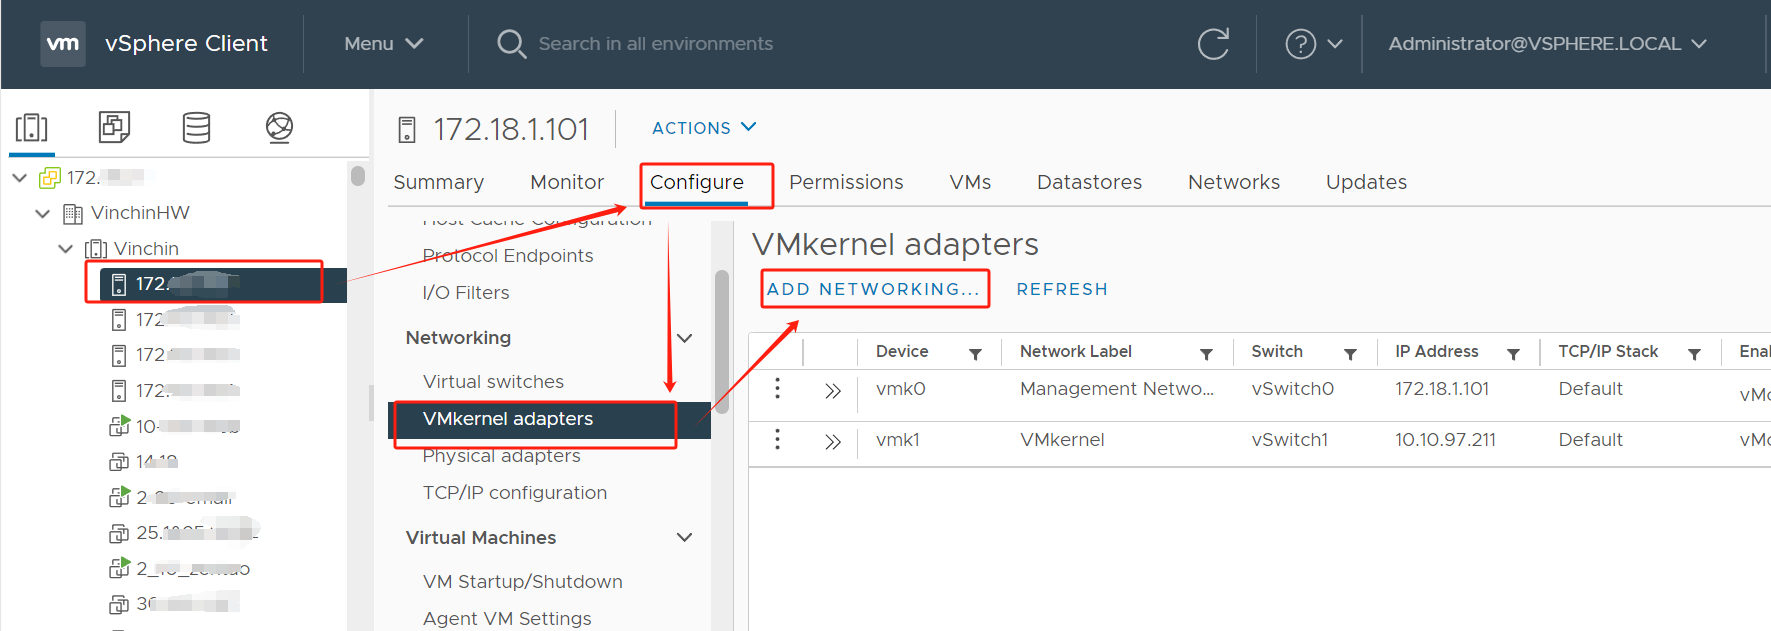
1. In vSphere Client, hit the host > choose Configure > hit VMkernel adapters > click ADD NETWORKING
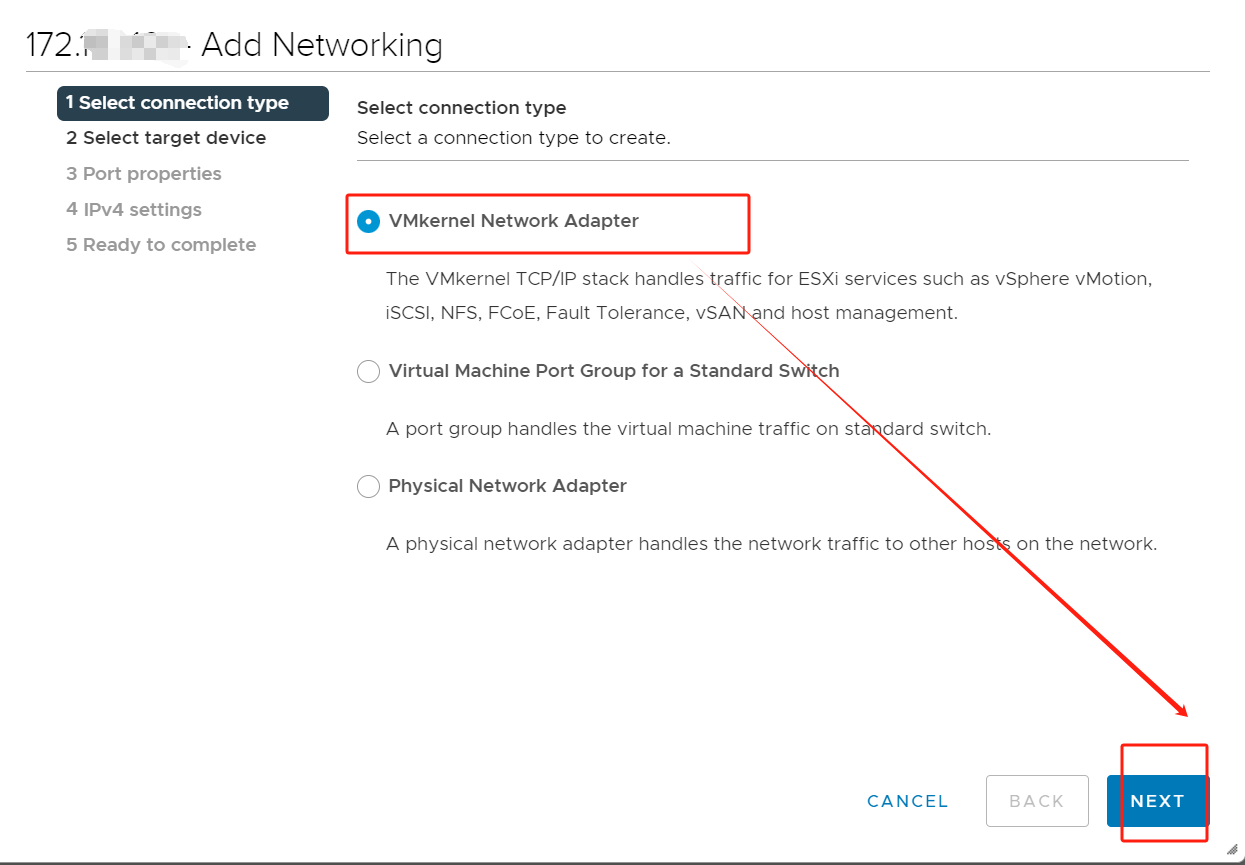
2. In Select connection type, choose VMkernel Network Adapter > hit Next
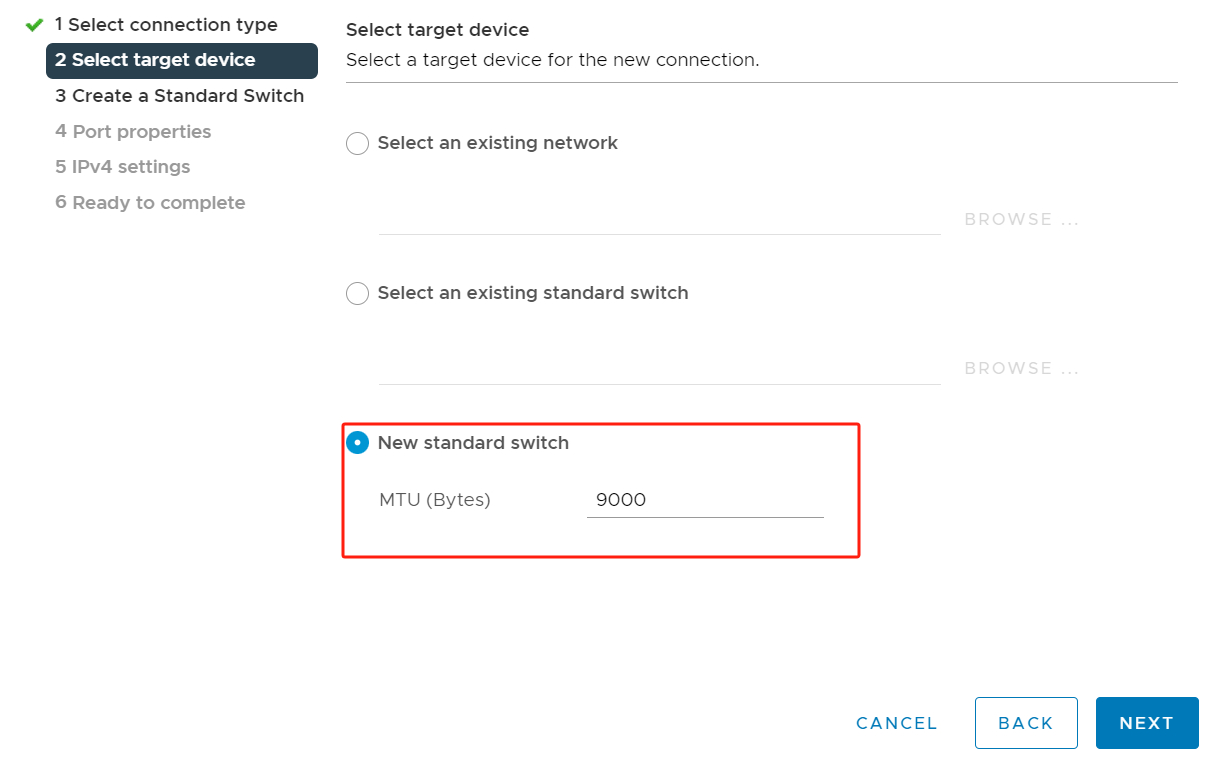
3. In Select target device, choose New standard switch
It is recommended here to change the default MTU value from 1500 bytes to 9000 bytes. This will improve network performance by utilizing jumbo frames to transport vMotion traffic.
4. In Create a Standard Switch, choose Unused adapters > click +
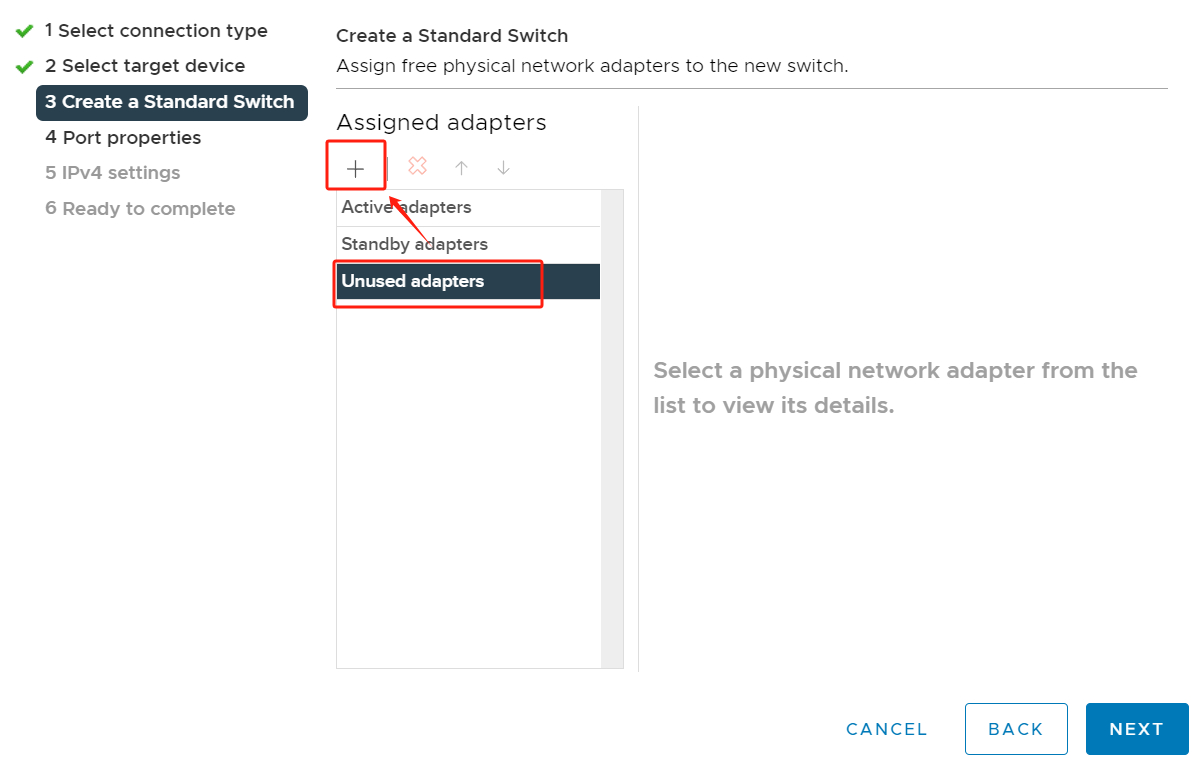
It is recommended to choose 2 physical network adapters for redundancy and better performance.
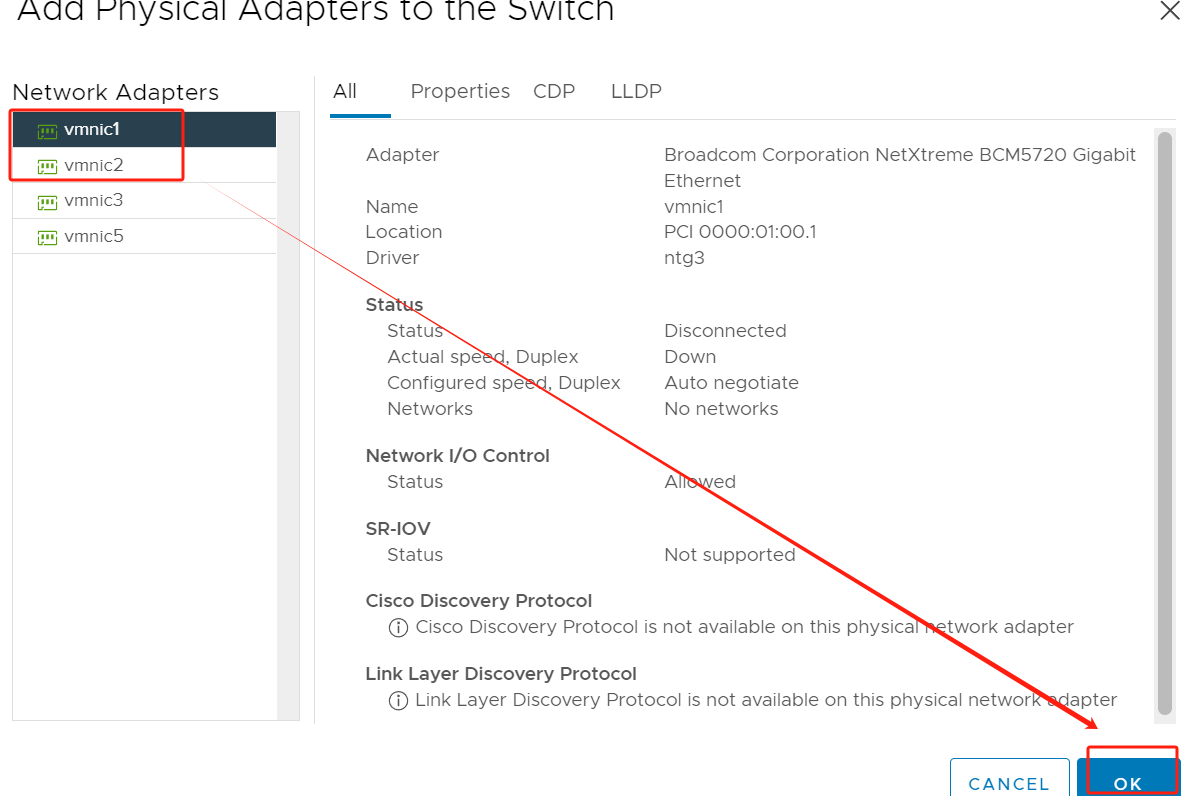
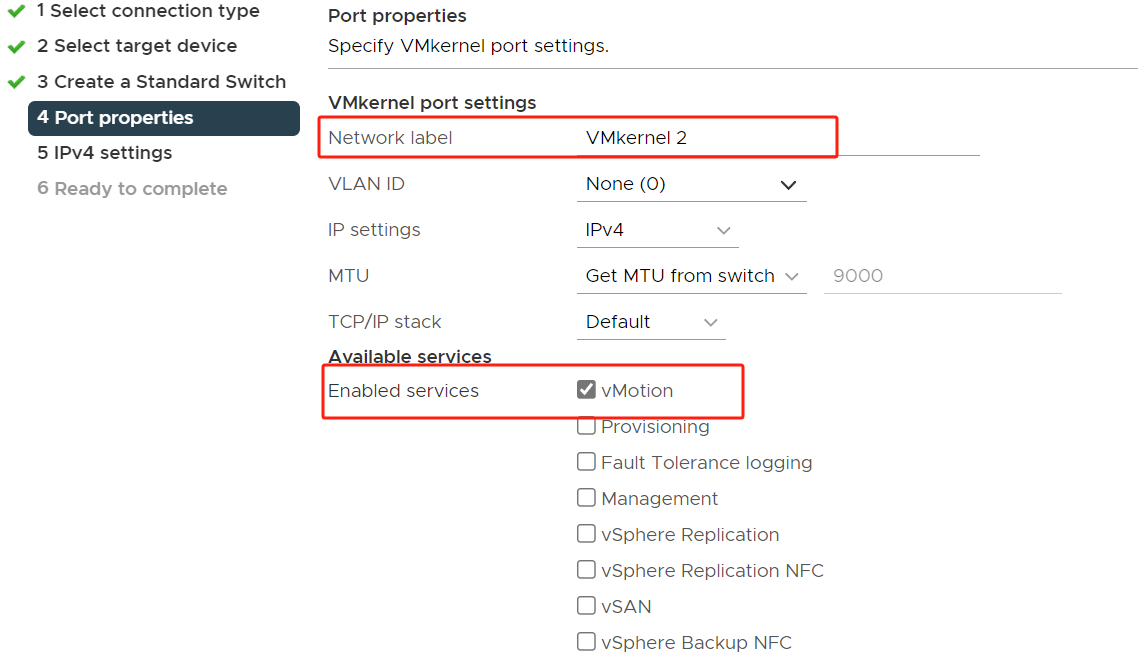
5. In Port properties, type the Network label(such as VMkernel 2)> enable vMotion
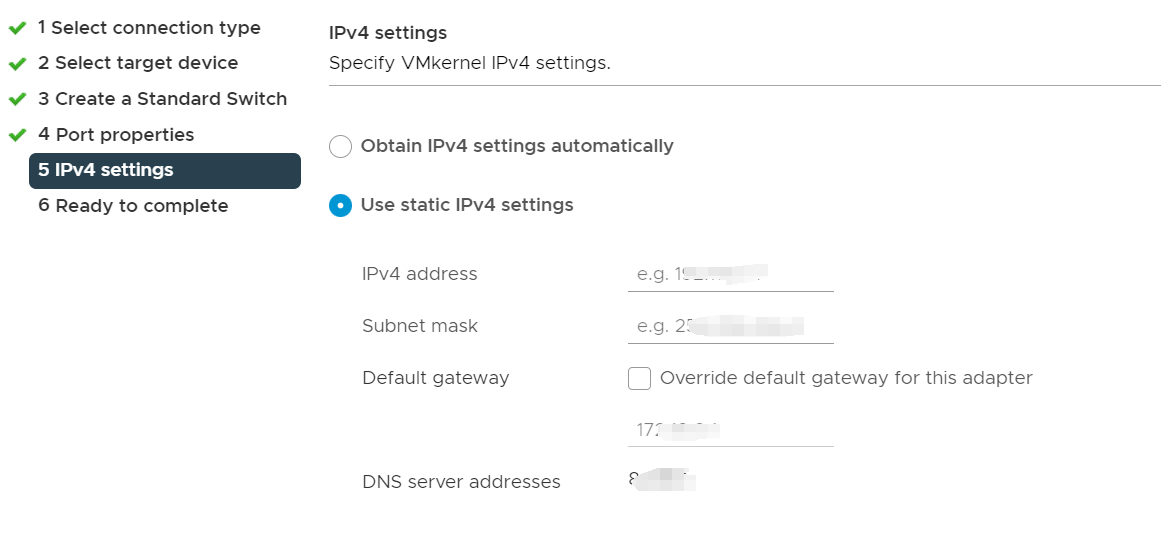
6. In IPv4 settings, use static IPv4 settings > Hit Finish
Configure Network Adapter
1. Choose the host > click Configure > hit Virtual switches
You can see the port groups, VMkernel adapters, and connected physical network adapters here.
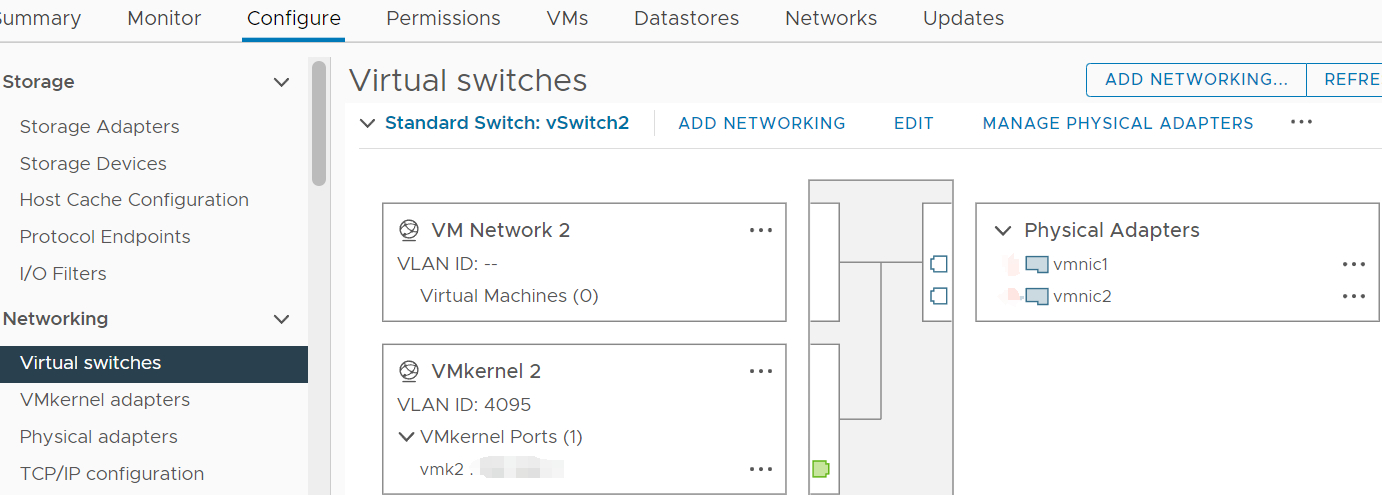
2. Now you need to move one of the physical network adapters from Active adapters to Standby adapters. Click Manage Physical Network Adapters, the example on the graphic is to keep vmnic1 active and then move vmnic2 down to become a standby adapter.
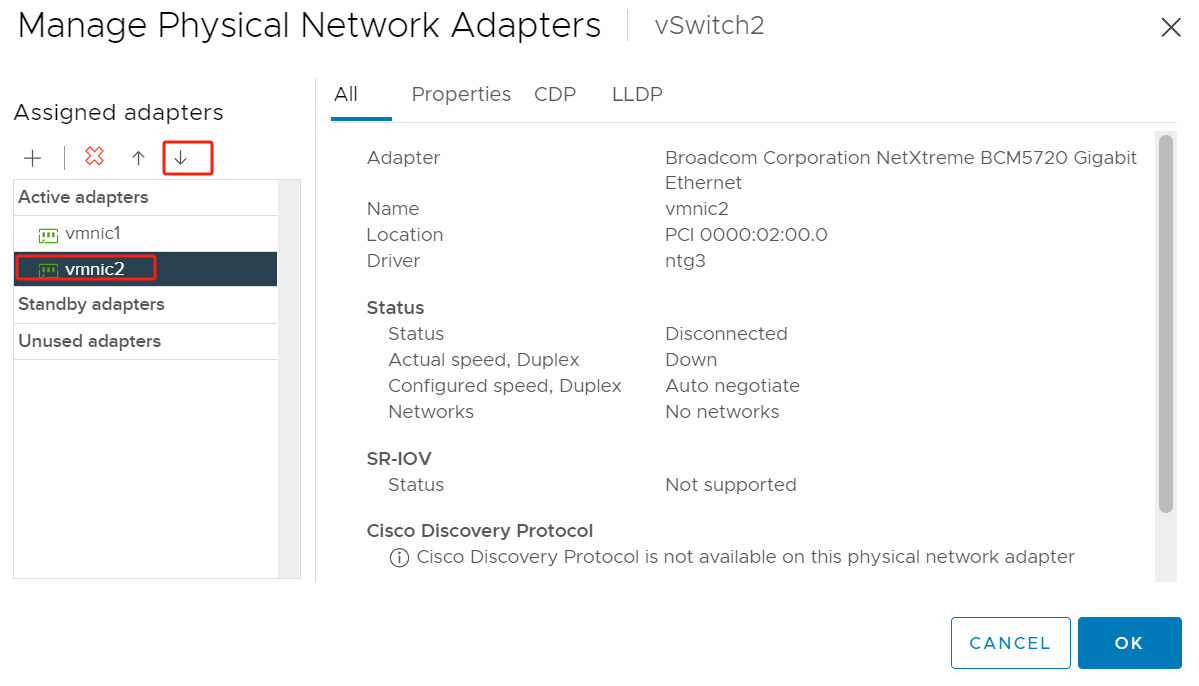
3. After adjusting the active state of the port group, the VMware vMotion network configuration is completed! Now, click OK to save the settings and close this window.
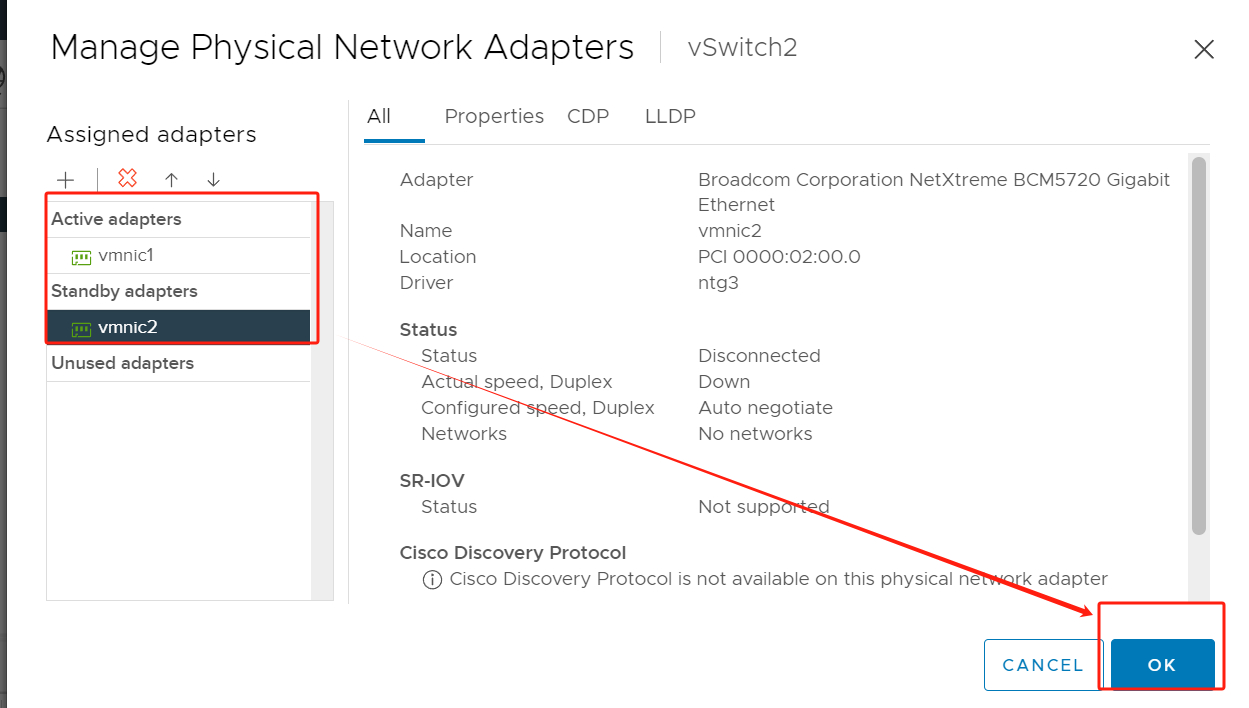
4. Repeat these steps on each ESXi
How to migrate VMware VMs using vMotion?
Migrating VMware virtual machines is a critical task. Using vMotion network enables seamless migration and ensures business continuity during the migration process. Below is a brief procedure for migration using vMotion:
1. Right-click the VM > hit Migrate
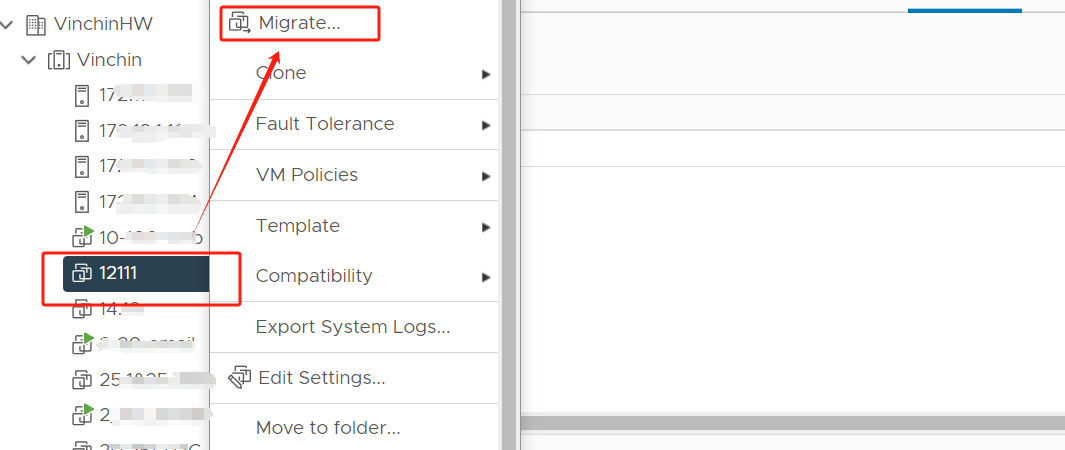
2. Select a migrate type > select a computer resource > select networks > select vMotion priority > hit Finish, the VMs will be migrated later.
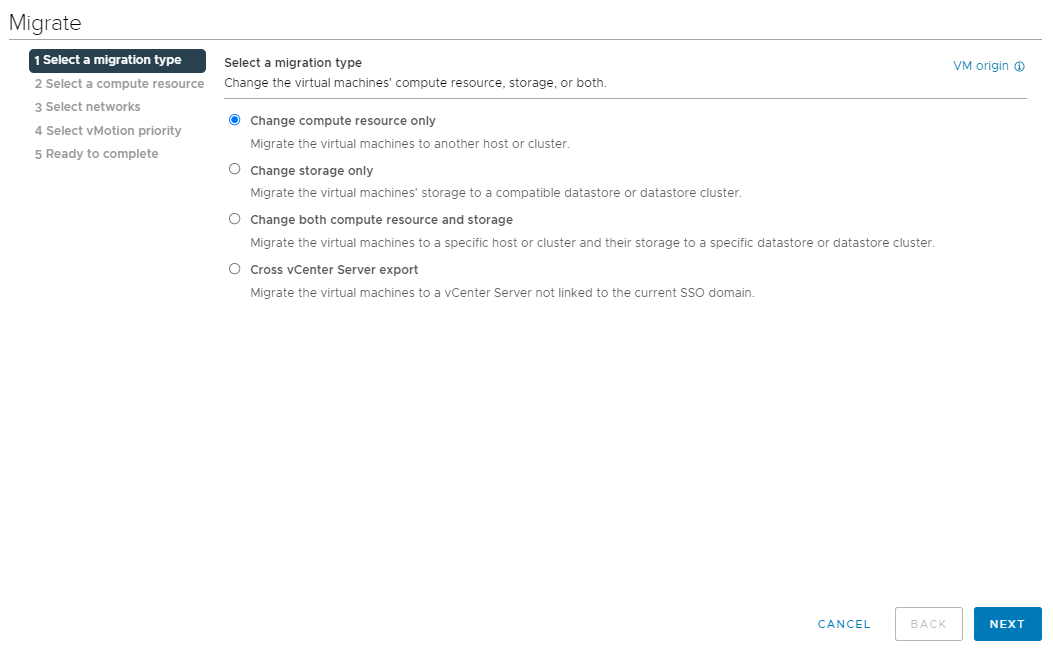
How to migrate VMware VMs with Vinchin Backup & Recovery?
Vinchin Backup & Recovery is a professional data protection solution designed to help organizations achieve reliable backup and fast VMware VM migration in virtual environments.
Vinchin supports multiple virtualization platforms, including Proxmox, VMware, Hyper-V, Citrix XenServer, etc., and provides various backup policy settings to meet different data protection needs. As powerful as VMware vMotion is, it is limited to VMware environments. In contrast, Vinchin offers superior V2V migration capabilities that enable you to easily migrate VMs between hosts on the same virtualization platform. It is even possible to migrate VMs from one virtualization platform to another. This flexibility and convenience opens up a wider range of possibilities for your IT infrastructure management.
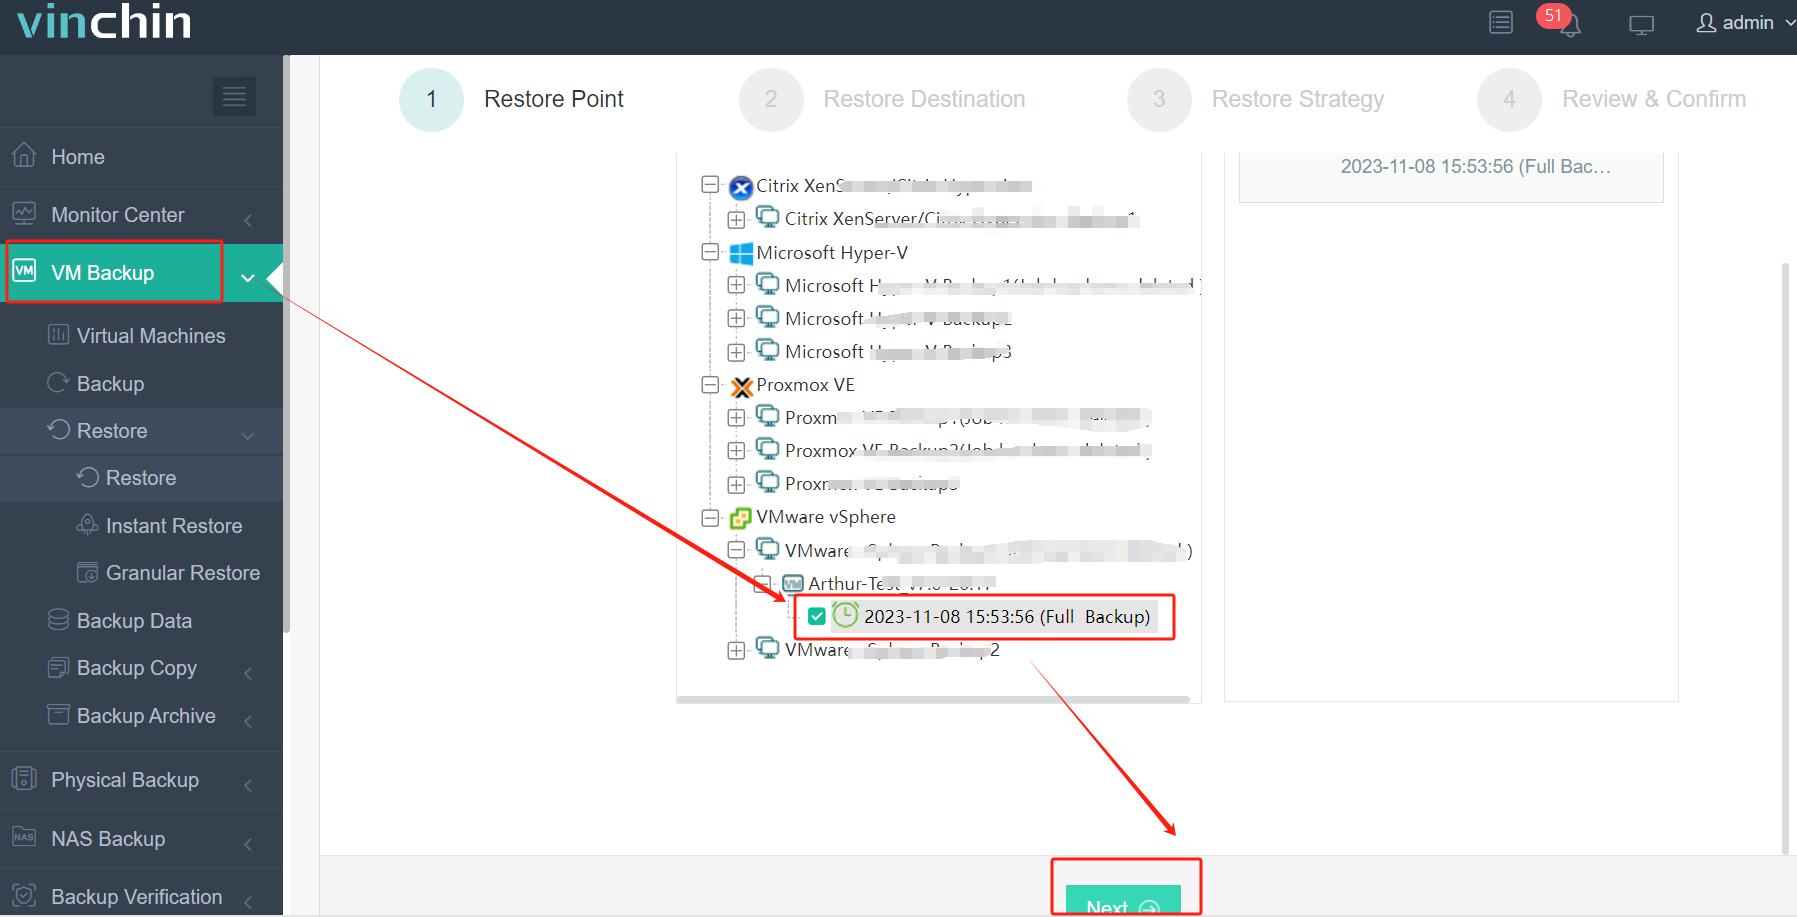
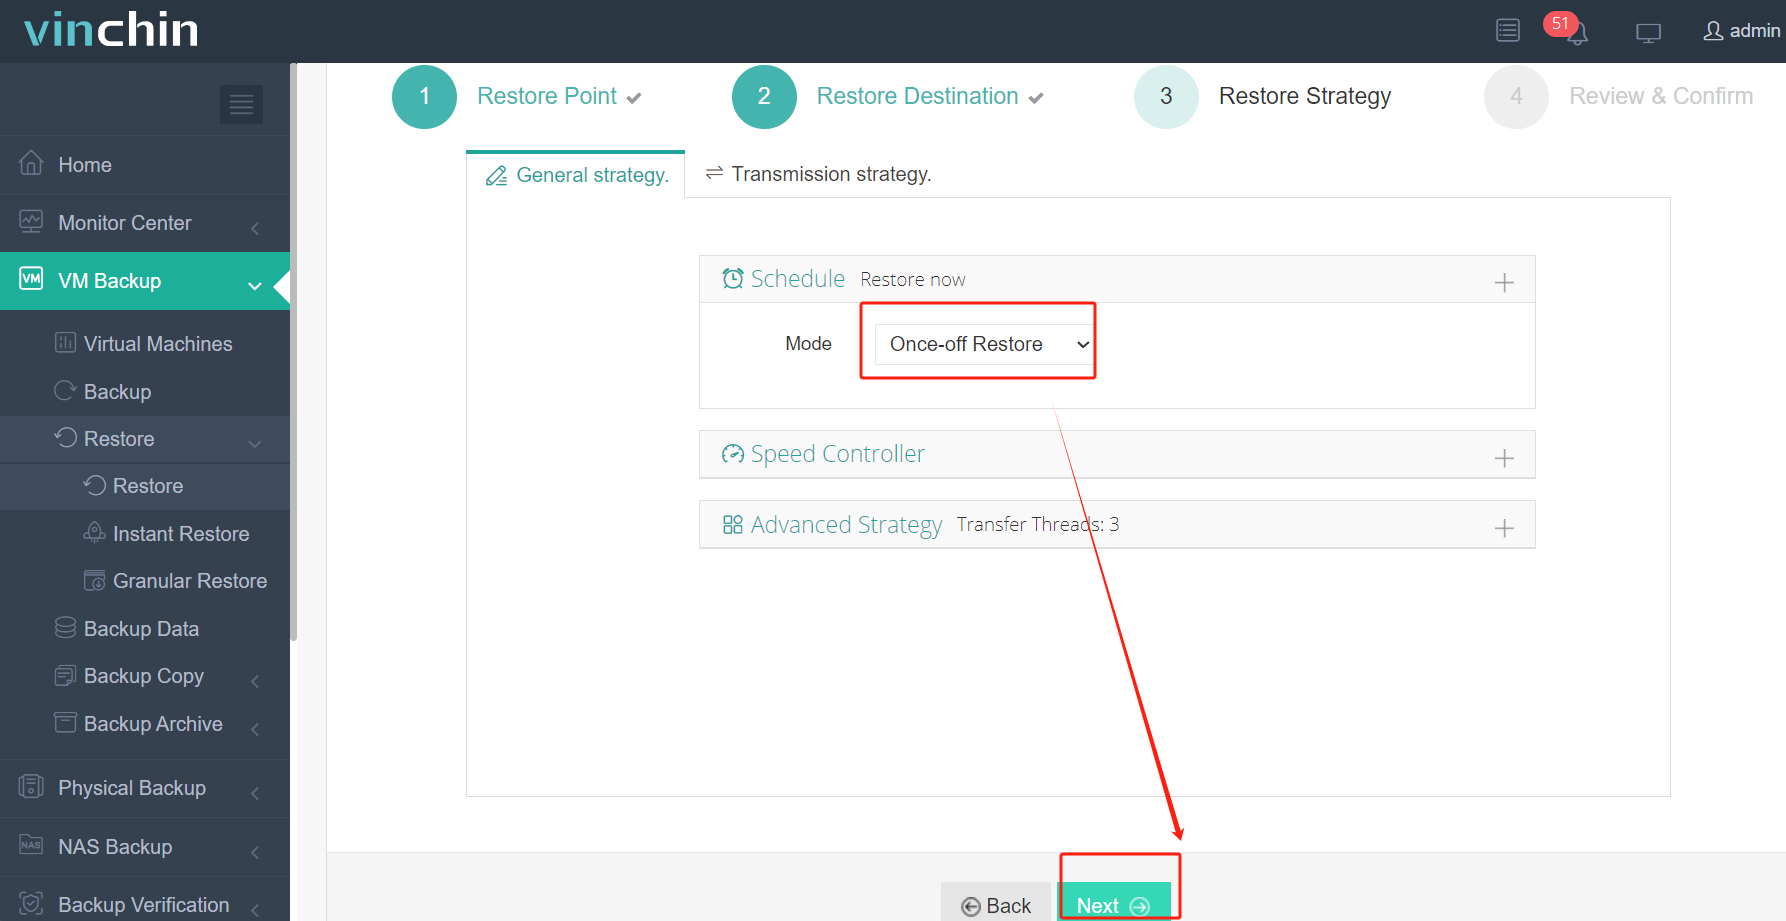
The following will demonstrate the migration from VMware VM to Proxmox. This process is very simple and there is no need to perform complex conversion tasks.
1. Just select the backup of VMware VM > click Next
2. Select the Proxmox host as the target host > click Next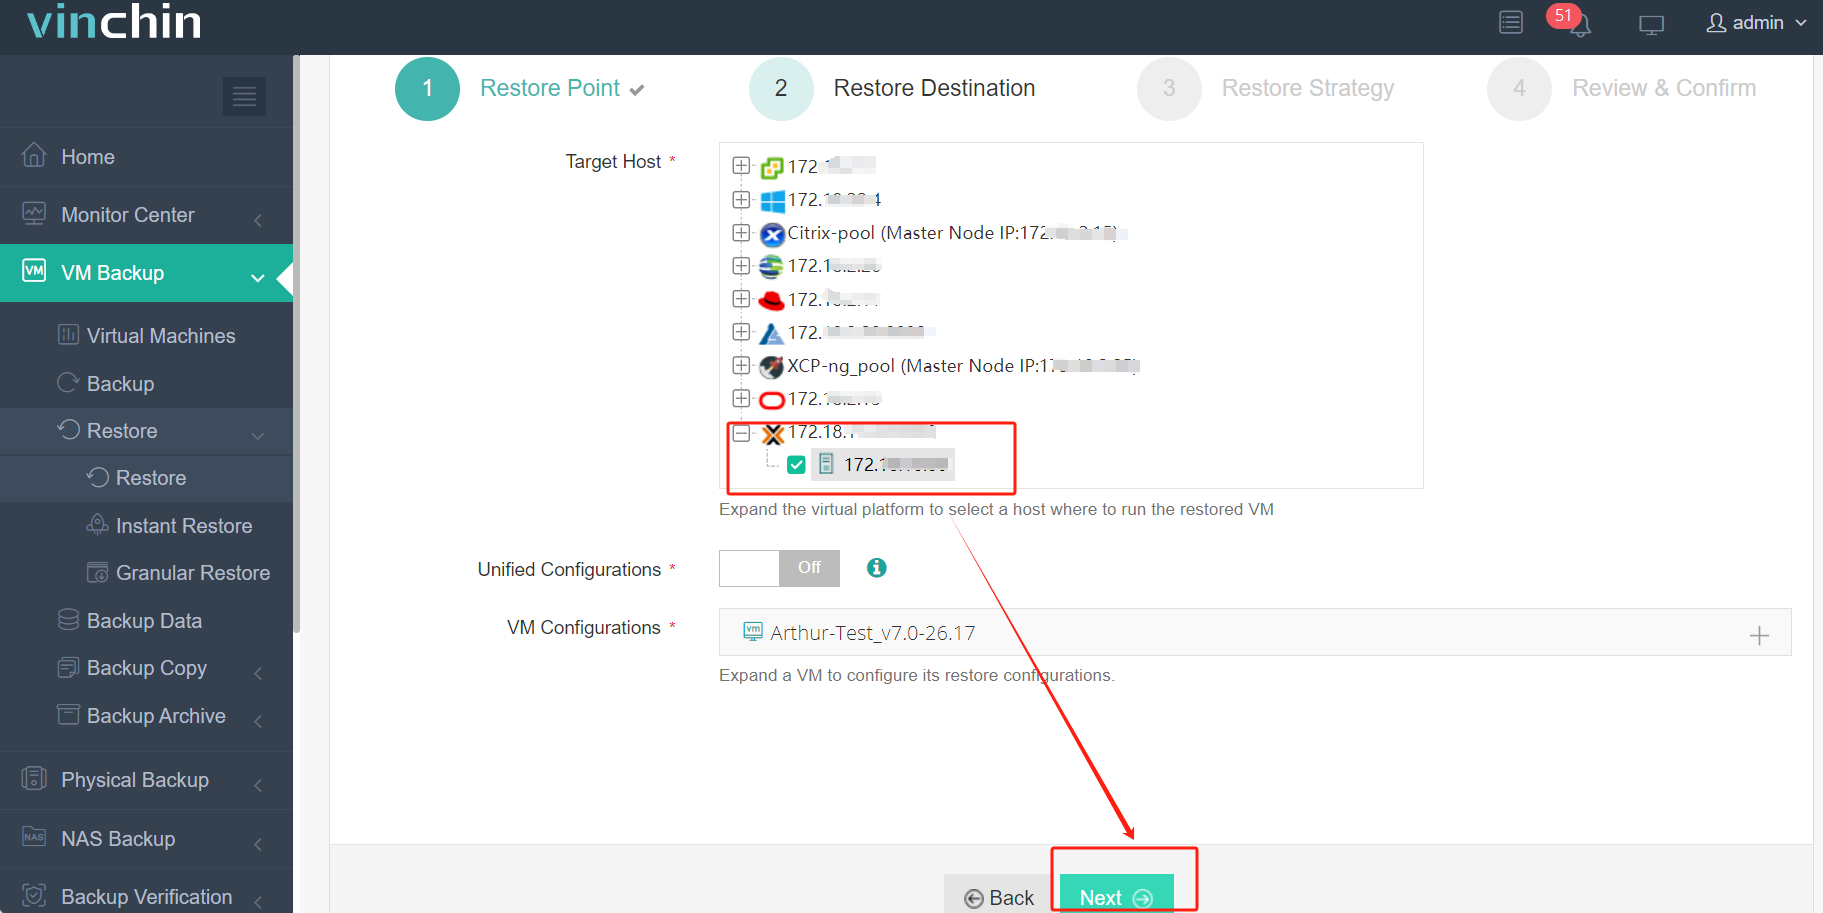
3. Select Once-off Restore > click Next
4. Submit the job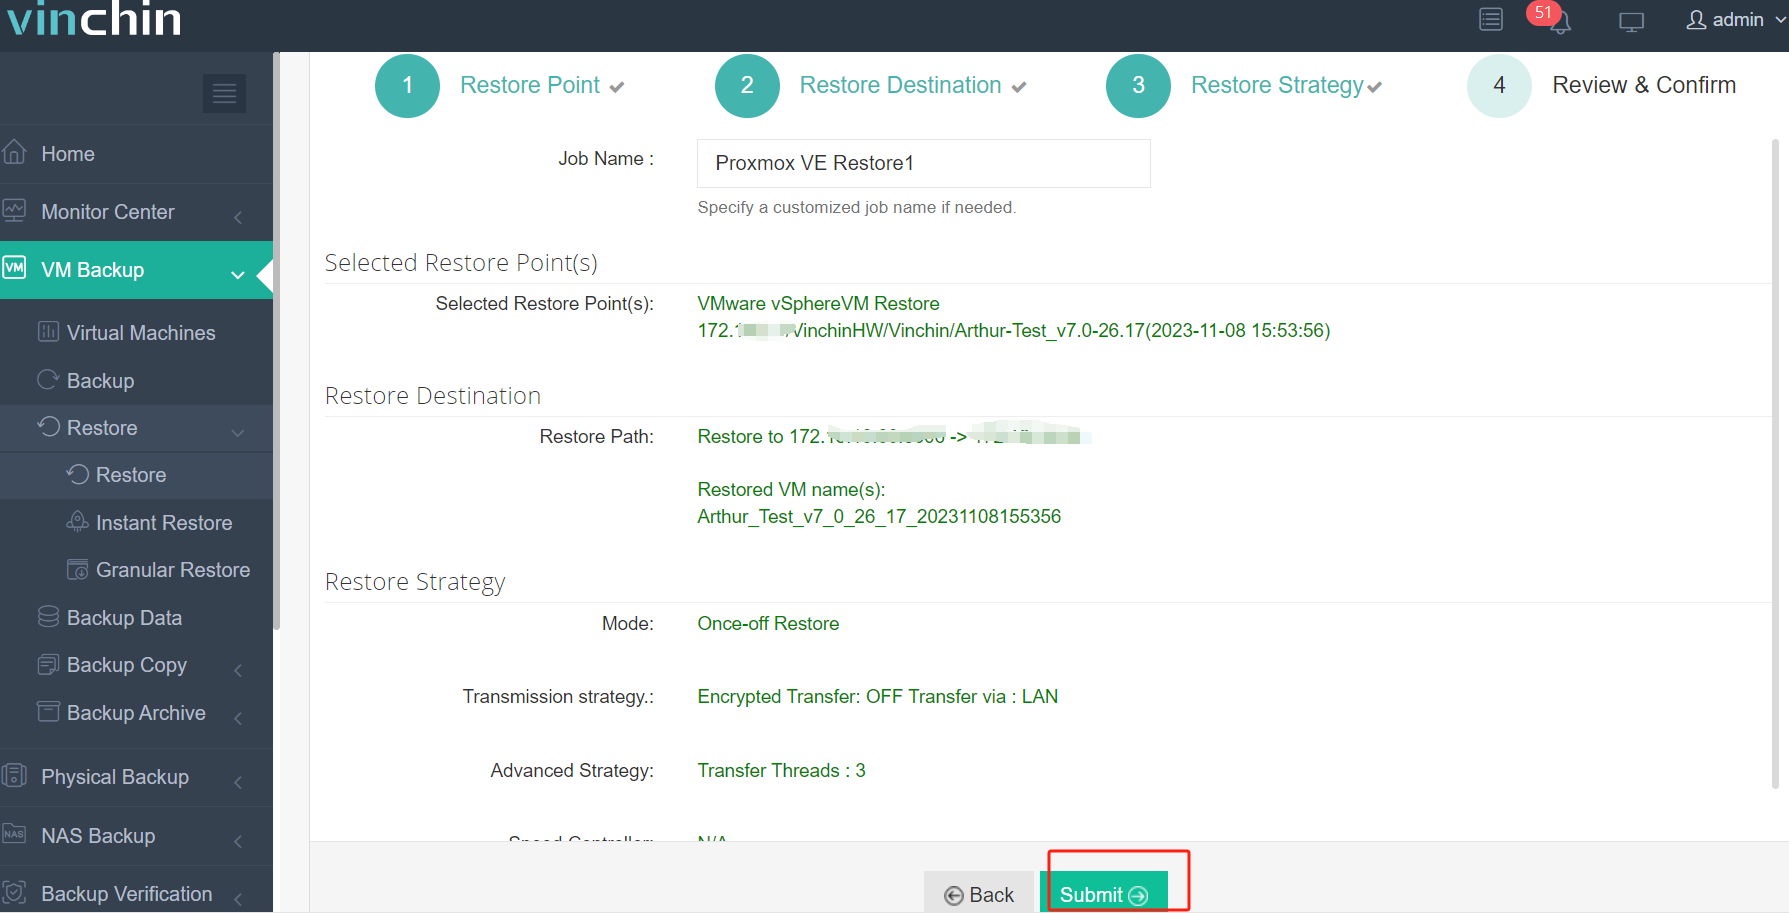
Vinchin provides users with a 60-day free trial to experience its features in a real-world environment. For further details, please reach out to Vinchin directly or contact our local partners.
FAQ
Q1: What are the troubleshooting methods for VMware vMotion network?
A1: Common VMware vMotion network faults include network latency, insufficient bandwidth, and network misconfiguration. You can troubleshoot by monitoring network performance, checking network configuration, and troubleshooting network devices.
Q2: How does a VMware vMotion network differ from other network types?
A2: Unlike a regular virtual machine network, a VMware vMotion network is a network dedicated to migrating virtual machines. It is typically configured on a separate physical network adapter and has dedicated network bandwidth and priority settings to ensure a smooth migration process.
Conclusion
In conclusion, the vMotion network is a dedicated network that facilitates seamless migration of VMware virtual machines, ensuring zero downtime and maintaining network connectivity. By following the steps to configure the vMotion network and utilizing the vMotion feature, VMs can be migrated without interrupting user access or services. Additionally, solutions like Vinchin provide advanced VM migration capabilities across different virtualization platforms, expanding the flexibility and convenience of VM migration.
Share on:


