-
Why convert physical server/VM to Hyper-V?
-
Tools for Hyper-V P2V conversion
-
Using MVMC for Hyper-V P2V conversion
-
Using Disk2vhd for Hyper-V P2V conversion
-
Simplify V2V migration with Vinchin Bakcup & Recovery
-
Hyper-V conveter FAQs
-
Conclusion
In the era of digital transformation, organizations are constantly seeking ways to enhance their IT infrastructure’s flexibility, efficiency, and cost-effectiveness. One strategic move that has gained significant traction is the migration from traditional physical machines to virtualized environments. Microsoft’s Hyper-V, a powerful hypervisor technology, offers an ideal platform for this transition.
Why convert physical server/VM to Hyper-V?
Resource Optimization: Hyper-V enables efficient utilization of hardware resources by allowing multiple virtual machines to run simultaneously on a single physical host. This consolidation reduces the number of physical servers required, lowering capital expenditure and energy consumption while maximizing available computing power.
Scalability and Flexibility: With Hyper-V, scaling up or down resources allocated to VMs can be done effortlessly, ensuring that workloads receive the necessary processing power, memory, and storage as demands fluctuate. Moreover, VMs can be quickly provisioned, migrated, or replicated across hosts, enabling seamless workload balancing, disaster recovery, and business continuity.
Enhanced Manageability: Hyper-V integrates seamlessly with Microsoft’s System Center suite and Azure cloud services, providing centralized management, monitoring, and automation capabilities. This simplifies IT administration tasks, streamlines updates and patching processes, and facilitates compliance with security policies.
Testing and Development Environments: Hyper-V supports the creation of isolated, customizable VM environments, which are invaluable for software testing, application development, and training purposes. These sandboxes allow teams to experiment without impacting production systems, accelerating innovation and reducing risks.
Switching to new virtual environment: Hyper-V is Microsoft's virtualization platform. With its deep integration with the Windows operating system, cost-effectiveness, wide hardware compatibility and driver support, storage virtualization and flexibility, powerful cloud computing and containerization support, efficient management tools and advanced virtualization functions, it provides a highly compatible, cost-effective, easy-to-manage and feature-rich virtualization solution for enterprise users in Windows environments. Its close integration with the Azure cloud platform is particularly suitable for users seeking hybrid cloud deployment and fully leveraging the advantages of Microsoft's ecosystem.
Tools for Hyper-V P2V conversion
Several specialized tools have been developed to facilitate the process of converting physical machines (P2V) to Hyper-V virtual machines. Three such tools that stand out for their effectiveness and ease of use are:
Microsoft Virtual Machine Converter (MVMC): A free utility from Microsoft, MVMC is designed specifically for converting physical Windows and Linux servers, as well as VMware virtual machines, to Hyper-V VMs. It offers a user-friendly interface and command-line support, ensuring compatibility with various automation scenarios.
Disk2vhd: Disk2vhd is a lightweight, standalone tool that creates VHD or VHDX images of physical disks or volumes, ready for import into Hyper-V. Its simplicity and lack of installation requirements make it an attractive choice for quick P2V conversions, particularly in smaller environments.
Using MVMC for Hyper-V P2V conversion
1. Download the latest version of MVMC from the official Microsoft website and install the software following the on-screen insreltructions.
2. After installation, launch the MVMC wizard. You’ll be presented with a welcome screen. Click Next to proceed.
3. In the Machine Type page, select Physical machine conversion. In the next screen, provide the IP address or host name of the physical machine you want to convert, along with the appropriate authentication credentials (username and password). Then click Scan System to get the information of the physical machine.
4. Select the physical partition that needs to be converted, and select the type of virtual disk.
5. Enter the name after conversion to the virtual machine and the configuration of CPU and memory.
6. Enter the address, username and password of the target Hyper-V host, which hosts the converted virtual machine.
7. Specify the storage path where the virtual machine files will be stored after conversion (using a shared path requires write permission).
8. Specify the workspace path of the converted virtual machine.
9. Select the network card connection status.
10. View the summary information, confirm it is correct, and click Next.
11. Start the conversion and wait for the conversion to complete.
After the conversion is completed, you can see the virtual machine that has been automatically created on the Hyper-v host.
If you want to perform V2V migration with MVMC, just select Virtual machine conversion in the Machine Type page and then follow the wizard.
Using Disk2vhd for Hyper-V P2V conversion
1. Download and Run Disk2vhd
Download the portable Disk2vhd executable from the Microsoft website. No installation is required; simply run the executable on the physical machine you want to convert.
2. Select Disks or Volumes to Convert
In the Disk2vhd window, you’ll see a list of all available disks and volumes on the physical machine. Check the boxes next to the disks or volumes you wish to include in the conversion, typically the system drive (C:) and any additional data drives. Note that Disk2vhd can perform the conversion while the system is online, minimizing downtime.
3. Specify Output Location and Format
Output folder: Choose the location where you want Disk2vhd to save the resulting VHD or VHDX files. Ensure there is enough free space at the specified location to accommodate the converted disks.
Virtual hard disk format: Select either VHD or VHDX. VHDX is generally preferred for its larger size limits and advanced features.
4. Initiate the Conversion
Click Create to start the conversion process. Disk2vhd will create virtual disk images of the selected disks or volumes, which can later be attached to a new Hyper-V virtual machine.
5. Import the VHD/VHDX into Hyper-V
Once the conversion is complete, copy the generated VHD or VHDX files to the Hyper-V host. On the Hyper-V host:
a. Create a new virtual machine using the New Virtual Machine Wizard.
b. During the wizard, specify the desired settings for the new VM, such as memory allocation, network configuration, and integration services.
c. When prompted to choose a virtual hard disk, select Use an existing virtual hard disk and browse to the location where you copied the converted VHD/VHDX files.
d. Complete the wizard, and your converted physical machine will now be available as a Hyper-V virtual machine.
Simplify V2V migration with Vinchin Bakcup & Recovery
V2V converter makes the conversion easier and users don’t have to stick with one virtualization platform any more. However, an all-in-one solution is much better for a hybrid IT environment.
Vinchin Backup & Recovery is not only a professional backup solution for virtual machine, but also an advanced VM migration solution, supporting VMware vSphere, Hyper-V, Proxmox, XenServer, XCP-ng, oVirt, OLVM, RHV, OpenStack, etc. By adding both virtualized platforms into the backup system, you can perform easy agentless V2V migration with a user-friendly web console.
There is the built-in conversion engine in the backup system, you just need to select the VM you need to move it to another virtualized platform.
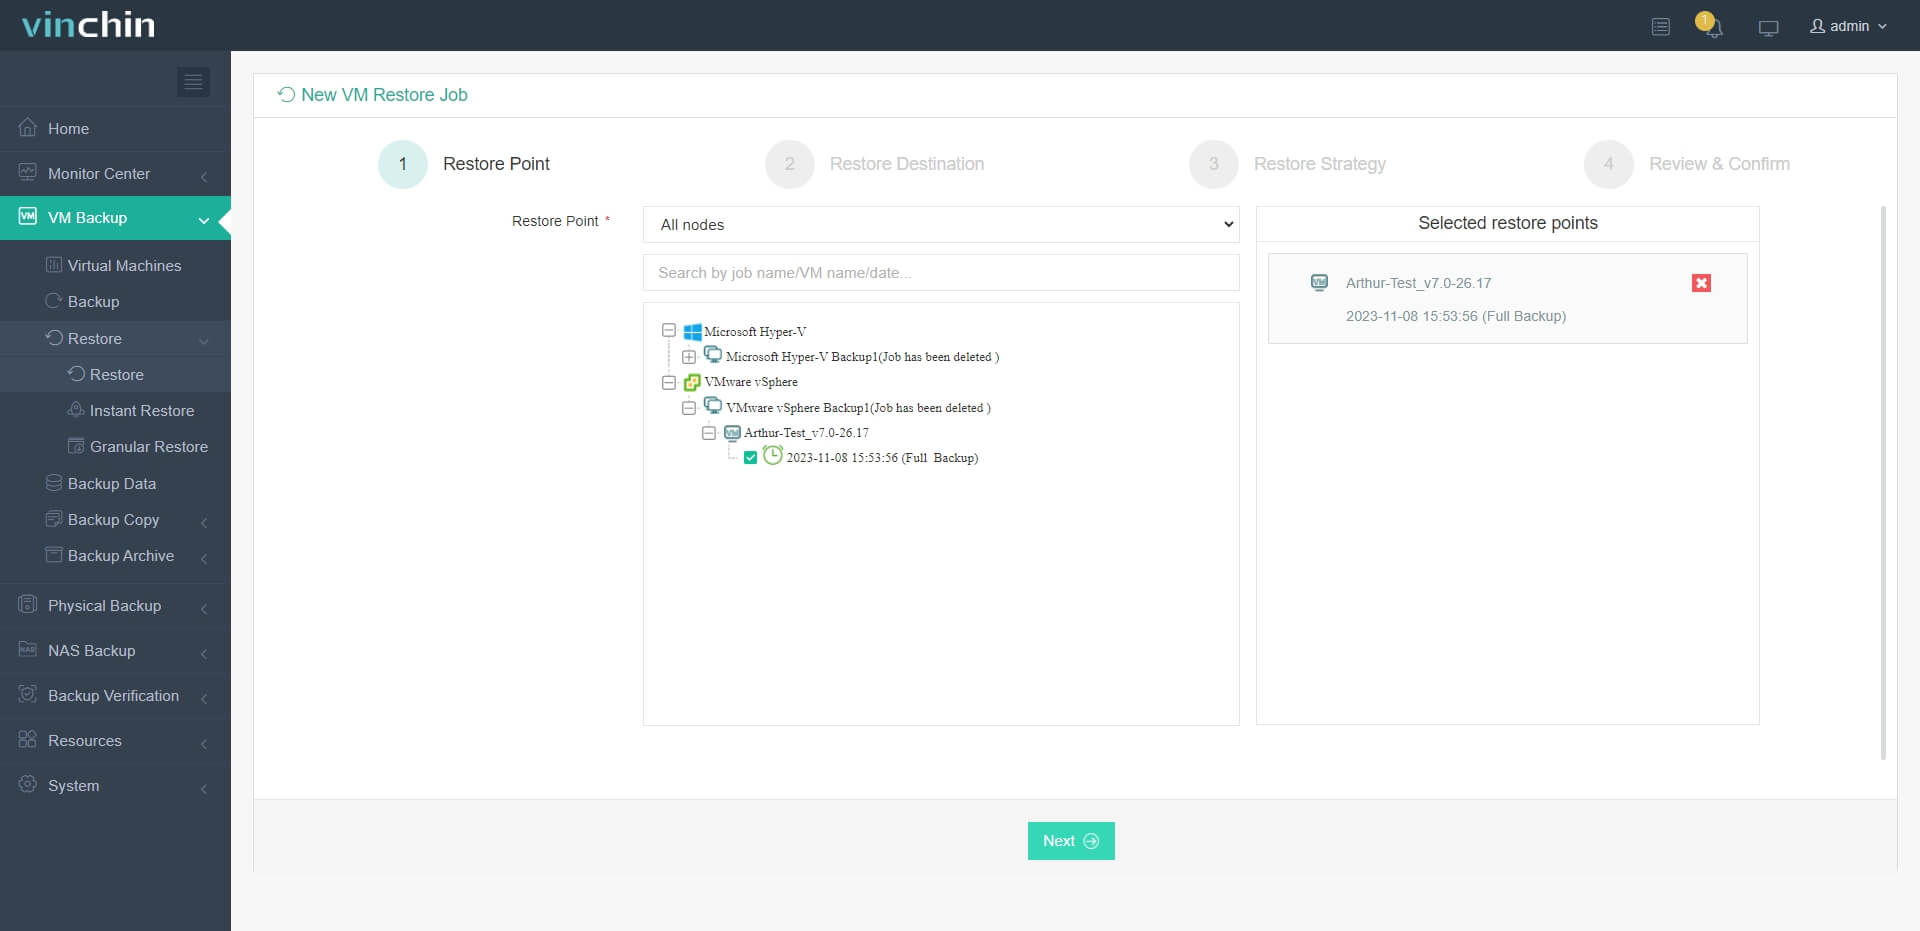
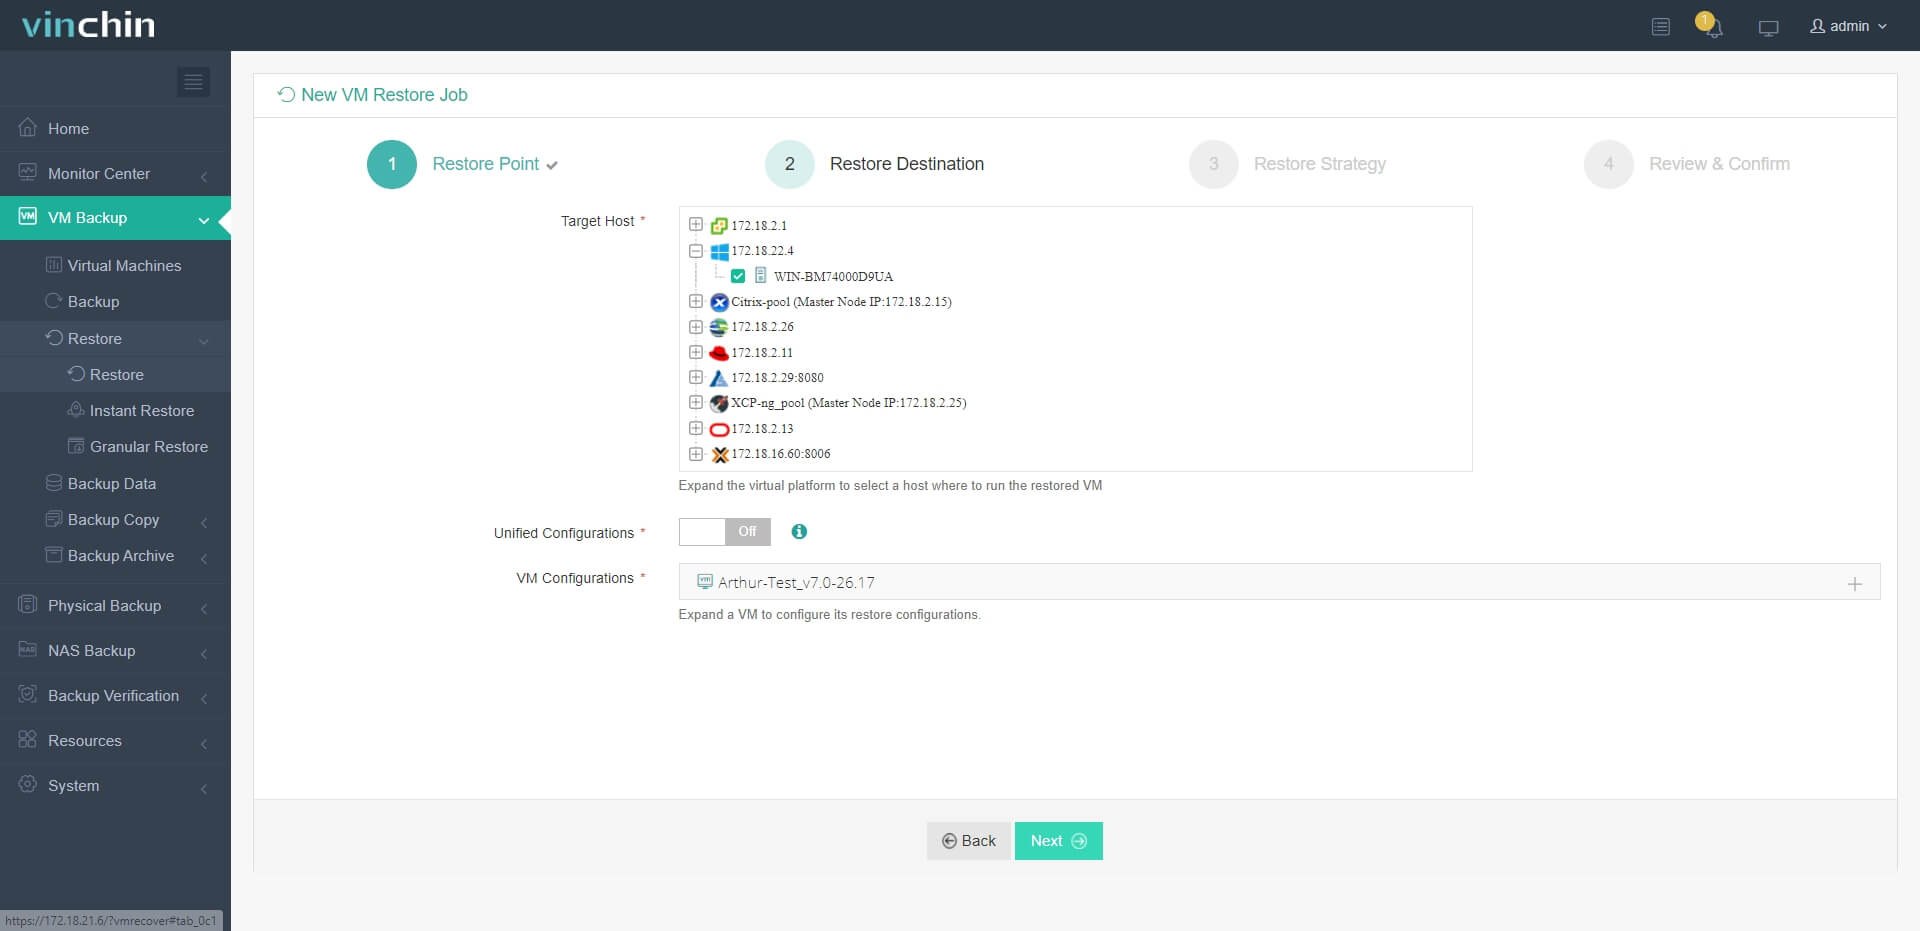
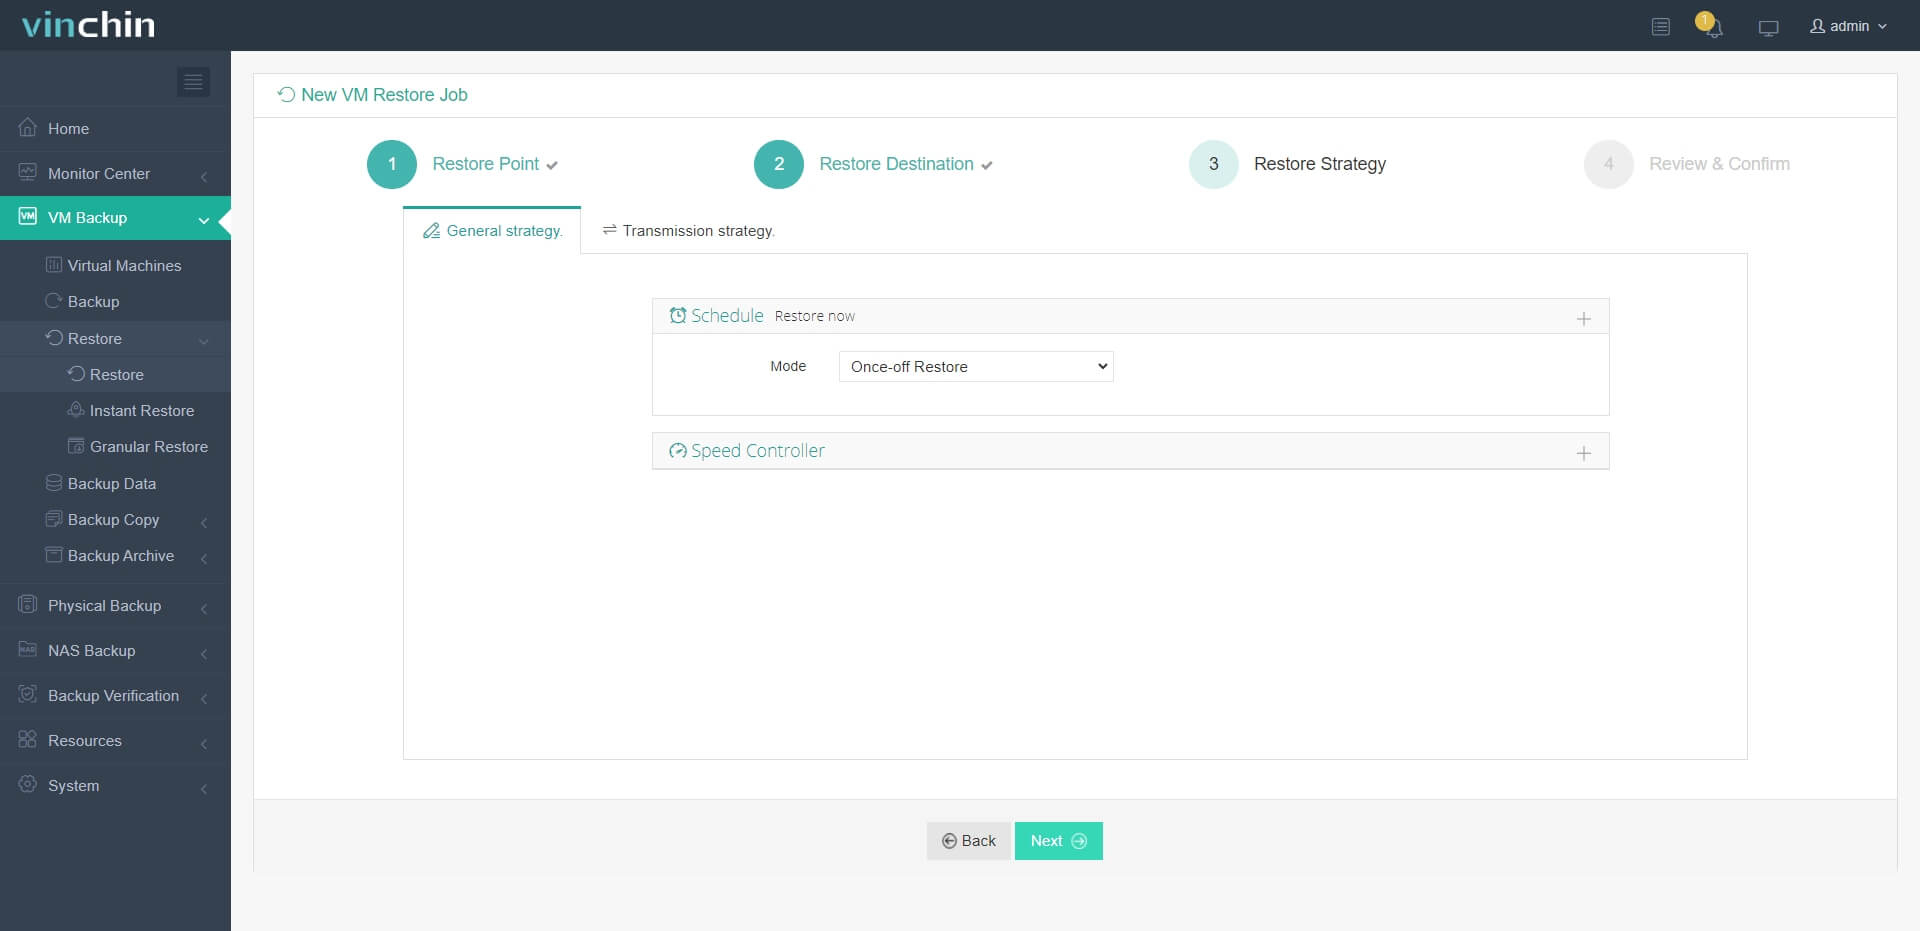
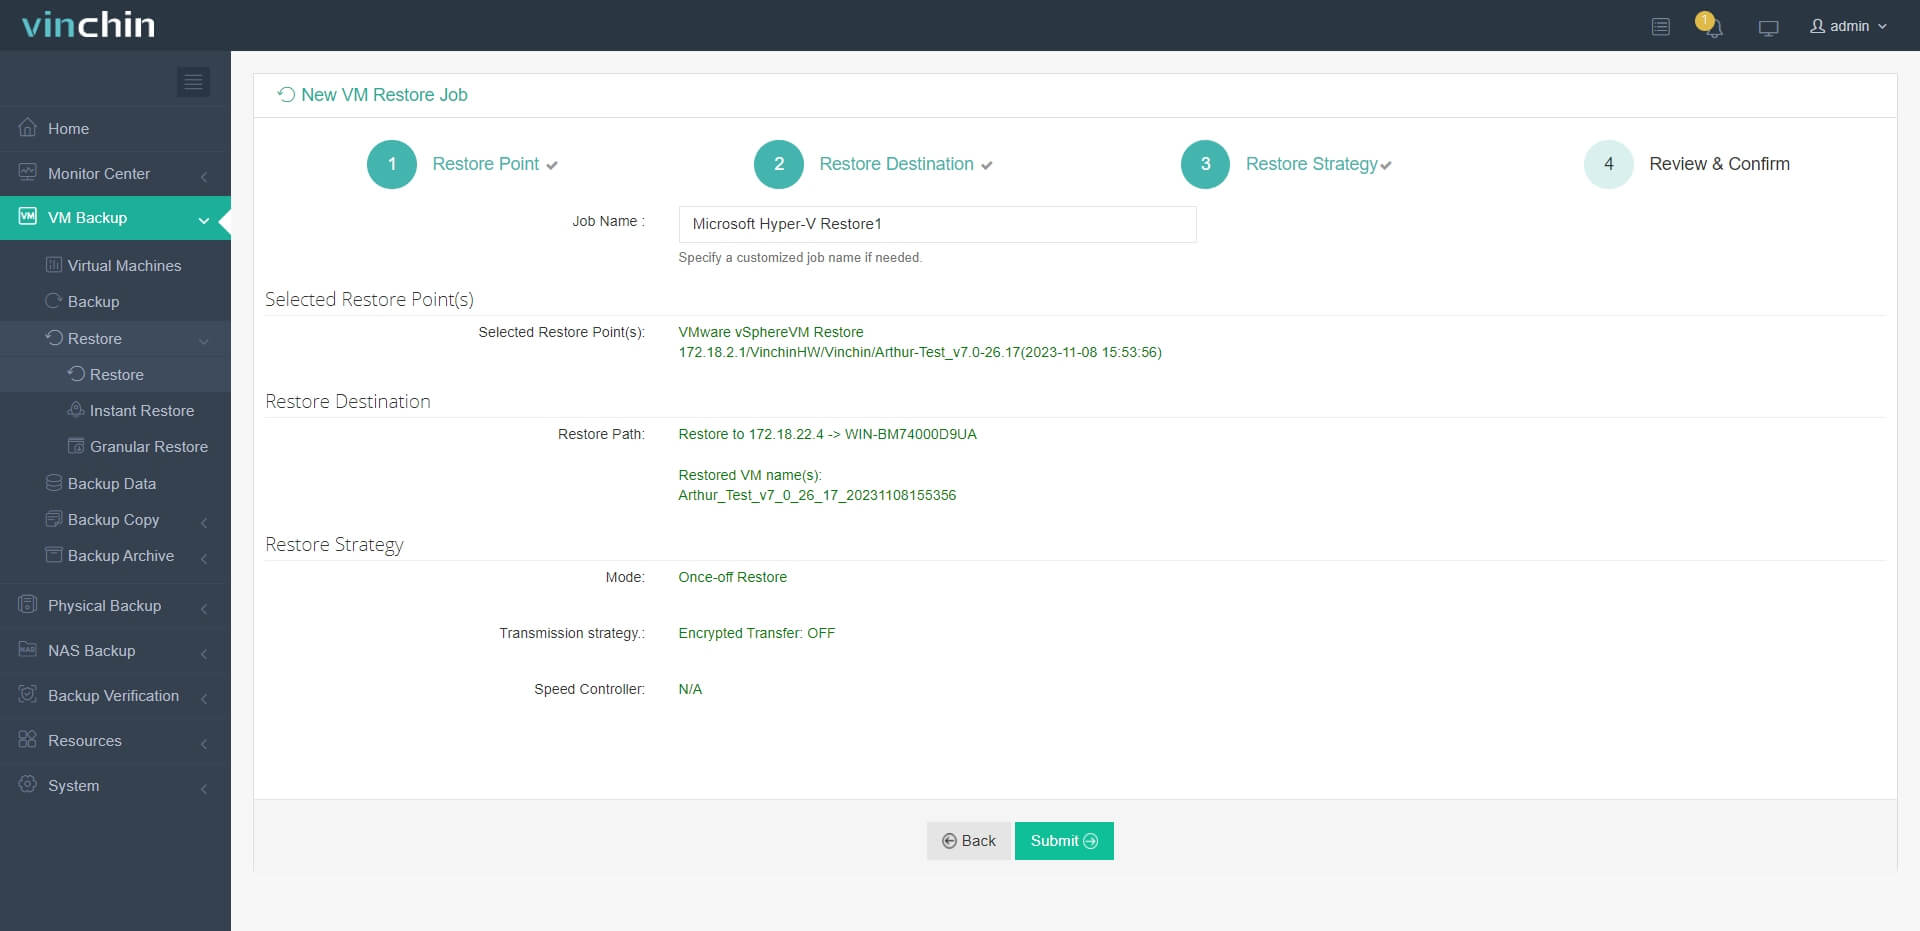
For example, it only takes 4 steps to migrate VMs from VMware to Hyper-V:
1.Choose the VM you want to restore.
2.Select the Hyper-V host to run the restored VM.
3.Select the restore strategy.
4.Review and submit the job.
Experience the full potential of this all-encompassing system through a complimentary 60-day trial! Simply share your specific requirements, and receive a tailor-made solution perfectly aligned with your IT environment.
Hyper-V conveter FAQs
1. Q: Will all hardware components, drivers, and applications work in the converted VM?
A: Not all hardware-specific drivers and devices will function in a virtualized environment, as Hyper-V provides emulated or synthetic equivalents for common hardware. Some specialized or legacy hardware may require additional drivers or may not be supported at all. It’s crucial to verify driver compatibility and update them as needed after the conversion.
2. Q: What is the difference between a Generation 1 and Generation 2 virtual machine in Hyper-V, and which one should I choose for my converted machine?
A: Generation 1: Compatible with older operating systems and provides support for legacy BIOS and virtual devices. May be a better choice for converted physical machines running older operating systems or those with specific hardware emulation requirements.
Generation 2: Offers modern features like UEFI firmware, secure boot, and faster boot times. Requires a more recent operating system (e.g., Windows 8/Server 2012 or later) and is generally more efficient. Choose this option for converted machines running newer operating systems and benefiting from the latest virtualization features.
Conclusion
Migrating physical machines to Hyper-V virtualized environments offers a multitude of benefits for organizations striving to modernize their IT infrastructure. The availability of tools like MVMC and Disk2vhd streamlines the conversion process, allowing for seamless transition of physical machines to virtualized counterparts. By leveraging Hyper-V, organizations can unlock greater flexibility, efficiency, and cost-effectiveness in their IT operations, paving the way for increased innovation and competitiveness in the digital age.
Share on:


