-
3 general imported courses for oVirt
-
How to migrate VMware to oVirt step by step?
-
How to easily migrate VM from VMware to oVirt/RHEV?
-
VMware to oVirt migration FAQs
-
Sum Up
VMware is the widely popular virtualization platform provider based on x86 architecture. Backed by the type 1 hypervisor ESXi and centralized management console vCenter, VMware is faster and simpler to maintain and manage. With vMotion, VMware users are able to perform data migration within the platform.
oVirt is a free open-source distributed virtualization solution based on the KVM hypervisor and community projects like libvirt, Gluster, PatternFly, and Ansible. Consisted of oVirt Node, the component that will be installed KVM and VDSM, equivalent to ESXi and oVirt Engine, the administration of the oVirt Node set, a counterpart of vCenter, oVirt is generally considered as an alternative to VMware.
VMware can be pricey in the features that oVirt offers for free. This is for those who want to lift from VMware and turn to oVirt. So, how do we migrate VMware ESXi to oVirt? You can use the command lines in this post or choose a V2V converter.
P.S. Because oVirt and RHV share a similar architecture, so you can also try the methods in this post for VMware to RHV migration. One method needs virt-v2v installed so you’d better prepare it at first.
Note:
Only virtual machines that exist on oVirt's Storage Domain (either the export domain or the data domain) can currently be imported. That is, only three types of virtual machines can be imported into oVirt:
• Virtual machines that are housed in the Data Center's Storage Domain;
• Virtual machines that were previously exported from oVirt and are now stored on the export domain;
• Virtual machines were converted from the external environment to the export domain as a first step.
3 general imported courses for oVirt
1. Import VM from Storage Domain
1. Choose the source from which the VM will be imported
2. Choose a destination storage domain
3. Choose a proxy host
4. Choose a VM from the source
5. Obtain VM configuration
6. Set up conversion properties
7. Add VM and disks to the Datastore (locked)
8. Convert VM’s disks. This process should be monitored
9. Update VM and disks if needed
10. Unlock the VM and disks
2. Import VM from Export Domain
1. Set the VM’s export domain
2. Choose the destination data domain
3. Choose one of the VMs in the export domain
4. VM configuration is in place
5. Set up the conversion properties
6. Add VM and disks to the Datastore (locked)
7. Disks are copied and no other update is required
8. Unlock the VM and disks
3. Import from the External Environment
1. Set the external environment's properties by hand or by selecting a provider
2. Choose the destination data domain
3. Choose a host in the Data Center installed with virt-V2V as a proxy
4. Choose the VM in the external environment
5. Do a conversion that doesn’t mean getting the VM configuration via disks
6. Set up the conversion properties
7. The modified VM and disks are added to the Datastore
8. Do a conversion involving the disks
9. Disks’ sizes are updated
10. Unlock the VM and disks
How to migrate VMware to oVirt step by step?
1. oVirt host preparation
1. Create an export storage domain
2. Create an NFS-share with enough storage. Create a directory for mount point, make VDSM owner, and mount an
LVM on the mount point. Then add a line in /etc/exports to export the mount.
[root@ovirt ~]# mkdir /var/lib/exports/export
[root@ovirt ~]# chown vdsm:kvm /var/lib/exports/export
[root@ovirt ~]# mount /dev/mapper/vgnonssd-lvnonssd /var/lib/exports/export
[root@ovirt ~]# df -h /var/lib/exports/export/
Filesystem            Size  Used Avail Use% Mounted on
/dev/mapper/vgnonssd-lvnonssd i.          439G   71M  417G   1% /var/lib/exports/export
[root@ovirt ~]# echo "/var/lib/exports/export    ovirt(rw)">>/etc/exports
[root@ovirt ~]# exportfs -a
[root@ovirt ~]# showmount -e
Export list for ovirt:
/var/lib/exports/export ovirt
/var/lib/exports/ssd    ovirt
/tmp/iso              ovirt
3. Add the storage domain
Go to System > Data Centers > Default (or your data center name)> Storage > New Domain in order. And enter the details valid for your environment.
4. Activate the domain.
Go to System > Data Centers and choose the data center name from the list.
Choose a new export domain and click Activate.
5. Install VIRT-V2V to convert the format.
6. Create a ~/.netrc file.
This file contains the credentials at VMware to authenticate. It must have mode 600 for permissions.
2. Virtual machine preparation
Linux VM: remove the VMware tool and install the oVirt agent after conversion and VM import. Remain virtio drivers in the recent kernel and delete the VMware tools.
Windows VM: install virtio drivers before migration. Remove the VMware tools after migration.
3. Copy the VM to oVirt
Run the command line to copy and convert VMware VM to oVirt export domain:
[root@ovirt ~]# virt-V2V -ic esx://192.168.0.5/?no_verify=1 -o rhev -os ovirt:/var/lib/exports/export --network ovirtmgt testvm2
testvm2_testvm2: 100% [===================================================================]D 0h07m40s
4. Import the VM in oVirt
Go to System > Data Centers > Default (or your data center name)> Storage and select the export domain from the list. Click VM import at the bottom and choose the exported VM and click Import. We are now ready to boot the VM after the import. Check the network settings and we’re done.
Note:
Importing from the export storage domain will be one general process. There are other cases:
• Import VM from VMware ESXi: the user specifies URL+ authentication to the ESXi host.
• Import a VMware-exported virtual machine: The user specifies the nfs/posix path to the ova file.
How to easily migrate VM from VMware to oVirt/RHEV?
The V2V migration between two different types of virtual machines can be challenging due to adaptation issues, different hypervisors, and different versions.
As a result, there are various V2V tools available on the market to match with corresponding virtualization platforms. It is, however, inconvenient. Is there an all-in-one solution that can assist in simplifying such things in order to realize efficient V2V? Of course, yes.
Vinchin Backup& Recovery is the most convenient backup and V2V software, which supports most mainstream virtualization platforms including VMware vSphere, oVirt, RHV, OLVM, Hyper-V, Proxmox, XenServer, XCP-ng, OpenStack, etc.
Vinchin V2V works by adding both platforms to the backup system, creating backups of VMs from the original virtualization platform and restoring them on the target platform. The data protection and migration solutions can be integrated as one, saving many operational workloads and software maintenance costs.
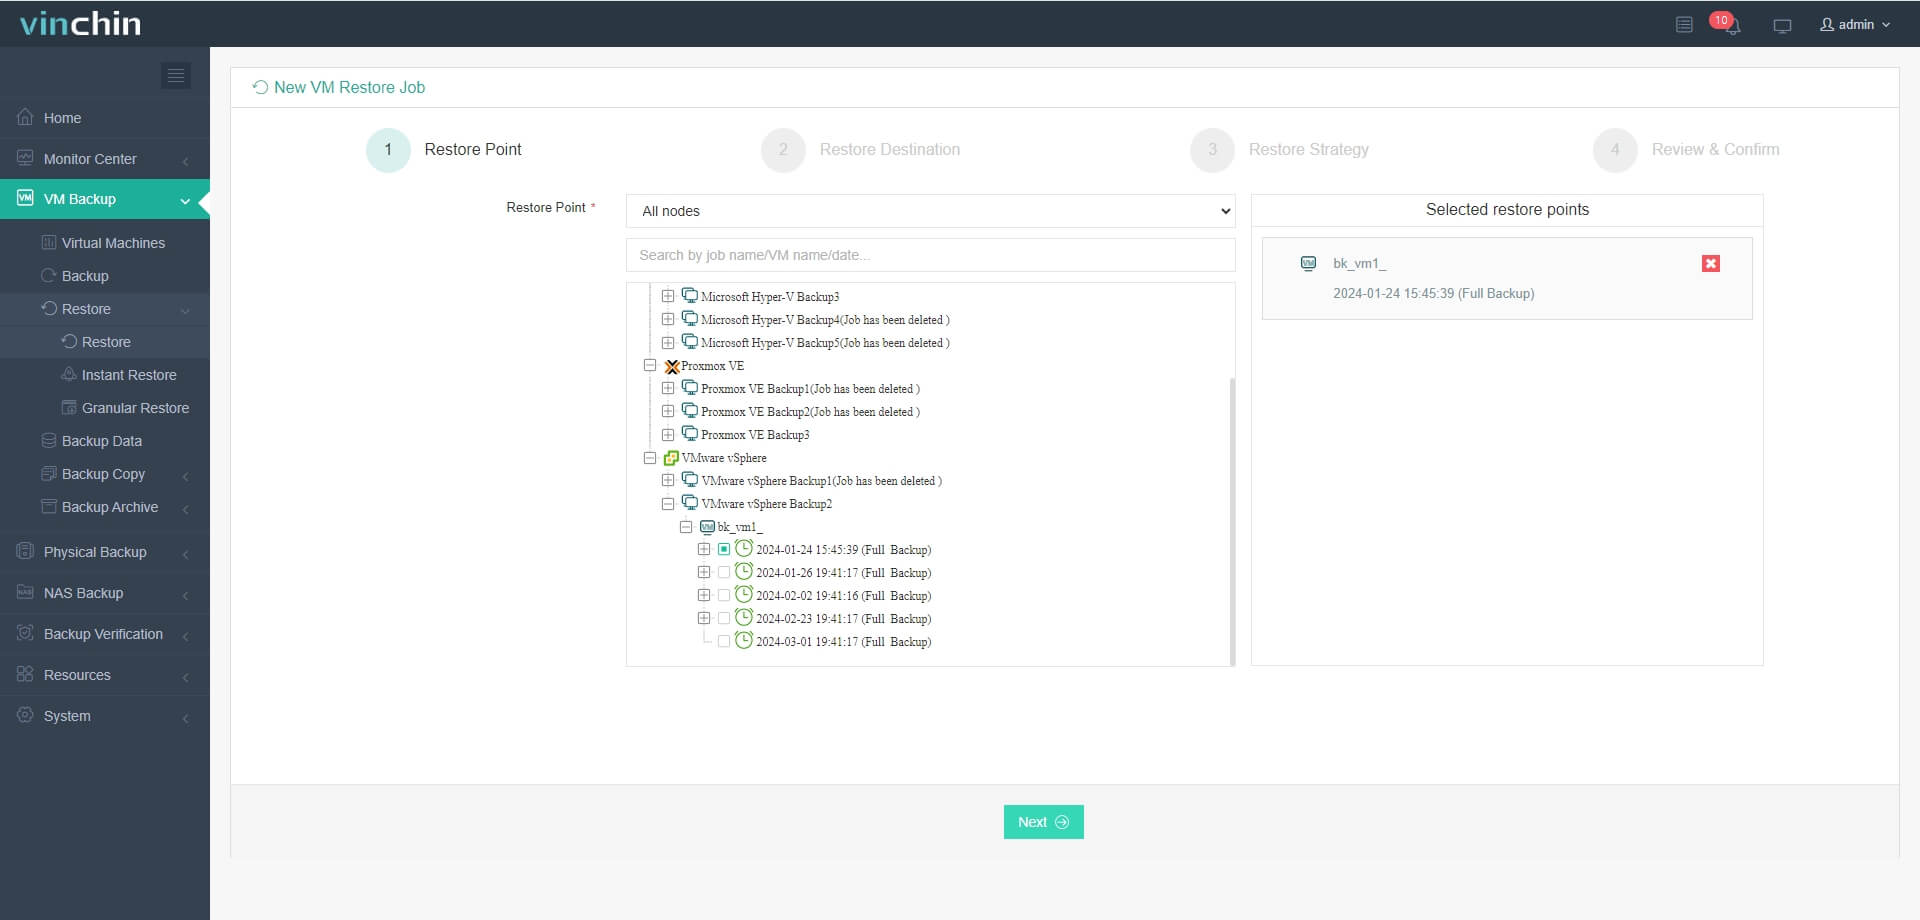
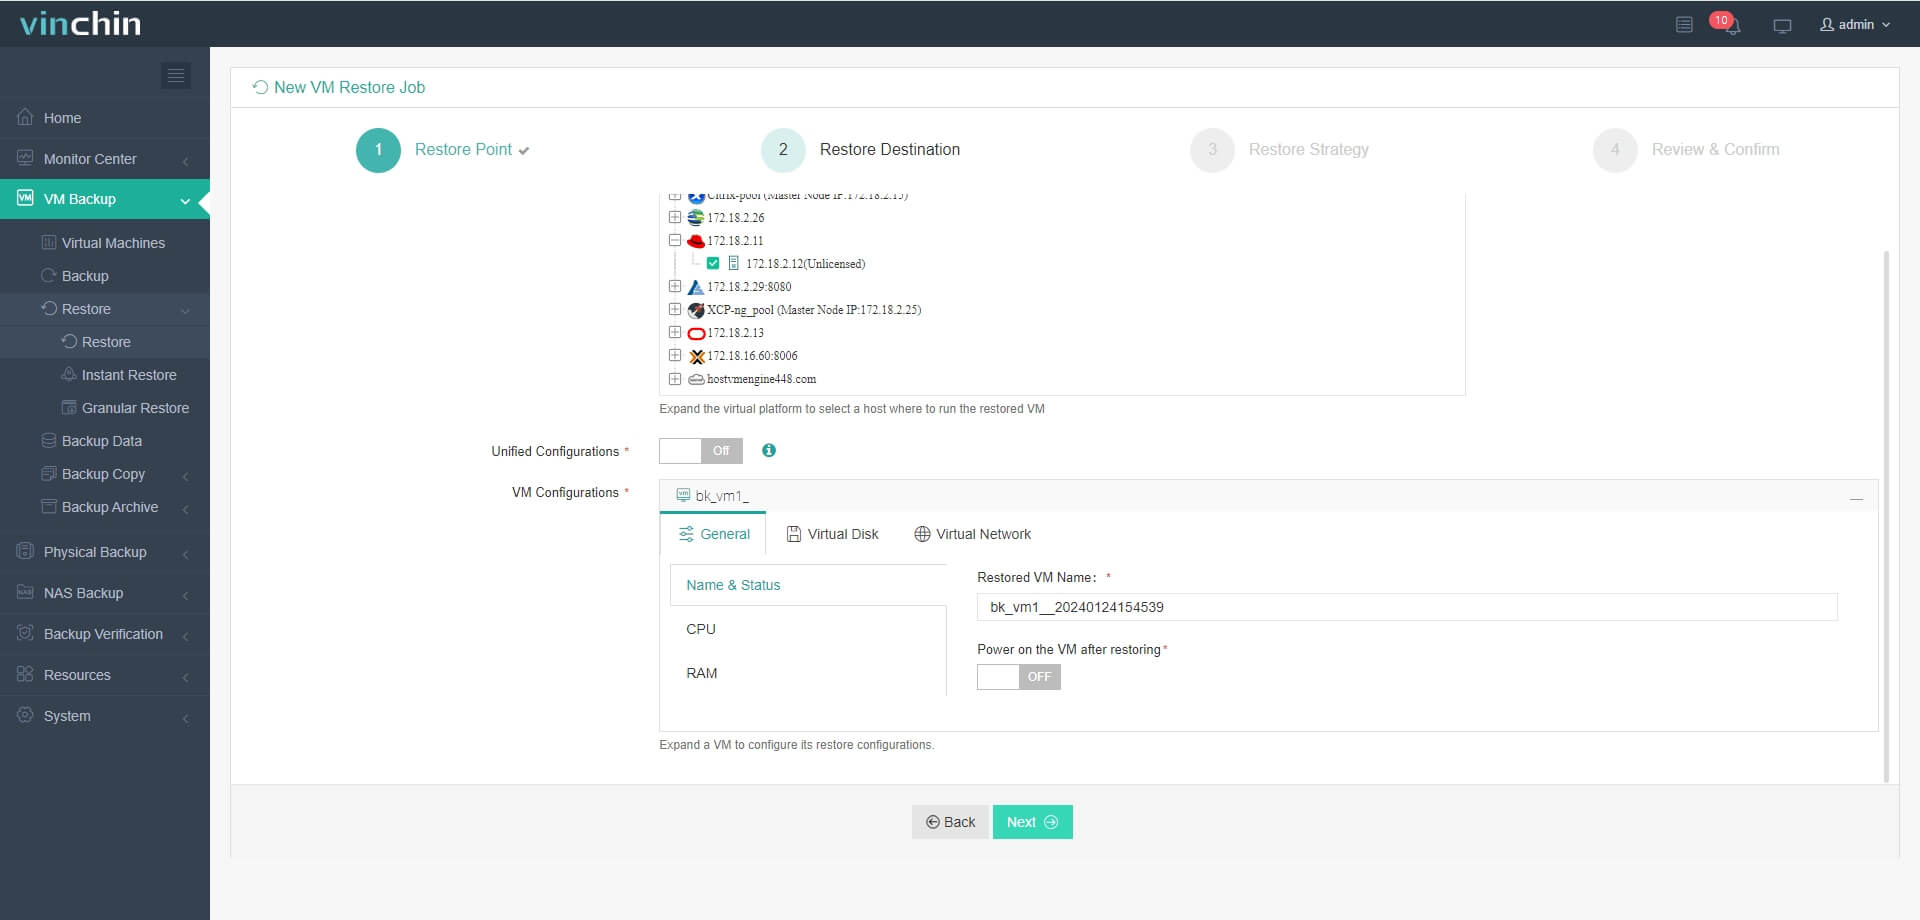
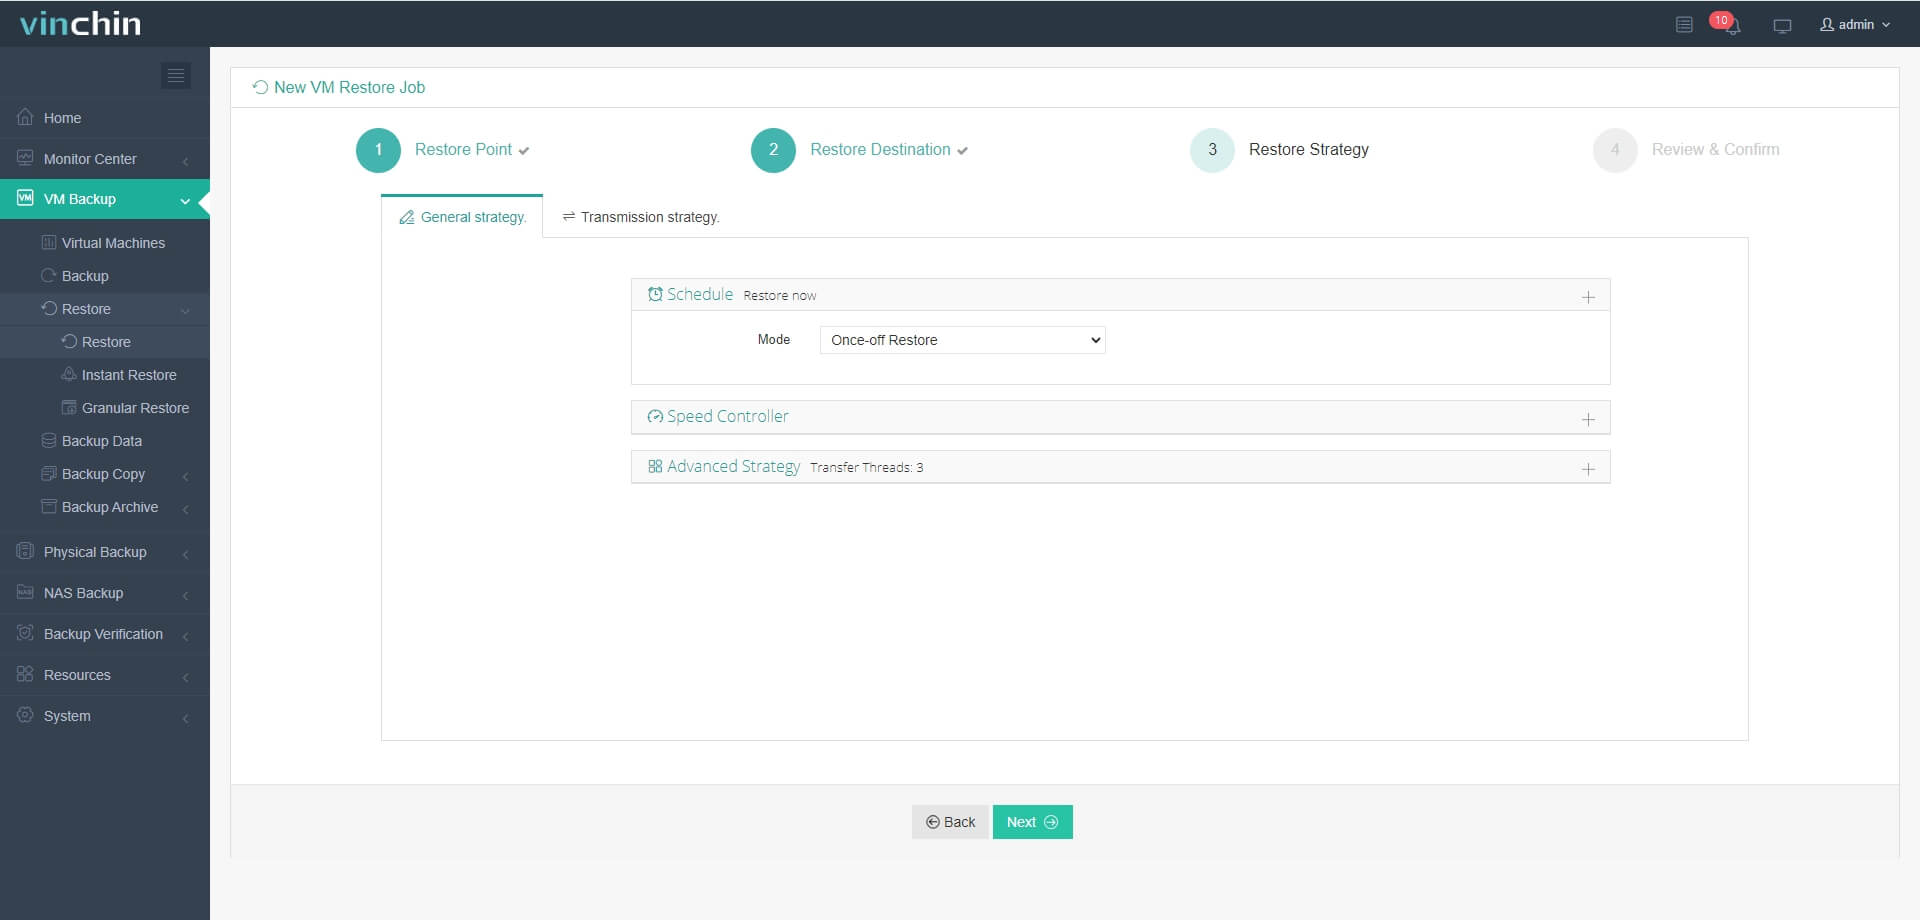
You can easily migrate VMware VM to oVirt in an intuitive web console.
1. Select the backup of VMware VM

2. Select the target oVirt host

3. Select strategies or directly click Next

4. Submit the job

After minutes, you can directly start and use this VM in oVirt.
Vinchin Backup & Recovery also supports Instant Recovery so you can either migrate the VM backups to the new hypervisor at once to restart the VM in 15 seconds to guarantee business continuity.
Vinchin Backup & Recovery has helped a lot of companies backup and migrate VMs and you can also start a 60-day full-featured free trial here to see how easy it is to deploy and use. If you need any help, contact us and then our engineers will help you use this software in your environment. We have established partnerships with reputable companies all over the world so if you would like to do a local business, you can select a local partner here.
VMware to oVirt migration FAQs
1. Is oVirt better than VMware?
It’s hard to say whether one virtualization solution is better than another. Compared to oVirt, VMware is generally more powerful overall, but oVirt also has its own advantages. You can read the post oVirt vs VMware to see the comparison between them to choose the proper solution for you.
2. Can you migrate VM without downtime?
It’s hard to avoid downtime during VM migration but you can use Vinchin Instant Restore to reduce it.
3. Do you need to convert the virtual disk during migration?
If you migrate VM with command line, it often requires converting the virtual disk so you can use Vinchin Backup & Recovery to simplify the task.
Sum Up
As an open-source virtualization solution, oVirt has its advantages that VMware doesn’t have so you might need to convert VMware VM to run it on oVirt. You can use the command lines in this post to migrate VM step by step or you can also choose an easier way to migrate VM with Vinchin Backup & Recovery. Don’t miss the free trial.
Share on:


