-
Way 1: Migrate OpenStack instances with the command
-
Way 2: Live migrate OpenStack instances with Horizon
-
Way 3: Easily migrate instances with an all-in-one solution
-
Takeaways

OpenStack is a free open-source cloud computing platform that pools virtual resources to build and manage both public and private clouds. If you want to move an instance between different compute hosts, you can use the OpenStack server migrate command. This procedure does not presume that the instance on the target host has access to shared storage, and you need to make sure each node is equipped with SSH key authentication is you are using SSH tunneling.
There is another way that you can live migrate instances in the dashboard of OpenStack Horizon, or you can use an integrated solution to migrate the instances.
Way 1: Migrate OpenStack instances with the command
1. List OpenStack VMs to be migrated and hypervisor available.
$ openstack server list
$ openstack hypervisor list
2. Input server migrate command.
$ openstack server migrate <options> <server>
3. See command options.
$ openstack server migrate --help
usage: openstack server migrate [-h] [--live <hostname>]
[--shared-migration | --block-migration]
[--disk-overcommit | --no-disk-overcommit]
[--wait]
<server>
Migrate server to different host
positional arguments:
<server> Server (name or ID)
optional arguments:
-h, --help show this help message and exit
--live <hostname> Target hostname
--shared-migration Perform a shared live migration (default)
--block-migration Perform a block live migration
--disk-overcommit Allow disk over-commit on the destination host
--no-disk-overcommit Do not over-commit disk on the destination host (default)
--wait Wait for migrate to complete
Way 2: Live migrate OpenStack instances with Horizon
1. Start OpenStack Horizon with the administrator role.
2. Navigate to Admin> Compute> Instances to find the parent host of the instances.
3. Go to Admin> Compute> Instances> click the inverted triangle icon next to the Rescue Instance and select Live Migrate Instance from the dorm-down list.
Both Disk Over Commit and Block Migration are for local storage, the latter uses ephemeral disks on instances that do not share between hosts. But neither of the options should be chosen because OpenMetal uses a shared storage system through Ceph.
Auto-select a new host or choose one if you have a specific node for instances manually under the New Host option.
Way 3: Easily migrate instances with an all-in-one solution
Vinchin Backup & Recovery supports the agentless and automatic backup, disaster recovery, and cross-platform V2V migration for 10+ virtualization platforms, including OpenStack, VMware, KVM, Xen (XCP-ng, XenServer), oVirt, Oracle OLVM, RHV, etc., 6 databases, Linux & Windows Servers, and NAS.
The key features of Vinchin Backup & Recovery for OpenStack are:
Automated OpenStack backup: Automate the agentless backup process with flexible schedules and email notifications to reduce workload.
Speedy backup with less storage consumption: Choose from SpeedKit (CBT alternative)-helped forever incremental, incremental, differential, and full backup under multithreaded transmission and data reduction technologies to save 50% space while enabling faster backup.
Cross-platform V2V migration: Move OpenStack to VMware or vice versa, or any other host Vinchin supports easily by choosing source virtualization and recovering it to the target platform in 4 steps.
Anti-Ransomware protection: Protect data saved in the Vinchin server against threat actors with anti-malware backup storage protection, offsite backup copy, public cloud archiving, and more.
Here I’ll migrate OpenStack to VMware as an example.
Before that, backup OpenStack volumes and instances in case of data loss.
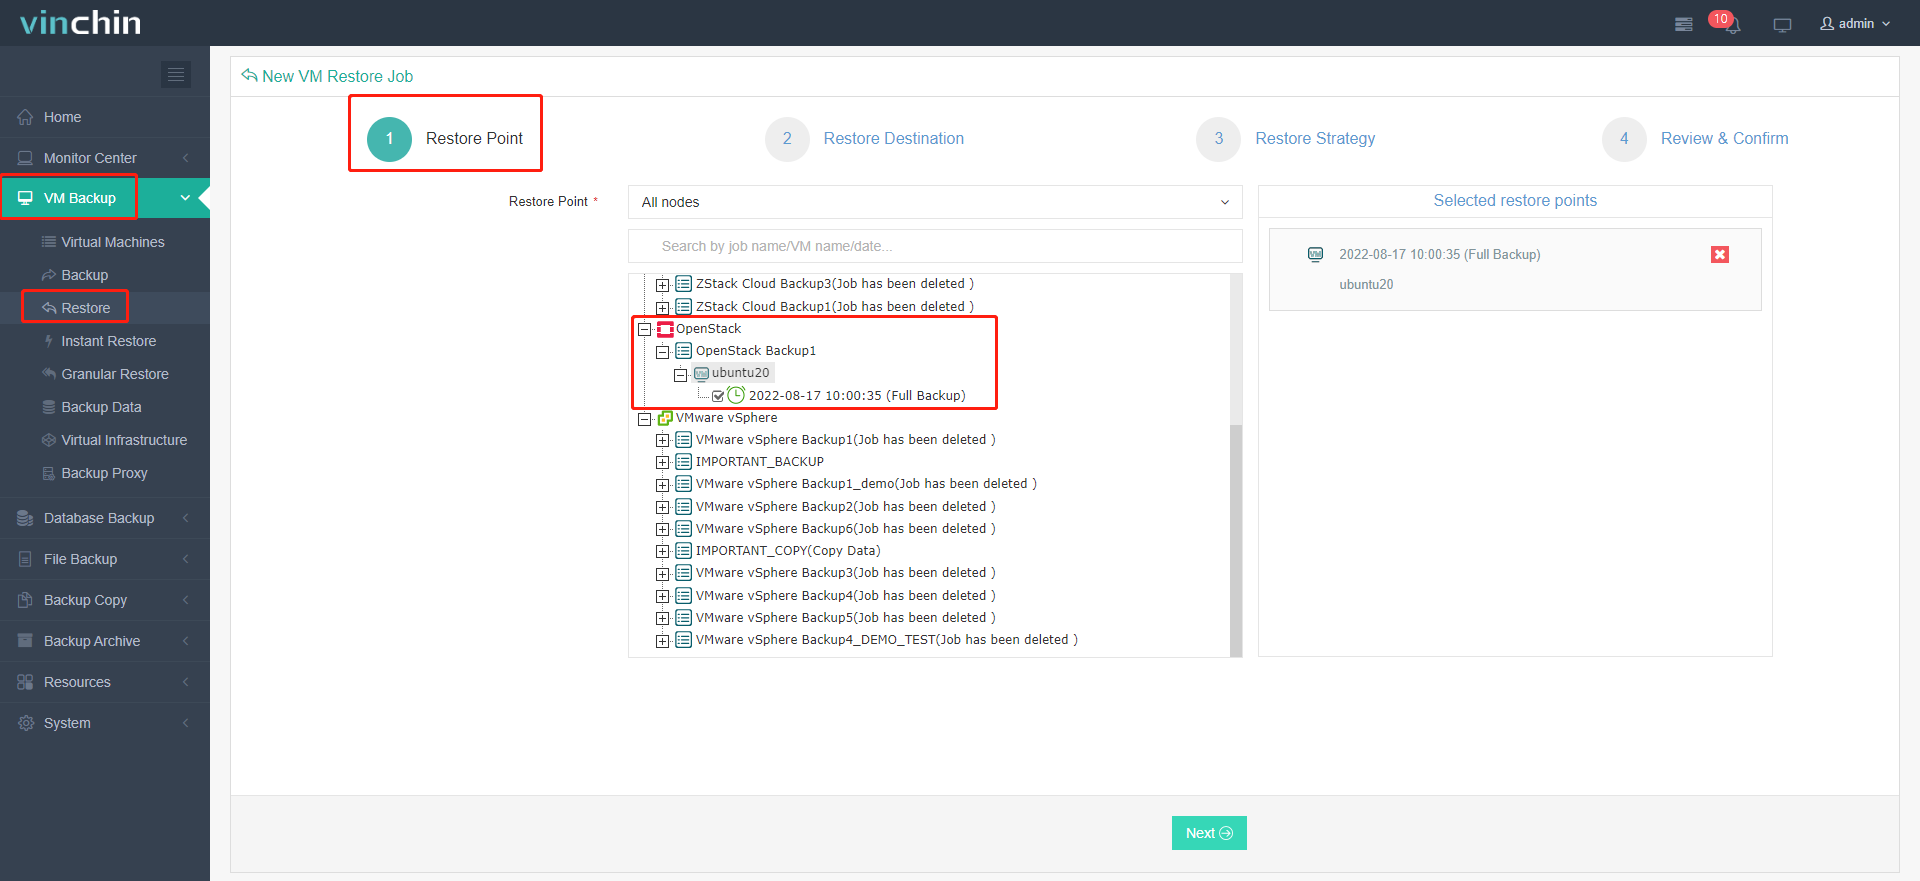
1. Go to VM Backup > Restore and select a restore point from OpenStack backups in the Vinchin server.

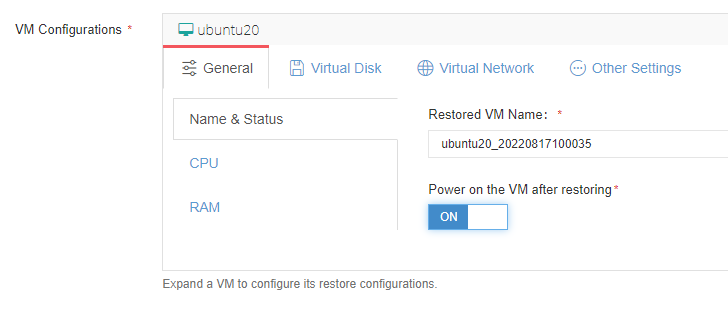
2. Specify one VMware host as your restore destination and set up the restored VM, such as VM name, CPU, RAM, power on the VM after migration or not, and more.


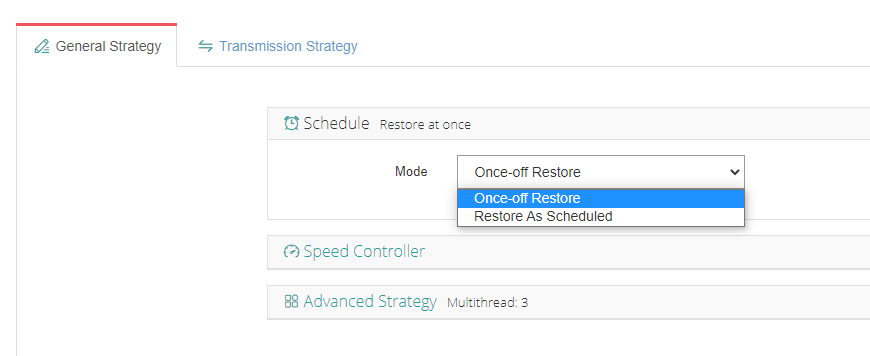
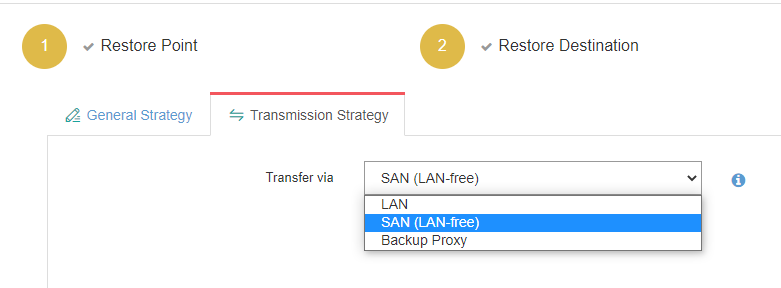
3. Configure restore strategies.
General Strategy:
Schedule: Once-off Restore (recommended) or Restore as Scheduled.
Speed Controller: Limit the transmission speed.
Advanced Strategy: Multithread.
Transmission Strategy: Transfer via LAN, SAN, and Backup Proxy.


4. Review and click Submit.
Now, after the migration, you can find your new VMware in your infrastructure. To integrate VM backup, recovery, and V2V migration, you are more than welcome to download the 60-day full-featured free trial now.
Takeaways
You can move OpenStack instances from one compute host to another with the server migrate command, OpenStack Horizon, and an all-in-one backup solution combining VM backup, recovery, and migration in one web console for simplified management and speedy operations.
Share on:


