-
What is Hyper-V?
-
How to create Hyper-V VM in Hyper-V Manager?
-
How to install Windows/Linux OS in Hyper-V VM?
-
How to Backup Hyper-V VM with a professional solution?
-
Hyper-V VM creating FAQs
-
Sum Up
In the development of information technology, virtualization definitely pushes the development of technology application because it decreases the cost for companies and organizations and increases the speed and security in testing.
One of the most popular virtualization solutions is Microsoft’s Hyper-V. Whether you are an IT pro wishing to optimize server infrastructure or an enthusiastic hobbyist eager to explore new technologies for home lab, understanding Hyper-V will bring many benefits.
In this guide, we will tell you the basic knowledge of Hyper-V, what is Hyper-V and how to create Hyper-V virtual machine.
What is Hyper-V?
Before we dive into Hyper-V creation, let’s take a moment to have a basic understanding of this virtualization solution.
Hyper-V is regarded as a type-1 hypervisor, also called bare-metal hypervisor which directly run on the physical hardware, although it can also function as a role within the Windows operating system. I think it might be because Hyper-V is a built-in feature in Windows operating system. The typical type-2 hypervisors like VMware Workstation and Virtualbox are applications which require you to download and install on the top of OS like other common applications.
By abstracting the underlying operating systems, hyper -V facilitates resource optimization, scalability, and cost-efficiency in IT infrastructures.
If you would like to know the requirements of using Hyper-V and how to install it, here is another guide for installing Hyper-V.
How to create Hyper-V VM in Hyper-V Manager?
The most common method of creating Hyper-V virtual machine is using Hyper-V Manger, a built-in tool in Windows operating system, and you can find it in the search box after you enable Hyper-V.
If you would like to use the virtual machine as soon as possible, it is recommended to prepare the ISO image of the operating system in advance.
1. Search Hyper-V Manager in the search box to open it
2. Let’s prepare the virtual switch for the VM. Click on the hostname > click Virtual Switch Manager on the right > click New virtual network switch > create External, Internal and Private switches respectively
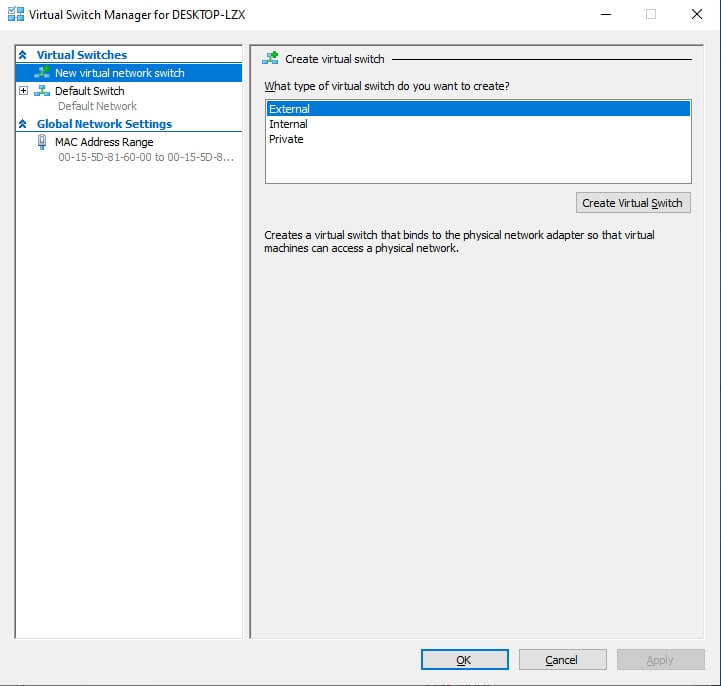
Here are the explanations for the three kinds of virtual switches:
External Network: Used to connect to the external network.
Internal Network: Used for communication between the host and virtual machines.
Private Network: Used for communication between two virtual machines
3. Right-click the hostname > select New > select Virtual Machine. You will be led to the New Virtual Machine Wizard

4. Read Before you begin > click Next
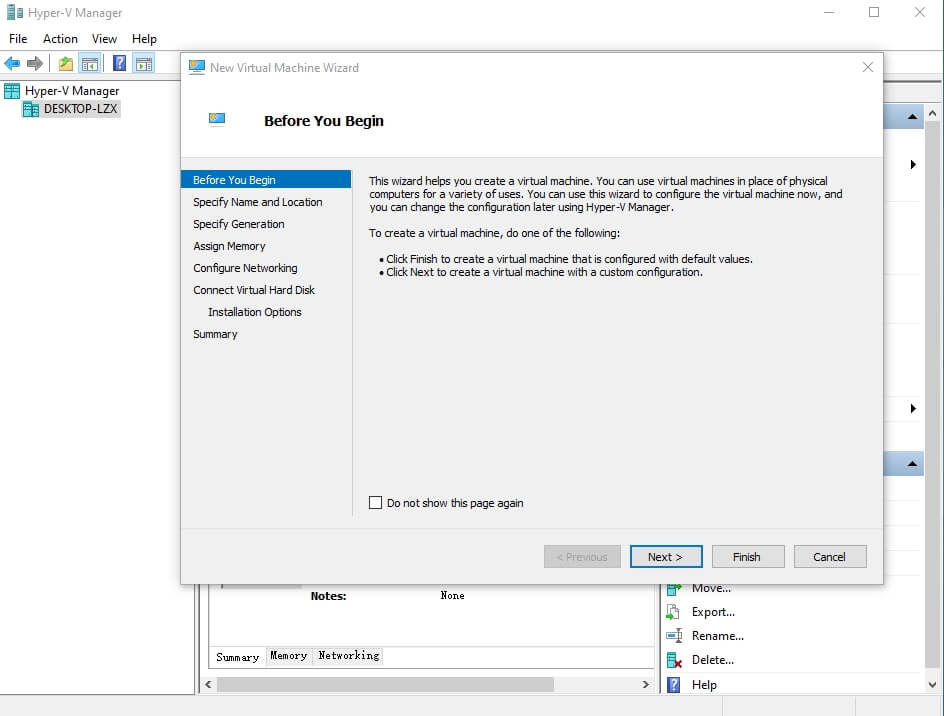
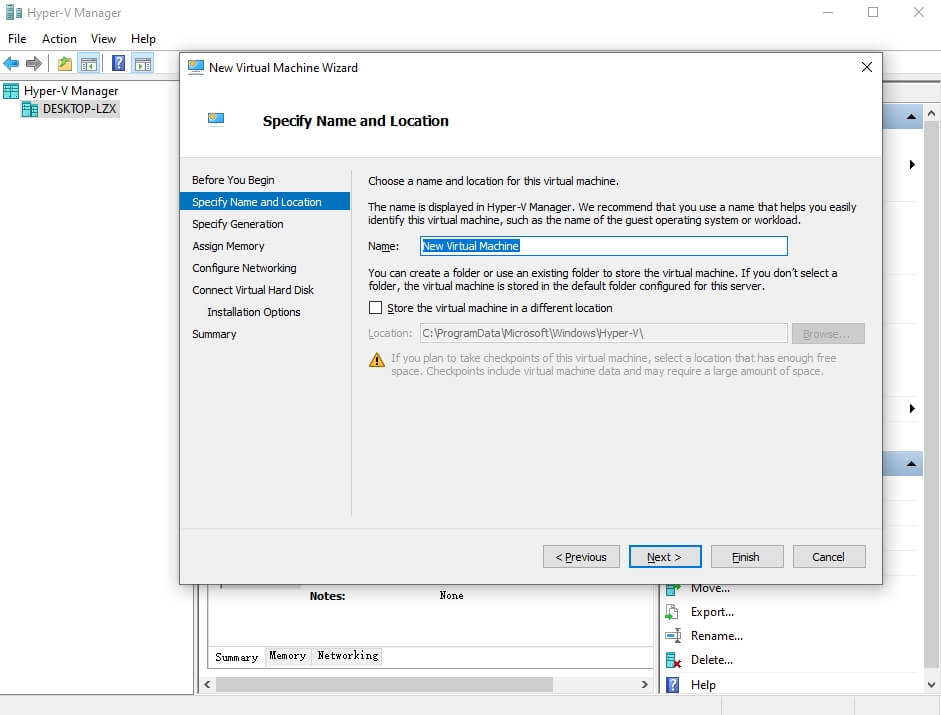
5. Specify the VM name > check the location of VM or use the default location > click Next
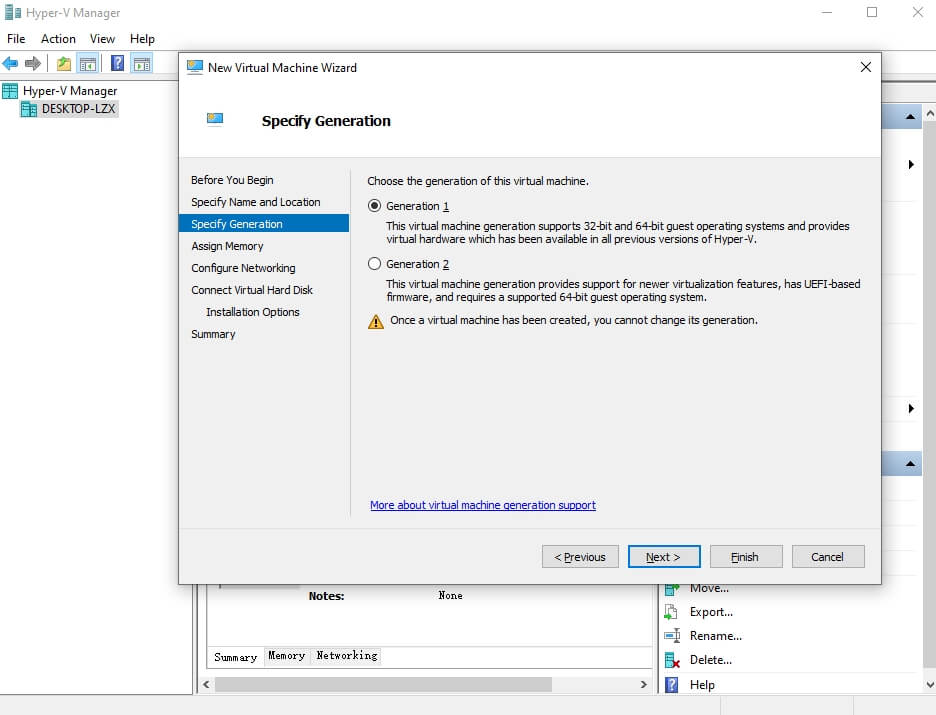
6. Specify the generation of Hyper-V VM > click Next
7. Allocate memory to the VM > click Next
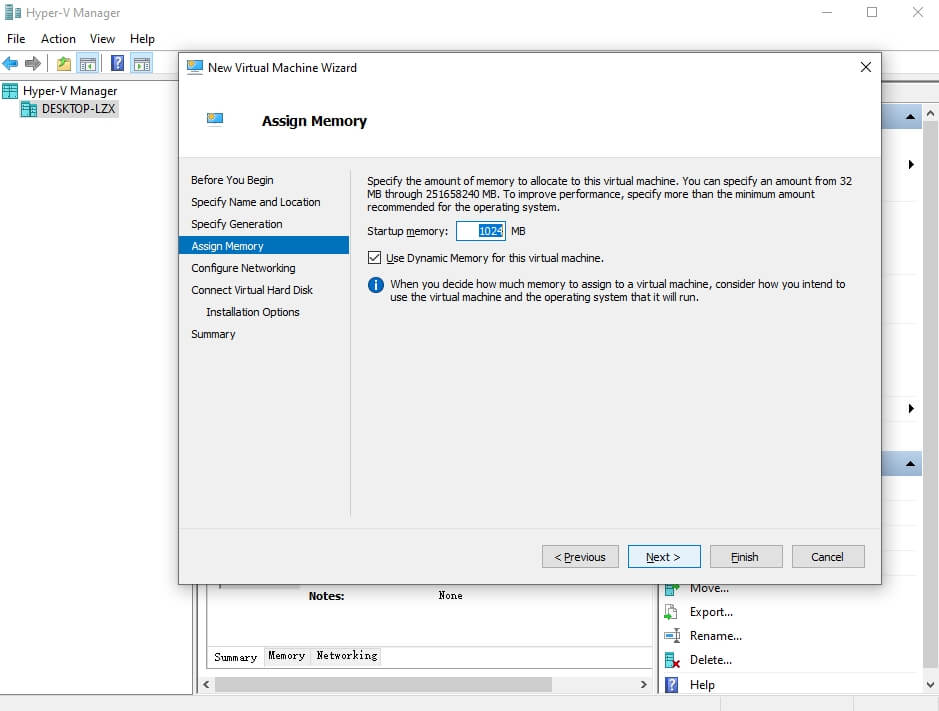
8. Select the proper virtual switch for this VM as you need > click Next
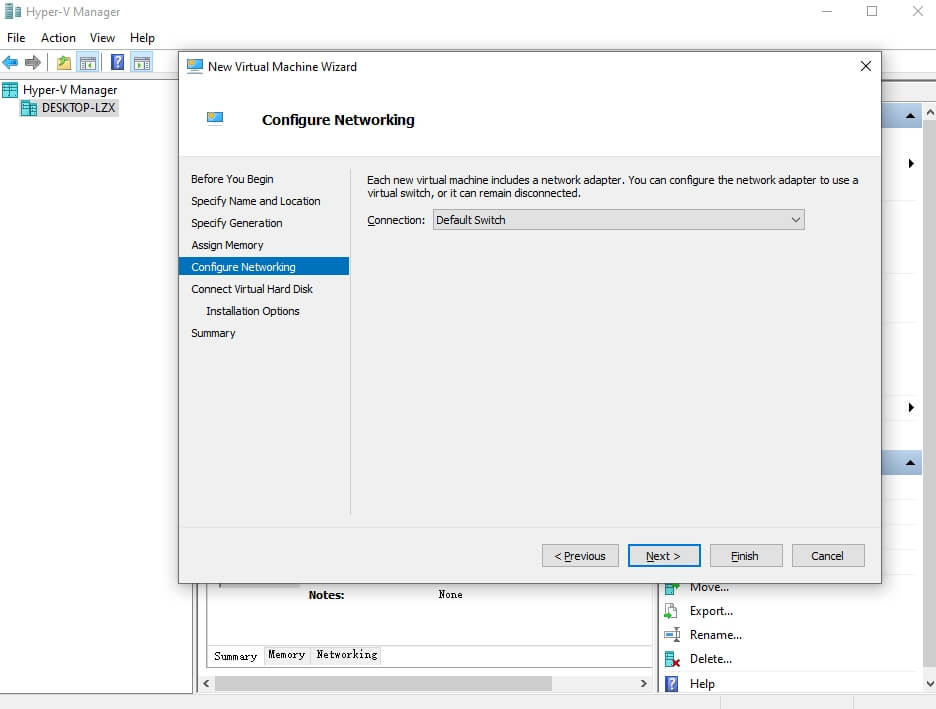
9. Create the virtual disk for this virtual machine > click Next
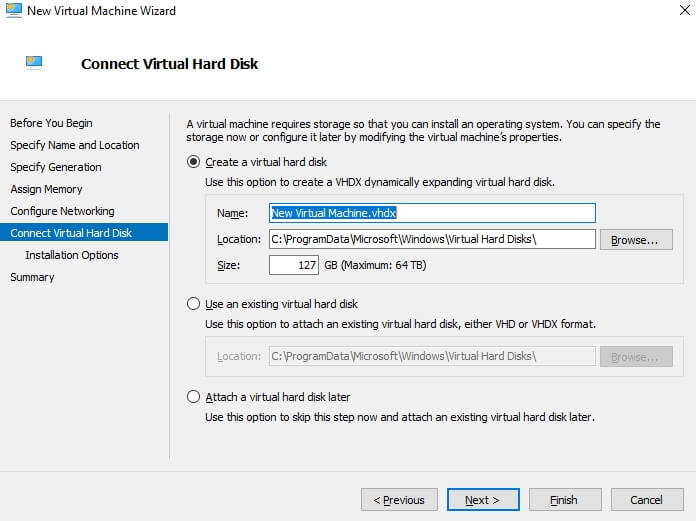
10. Select Install an operating system from a bootable CD/DVD-ROM > select ISO image > click Browse to add the prepared ISO image here or you can Install an operating system later > click Finish
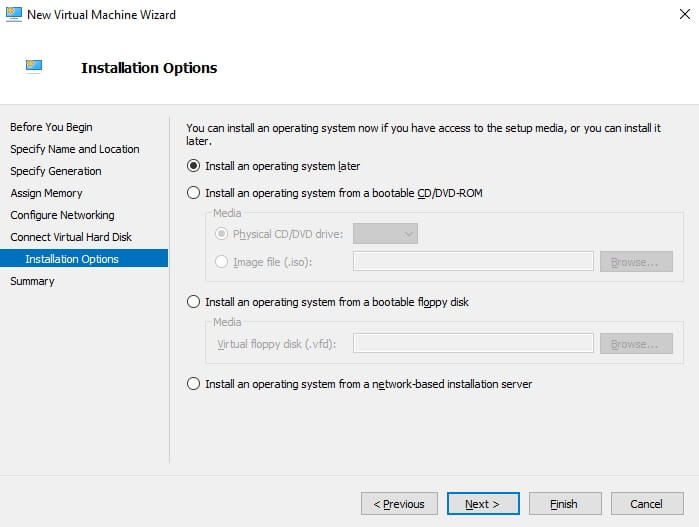
11. Right-click the VM name in Hyper-V Manager > select Start to power on this VM
12. Configure the OS settings as in physical machine
Now you can use the VM as you wish.
If you don’t need the VM anymore, just right-click the VM name > click Delete.
Also, you can simply backup the VM by exporting the VM in Hyper-V Manager.
How to install Windows/Linux OS in Hyper-V VM?
If you haven’t installed the OS when creating the virtual machine, you can mount the ISO image on Hyper-V VM to install the OS like what you did on physical machine.
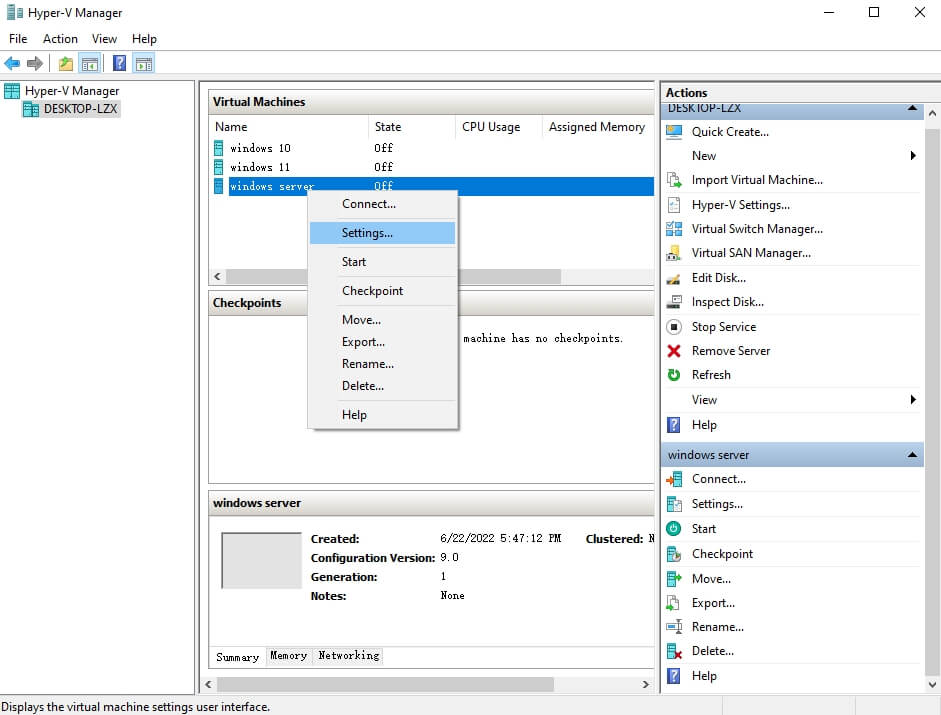
1. Right-click the VM name > select Settings
2. Expand IDE Controller on the left > select DVD Drive
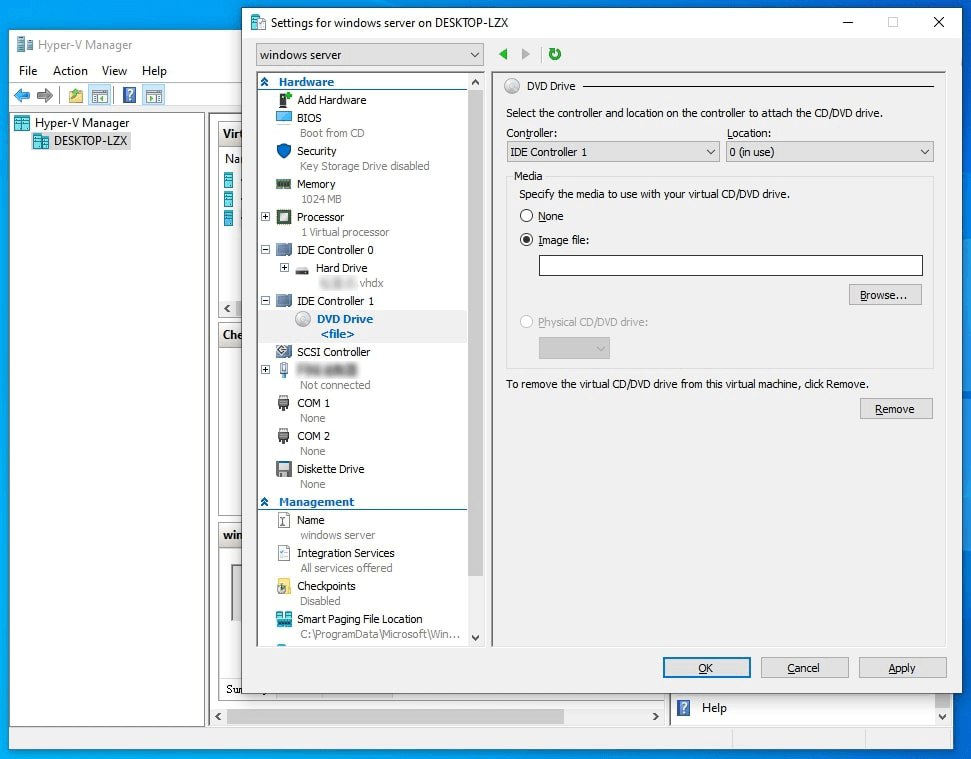
3. Select Image file > click Browse to add the ISO image of Windows/Linux operating system > click OK
Now you can boot the Hyper-V VM from ISO to install the operating system.
How to Backup Hyper-V VM with a professional solution?
Using VM export as backup is simple but not good for enterprise backup management due to its potential shortcomings in reliability and scalability so companies and organizations often use a professional solution.
Vinchin Backup & Recovery is such kind of professional virtual machine backup solution for multiple platforms like Hyper-V, VMware, Proxmox, XenServer, XCP-ng, oVirt, OLVM, OpenStack, etc. Compared with using VM export, it will bring more comprehensive protection to virtual environment.
You can create backup jobs for different virtual machines to automatically backup them with backup strategies like incremental backup, data deduplication and compression, etc.
For disaster recovery, you can add a backup copy job to create the local backup to a secondary datacenter to retrieve data backup when needed.
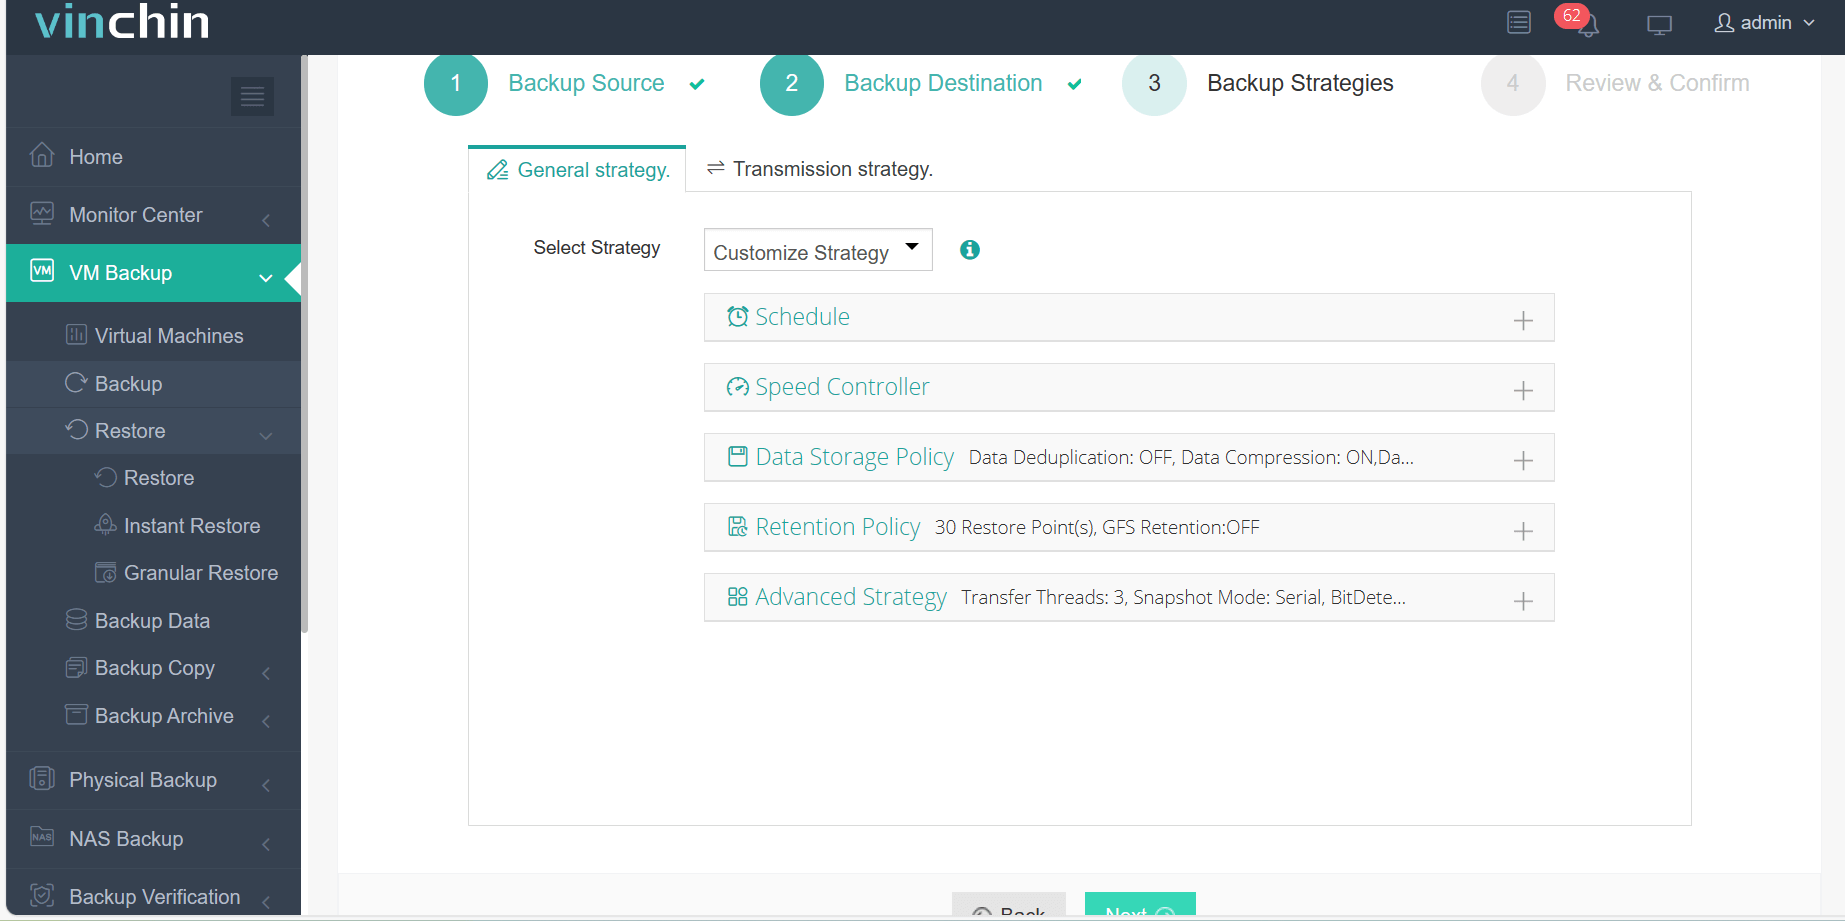
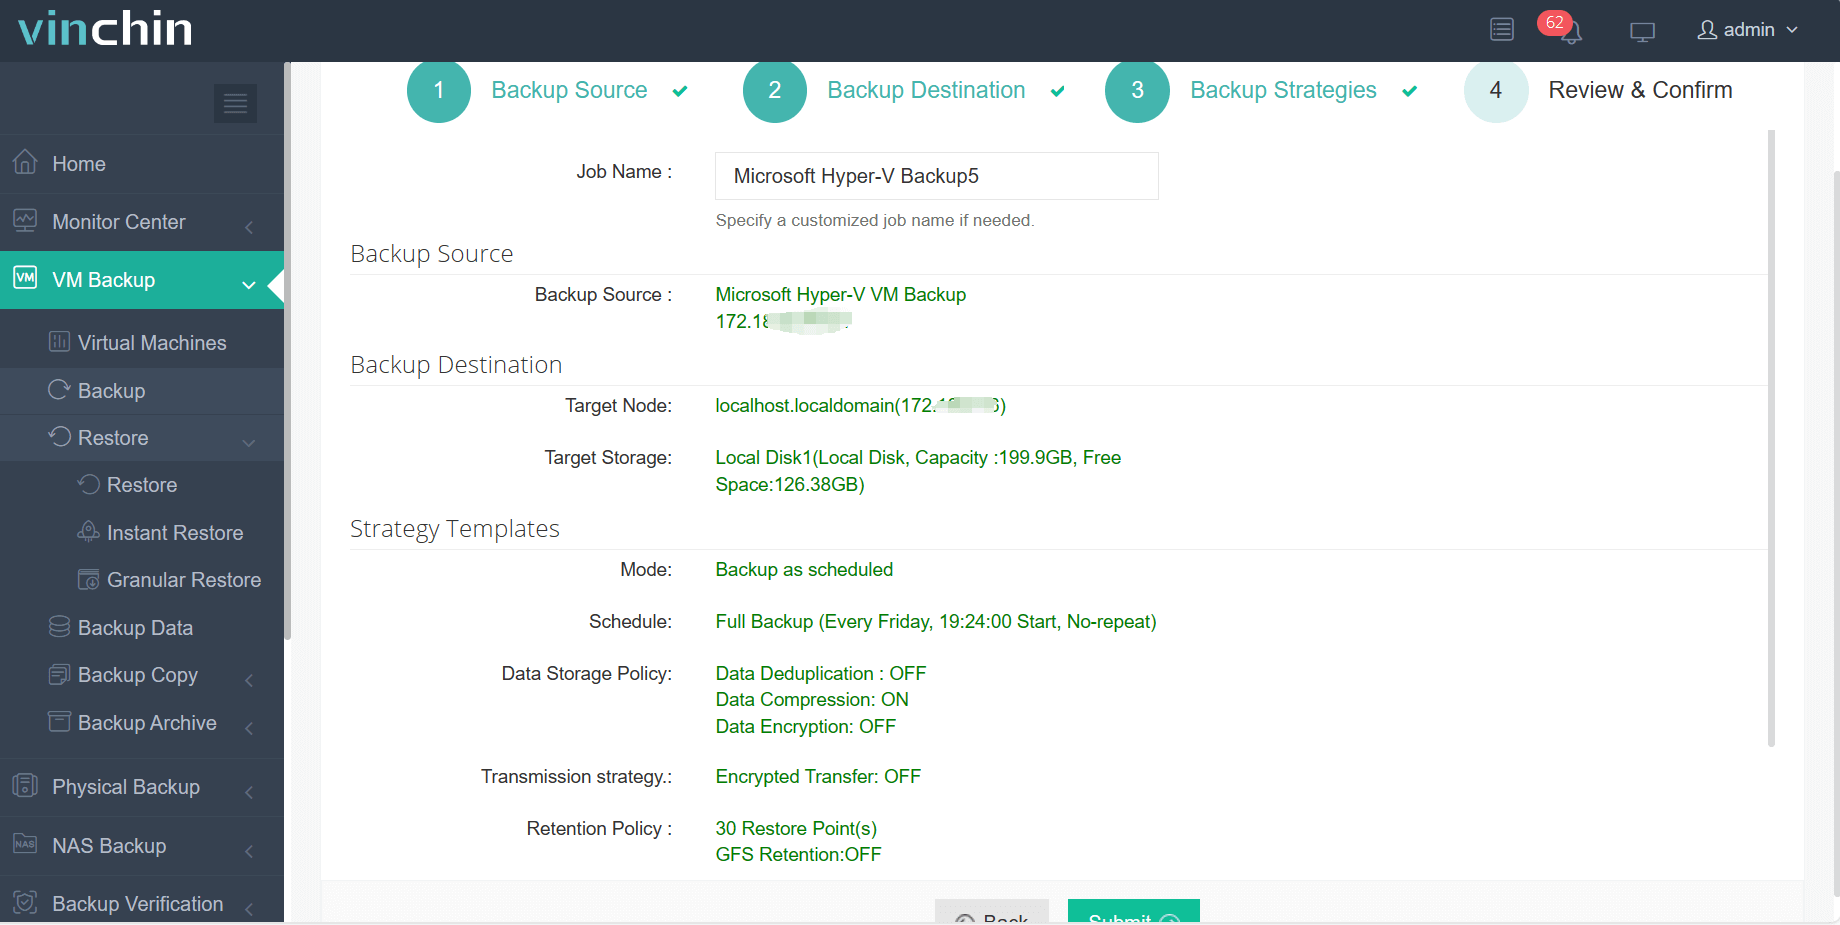
It will be easy to create a Hyper-V backup job within 4 steps.
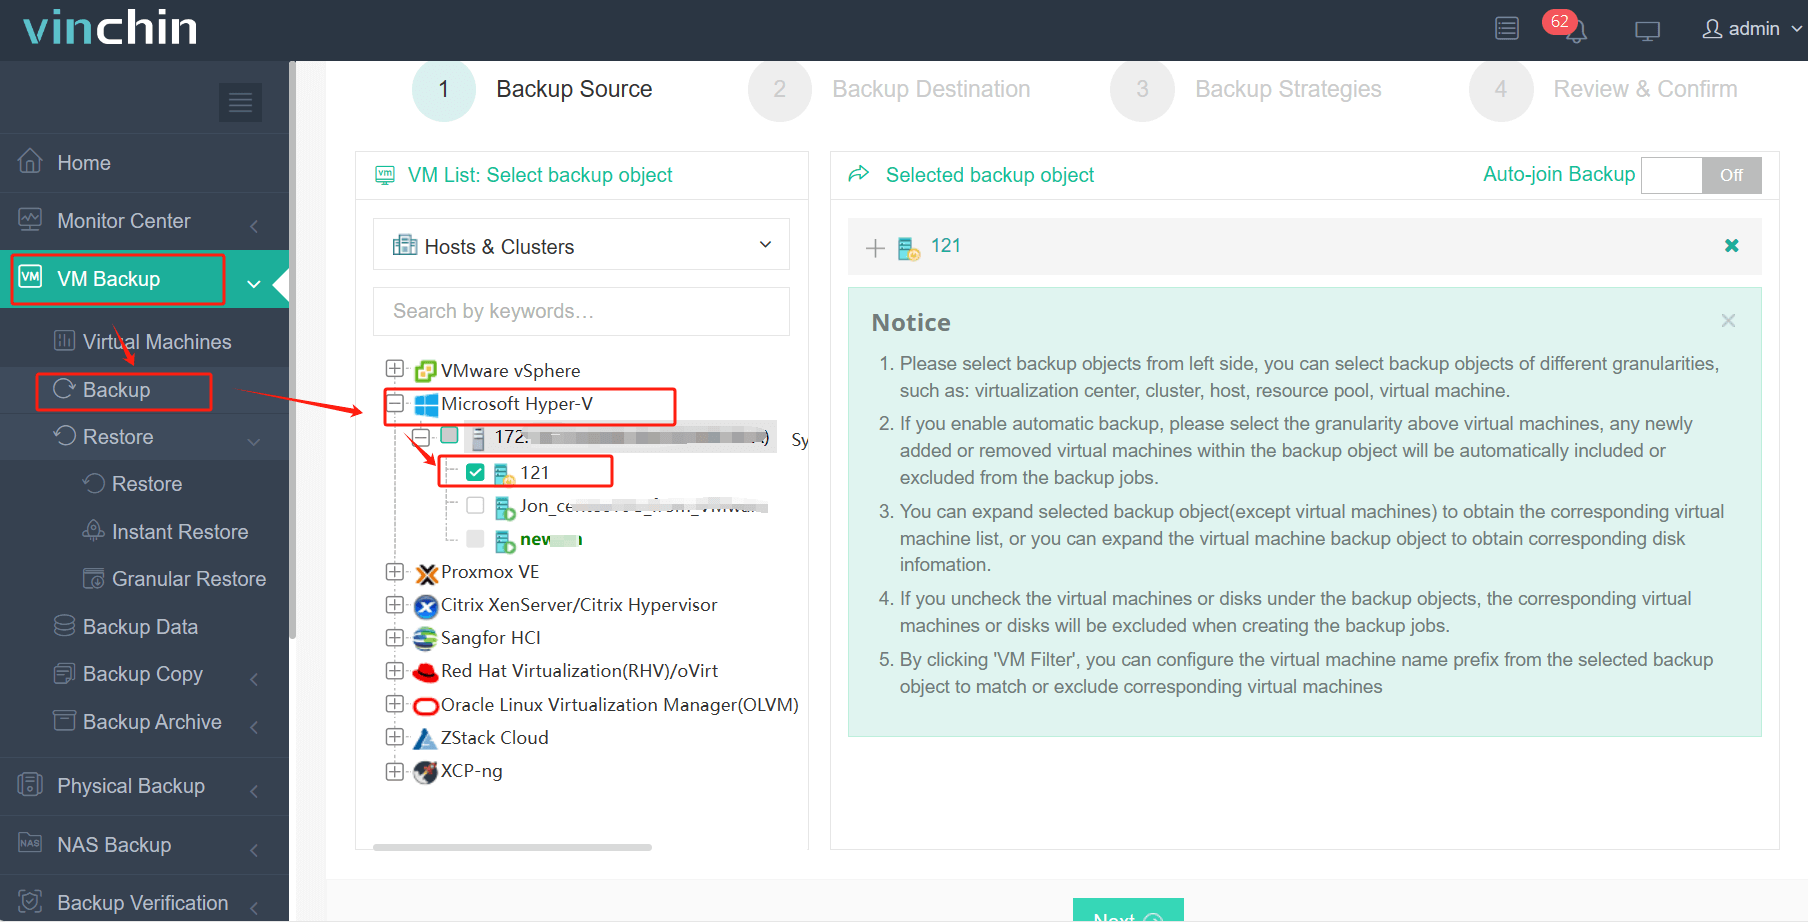
1. Select the Hyper-V VM
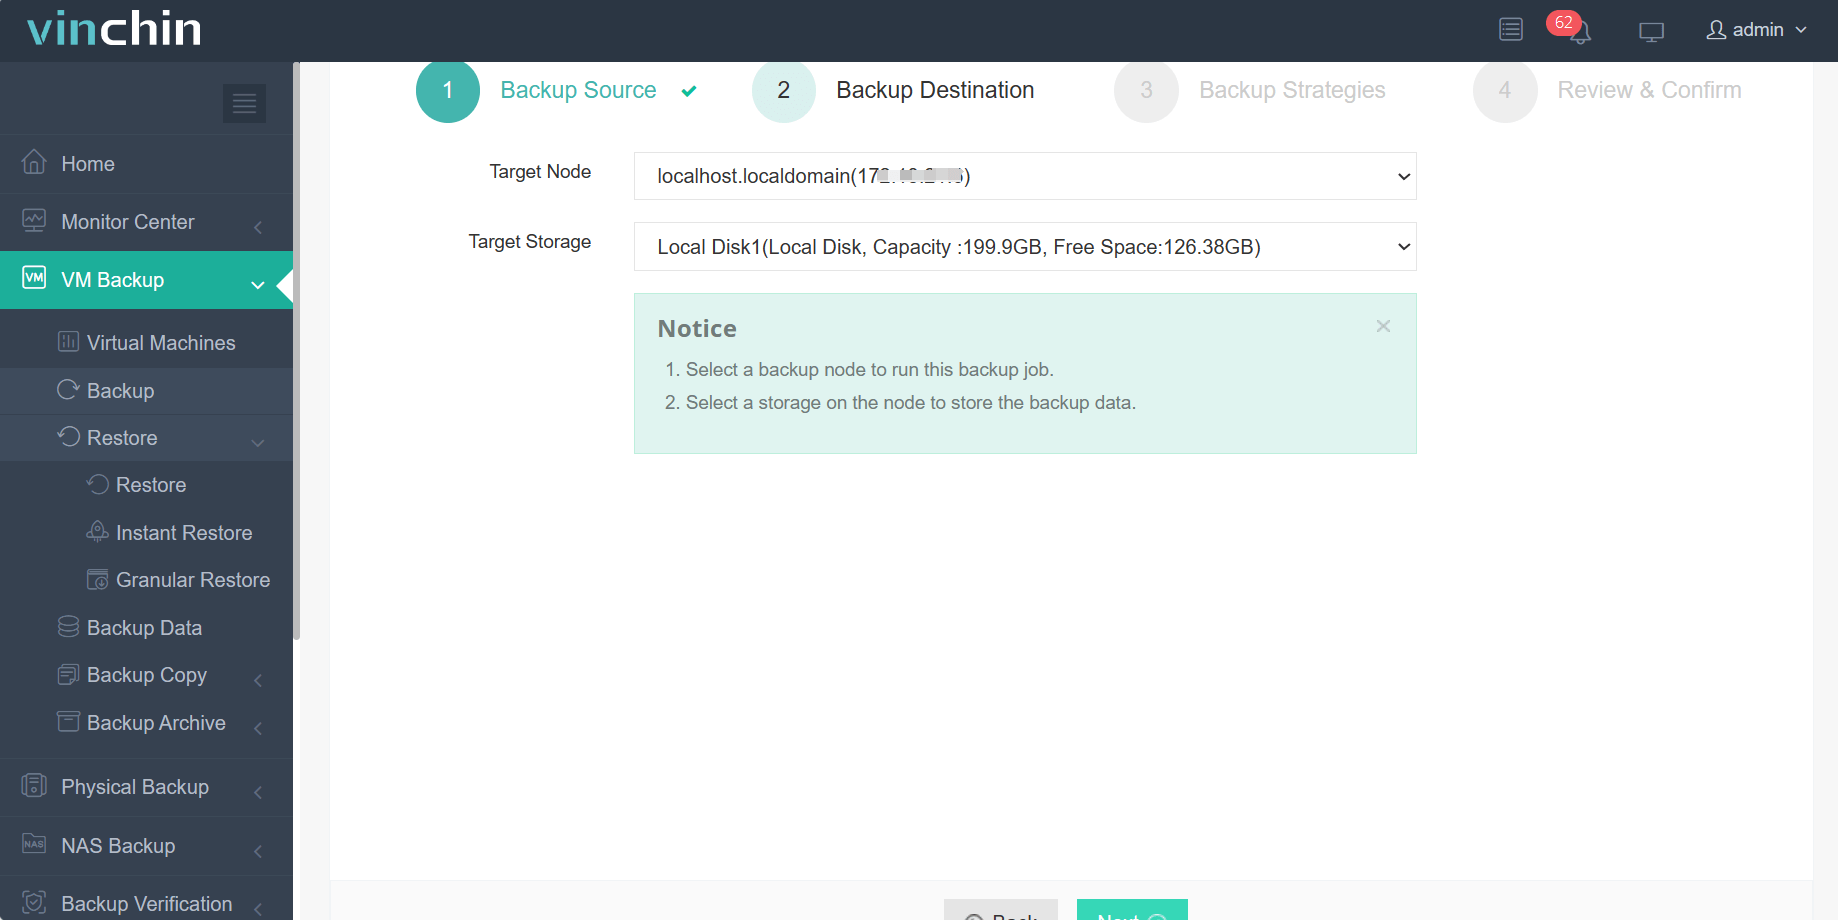
2. Select the backup storage
3. Select the backup strategies
4. Submit the job
Vinchin Backup & Recovery has helped a lot of companies backup Hyper-V VMs and you can also start a 60-day full-featured free trial here to see how suitable it is for virtual environment. If you need any help, contact us and then our engineers will help you use this software in your environment. We have established partnerships with reputable companies all over the world so if you would like to do a local business, you can select a local partner here.
Hyper-V VM creating FAQs
1. Can you resize a VM's resources after creation?
Yes, Hyper-V allows you to adjust resource allocation for VMs even after they've been created. You can modify settings such as memory allocation, hard disk size and CPU cores while the VM is powered off, enabling you to adapt to changing workload requirements dynamically.
2. Can you create checkpoints for VMs?
A: Yes, checkpoints, also known as snapshots, allow you to capture the current state of a VM at a specific point in time. You can create checkpoints for the VM in Hyper-V Manager.
Sum Up
Now let’s summarize this post. Hyper-V is a popular virtualization solution for reducing IT costs and improving efficiency and security in IT environment. After you install Hyper-V on a Windows operating system, you can create VMs and install OS in Hyper-V Manager following the steps in this post.
For enterprise backup, it is recommended to backup Hyper-V VM with a professional solution like Vinchin Backup & Recovery. Don’t miss the free trial.
Share on:


