-
What is Disk Passthrough?
-
Types of Disk Passthrough
-
Common Use Cases
-
Method 1: Map a single hard drive pass-through via command
-
Method 2: Add a PCI device, pass-through a SATA Controller
-
Proxmox VM Backup is essential
-
Conclusion
Proxmox VE is a powerful and open-source platform for virtualization that supports both KVM-based virtual machines and Linux containers. One of the features that makes Proxmox highly flexible for advanced users is disk passthrough, allowing direct access to physical disks from within a virtual machine. This feature is essential for certain use cases like running storage-intensive applications, using ZFS natively, or passing through hardware RAID controllers to guest systems.
What is Disk Passthrough?
Disk passthrough is a technique that allows a virtual machine in Proxmox to access a physical storage device directly, bypassing the host’s storage stack. In contrast to traditional virtual disk images stored on the host’s filesystem, disk passthrough gives the VM exclusive access to a physical disk, which provides several advantages, including reduced I/O overhead and native hardware functionality within the VM.
Types of Disk Passthrough
1. Whole Disk Passthrough: The entire physical disk is passed through to the VM without any intermediate layers. This gives the VM full control of the disk, which is useful for ZFS, RAID configurations, or when running specialized storage applications.
2. Partition Passthrough: Instead of passing the entire disk, you can pass only a specific partition to the VM. This allows more granular control if you don't want to dedicate the entire disk.
3. Hardware Controller Passthroug: For setups that involve hardware RAID cards or specialized controllers, passing the entire storage controller to the VM ensures that the VM can manage all disks attached to the controller natively.
Common Use Cases
ZFS Inside a VM: ZFS is a popular file system that includes features such as snapshots and RAID-like functionality. Passing through physical disks to the VM allows ZFS to directly control the disks, providing better performance and enabling advanced features such as data integrity checks.
Storage-Attached VMs: For systems like NAS, iSCSI targets, or other disk-intensive applications, direct disk passthrough ensures that the performance bottlenecks typically caused by virtualization layers are minimized.
Hardware RAID: If your server uses hardware RAID controllers, passing them through ensures that your VM has full access to the RAID configurations without relying on software emulation.
There are two ways to pass through hard drives in Proxmox VE:
Method 1: Map a single hard drive pass-through via command;
Method 2: Add a PCI device, pass-through a SATA Controller.
Method 1: Map a single hard drive pass-through via command
Access the SSH of the Proxmox VE system or directly enter the PVE management web Shell.
1. Check the disk ID
ls -l /dev/disk/by-id/
Note: “ata, mmc”, etc., indicate the interface method. Common types include ATA, SATA, SCSI, NVME, eMMC, and SASI. IDE and SATA interfaces are generally labeled as "ata," while SCSI and SAS interfaces are labeled as "scsi."
2. Import the virtual machine
qm set <vm_id> –<disk_type>[n] /dev/disk/by-id/<type>-$brand-$model_$serial_number
<disk_type>[n]: The bus type and its number for the imported disk. Bus types can be IDE, SATA, VirtIO Block, or SCSI, with numbering starting from 0. The maximum value depends on the bus interface type: IDE is 3, SATA is 5, VirtIO Block is 15, and SCSI is 13.
/dev/disk/by-id/-brand-brand−model_$serial_number: The specific path and name of the disk ID.
For example, with the disk data “ata-ST4000VX000-2AG166_ZGY163KG”, this disk will be passed through to the virtual machine with VM ID 102, and the bus type interface is sata2 (please set the bus number according to the PVE virtual machine).
qm set 102 -sata2 /dev/disk/by-id/ata-ST4000VX000-2AG166_ZGY163KG
The return information will display:
update VM 102: -sata2 /dev/disk/by-id/ata-ST4000VX000-2AG166_ZGY163KG
This indicates that the pass-through was successful.
Method 2: Add a PCI device, pass-through a SATA Controller
When passing through a SATA Controller in Proxmox VE, the entire SATA bus will be passed through, meaning the southbridge or the northbridge-connected SATA bus is directly passed through. On some motherboards, this will result in all SATA interfaces being passed through.
Note: If your PVE system is installed on a SATA hard drive, this may cause the PVE system to fail to start. Therefore, before passing through the SATA Controller, confirm the installation location of the PVE system, or install the system directly on an NVMe drive.
Before starting, ensure that the IOMMU hardware pass-through function is enabled, then proceed with adding the SATA Controller.
1. Confirm whether your motherboard's CPU supports Vt-d
If it doesn't, you cannot perform the pass-through. Intel requires at least the B75 chipset to support it. In other words, Intel Core processors from the 4th generation and above support this feature. VT-D is for I/O virtualization, not VT-X.
Many beginners mistakenly think that enabling virtualization on the motherboard is sufficient for pass-through, but it's not. VT-D must be enabled for I/O virtualization. On the AMD platform, it's called IOMMU, and on some OEM motherboards, it's called SRIOV. Please take note.
2. Enable IOMMU
Edit the grub file. Do not modify it blindly. Set it according to your environment.
vi /etc/default/grub
Find this line:
GRUB_CMDLINE_LINUX_DEFAULT="quiet"
If using an Intel CPU, modify it to:
GRUB_CMDLINE_LINUX_DEFAULT="quiet intel_iommu=on iommu=pt"
If using an AMD CPU, modify it to:
GRUB_CMDLINE_LINUX_DEFAULT="quiet amd_iommu=on iommu=pt"
If GPU pass-through is required, it's recommended to add an additional line:
video=vesafb:off video=efifb:off video=simplefb:off
After adding this line, PVE will reboot and stops at a screen after entering the kernel.
GRUB_CMDLINE_LINUX_DEFAULT="quiet amd_iommu=on iommu=pt video=vesafb:off video=efifb:off video=simplefb:off"
After modification, update grub directly:
update-grub
Note: If this method doesn't enable IOMMU, modify the “/etc/kernel/cmdline” file and use “proxmox-boot-tool refresh” to update the boot options.
3. Load the necessary kernel modules
echo vfio >> /etc/modules
echo vfio_iommu_type1 >> /etc/modules
echo vfio_pci >> /etc/modules
echo vfio_virqfd >> /etc/modules
Update the kernel parameters
update-initramfs -k all -u
Reboot the host
reboot
4. Verify if IOMMU is enabled
After rebooting, enter the following command in the terminal:
dmesg | grep iommu
If the following output appears, it indicates success:
[ 1.341100] pci 0000:00:00.0: Adding to iommu group 0
[ 1.341116] pci 0000:00:01.0: Adding to iommu group 1
[ 1.341126] pci 0000:00:02.0: Adding to iommu group 2
[ 1.341137] pci 0000:00:14.0: Adding to iommu group 3
[ 1.341146] pci 0000:00:17.0: Adding to iommu group 4
At this point, enter:
find /sys/kernel/iommu_groups/ -type l
If many pass-through groups appear, it indicates success. If nothing appears, then IOMMU is not enabled.
Select the required PVE system, click on "Hardware" > "Add" > "PCI Device" > choose "SATA Controller," and finally click "Add" to assign the SATA Controller to the corresponding system. After rebooting, the PVE hardware pass-through settings will take effect.
Proxmox VM Backup is essential
Vinchin Backup & Recovery is a robust virtual machine data protection solution designed for multi-platform environments, with full support for popular virtualization platforms like Proxmox. Its core features include automated backups, deduplication, and compression technologies, helping users save significant storage space. Additionally, it supports cross-platform data migration and advanced features like instant recovery and granular file-level recovery, significantly boosting recovery speed and efficiency. In a Proxmox environment, Vinchin Backup & Recovery ensures data security and reliability through efficient backup encryption and protection, making it an essential solution for virtual machine environments.
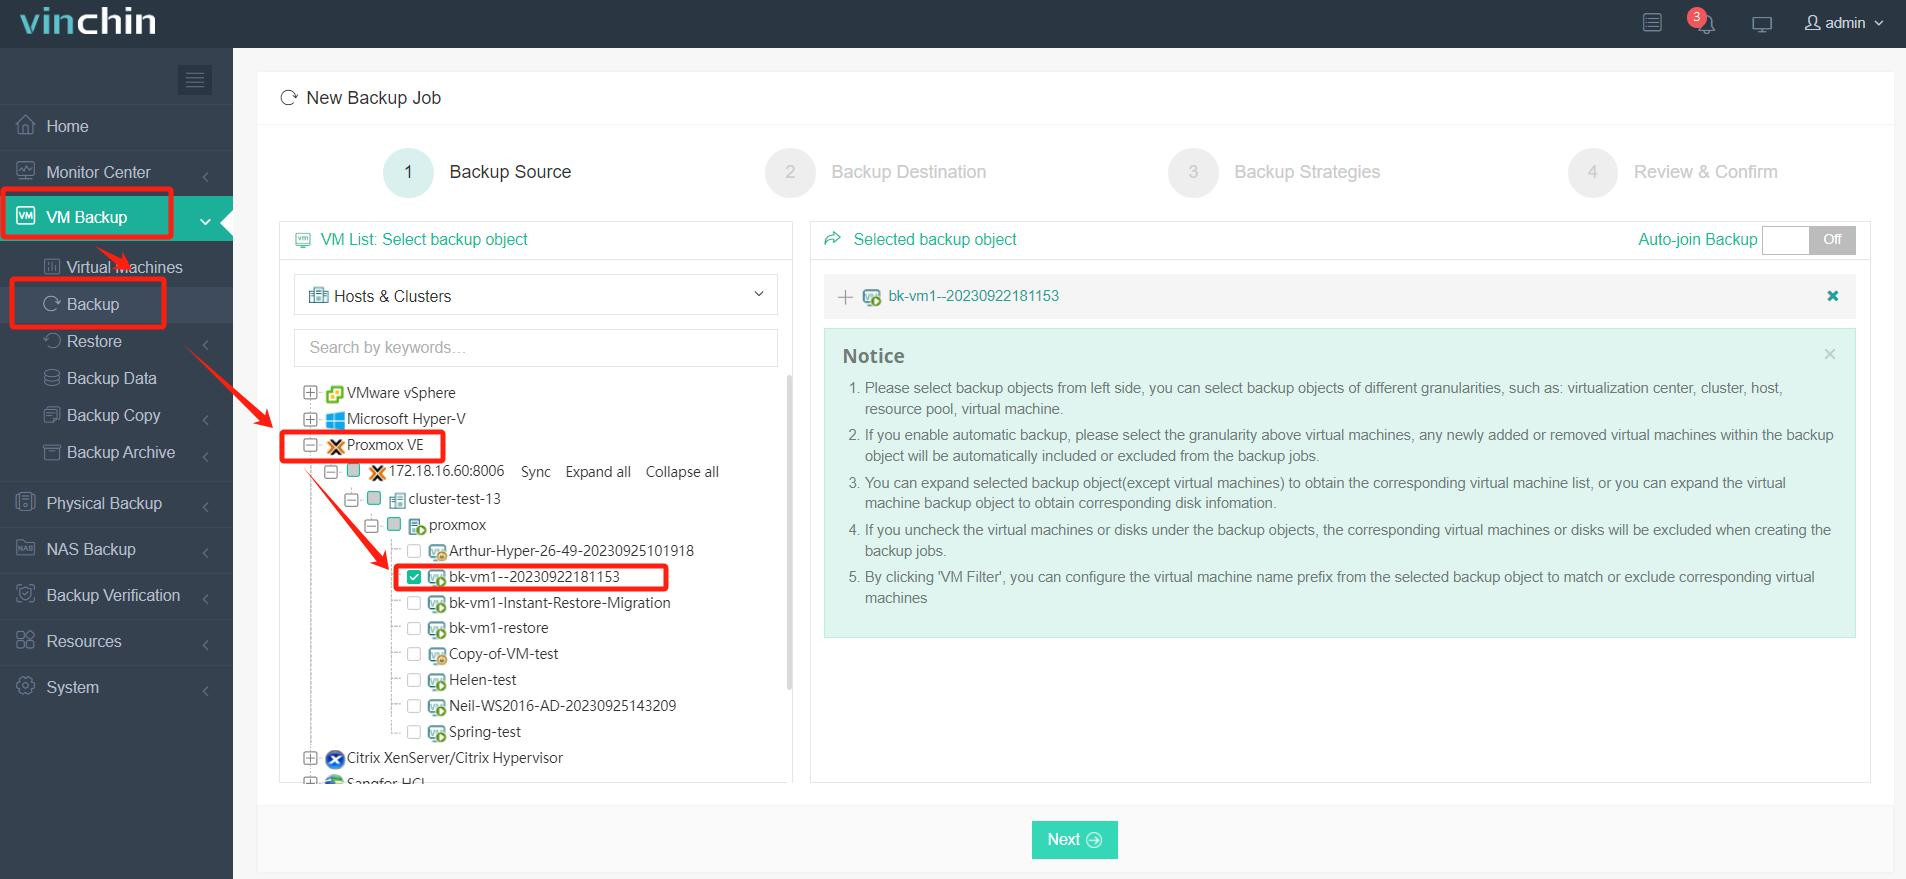
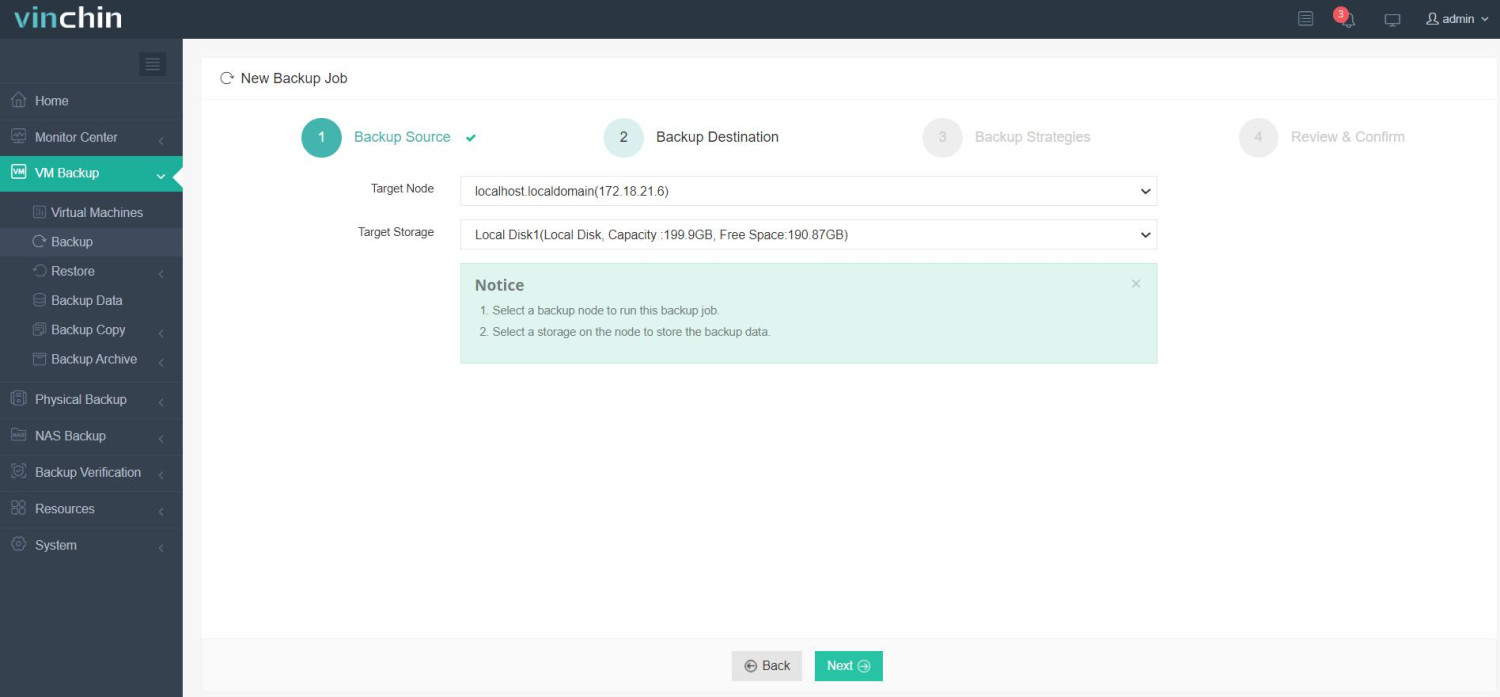
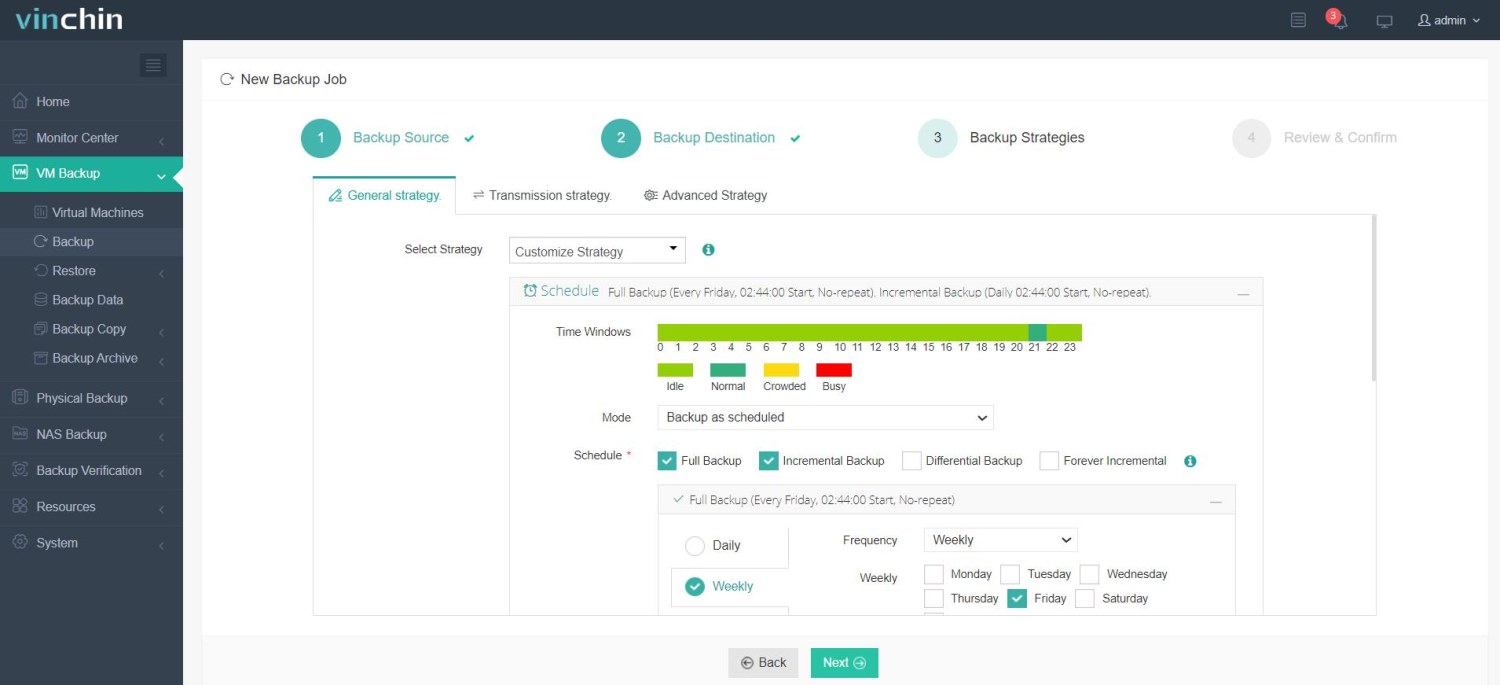
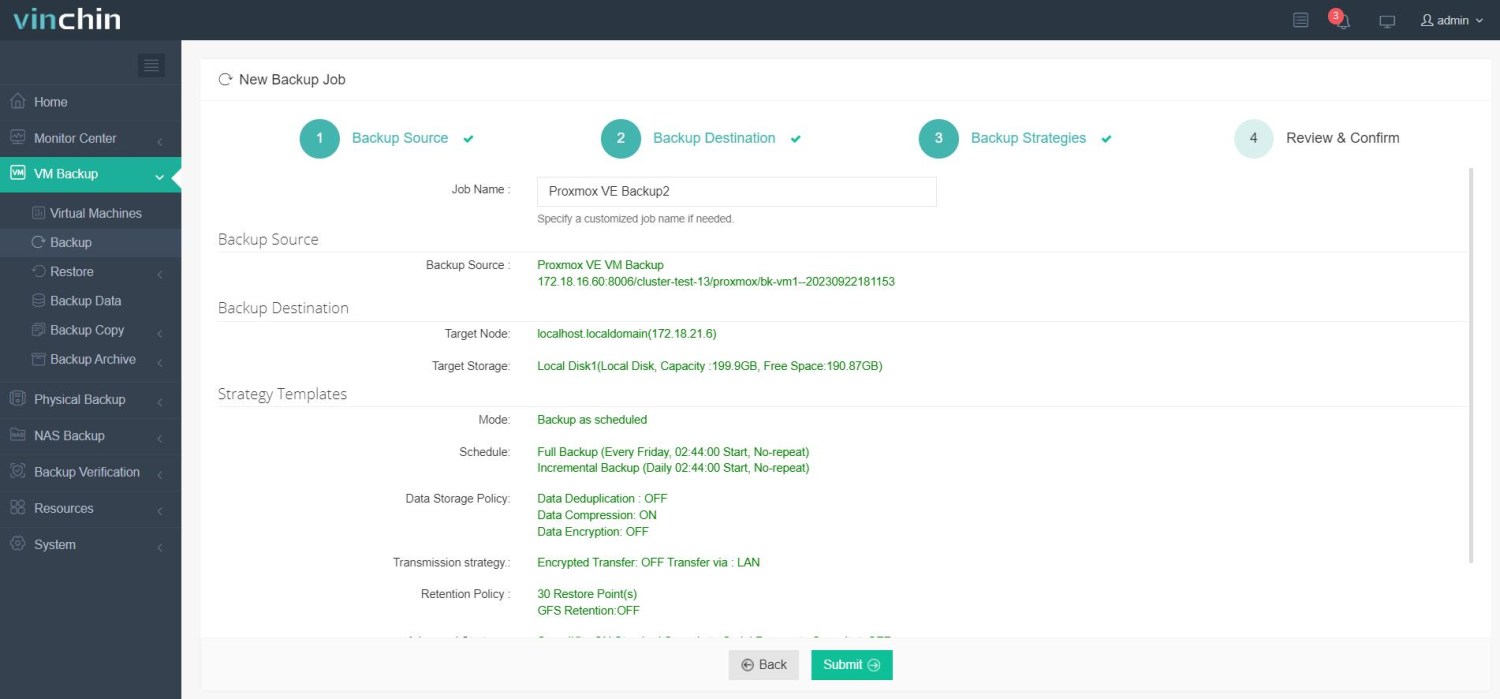
It only takes 4 steps for you to backup Proxmox VE VMs with Vinchin Backup & Recovery:
1.Select the backup object.

2.Select backup destination.

3.Configure backup strategies.

4.Review and submit the job.

Click the button below to download a 60-day free trial and experience more advanced features by yourself!
Conclusion
Proxmox disk passthrough is an invaluable feature for scenarios where native disk access is required by the VM. Whether you are running storage-heavy applications, managing ZFS pools, or handling hardware RAID configurations, direct access to physical disks can greatly enhance performance and functionality.
Share on:


