-
Proxmox snapshot benefits
-
What are the prerequisites for creating snapshots in Proxmox?
-
How to take a snapshot in Proxmox VE?
-
How to create a Proxmox snapshot using the command line?
-
What is a best way to backup a Proxmox VM?
-
Conclusion
Proxmox Snapshot is a feature that captures and saves the current state of a virtual machine in a virtualized environment. It is similar to taking an instantaneous photo of a computer system. It allows users to easily record the current state of a VM while making major changes or experimenting, and quickly revert to that state when needed. Like turning back time to ensure system stability and data integrity.
Proxmox snapshot benefits
These are the main advantages of using Proxmox VM snapshots:
Convenience of Backup and Restore: Creating Proxmox VM snapshots generates a backup of the current state of a virtual machine in a short period of time. In the event of a system failure or configuration change, you can quickly restore VMs to the previous Proxmox snapshot state to ensure business continuity.
Support for Development and Testing: Allows the system state to be saved prior to creating a Proxmox VM snapshot for quick restoration to the initial state during experimentation, development, or testing.
Performance Analysis: Once created, snapshots in Proxmox can be used for subsequent performance analysis to compare system performance at different points in time.
What are the prerequisites for creating snapshots in Proxmox?
In Proxmox Virtual Environment, when creating a virtual machine, you can choose from different disk formats. Some of the common ones are qcow2, raw and vmdk. To create live snapshots in Proxmox, you need to choose qcow2 here.
raw (Raw disk image): Without copy-on-write, the disk image file size is equal to the actual space used by the virtual disk.
qcow2 (QEMU copy-on-write): Supports copy-on-write to save storage space, fast Proxmox snapshot creation, and dynamic allocation of disk space.
vmdk (VMware image format): VMware's virtual disk format for scenarios that require interaction with the VMware environment.

If you do not choose the qcow2 format, you will be unable to take a snapshot in Proxmox, and the interface will appear like this.

How to take a snapshot in Proxmox VE?
The GUI of Proxmox VE provides an intuitive user interface that makes creating snapshots very easy. Even novice users can easily understand and perform these operations.
To create a snapshot in Proxmox VE, you can follow the steps below:
1. Click a VM > hit Snapshot > choose take Snapshot

2. Enter the Name and Description > click Take Snapshot

Note: Proxmox RAM refers to the memory in the Proxmox Virtual Environment that is used to store the operating system, applications, and data of the virtual machine. Allocating more RAM can support the VM to perform more tasks and run more applications at the same time.
How to create a Proxmox snapshot using the command line?
The use of scripting makes creating snapshots more efficient and ensures consistency of operation. Scripting reduces the risk of possible errors in manual operations and increases the reliability of the entire creation process.
To create a Proxmox VM snapshot using the command, please follow these steps:
1. Choose Proxmox node > click Shell
2. Type command to view the list of all virtual machines on the current Proxmox host.
qm list
The first column shows the VM ID required to create the snapshot.

3. Type command line:
qm snapshot [vmid] [snapshot_name] [OPTIONS]
qm snapshot 12345 snapshot_22222 --vmstate true
Note: Here, it is recommend using the string parameter to link the description.
[OPTIONS] represents the options that can be added, you can add different parameters as needed.
--vmstate true: Indicates to include the running state (RAM) of the VM.
--vmstate false: Indicates that the running state of the VM is not included.

Here you can see that the snapshot has been created.

Or you can click the VM > choose Snapshots, here we can see a created snapshot

If you need to roll back the VM to a particular state, click a snapshot > click the Rollback > hit Yes

If you want to remove it, just hit Remove > hit Yes

What is a best way to backup a Proxmox VM?
When you need a more comprehensive and flexible backup solution, considering a third-party backup software, such as Vinchin Backup & Recovery, may be a more ideal option. While Proxmox offers convenient snapshot capabilities, if you wish to customize your backup strategy, integrate additional features (such as CBT), or backup between different platforms, Vinchin is better suited to your needs.
Vinchin Backup & Recovery is a backup solution designed for virtual machines of VMware, Hyper-V, XenServer, XCP-ng, oVirt, RHV, etc. It provides comprehensive and powerful VM backup and recovery features like agentless backup, instant recovery, V2V migration designed to protect and manage critical data in the virtualization environment.
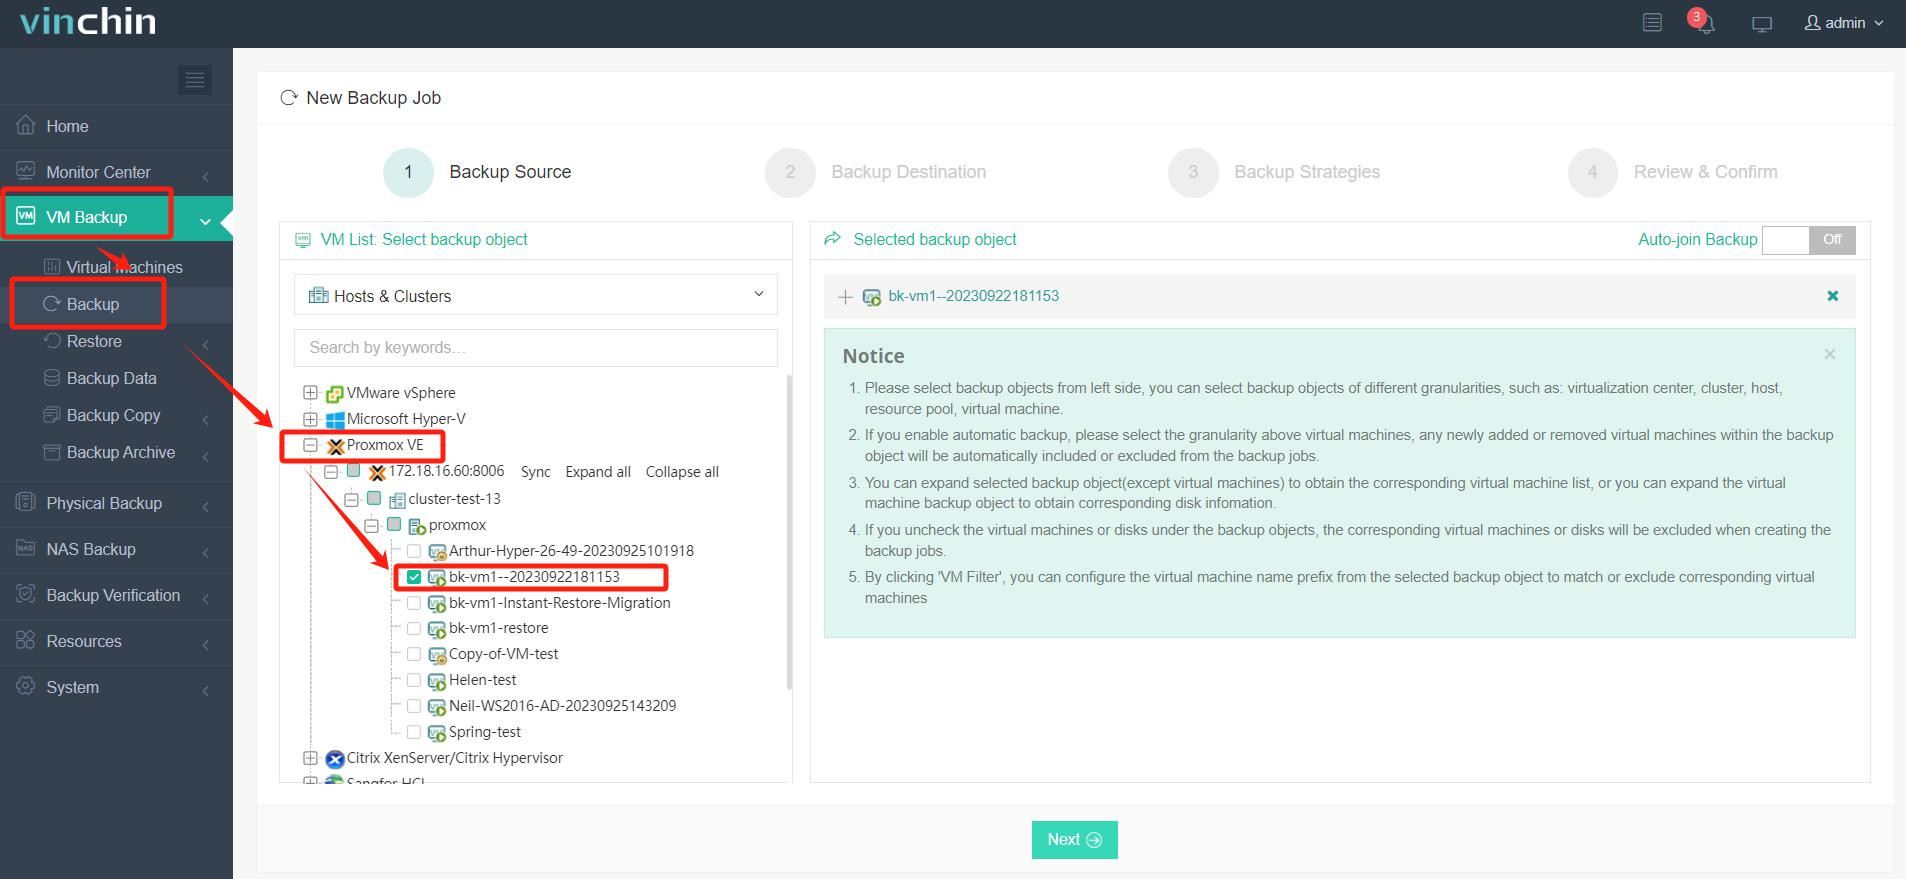
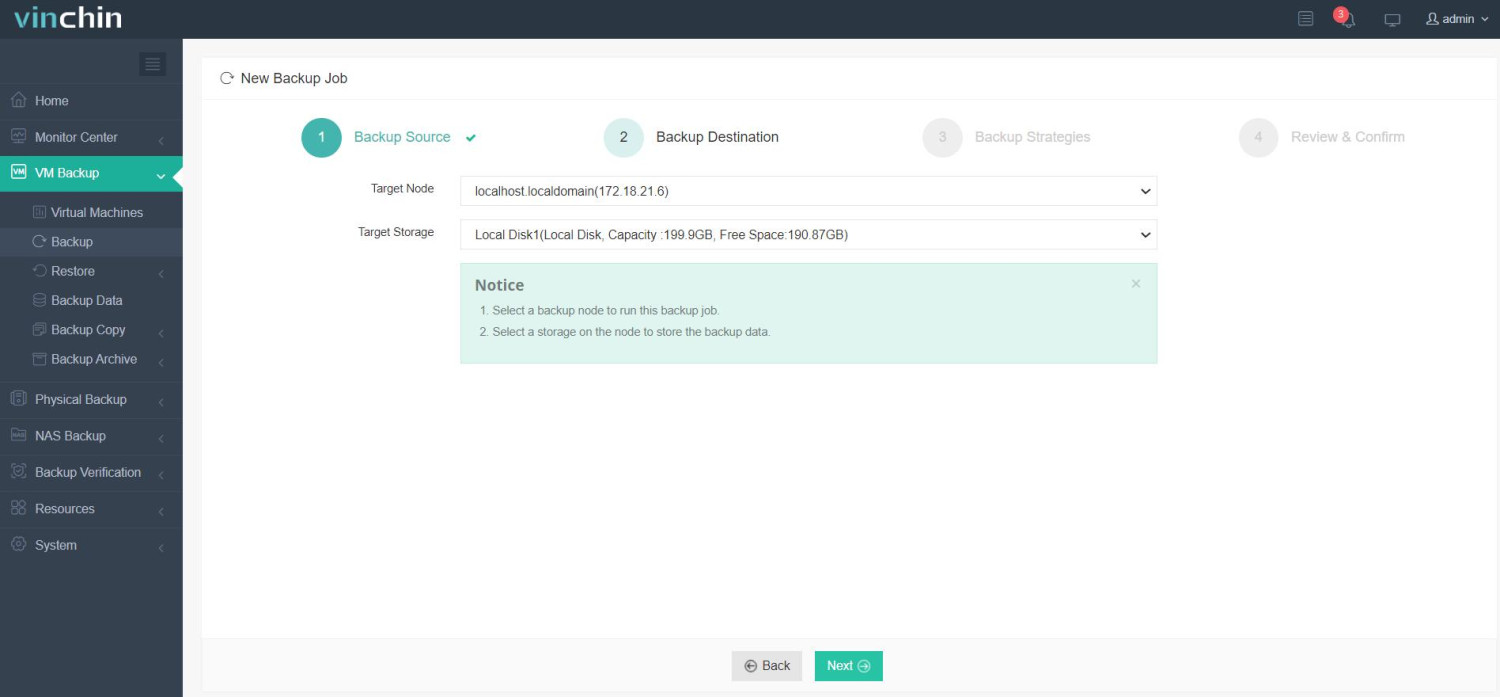
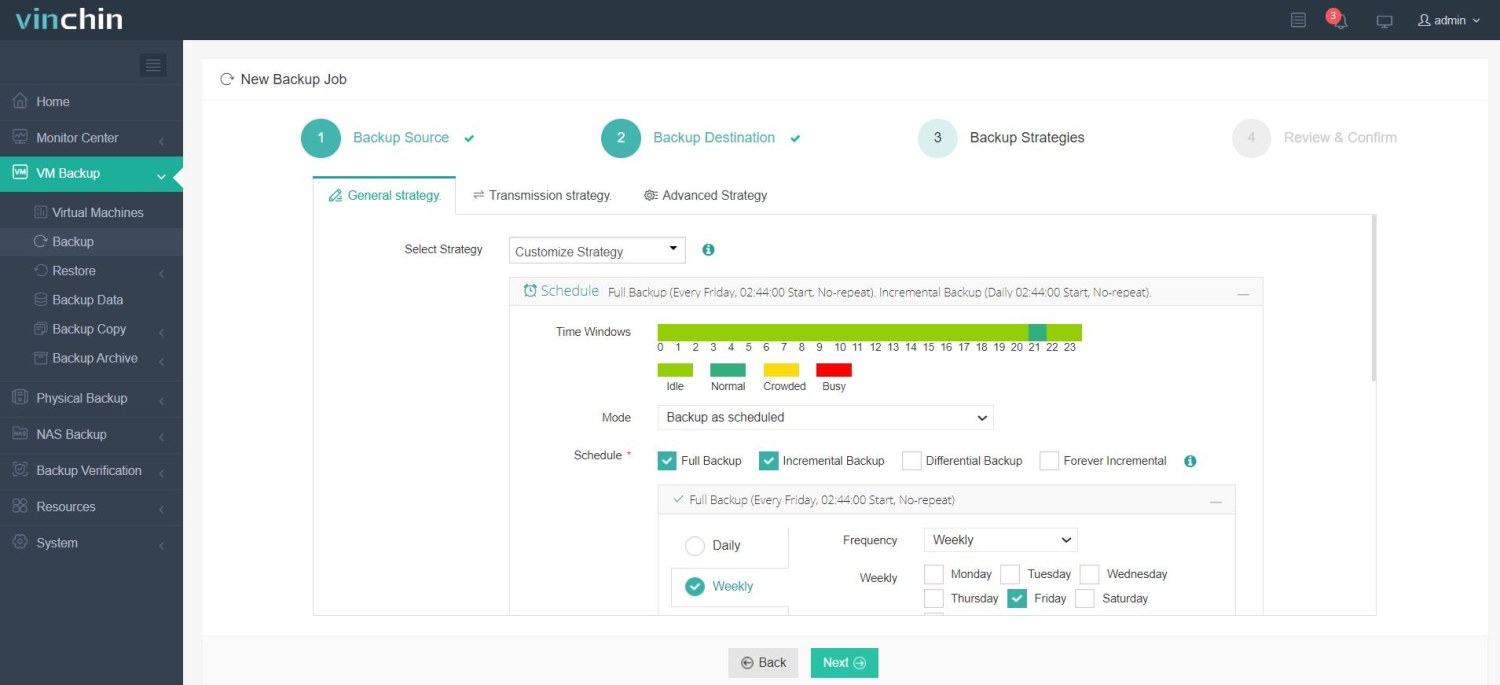
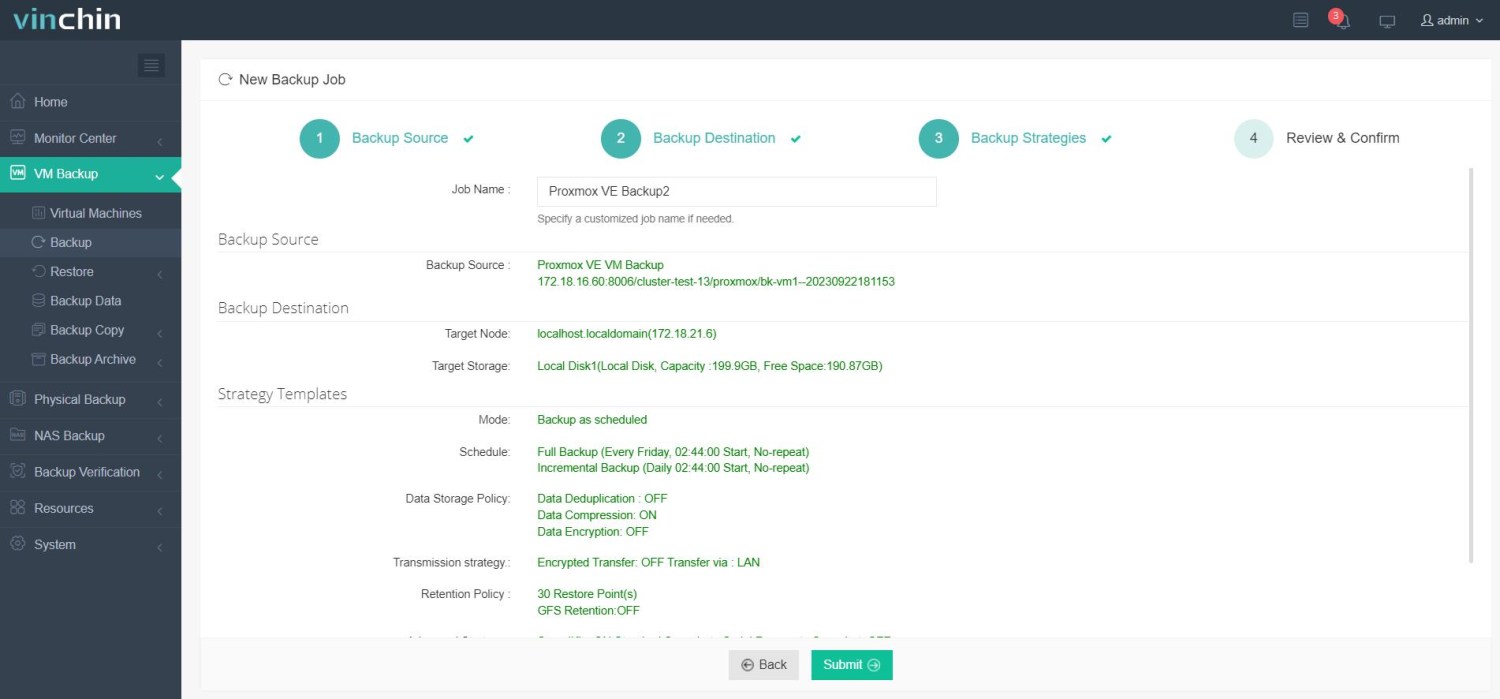
Vinchin Backup & Recovery's operation is very simple, just a few simple steps.
1.Just select VMs on the host

2.Then select backup destination

3.Select strategies

4.Finally submit the job

Vinchin offers a free 60-day trial for users to experience the functionality in a real-world environment. For more information, please contact Vinchin directly or contact our local partners.
Conclusion
In conclusion, Proxmox snapshots are a valuable feature that captures and saves the current state of a virtual machine for backup and restore purposes. Snapshots can be easily created through the Proxmox VE graphical user interface or from the command line. For a more comprehensive and flexible backup solution, it is recommended to consider using third-party software such as Vinchin Backup & Recovery.
Share on:


