-
Create a Bootable ESXi 8.0 Installer USB Flash Drive on Linux
-
Create a Bootable ESXi 8.0 Installer USB Flash Drive on Windows
-
Create a Bootable ESXi 8.0 Installer USB Flash Drive on Mac
-
How to Install ESXi from USB Flash Drive?
-
ESXi Backup Best Practices
-
ESXi Bootable USB FAQs
-
Summary
As one of the most widely used type 1 hypervisors among enterprises, VMware ESXi can be booted from various media, such as CD/DVD, Preboot Execution Environment, a remote management application, and a USB flash drive.
More than that, ESXi can also be booted from a USB flash drive. Doing so brings both conveniences and challenges.
Saving cost and space. Using a USB device to install your ESXi hypervisor saves both internal direct attached storage and cost on it.
Easy to maintain when it's time to swap out the disks in a datastore. Since ESXi is loaded on a USB flash drive, you can change the datastore drives without having to reinstall ESXi.
Simpler upgrades and installation. Clone USB and upgrade ESXi. Simply switch to a USB drive that has a previously installed and functional ESXi version should something goes awry. Thus, you don’t have to roll back to the old version.
The incompatibility with RAID enables host downtime once the USB fails, and it takes time to replace the drive. Also, ESXi boot time can be longer with a USB drive because ESXi is loaded entirely into the RAM.
And USB devices may wear out quickly from frequent IO operations. So, make sure you select a reliable and supported device.
Likewise, note that the installer doesn’t create a scratch partition on USB to store vm-support output, so, a ramdisk will take that mission, and eventually the content will be erased by the system.
Create a Bootable ESXi 8.0 Installer USB Flash Drive on Linux
1. Download ESXi 8.0 image from customerconnect.vmware.
2. Install syslinux with Linux packet manager.
# yum install syslinux
# apt install syslinux
3. Identify the USB device path by running dmesg after connecting the device.
# dmesg
4. Launch the tool to create a partition using fdisk. Press options.
# fdisk /dev/sdb
d: delete current partitions.
n: new partition, followed by primary.
ENTER 3 times: default settings.
t: switching between file systems.
c: select FAT32 as the file system type.
a: activate the partition.
w: write changes to disk.
5. Format the USB drive.
# /sbin/mkfs.vfat -F 32 -n ESX /dev/devicepath
6. Make a copy of the boot loader and Master Boot Record.
# /usr/bin/syslinux /dev/devicepath
# cat /usr/share/syslinux/mbr.bin > /dev/devicepath
7. Mount the USB drive.
# mkdir /usbdisk
# mount /dev/ devicepath /usbdisk
8. Mount ESXi ISO.
# mkdir /esxi
# mount -o loop VMware-VMvisor-Installer-x.x.x-XXXXXX.x86_64.iso /esxi
9. Copy ISO contents to the USB.
# cp -r /esxi/* /usbdisk
10. Change the APPEND -c boot.cfg line in the /usbdisk/syslinux.cfg file to APPEND -c boot.cfg -p 1.
# sed -i 's/APPEND -c boot.cfg/APPEND -c boot.cfg -p 1/g' /usbdisk/syslinux.cfg
11. Unmount USB and ISO.
# umount /usbdisk
# umount /esxi
12. Remove the flash drive and install ESXi with it.
Create a Bootable ESXi 8.0 Installer USB Flash Drive on Windows
1. Download the ESXi 8.0 image and Rufus.
2. Connect the USB to your computer.
3. Start Rufus, and choose the USB drive as the Device.
4. Click SELECT to open the ESXi ISO and specify it. Give a name to the Volume label.
5. Choose MBR for the Partition scheme, BIOS or UEFI for the Target system type, and the default FAT32 as the File system from the dropdown lists.
6. Hit START and click Yes to continue in the pop-up window.
7. Click OK for another prompt.
Create a Bootable ESXi 8.0 Installer USB Flash Drive on Mac
1. Download the ESXi 8.0 image.
2. Identify the USB.
# diskutil list
3. Make a partition map, then format the drive with FAT32.
# diskutil eraseDisk MS-DOS "ESX" MBR flashdrive
4. Unmount the USB.
# diskutil unmountDisk /dev/flashdrive
5. Activate the first partition with fdisk.
fdisk: 1> f 1
fdisk: 1> write
fdisk: 1> quit
6. Copy the contents of the ESXi ISO to the USB flash drive after mounting the ISO.
7. Find the ISOLINUX.CFG file and rename it to SYSLINUX.CFG on the USB.
8. Change the APPEND -c boot.cfg line in the syslinux.cfg file to APPEND -c boot.cfg -p 1.
9. Remove the flash drive and install ESXi with it.
How to Install ESXi from USB Flash Drive?
Install ESXi from USB with Rufus
1. Connect the bootable USB to the host, then in the BIOS boot menu, alter the boot order to boot from the USB disk.
2. Accept the EULA and continue.
3. Click Enter and then F11. Select the destination drive on which you want to install ESXi.
4. Choose a keyboard layout and input the root password.
5. Choose Install on the Confirm Install widow.
6. Remove the USB from the host and reboot the system.
Install ESXi from USB with the Workstation
1. Connect the bootable USB flash drive to your computer.
2. Create a new VM in VMware Workstation, then configure the VM to use the defaults.
Make sure to select the ESXi installer ISO image and UEFI firmware type (VM > Settings > Options > Advanced).
3. Turn on the VM and boot from the ESXi installer ISO. Press F2 after powering on, choose the boot device in the virtual UEFI/BIOS.
Navigate to VM > Removable devices > Your Flash Drive Name > Connect (Disconnect from Host) to connect the USB flash drive.
4. Install ESXi. Hit Enter to continue and F11 to accept the agreement. Recognize a disk to install/upgrade ESXi with the following guides.
a. Reboot the VM running ESXi connected by the USB.
b. Press Shift+O to manually enter extra boot settings.
c. Add preferVMklinux=TRUE to cdromBoot runweasel and press Enter.
cdromBoot runweasel preferVMklinux=TRUE
d. Repeat the steps of 4 and select a disk to install ESXi and hit Enter.
e. Choose a keyboard layout, enter a root password, and input F11 to confirm installation.
f. After that, eject the installation media, press Enter and reboot the ESXi VM.
5. Enter Alt-F1 to open the ESXi console, then input the root and password. (go to Troubleshooting > Enable ESXi Shell if you manually chose a USB when installing ESXi).
To save the USB settings persistently:
esxcli system settings kernel set -s preferVmklinux -v FALSE
esxcli system module set --enabled=false -m vmkusb
reboot
ESXi Backup Best Practices
Never one to mince words, ESXi VM backup is certainly essential for any business in a VMware infrastructure. If you are a small business with few VMs to protect, you can use traditional backup solutions like tape, or free editions of modern software. However, if you have numerous VMs and care about the efficiency of backup and recovery, you could need agentless backup software.
Vinchin Backup & Recovery is a professional ESXi backup solution that integrates automatic backup, instant recovery, and V2V migration.
Compatible with 15+ platforms: support mainstream virtualization on the market like VMware, Citrix Hypervisor (XenServer), XCP-ng, oVirt, Oracle Linux Virtualization Manager, Red Hat Virtualization, and more. It also supports backup and recovery for databases, physical servers, NAS, and massive files.
Simple intelligent backup: automate VM backup under preset schedules and mail alters to remind users of job status and unusual activities.
Speeds up the backup: process with HotAdd transmission, 50% of data reduction, and multithread lines.
Cross-platform V2V migration: smooth V2V migration across 10+ platforms without any commands or tools in 4 steps.
Instant recovery: restore crashed VM in seconds directly from the backup datastore or an offsite backup copy saved in another location for minimum RTO.
VM backup verification: verify the VM backup in the built-in DR lab to test whether it is bootable.
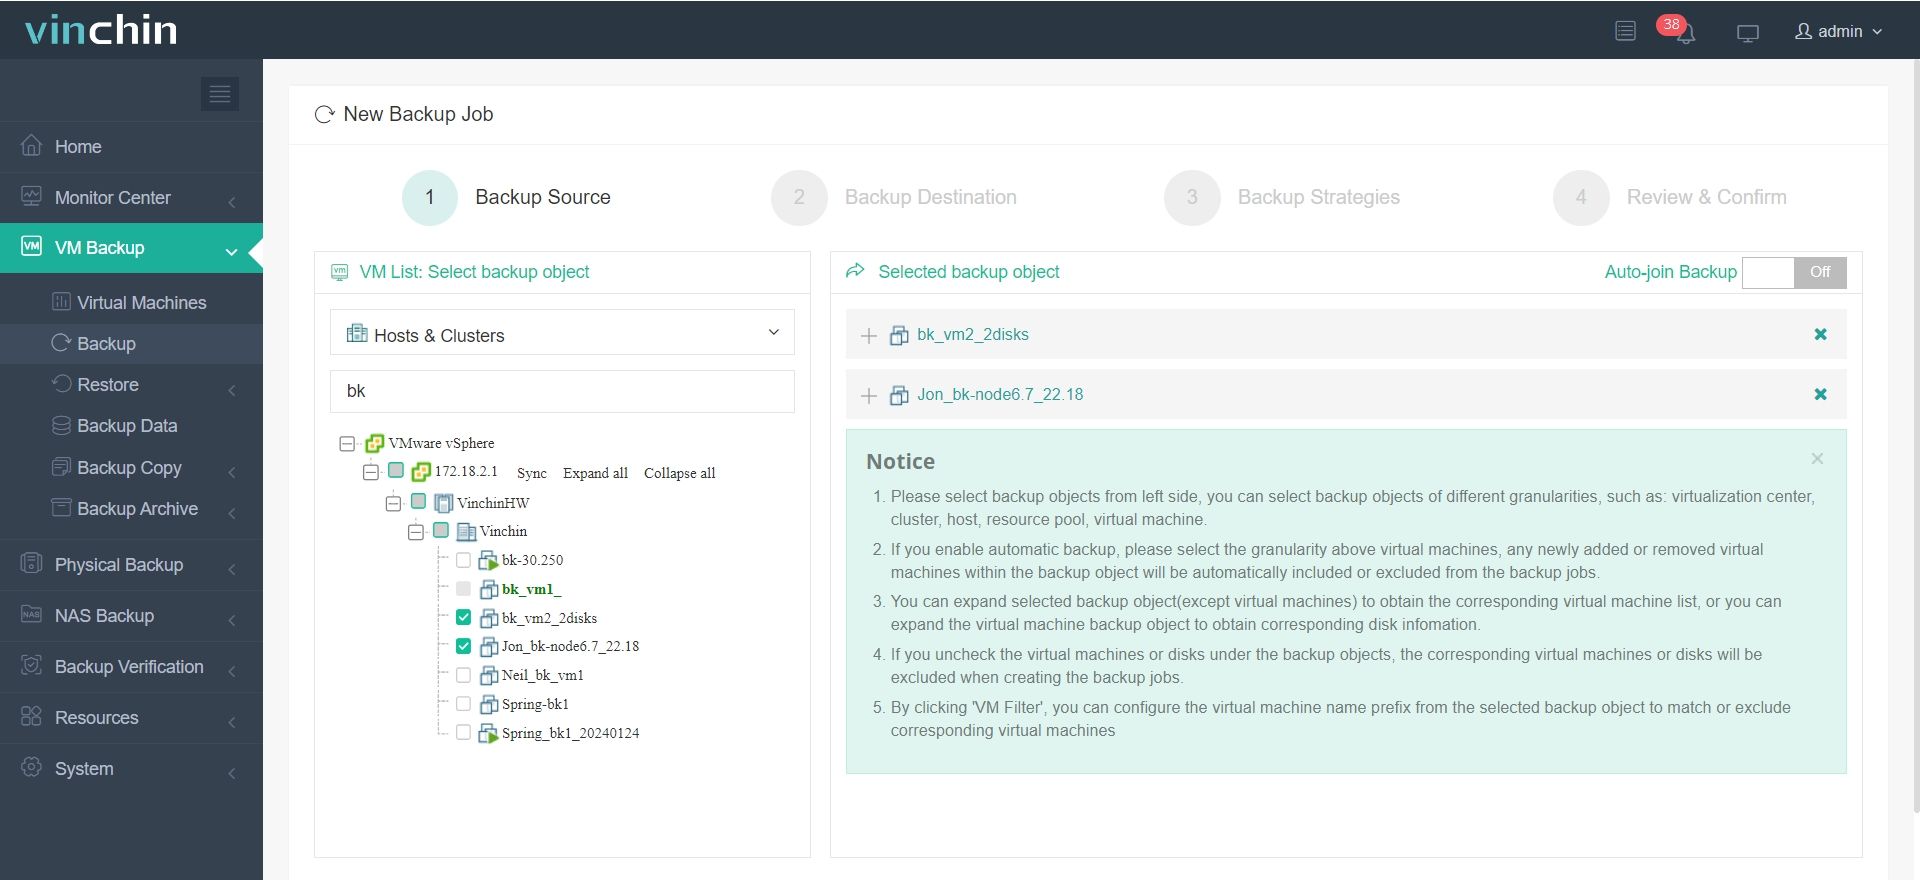
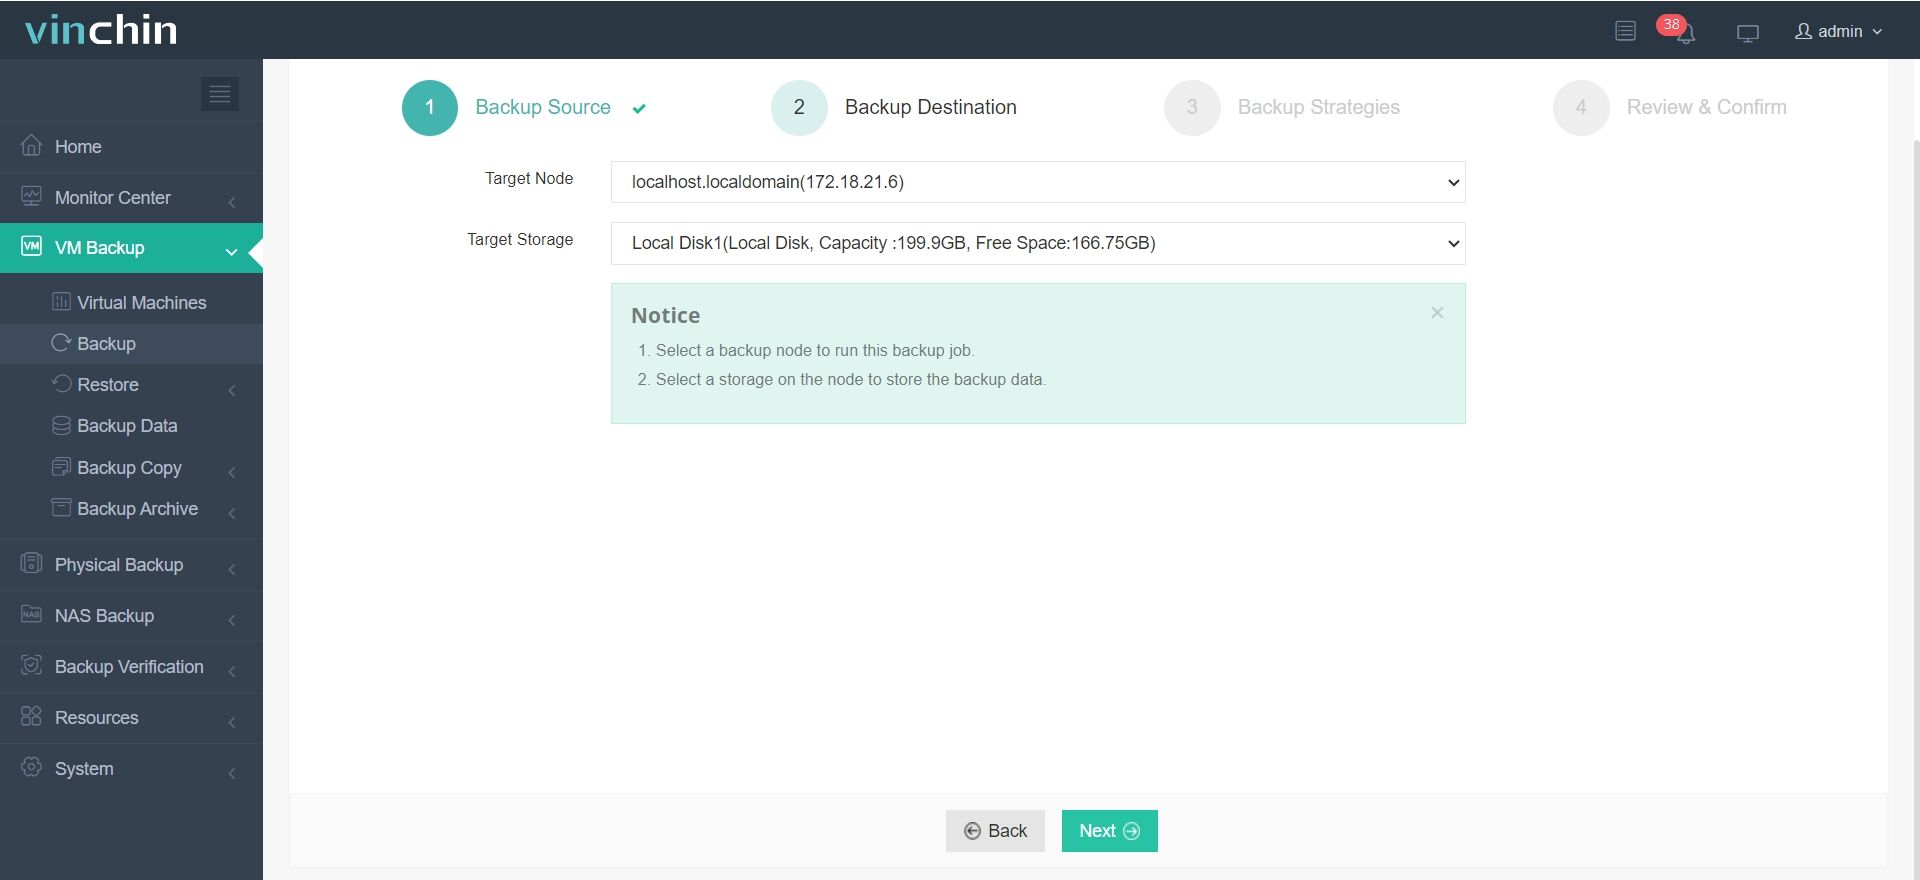
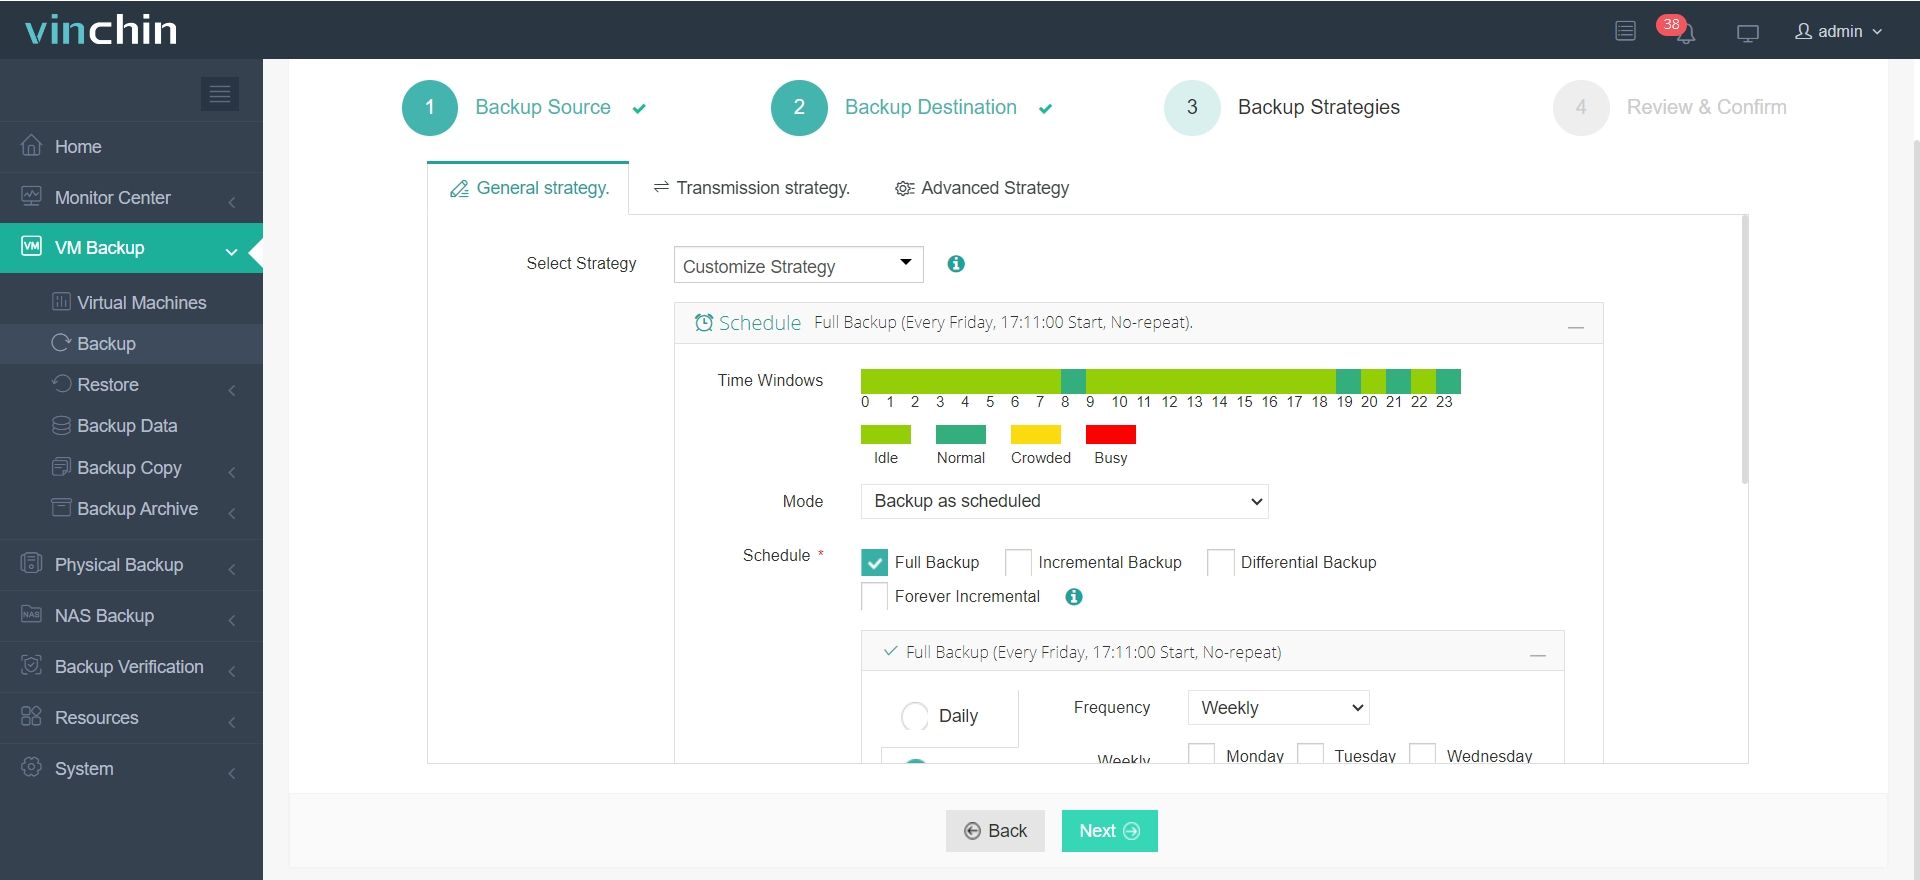
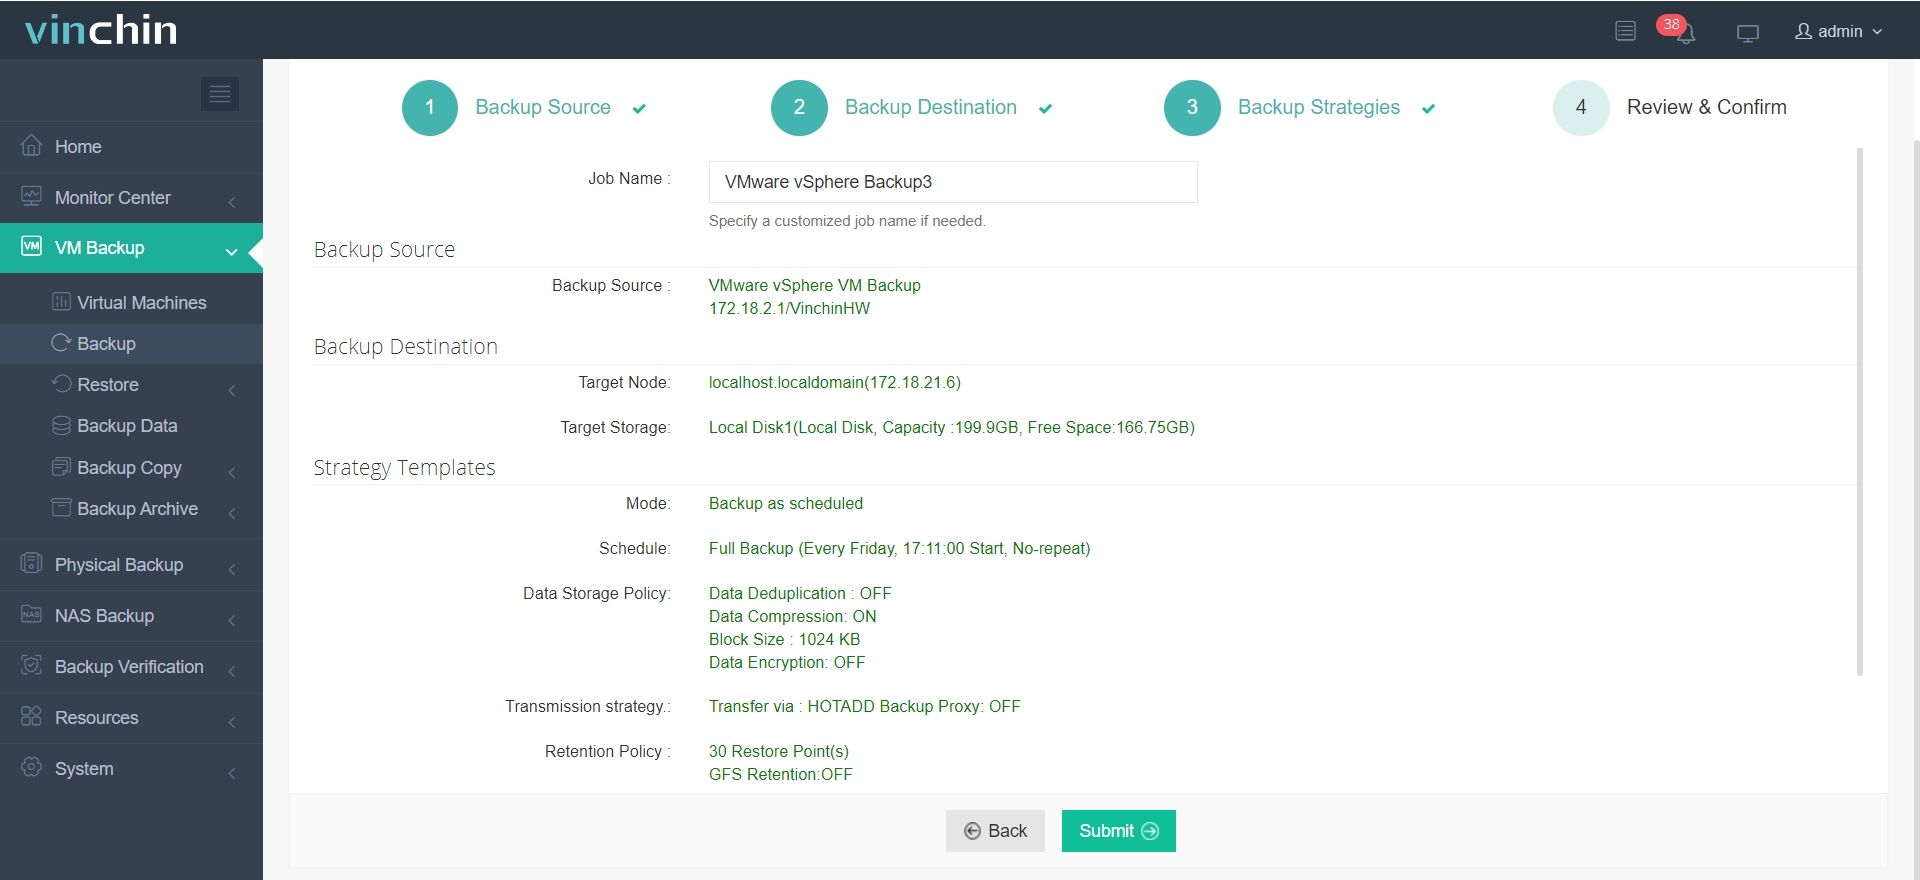
It is very is to use and you can create a VMware backup job in four steps in its user-friendly web console.
1 Select the VMware VM

2 Select the backup storage

3 Select the backup strategies

4 Submit the job

The solution has both a free edition and a 60-day full-featured free trial of the Enterprise version that supports advanced features and more virtualization (15+).
ESXi Bootable USB FAQs
Q1: What minimum USB size is recommended to boot ESXi?
Use a retail USB flash drive of at least 16 GB for boot media (4 GB suffices only for the coredump)
Q2: Can ESXi run entirely from a USB stick?
Yes—ESXi supports USB/SD boot, but VMware advises adding a persistent device for the OSData partition.
Q3: Should I store /scratch on the USB boot device?
No—by default /scratch lives in RAM, so configure a datastore or local disk for persistent scratch storage.
Summary
VMware ESXi has numerous boot choices available, like CD/DVD, and USB flash drives. This article described how to make an ESXi 8.0 bootable USB drive and how to install ESXi from it.
You are now prepared to use virtual machines after successfully installing VMware ESXi. Tough concern yourself about the critical VM data protection at the same time for business continuity guarantees. See the 10 best practices to protect ESXi VMs.
You could try Vinchin Backup & Recovery for fast and easy ESXi backup with no concerns about downtime or disasters.
Share on:


