-
What is a VMware VMDK file?
-
What are the key features of a VMDK file?
-
How to extract data from VMDK file?
-
Best way for backing up and restoring VMware VMs
-
Extract files from VMDK FAQs
-
Conclusion
VMDK files are a crucial component in VMware. These files act as virtual hard disks for virtual machines, containing the operating system, application data, and user files. However, there are times when users need to extract specific files or recover data from VMDK files without booting the VM. This blog will explore various methods and tools used to extract files from VMDK files.
What is a VMware VMDK file?
A VMDK file is essentially a file that contains virtual hard drive data, representing a physical hard drive or logical drive. These files can either be of fixed size (where all space is pre-allocated) or dynamically expanding (where space is only allocated as it is actually used). VMDK files typically contain one or more partitions, each with its own file system. This means that if we want to extract files from a VMDK file, we need to be able to access these partitions and their file systems.
What are the key features of a VMDK file?
Virtual disk image: A VMDK file contains all the data of a virtual machine, including the operating system, program files, user data, etc., just like a physical hard drive.
Disk allocation: There are two types: sparse and flat. A sparse VMDK file initially takes up less disk space and grows as data is added, while a flat VMDK file allocates all the required disk space at the time of creation.
File format: VMDK files can be in a single file format or a split file format, with the latter dividing large files into smaller parts for easier management and storage.
Compatibility: VMDK files are used not only with VMware products (such as VMware Workstation, VMware ESXi, and VMware Fusion) but are also compatible with other virtualization platforms, such as Oracle VirtualBox.
Snapshots and backups: VMDK files support virtual machine snapshots, allowing users to save the state of a virtual machine at a specific point in time. Users can create multiple snapshots and revert to a previous state when needed.
Storage expansion: VMDK files can dynamically expand to meet the growing storage needs of the virtual machine.
How to extract data from VMDK file?
Method 1: Using DiskGenius Software (for Windows VMs)
It might be due to the difference in file systems, as DiskGenius can only read the directory structure of the Ubuntu VM's virtual disk but cannot copy the data inside. However, it can normally read and copy files from the Windows VM's virtual disk.
1. First, open the DiskGenius software and click on the toolbar's "Disk" menu. Choose "Open Virtual Disk File" and locate the VMDK file to open it.
2. Once opened, you can see the directory structure of the virtual disk on the left side of the main interface, and perform various operations on the files on the right side.
3. To extract data, right-click the file and copy it to the specified folder.
Method 2: Using a Working Virtual Machine to Mount the Virtual Disk (for Linux VMs)
1. First, you need a properly running Linux virtual machine. In VMware, select "Edit Virtual Machine Settings," and add a hard disk. Choose the VMDK type you want to open, usually the default SCSI type.
2. Select the original virtual disk file, and make sure to select the VMDK file without the suffix. Complete the disk addition.
3. Start the virtual machine and use the fdisk command to view the disk partitions.
sudo fdisk -l
4. Find the newly added disk in the output; in this case, it is /dev/sdb. You can see that the disk has three partitions, with the largest one, sdb3, being the partition storing files.
Disk /dev/sdb: 50 GiB, 53687091200 bytes, 104857600 sectors
Disk model: VMware Virtual S
Units: sectors of 1 * 512 = 512 bytes
Sector size (logical/physical): 512 bytes / 512 bytes
I/O size (minimum/optimal): 512 bytes / 512 bytes
Disklabel type: gpt
Disk identifier: 8D1FD725-00E4-4AA4-B4EE-453C0986E9B2
Device Start End Sectors Size Type
/dev/sdb1 2048 4095 2048 1M BIOS boot
/dev/sdb2 4096 1054719 1050624 513M EFI System
/dev/sdb3 1054720 104855551 103800832 49.5G Linux filesystem
5. Next, create a mount point and mount the disk.
sudo mkdir /mnt/sdb3
sudo mount /dev/sdb3 /mnt/sdb3
6. Once mounted, you can access the files inside the virtual disk through the mount directory and then transfer the files to the physical machine via FTP or other means.
Method 3: Using 7-Zip (Windows/Linux)
Step 1: Install 7-Zip.
Step 2: Right-click on the VMDK file and choose Open archive from the 7-Zip context menu.
Step 3: Navigate through the directories in the VMDK and extract the files you need.
Note: This method works for simple, non-split VMDK files. If your VMDK is split into multiple files, you may need to combine them first.
Method 4: Using qemu-nbd (Linux)
Step 1: Install the required packages:
sudo apt-get install qemu-utils
Step 2: Attach the VMDK as a network block device:
sudo qemu-nbd --connect=/dev/nbd0 /path/to/your.vmdk
Step 3: Check which partitions are available:
sudo fdisk -l /dev/nbd0
Step 4: Mount the partition you want to extract files from:
sudo mount /dev/nbd0p1 /mnt
Step 5: Copy the files from /mnt to your desired location.
Step 6: Once done, unmount and disconnect the network block device:
sudo umount /mnt
sudo qemu-nbd --disconnect /dev/nbd0
Best way for backing up and restoring VMware VMs
Data is priceless, so it is recommended to regularly back up important data when using virtual machines.
Vinchin Backup & Recovery provides a comprehensive virtual machine backup and recovery solution for VMware, ensuring that data can be quickly recovered in different disaster scenarios. Its efficient data protection system supports automatic backup, multiple storage types, and intelligent compression and deduplication technology to maximize storage utilization and improve backup efficiency.
In particular, Vinchin's granular recovery function allows users to quickly extract individual files or folders from backups without restoring the entire virtual machine. This feature greatly shortens recovery time, especially when specific data needs to be retrieved, and improves the flexibility and efficiency of disaster recovery.
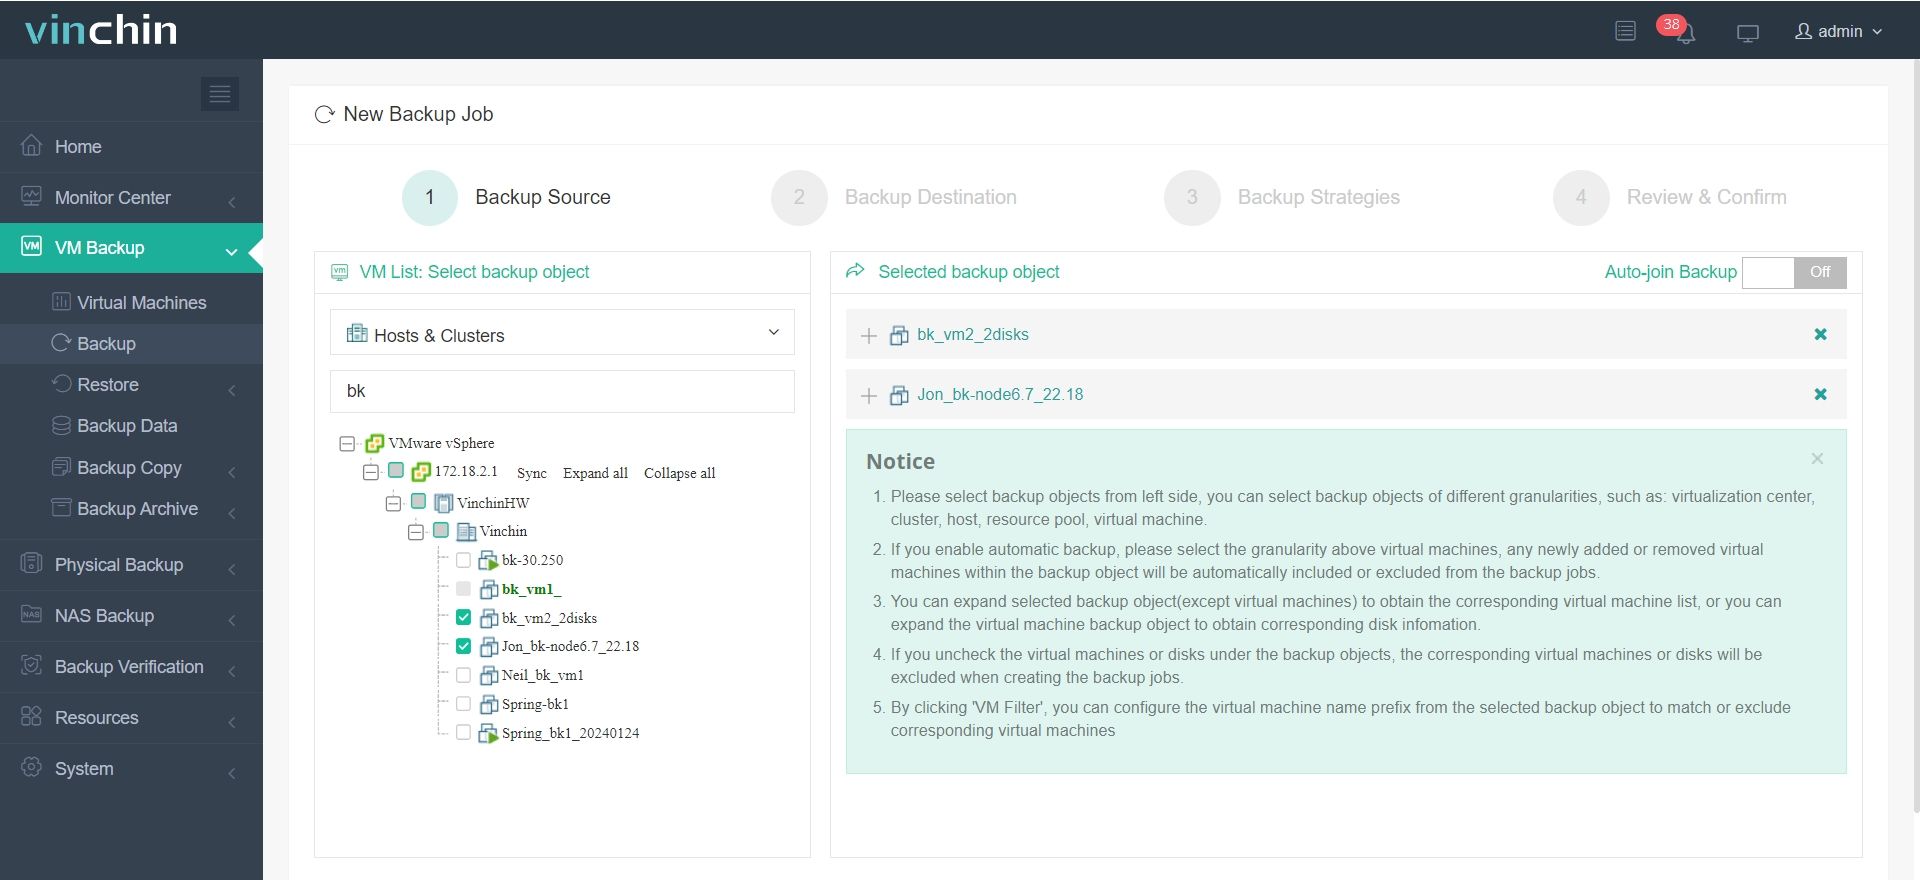
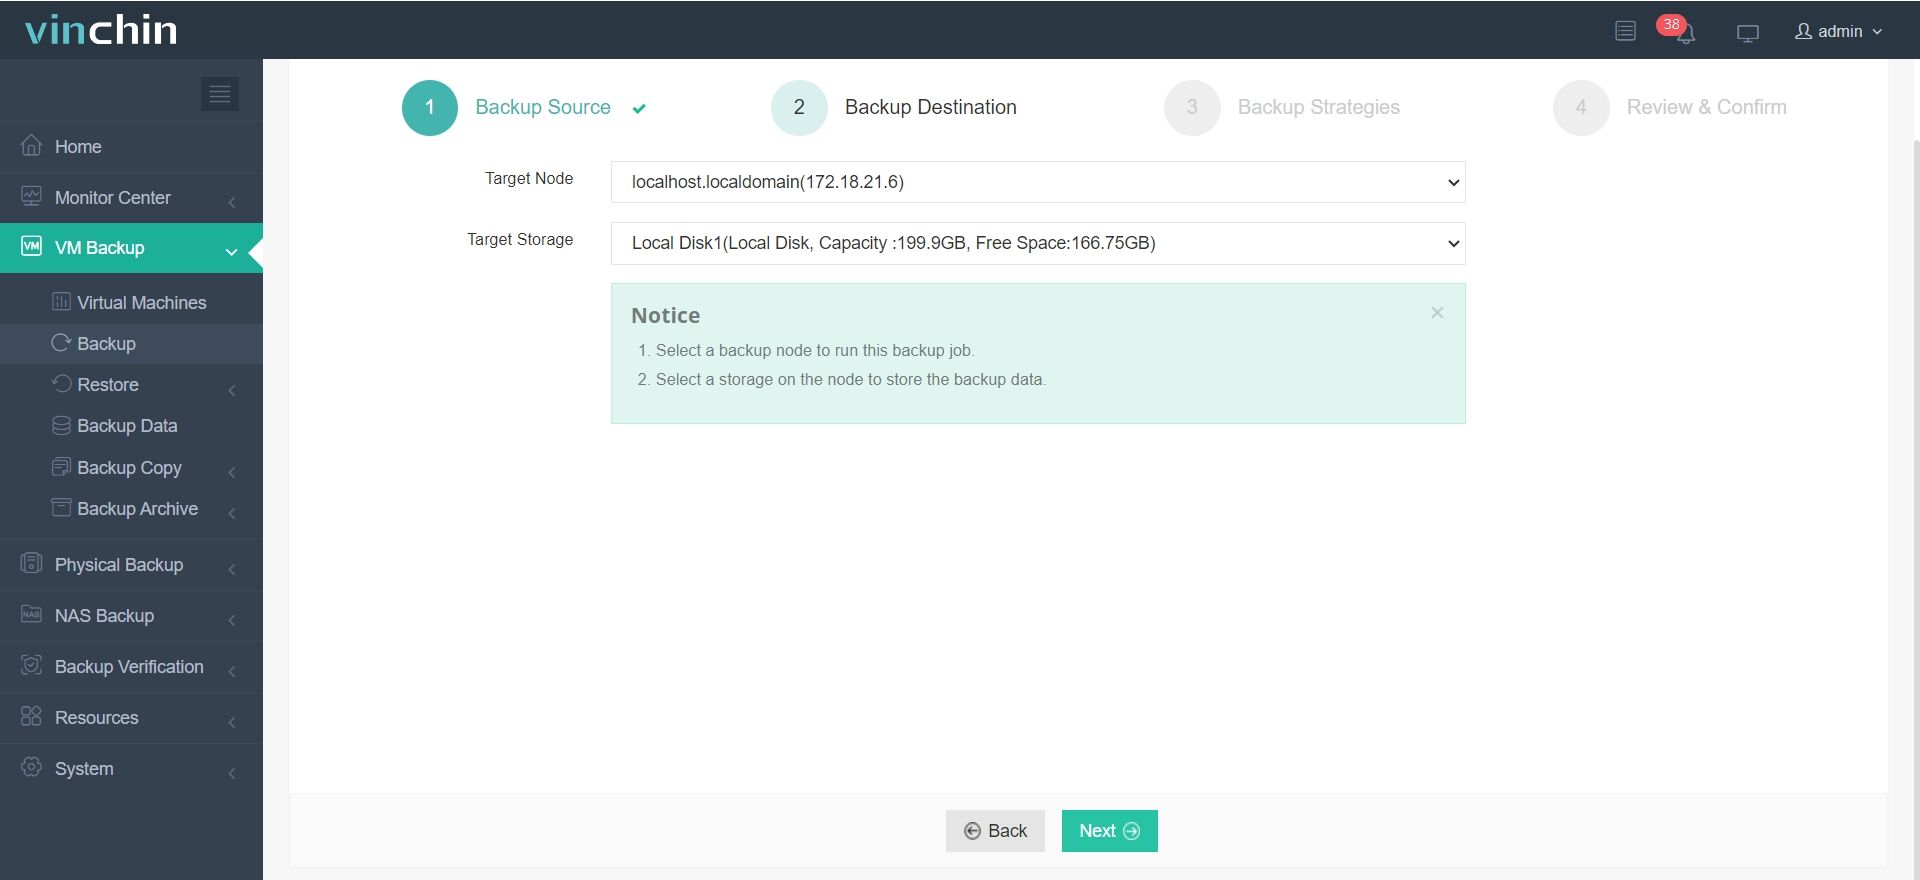
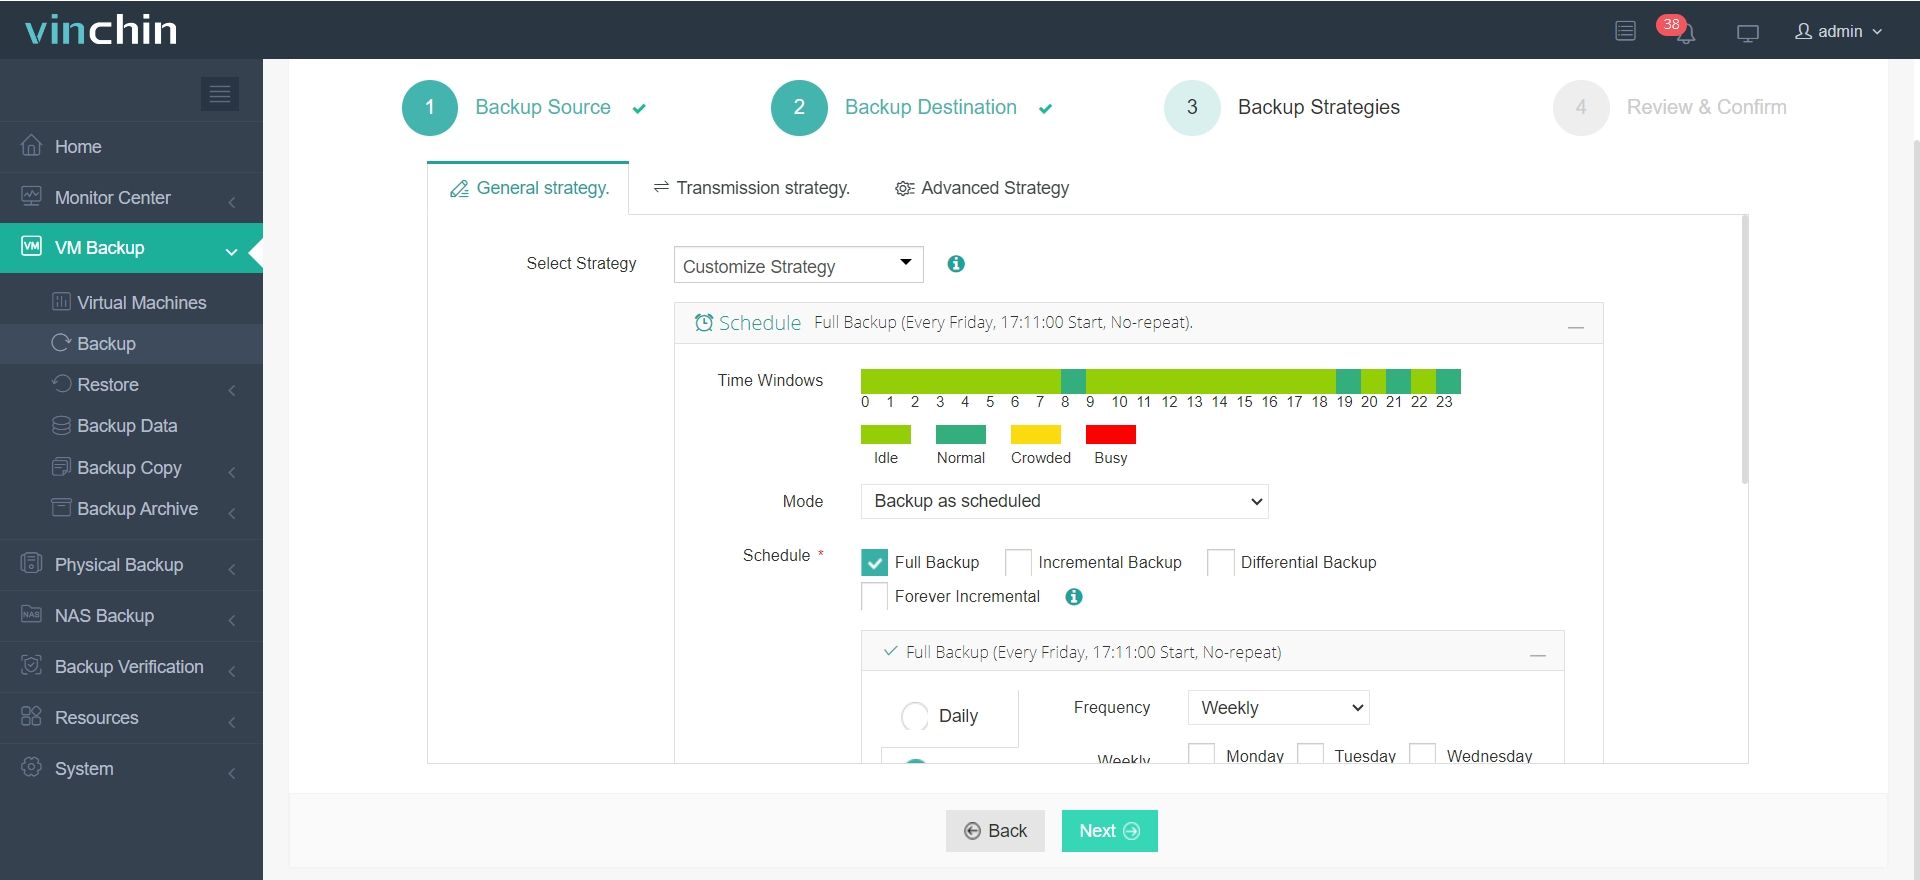
It only takes 4 steps for you to backup VMware VMs:
1. Select the backup object.
2. Select backup destination.
3. Configure backup strategies.
4. Review and submit the job.
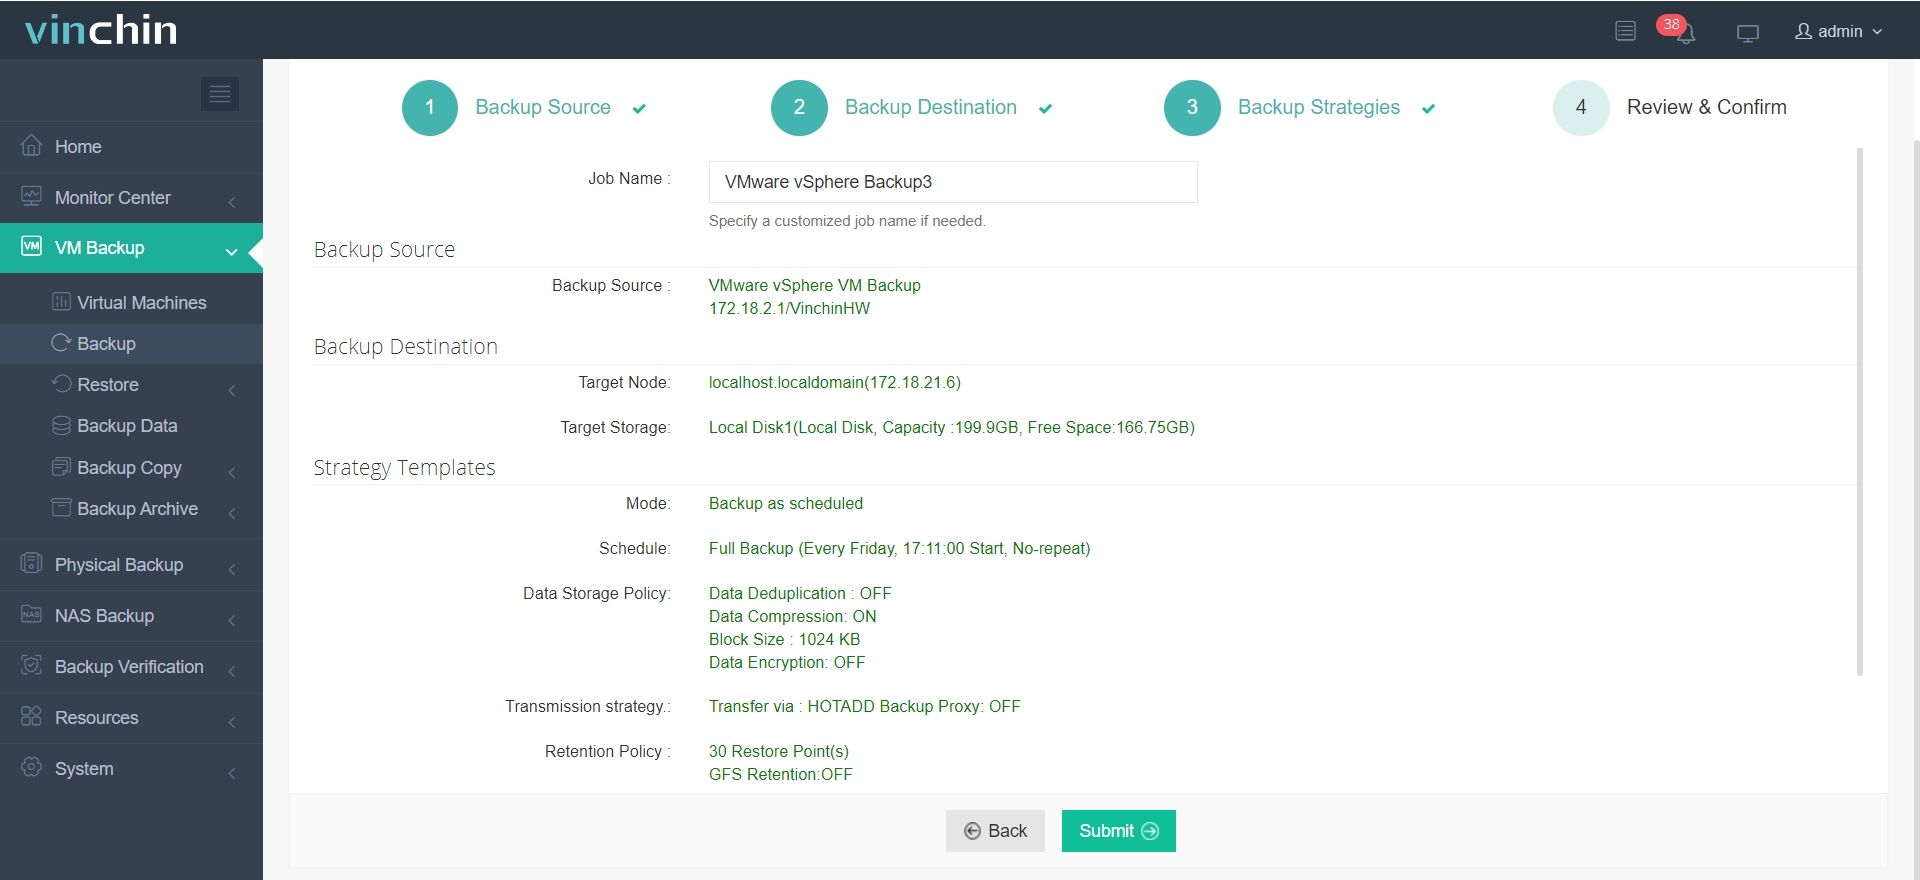
Vinchin also support V2V migration across multiple virtualization platforms. Click the download button below to try the 60-day full featured free trail and explore more advanced features!
Extract files from VMDK FAQs
1. Q: Can I recover deleted files from a VMDK?
A: Yes, file recovery tools like TestDisk or PhotoRec can be used to scan a mounted VMDK for deleted files, provided the VMDK has not been overwritten extensively.
2. Q: How can I convert a VMDK to another format for easier extraction?
A: You can convert a VMDK file to another format (e.g., QCOW2, RAW, VDI) using the qemu-img tool:
qemu-img convert -O <target format> source.vmdk destination.img
Conclusion
By understanding the VMDK structure and leveraging the appropriate tools, extracting data from a VMDK file can be a streamlined process, ensuring minimal downtime and effective data management.
Share on:


