-
What is VMFS?
-
Advantages of VMFS
-
Mounting VMFS in Linux Using vmfs-tools
-
Mounting an Existing VMFS Datastore on a New ESXi Host
-
Comprehensive protection for VMware environments
-
Mount VMFS FAQs
-
Conclusion
If your ESXi host crashes, but the server's local disks (disks) are still available, you can always copy the virtual machine files (data drives and configuration files) from the VMFS datastore and run the VM on a different server (even on VMware Workstation or Hyper-V). The main problem is that common operating systems (Windows and Linux) do not recognize partitions with the VMFS file system by default, because they do not have VMFS drivers. In this article, we will see how to access virtual machine files on disks with the VMFS file system.
What is VMFS?
VMware Virtual Machine File System (VMFS) is a high-performance cluster file system that extends the application of virtualization technology beyond a single system. VMFS allows multiple virtual machines to access a consolidated cluster storage pool, significantly increasing resource utilization. It serves as the foundation for virtualization across multiple servers, enabling various services such as VMware vMotion, Distributed Resource Scheduler, and VMware High Availability.
Features of VMFS
An automatic file system with a hierarchical directory structure
Optimization for virtual machines in a cluster environment
Lock management and distributed logical volume management
Dynamic expansion of data storage across multiple storage partitions
A cluster file system with logging for rapid recovery
Encapsulating the entire virtual machine state in a single directory
Advantages of VMFS
As an intelligent and automated storage interface for virtual machine environments, VMFS provides automatic cluster file system functionality and intelligent cluster volume management. The numerous advantages of VMFS make it particularly suitable as a cluster file system in virtual environments.
Unique Features that Ensure Application Service Levels
Traditional file systems only allow one server to read or write the same file at a given time, while VMware vStorage VMFS is a cluster file system that utilizes shared storage to allow multiple VMware ESX instances to simultaneously read and write to the same storage location.
Seamless Management of Virtual Machine Storage
VMware vStorage VMFS allows multiple ESX installations to concurrently read and write to the same storage location. ESX servers can be added or removed from a VMFS volume without disruption. It dynamically adjusts block sizes and addressing to accommodate growing files and supports automatic LUN discovery and mapping for simplified storage management. VMFS also optimizes virtual machine I/O with adjustable volume, disk, file, and block sizes. Its distributed logging enables faster and more reliable VM recovery in case of server failure, and all versions of VMware Infrastructure include this cluster file system.
Simplified Disaster Recovery
Since VMFS stores the files of a virtual machine in a single subdirectory, processes such as disaster recovery, testing, and cloning are greatly simplified. In the event of a disaster, the complete state of a virtual machine can be remotely mirrored, making it easy to recover. By automatically handling virtual machine files, VMFS can encapsulate an entire virtual machine, making it easy to become part of a disaster recovery solution.
Mounting VMFS in Linux Using vmfs-tools
Mounting a VMFS volume on a non-VMware system like Linux requires the installation of vmfs-tools. This method is ideal for accessing VMFS volumes when VMware environments are unavailable, or when migrating to a different hypervisor, such as Proxmox.
1. Install vmfs-tools
On Ubuntu or Debian, you can install vmfs-tools using the following command:
sudo apt-get install vmfs-tools
2. Identify the VMFS Partition
Use fdisk or lsblk to identify the VMFS partition:
sudo fdisk -l
The VMFS partition is usually labeled as VMFS, and its type might be fb.
3. Mount the VMFS Volume
Once you have identified the partition, use the following command to mount it:
sudo vmfs-fuse /dev/sdX /mnt/vmfs
Replace /dev/sdX with the actual device name, and /mnt/vmfs with the desired mount point.
4. Access the Mounted Files
Navigate to the mount point to access the VMDK files and other VM data:
cd /mnt/vmfs
ls
5. Unmounting the VMFS Volume
Once you are done, you can unmount the volume using:
sudo umount /mnt/vmfs
Mounting an Existing VMFS Datastore on a New ESXi Host
The most common way to access data on the VMFS partition of a failed server is to connect its disks to a new ESXi server. In this way, you can reconnect the physical hard drives and LUNs from the storage device (via FC or iSCSI).
The new ESXi host must correctly recognize the attached VMFS datastore for you to access the files on it. Follow the steps below to connect the existing VMFS storage to a new ESXi host without formatting it:
1. Use the vSphere Web Client to connect to the new ESXi server;
2. Attach the drive to the new server and run a storage rescan;
3. Go to Configuration > Datastore section and select the option to create a new datastore;
4. Select the storage type: Disk or LUN;
5. From the list of available devices, select the connected drive (LUN) with the VMFS storage;
6. Choose the connection method. Select the option to keep the existing signature;
7. Click the Finish button;
8. Go to the host's Storage section. Select the connected storage. Click the Datastore Browser button to display its contents;
9. You can now find the necessary “.vmx” files, register them on the host, and immediately start the critical virtual machines.
Comprehensive protection for VMware environments
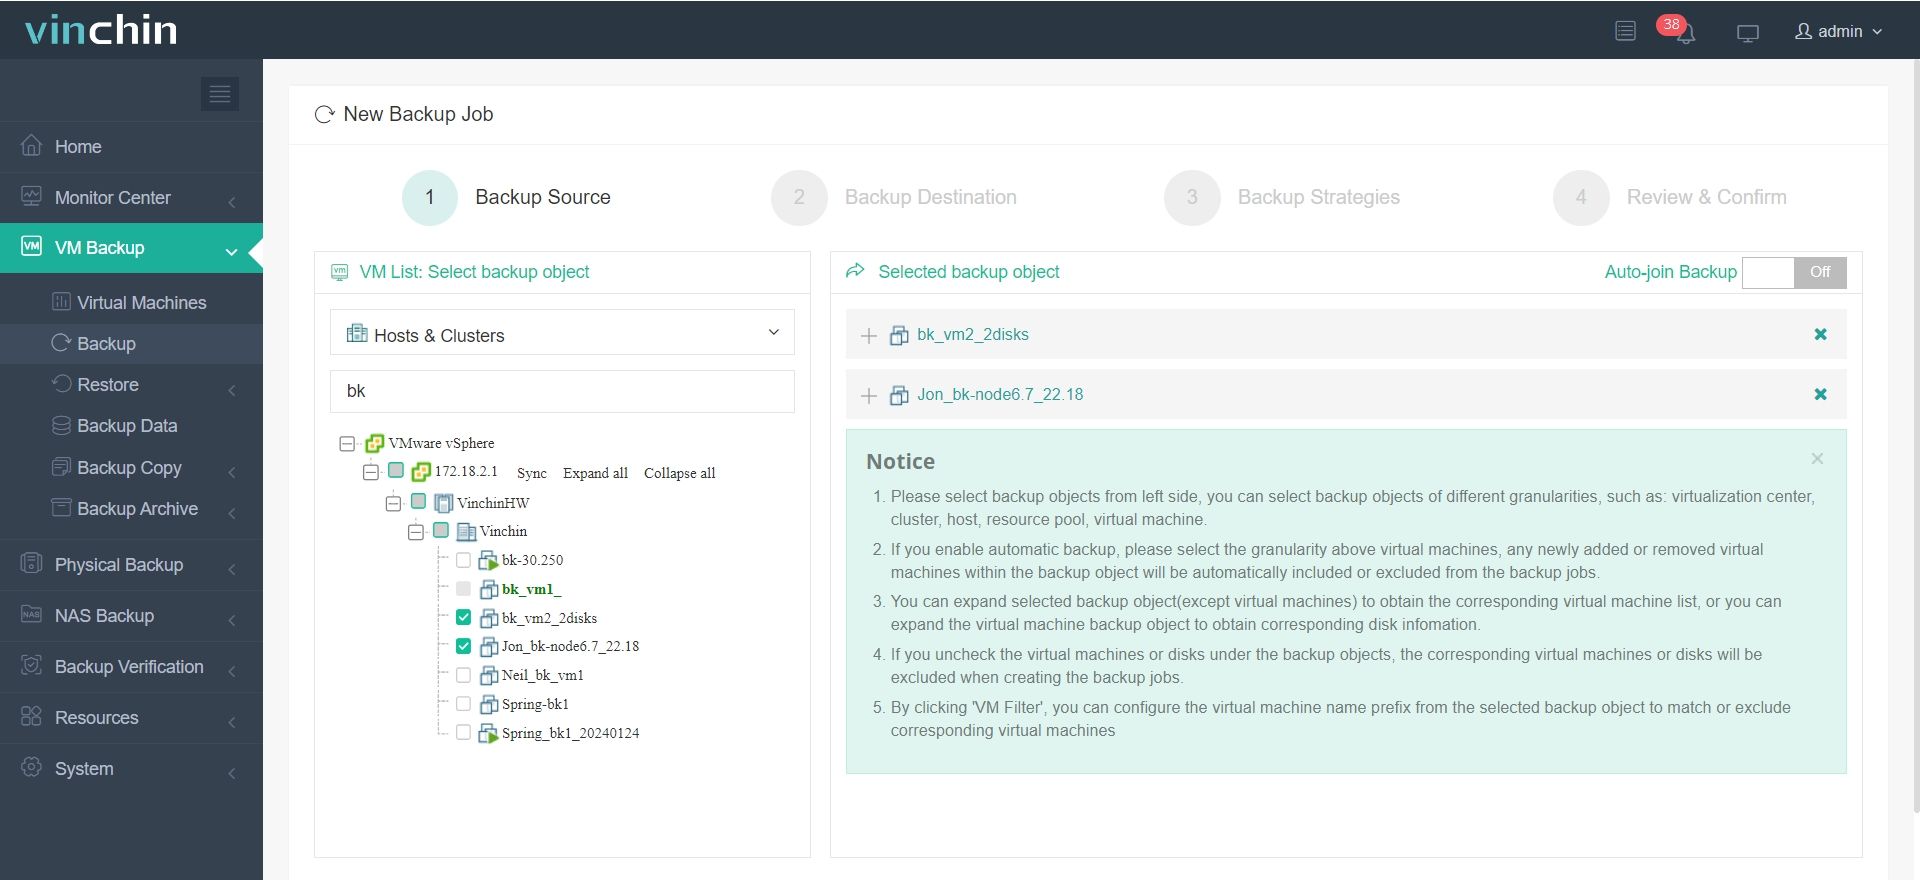
Vinchin Backup & Recovery provides comprehensive data protection for VMware environments, offering features such as backup, recovery, replication, and migration for VMware virtual machines. It utilizes deduplication and compression technologies to significantly reduce storage consumption, improving overall storage efficiency. With granular recovery capabilities, users can quickly restore entire virtual machines or individual files, ensuring business continuity. Additionally, vinchin supports various backup strategies, including incremental, differential, and full backups, allowing users to choose the most suitable approach for different scenarios, enhancing the security and stability of VMware virtualized environments.
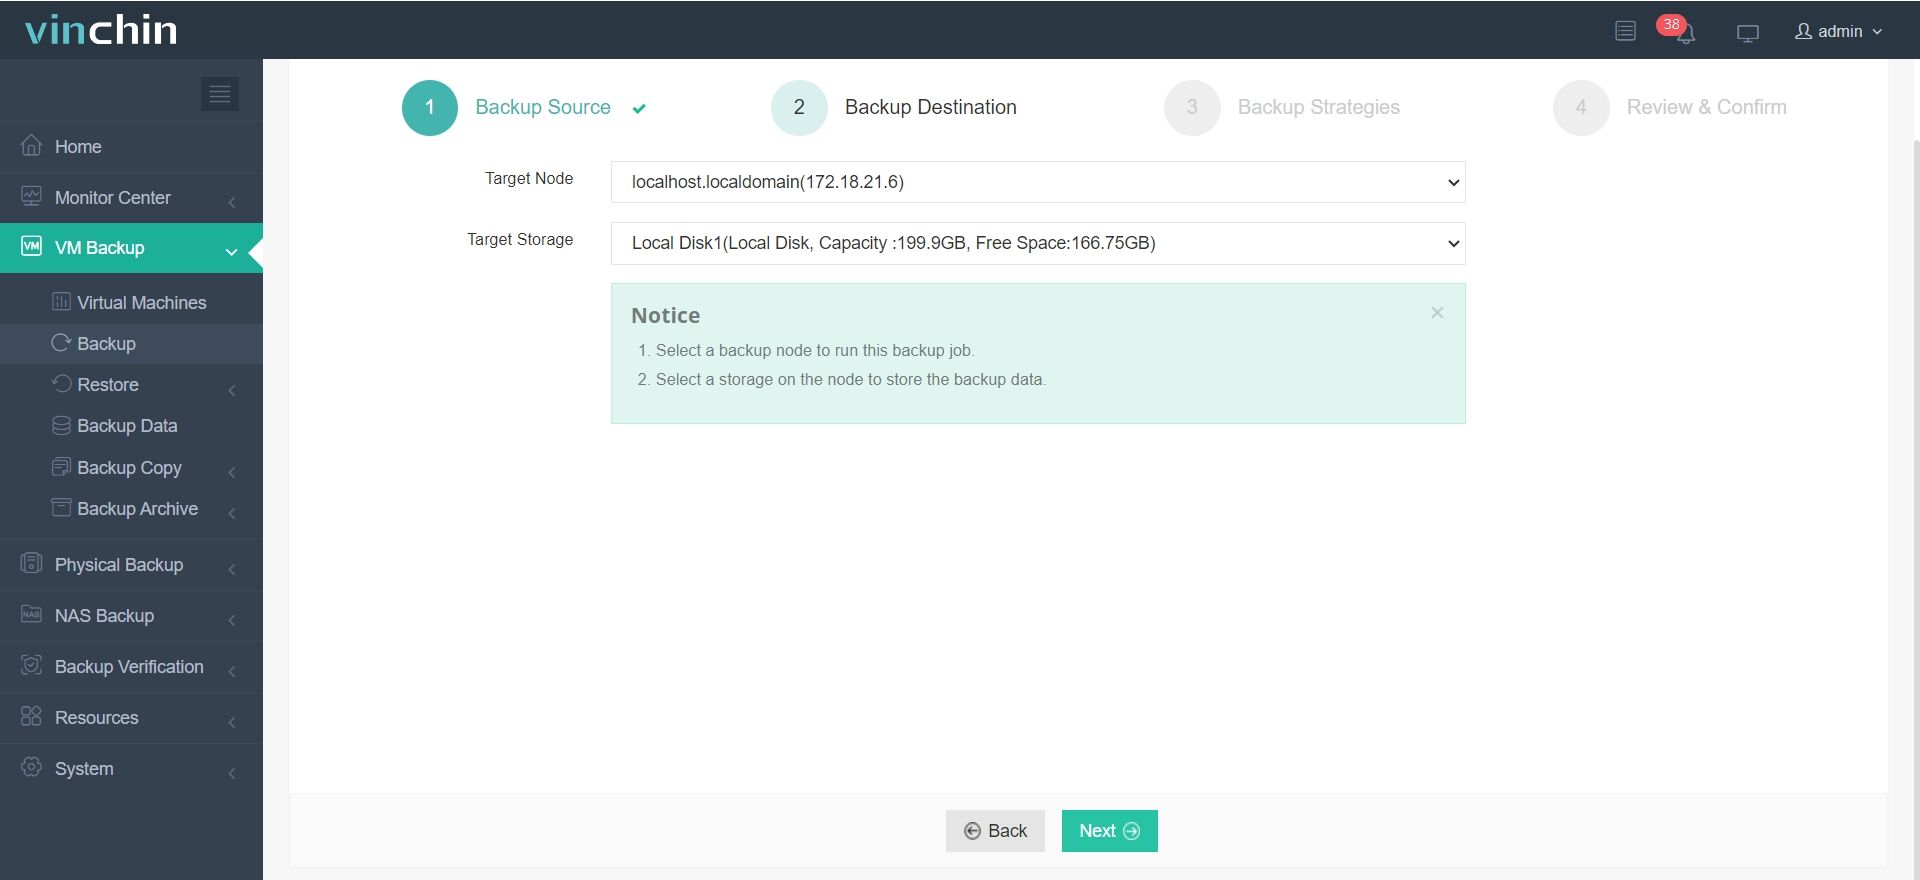
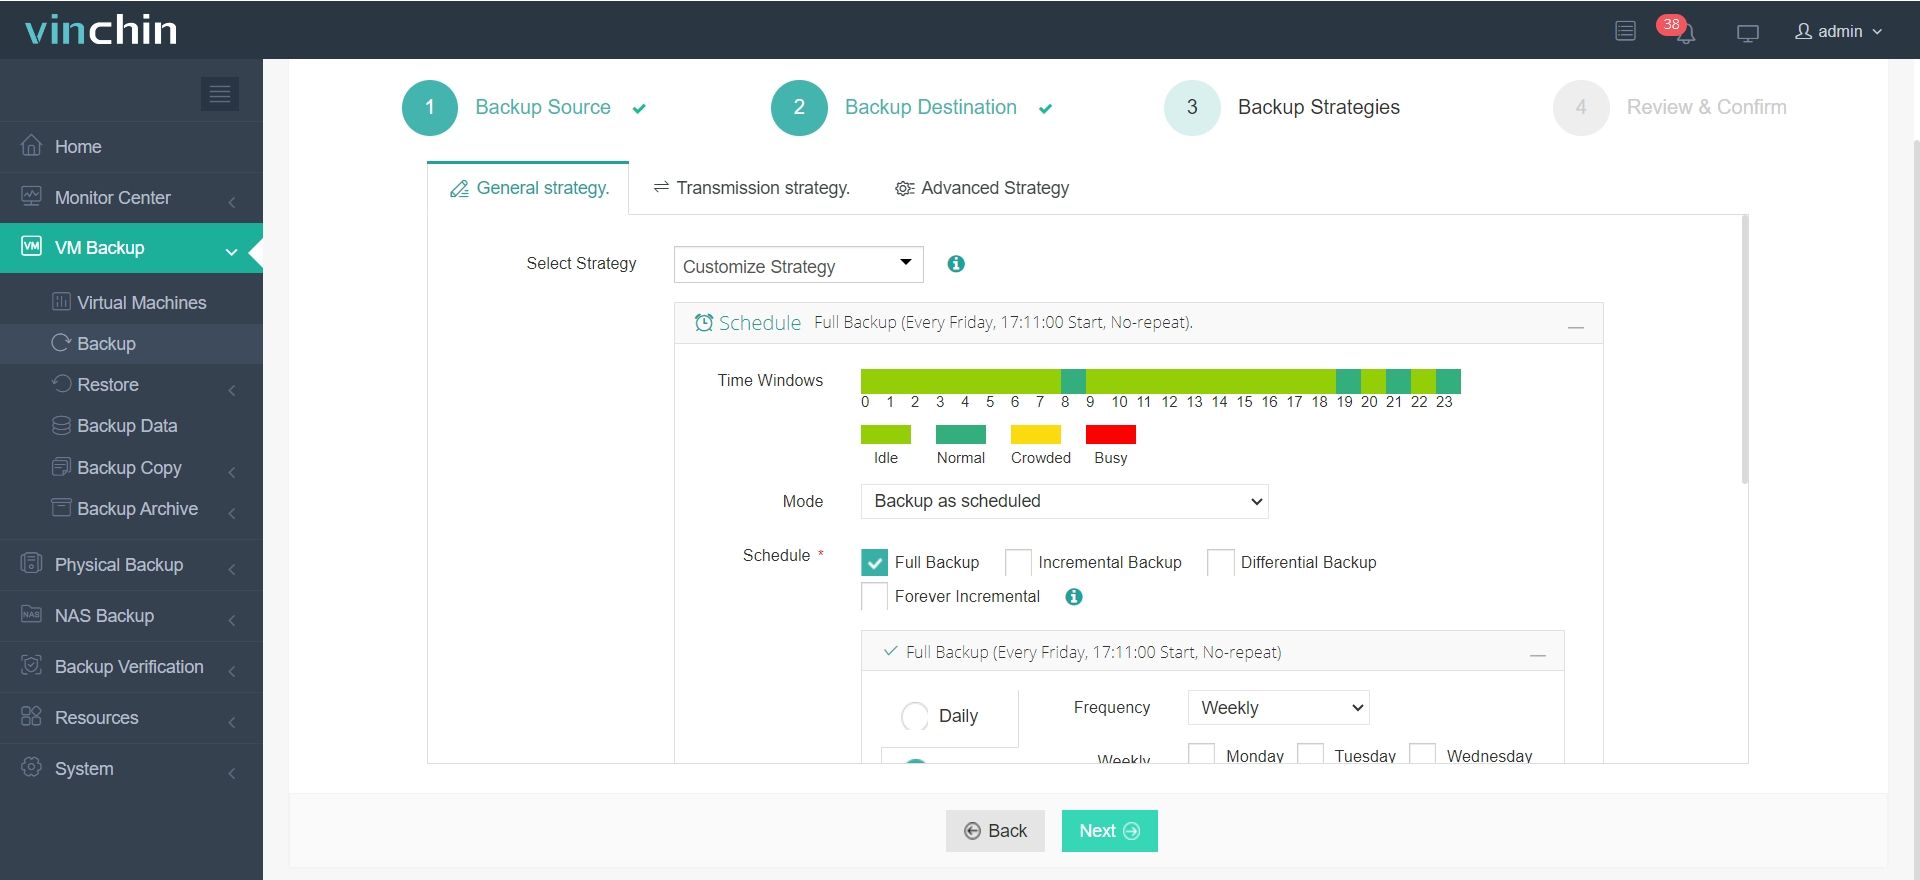
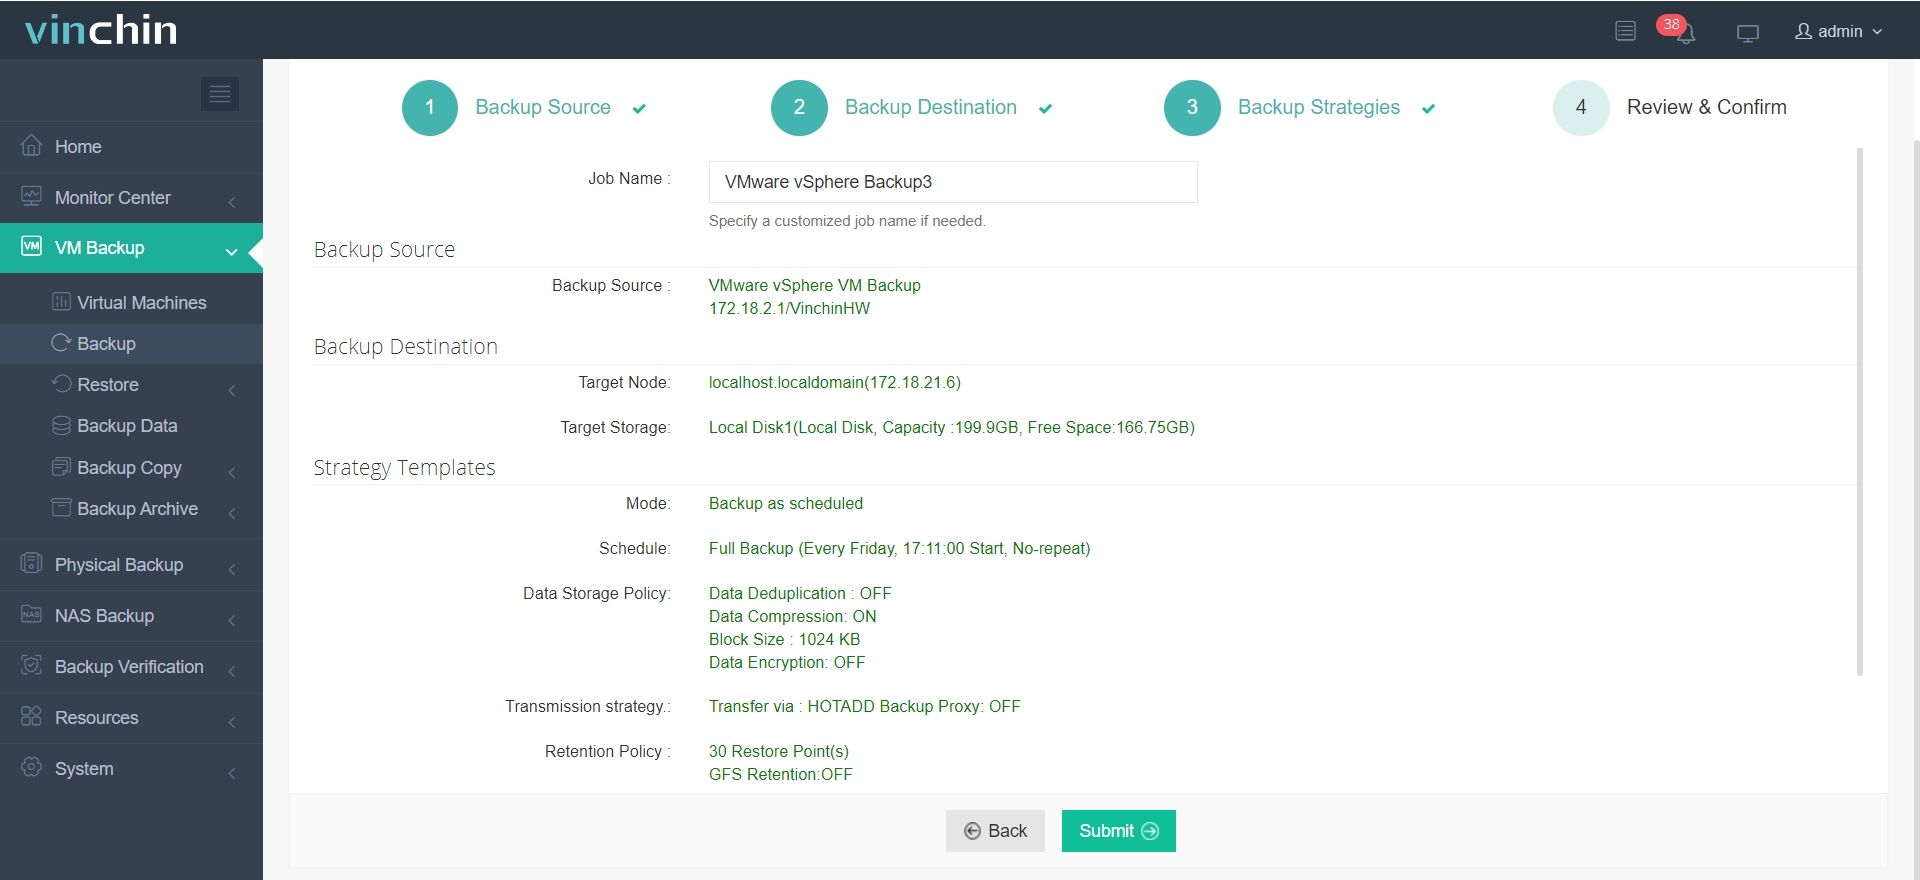
It only takes 4 steps for you to backup VMware VMs:
1. Select the backup object.

2. Select backup destination.

3. Configure backup strategies.

4. Review and submit the job.

Try the 60-day full featured free trail of Vinchin Backup & Recovery now to easily protect your VMware data and achieve automated backup and fast recovery!
Mount VMFS FAQs
1.Q: Can I mount VMFS on a non-VMware hypervisor like Proxmox?
A: Yes, it is possible to mount VMFS on Proxmox using vmfs-fuse.
2.Q: What is the difference between VMFS versions (e.g., VMFS 5 vs. VMFS 6)?
A: VMFS 5 and VMFS 6 are both versions of VMware's file system used for storing virtual machine data. VMFS 6 introduced improvements like automatic space reclamation (using UNMAP) and support for 4K Native Drives. VMFS 5 uses a 1MB block size, while VMFS 6 can use a smaller 512-byte block size.
Conclusion
Mounting VMFS volumes is an essential process for managing storage in virtualized environments, particularly when handling tasks like data recovery, VM migration, or troubleshooting. VMware provides native tools within vSphere and ESXi for seamless volume management, but in cases where you need to access VMFS from non-VMware systems, solutions like “vmfs-tools” on Linux come into play. Each method offers distinct advantages depending on your environment and requirements.
Share on:


