-
What is a PST file
-
How to Import and Export Archived Exchange Mail to PST?
-
Second Line of Defense to Protect Exchange Server
-
Restore Exchange Mailbox to PST FAQs
-
Conclusion
Microsoft Exchange Server is an essential email and collaboration tool in modern enterprises. Enterprise users rely on Exchange daily for email communication, calendar scheduling, contact management, and more. In backup and recovery strategies, it is sometimes necessary to export Exchange mailboxes to PST (Personal Storage Table) files for purposes such as archiving, migration, compliance investigations, or data recovery.
What is a PST file
PST (Personal Storage Table) is a file format used by Microsoft Outlook to store data, primarily including emails, calendars, contacts, tasks, and other information. It is commonly used to store email data from Outlook on a local computer, allowing users to perform backups, archiving, or data migration. When mailbox space is insufficient, users can archive old emails to a local PST file, thereby freeing up server space. Unlike OST files (Offline Storage Table), PST files are usually manually created to independently store data and can be imported into Outlook on different devices for access. In addition, PST files support large storage capacity; Outlook 2007 and later versions support file sizes of up to 50GB by default. Users can also set a password for PST files to enhance data security.
How to Import and Export Archived Exchange Mail to PST?
Step 1: Create an Exchange Role Group and Add It to the Mailbox Import Export Management Role
Use the following command to create a role group named "Enterprise Mail Support," assign it the "Mailbox Import Export" role permissions, and add the member `exadmin` to it.
New-RoleGroup –Name "Enterprise Mail Support" -Roles "Mailbox Import Export" -Members exadmin -Description "Import Export_Enterprise Support"
To delete the role group, use the command:
Remove-RoleGroup -Identity "Enterprise Mail Support"
Verify the role group:
get-RoleGroup -Identity "Enterprise Mail Support"
Step 2: Create a Shared Folder
To export or import mailboxes, you must first create a network shared folder. You need to grant the “Exchange Trusted Subsystem” group read/write permissions to the network share used for exporting or importing mailboxes. If you do not grant this permission, you will receive an error message indicating that Exchange cannot connect to the target mailbox.
Step 3: Create a Single User Mail Export Request
Use the following command to export the archive mailbox mail of a user to a PST file:
New-MailboxExportRequest -Mailbox exadmin -IsArchive -FilePath "\\127.0.0.1\PST\exadmin.pst"
Step 4: Import the Exported PST File to the User's Primary Mailbox
If the target folder for importing is not specified, the default is to import into the `#Inbox#` (Inbox) of the user's primary mailbox. Any user-defined folders in the PST file’s Inbox will be created in the primary mailbox Inbox (if they do not already exist). If a mail item already exists in the primary mailbox, duplicates are automatically skipped during the import process.
Delete Completed Mail Import Requests
To delete completed mailbox import requests, run the following command:
Get-MailboxImportRequest –Status Completed | Remove-MailboxImportRequest
Delete Completed Mail Export Requests
To delete completed mailbox export requests, run the following command:
Get-MailboxExportRequest –Status Completed | Remove-MailboxImportRequest
Batch Export Archived Mailboxes to PST Files
Export PST Files in Bulk Based on Database
Use the script `Export-Mail_DB.ps1` to export user archive mailbox data in bulk based on the database. The PST files are stored in directories named after each database.
Prerequisites for Running the Script:
1. Manually create a shared directory and grant the Exchange Trusted Subsystem full access permissions.
2. The operating account must belong to the "Mailbox Import Export" role group.
Script Content:
## Create directories in bulk using database names as folder names
foreach ($folder in Get-MailboxDatabase db* ) {mkdir \\localhost\pst\$folder\ }
## Export archive mailbox emails to PST files in bulk, naming PST files as "Username.pst"
foreach ($database in get-mailboxdatabase) {
    foreach ($Mailbox in Get-Mailbox -Database $database -Archive) {
        $b=$Mailbox.Alias;
        New-MailboxExportRequest -Mailbox $a -FilePath "\\localhost\pst\$db\$b.pst" -IsArchive
    }
}
Export PST Files in Bulk Using a CSV File
Use the script `Export-Mail_CSV.ps1` to export archived emails of mailbox users listed in a CSV file to PST files in bulk.
Important Notes Before Running the Script:
1. Manually create a shared directory and grant the Exchange Trusted Subsystem full access permissions.
2. The operating account must belong to the "Mailbox Import Export" role group.
Prepare the CSV file in advance (use the command below to generate it, then adjust the format as needed):
get-mailbox -Archive -Database DB01 | ft name,Alias,Sam* > c:\2014.csv
Script Content:
$mail  = import-csv -path "c:\test01.csv"
## Iterate through the CSV file contents
Foreach ($user in $mail) {
    $Alias = $user.SamAccountName
    ## Bulk export archive mailbox data to the shared directory, creating PST files named after the usernames
    New-MailboxExportRequest -IsArchive -Mailbox $Alias -FilePath "\\127.0.0.1\PST\$Alias.pst"
}
Batch Import PST Files to Users' Primary Mailboxes
Use the script `ImportMailbox.ps1` to import PST files into users' primary mailboxes. The script automatically recognizes PST file names and imports the identified files into the corresponding mailbox accounts.
Script Content:
Dir \\localhost\PST\*.pst | %{ New-MailboxImportRequest -Mailbox $_.BaseName -FilePath $_.FullName}Check Mail Import and Export Request Status
Use the following commands to check the status of import requests:
Get-MailboxExportRequest | Get-MailboxExportRequestStatistics
Get-MailboxImportRequestStatistics -Identity 'contoso.com/Exchangeuser/test\MailboxImport1' | fl TargetMailboxIdentity,EstimatedTransferSize,EstimatedTransferItemCount,BytesTransferred,ItemsTransferred,PercentComplete
Automate Script Execution Using Windows Task Scheduler
1. Open Task Scheduler in Administrative Tools.
2. Select Create Task.
3. Enter the task name.
4. Choose New Trigger.
5. Set the task runtime.
6. Create a new action.
7. Enter the following command in the Program or Script field:
C:\Windows\System32\WindowsPowerShell\v1.0\powershell.exe -noexit -command ". 'C:\Program Files\Microsoft\Exchange Server\V14\bin\RemoteExchange.ps1'; Connect-ExchangeServer –auto; .'C:\Export-Mailbox_DB.ps1'"
Second Line of Defense to Protect Exchange Server
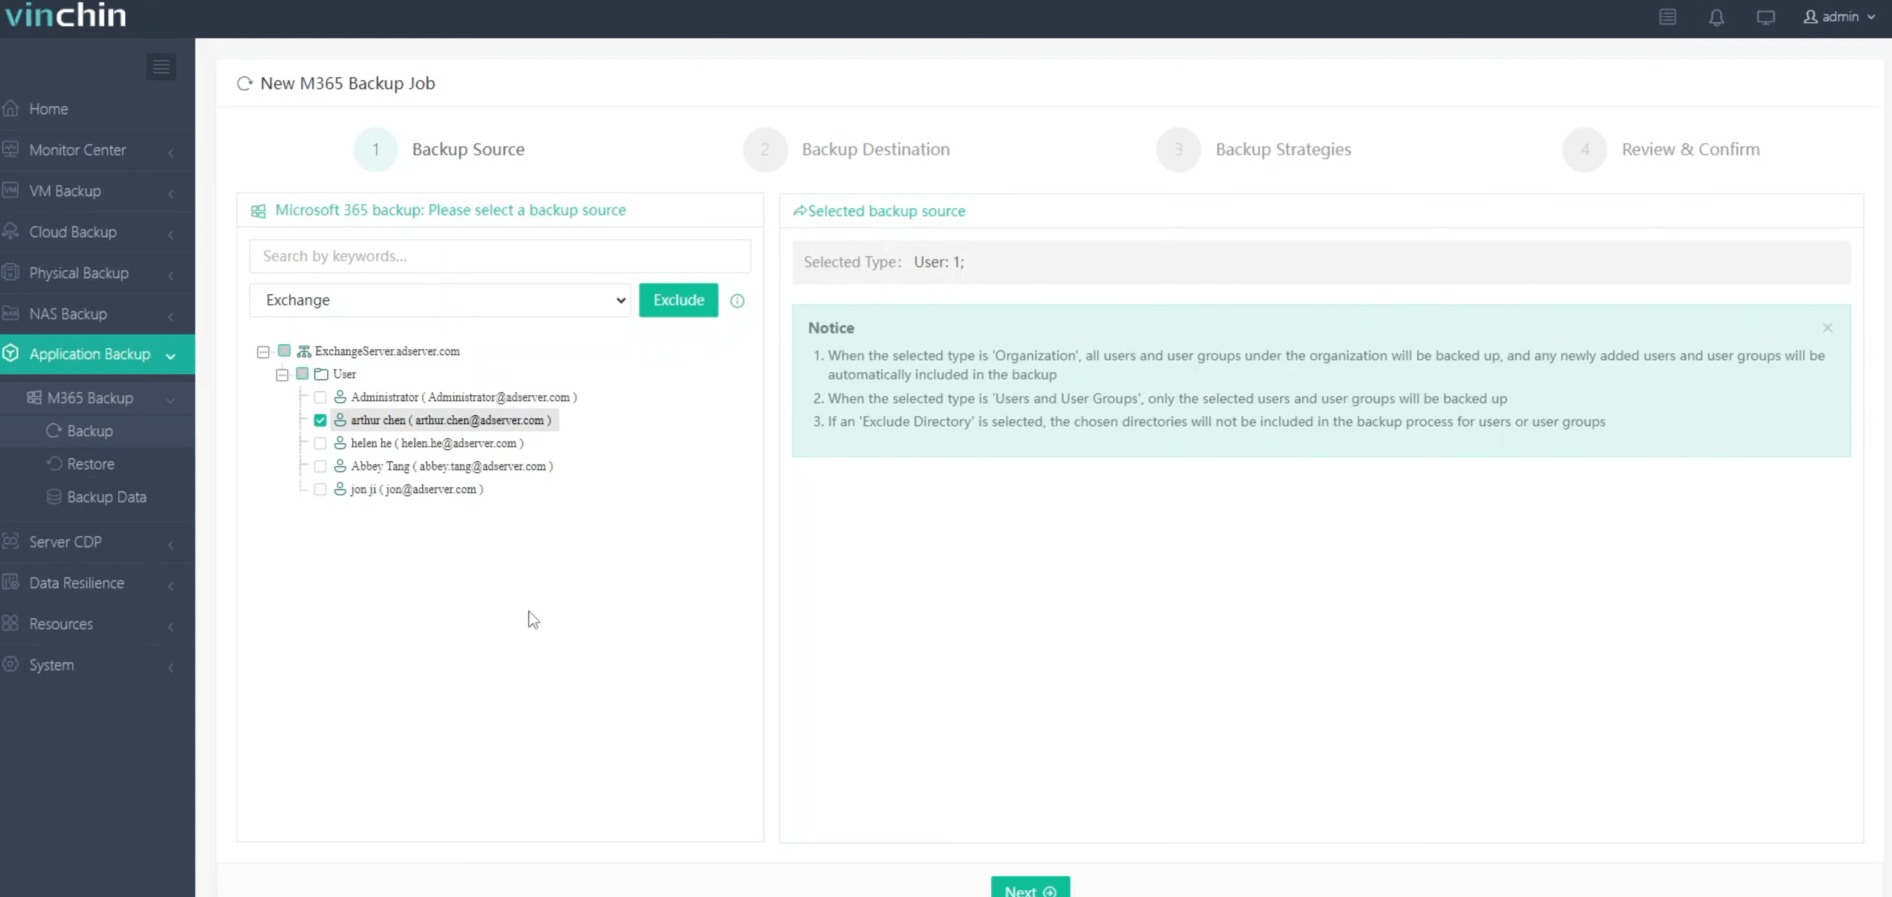
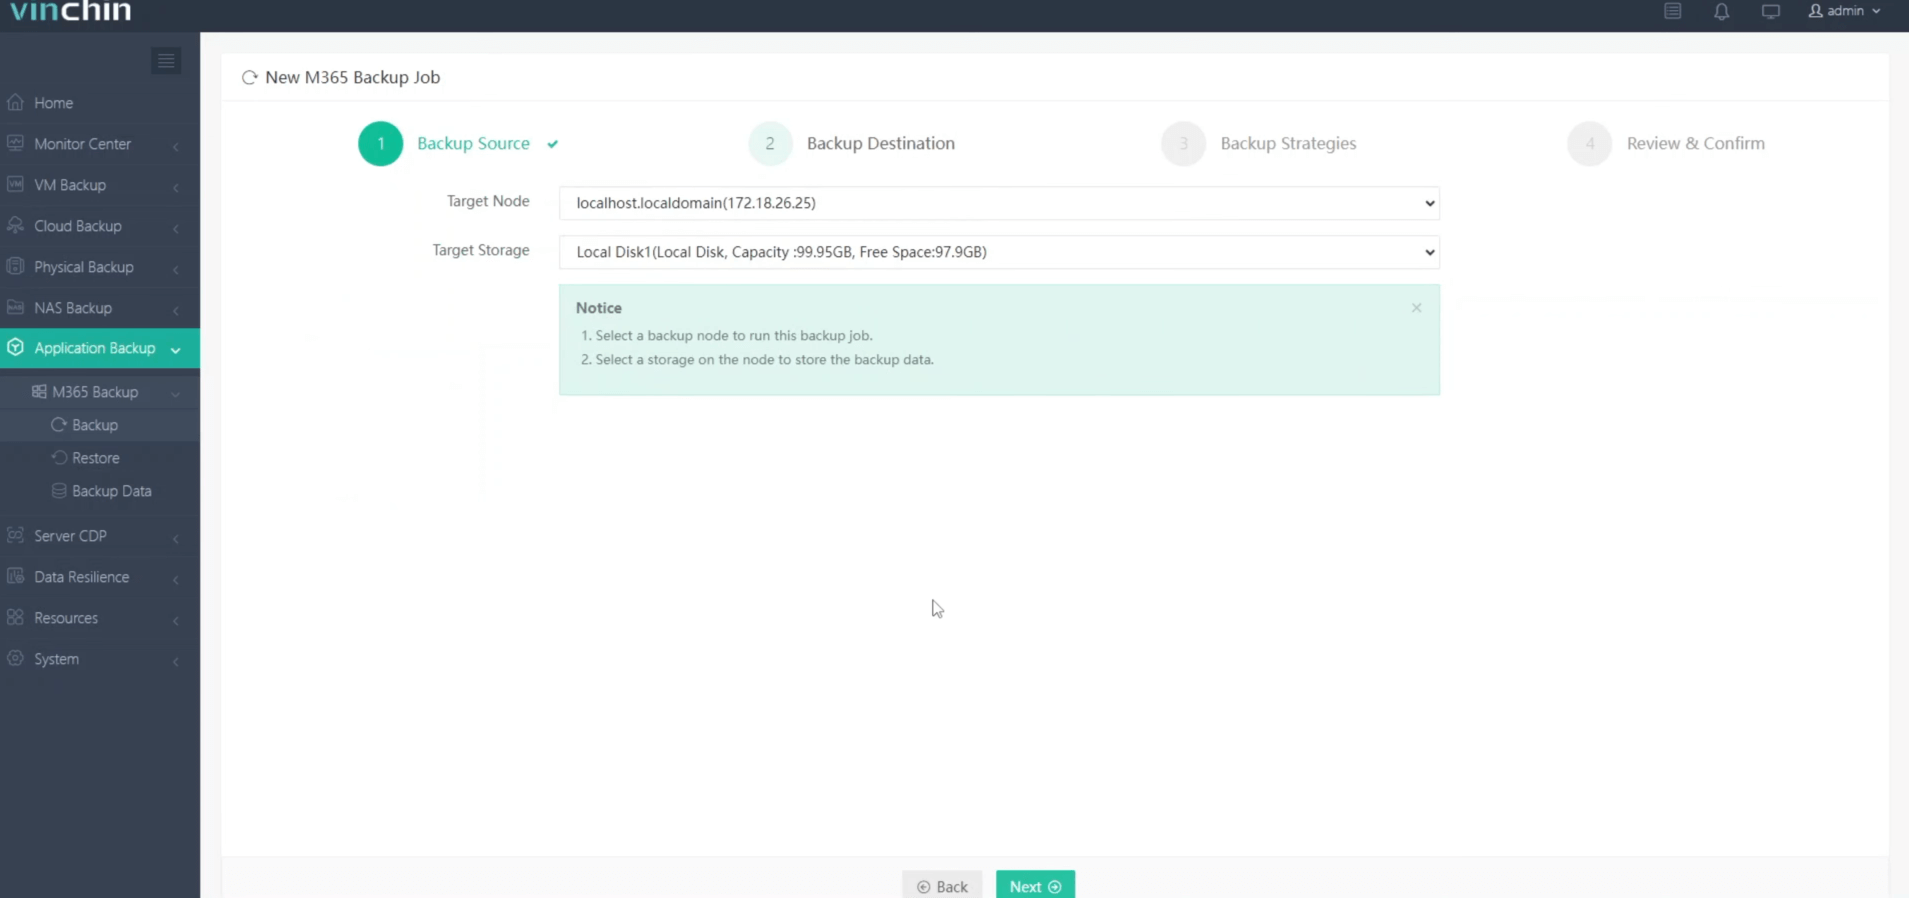
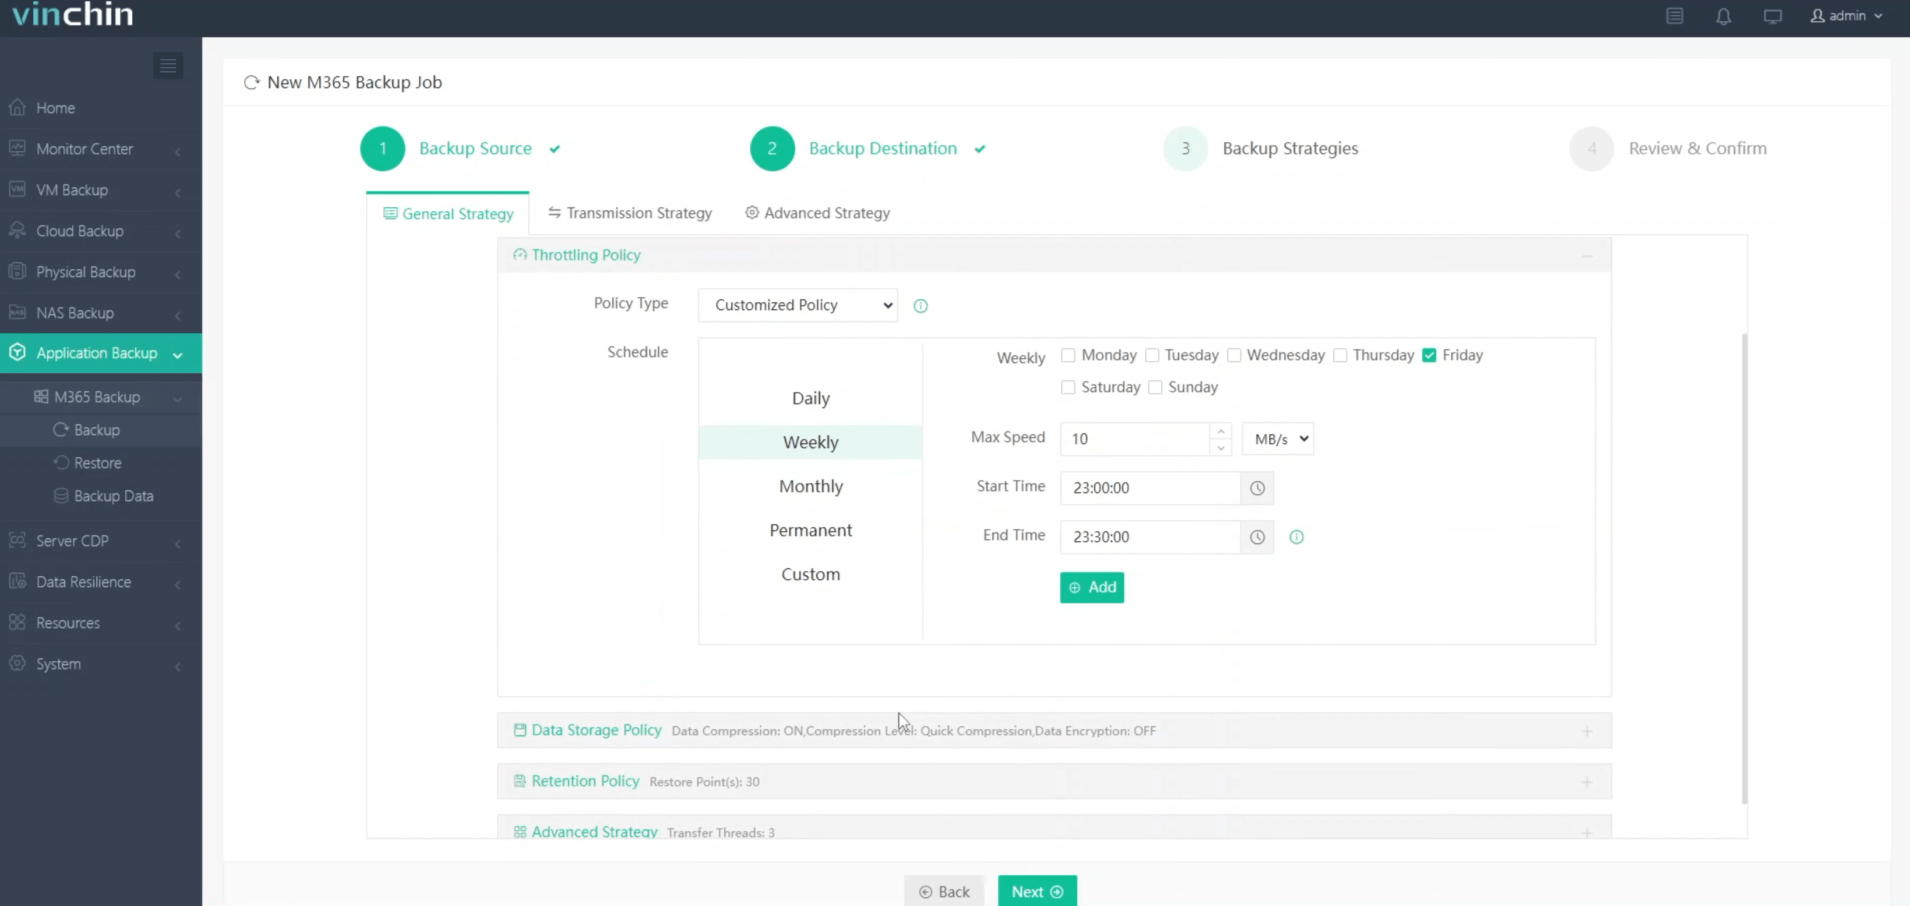
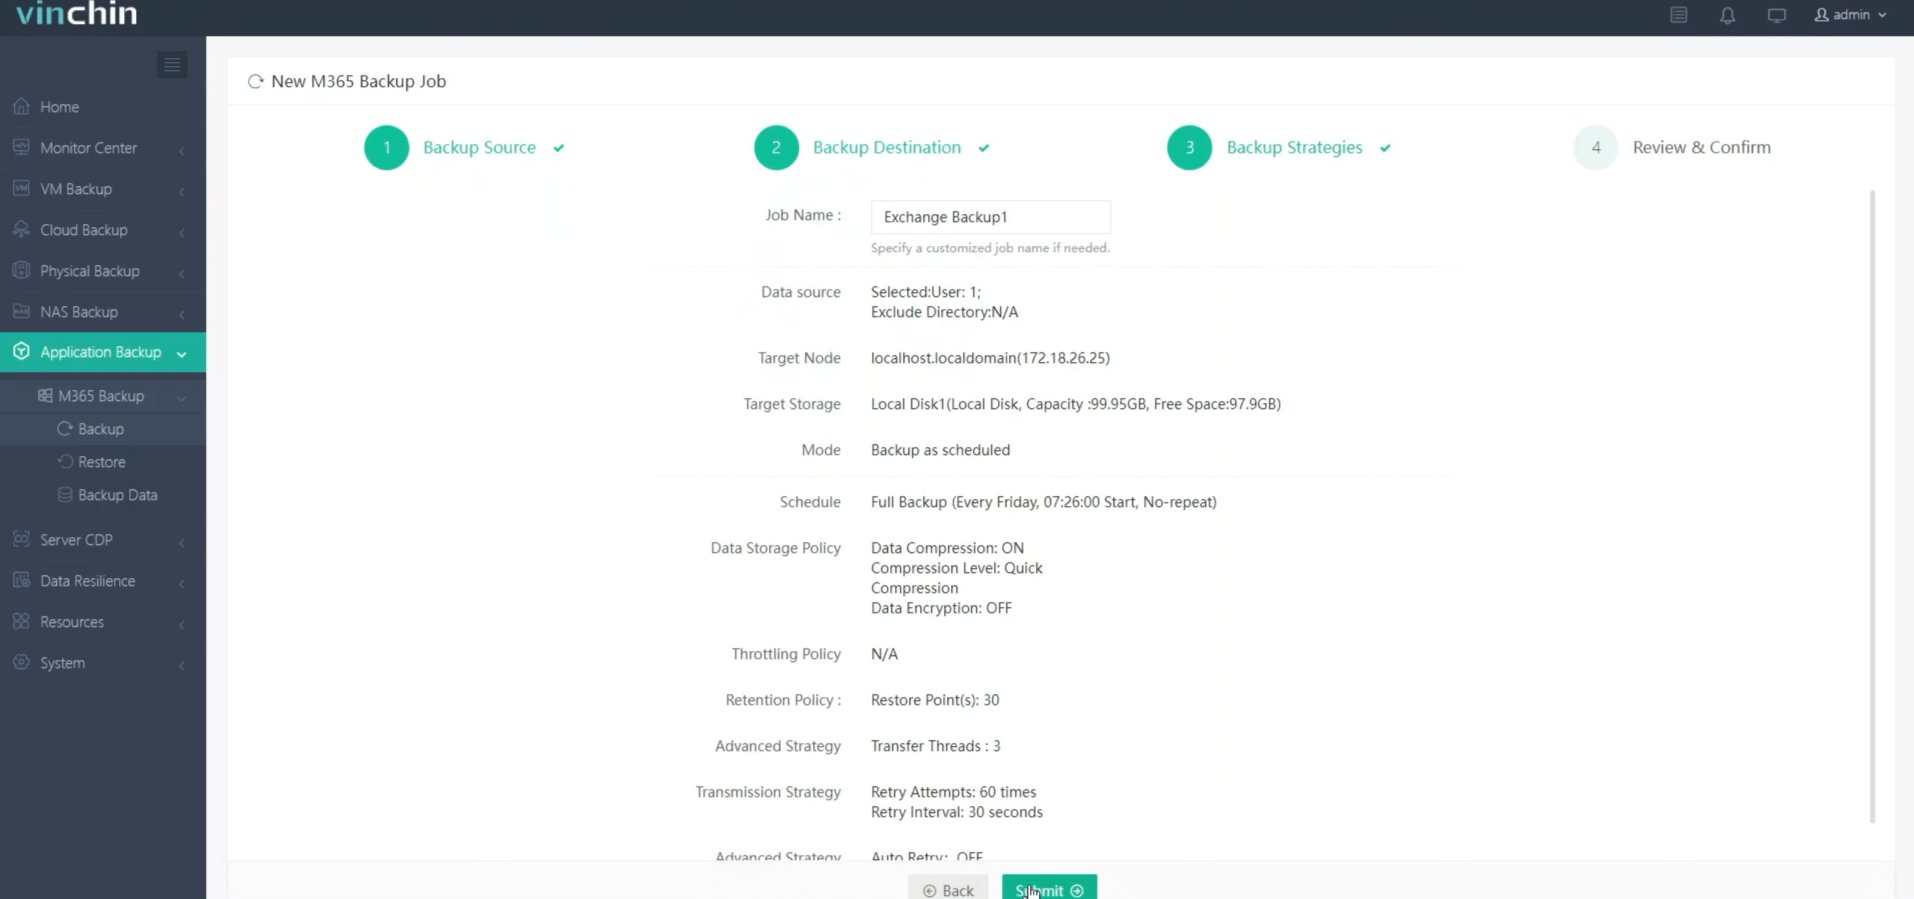
Vinchin Backup & Recovery offers reliable, enterprise-grade protection for Microsoft Exchange, supporting backups on virtual machines and physical servers to on-premises, offsite, or cloud storage like Azure and Amazon S3. It features forever incremental backups, flexible scheduling, and granular data selection, ensuring efficient and consistent data protection. With RSA encryption for data transfer, AES 256 encryption, and role-based access control, Vinchin ensures end-to-end security. High-speed data transfer and customizable throttling policies further enhance efficiency, while a web-based console simplifies centralized backup management for Exchange Server 2013, 2016, 2019, and Exchange Online.
It only takes you 4 steps to backup Exchange Server:
1.Select the backup object.

2.Select backup destination.

3.Configure backup strategies.

4.Review and submit the job.

Vinchin Backup & Recovery provides a 60-day free trial with full access to all its advanced backup and recovery features. Click the button below to explore its robust capabilities.
Restore Exchange Mailbox to PST FAQs
1. Q: What is a Recovery Database (RDB) in Exchange?
An RDB is a special mailbox database used to restore and extract data from a backup without affecting active mailboxes. Once mounted, you can recover data to a live mailbox.
2. Q: Can I restore Exchange mailboxes to Office 365?
Yes, restore the mailbox data to an on-premises Exchange server, export it to PST, and then import the PST file to Office 365 using the Office 365 Import Service.
Conclusion
Exporting and importing Exchange mailboxes to and from PST files is an essential capability for enterprise email management, enabling flexibility in data handling for archiving, migration, compliance, and recovery purposes. With Exchange’s robust role-based access control, scripts for automation, and integration with PowerShell, you can efficiently manage bulk operations while maintaining high levels of security and accuracy.
Share on:


