-
What is Ceph?
-
How to uninstall Ceph from Proxmox?
-
Ensuring Proxmox VM backup with Vinchin
-
Proxmox uninstall Ceph FAQs
-
Conclusion
What is Ceph?
Ceph is an open-source, distributed storage system designed to provide scalable and fault-tolerant storage solutions. It supports object, block, and file system storage and is often used in cloud environments and virtualization platforms like Proxmox for data storage needs.
Ceph is commonly integrated into Proxmox Virtual Environment (PVE) to provide scalable and high-availability storage for virtual machines and containers. However, there may be situations where you need to uninstall Ceph from your Proxmox cluster, such as reconfiguration, troubleshooting, or transitioning to a different storage solution.
This guide outlines the detailed steps to safely and completely uninstall Ceph from a Proxmox VE environment. Please be aware that removing Ceph will result in the deletion of all data stored within the Ceph cluster, so it is crucial to ensure proper backups are in place before proceeding.
How to uninstall Ceph from Proxmox?
1. Log in to the Proxmox Web GUI
Log in to your Proxmox VE Web interface.
2. Remove Ceph Storage Resources
Click on any PVE node.
In the right panel, navigate to Ceph -> Pools and note down the names of the existing pools
Navigate to Ceph -> CephFS and record the existing CephFS name
3. Remove CephFS and Pools
From the left menu, select Data Center > click on Storage in the right panel
Delete all the CephFS and Pools items recorded in step2
4. Stop and Destroy CephFS Metadata Services
In the right panel, select the main node, navigate to Ceph -> CephFS, and stop and destroy all metadata services (MDS).
5. Mark OSD as "Out"
In the right panel of the main node, navigate to Ceph -> OSD, and mark all OSDs as "Out"
6. Shut Down OSD
Open the terminal and input the following command to shut down OSDs:
ceph osd down <osdid>
# Example
ceph osd down 0
ceph osd down 1
ceph osd down 2
7. Destroy OSD
Select the main node, navigate to Ceph -> OSD > click on the OSD to be deleted> click the More button at the top right > select Destroy
Alternatively, destroy OSDs via command line:
ceph osd destroy <osdid> --force
# Example
ceph osd destroy 0 --force
ceph osd destroy 1 --force
ceph osd destroy 2 --force
8. Remove Ceph Configuration Files
Execute the following command to delete Ceph configuration files:
rm -r /etc/ceph
rm -r /etc/pve/ceph.conf
rm -rf /var/lib/ceph
9. Stop Ceph Monitor Services
On each PVE node, execute the following command to stop the Ceph Monitor service:
systemctl stop ceph-mon@<hostname or monid>
# Example
systemctl stop ceph-mon@labnode1
10. Delete Remaining Ceph Files
If you encounter errors when deleting files (e.g., /var/lib/ceph/osd/ceph-0), first unmount the filesystem and then delete it:
umount /var/lib/ceph/osd/ceph-0
rm -r /var/lib/ceph
12. Restart All PVE Nodes
Restart all Proxmox VE nodes to ensure that the Ceph configuration and services are completely cleared.
13. Restart Proxmox Host
Restart the host to ensure that all disks and configurations are fully cleaned.
Ensuring Proxmox VM backup with Vinchin
After Proxmox uninstall ceph, it’s essential to ensure your virtual machines are still protected. If you're looking for a reliable and efficient backup solution for your Proxmox VMs, I recommend using Vinchin Backup & Recovery. Vinchin offers a powerful backup solution designed to provide seamless protection for virtual machines, ensuring data integrity and minimal downtime.
By integrating Vinchin with your Proxmox environment, you can back up your VMs quickly and securely. Whether you need full VM restores or granular file-level recovery, Vinchin gives you the flexibility and reliability needed to safeguard your critical data. Plus, with its intuitive interface, you can easily manage backup schedules and monitor job progress.
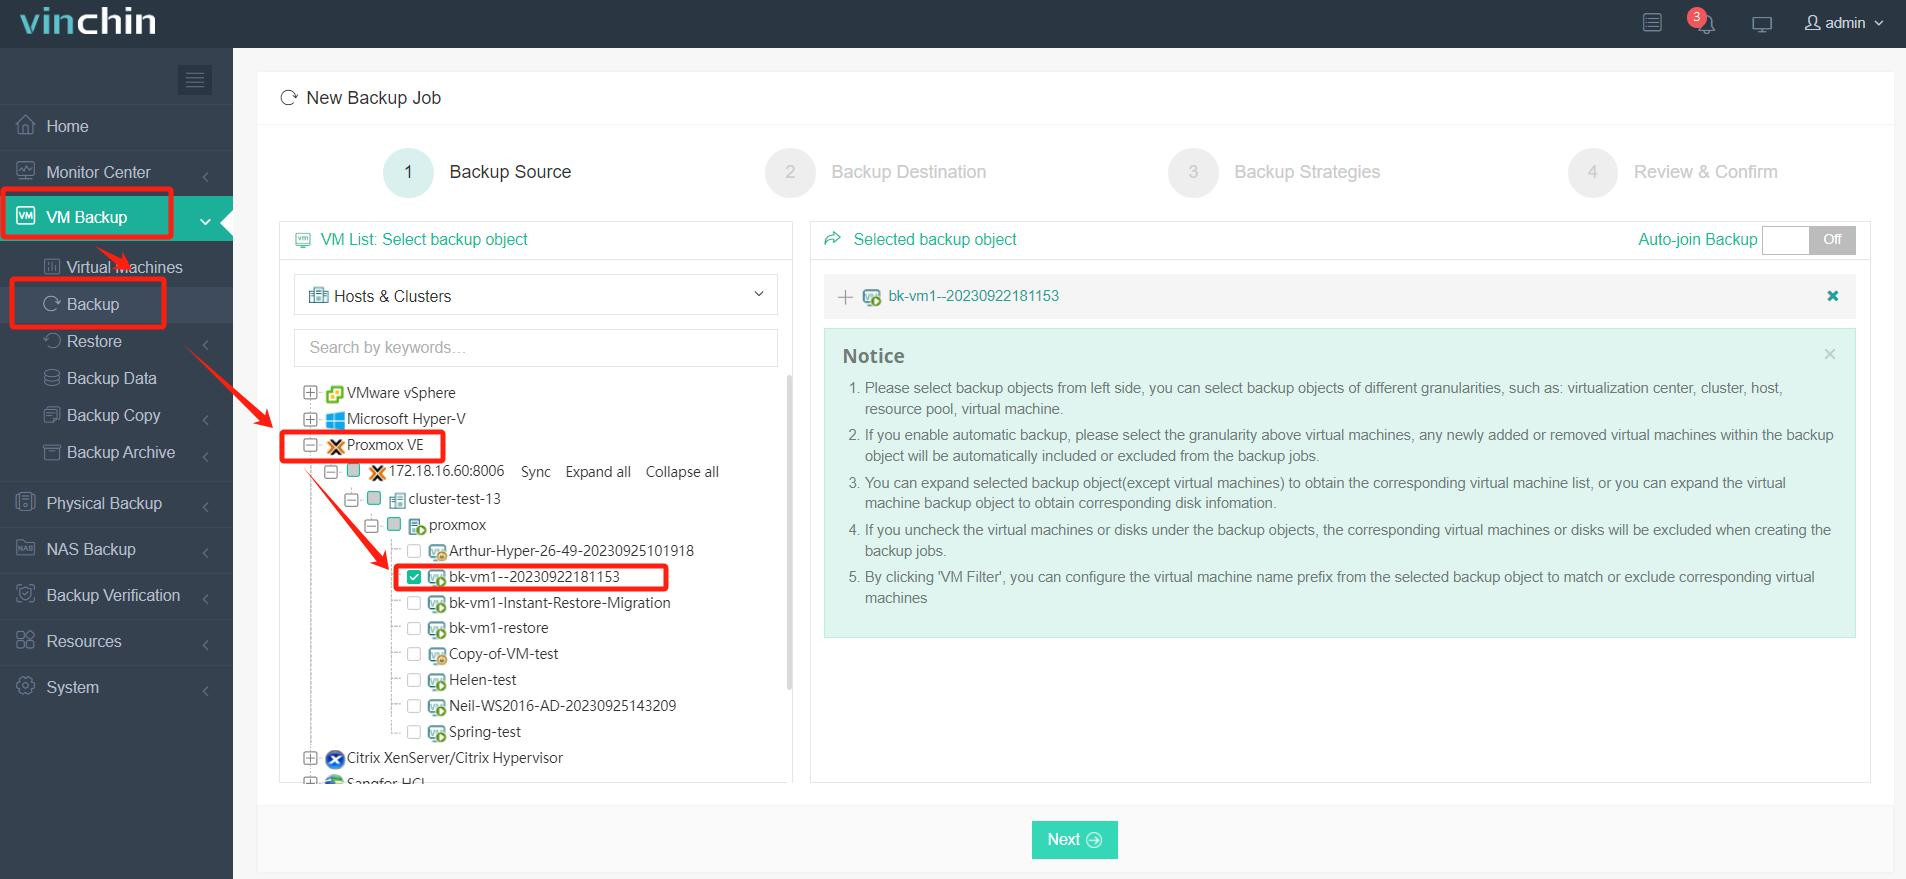
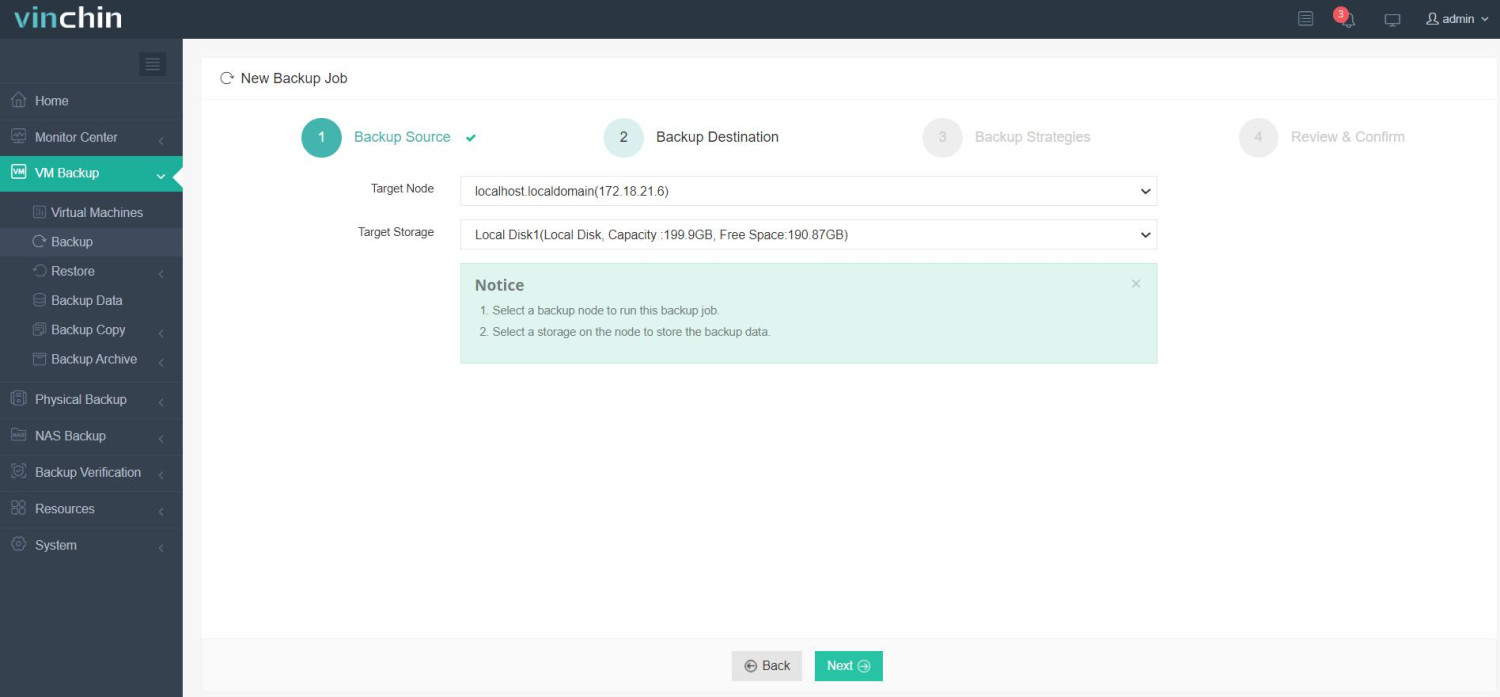
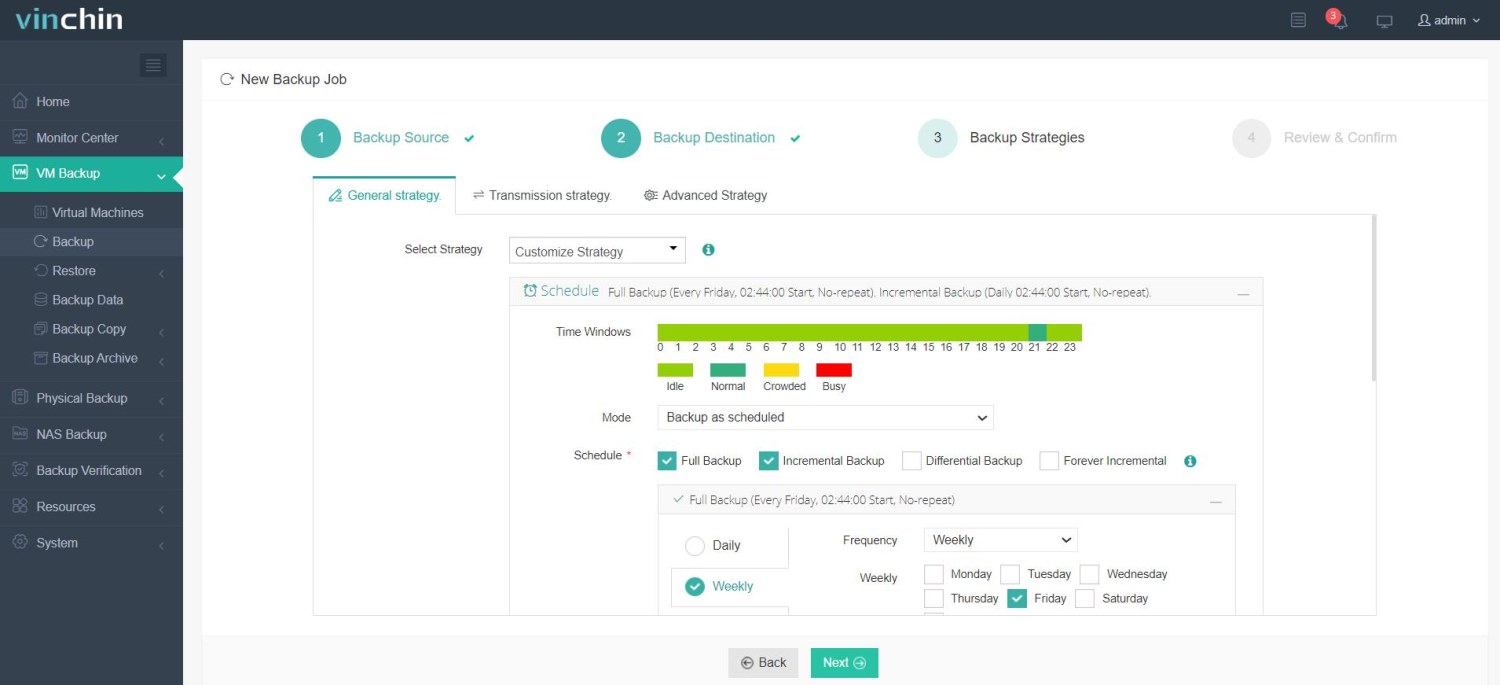
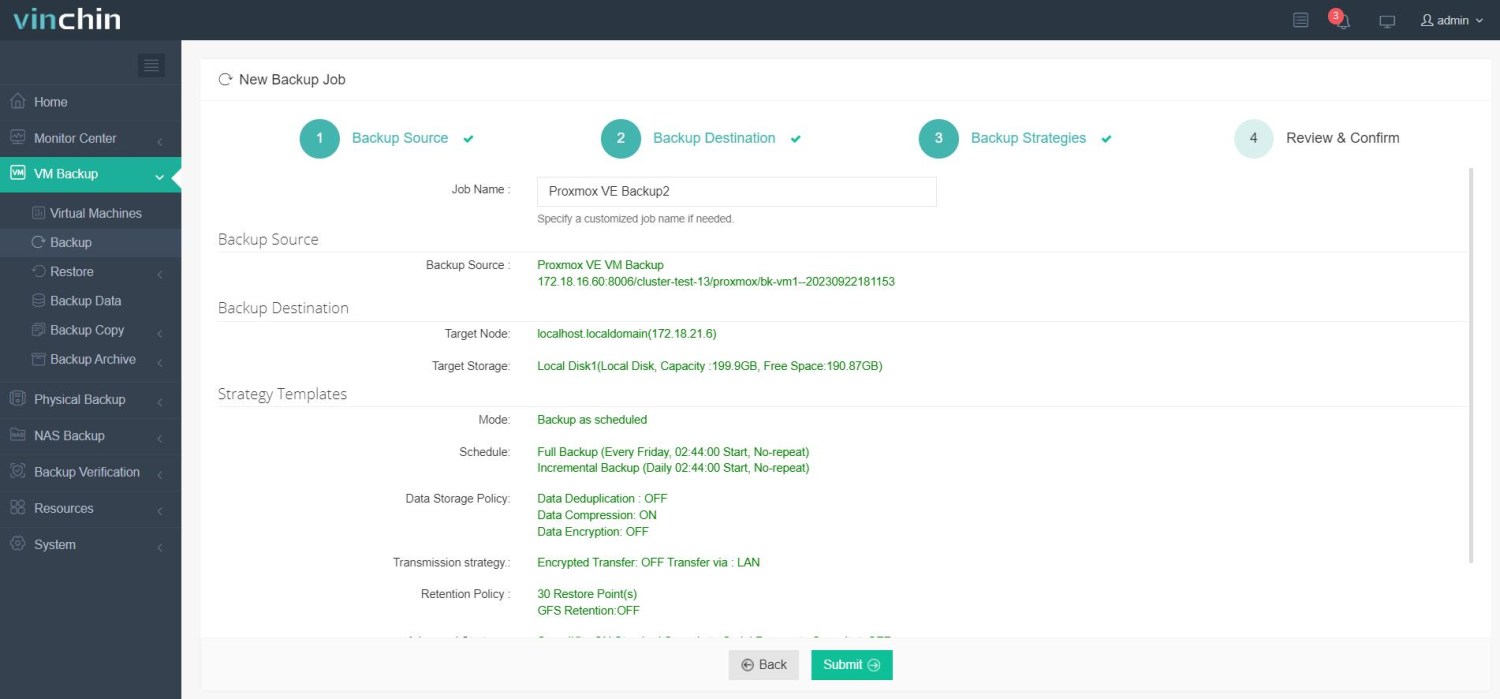
Vinchin Backup & Recovery's operation is very simple, just a few simple steps.
1.Just select VMs on the host

2.Then select backup destination

3.Select strategies

4.Finally submit the job

Vinchin supports Proxmox VE versions 7.2, 7.4, 8.0, 8.1, and 8.2, and offers a free 60-day trial, allowing users to experience its full functionality in a real-world environment. For more details, feel free to contact Vinchin directly.
Proxmox uninstall Ceph FAQs
Q1: Will uninstalling Ceph affect running virtual machines or containers?
A1: Yes, if your virtual machines or containers rely on Ceph-provided storage (such as RBD appliances), then uninstalling Ceph will make these storage resources unavailable, which may result in data loss or inaccessibility. Ensure that you migrate or back up all important data prior to offloading.
Q2: Will disk space be automatically freed up after I uninstall Ceph?
A2: After uninstalling Ceph, the disk partitions and file systems used by Ceph will not automatically change state. You will need to adjust the disk layout manually, for example, by deleting the Ceph file system, reformatting the disk, or allocating it for other purposes.
Conclusion
In conclusion, uninstalling Ceph from Proxmox requires careful steps to ensure data integrity and a smooth transition. After Proxmox uninstall Ceph, it's essential to implement a reliable backup solution, such as Vinchin Backup & Recovery, to protect your virtual machines and maintain data security.
Share on:


